
An Interest In:
Web News this Week
- April 2, 2024
- April 1, 2024
- March 31, 2024
- March 30, 2024
- March 29, 2024
- March 28, 2024
- March 27, 2024
Some of Our Sources
- Joshua Blankenship
- Smashing Magazine
- You The Designer
- Creative Curio
- Inspiredology
- Web Designer Depot
- Stylized Web
- Wal You
- Specky Boy
- Web Resource Source
Help Webnuz
Referal links:
Moving your character in Unity 2d
Have you ever wanted to create your own game but find it too overwhelming or not knowing where to start?
So let's start with very basic things, like making our character move from A to B!
In this tutorial we will be using Input System from Unity to create a 2D Platformer. It's not available by default so you'll need to add it to your project.
Installing Input Manager
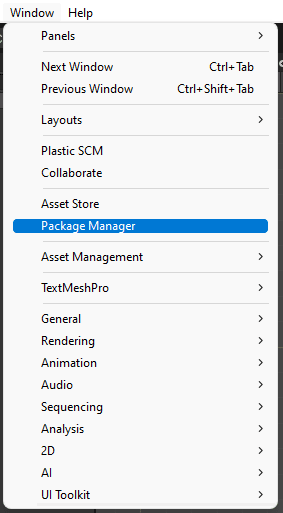
To do that, simply go select window in the to bar menu, navigate to Package Manager, in the package manager window, change the package resource to Unity Registry and download the Input System into your project!
When the package is installed, it'll pop up a warning, saying that it'll change the default input system to the new installed package, hit Yes and Unity will be restarted.


Using the Input Manager
Now that the Input Manager is installed let's start using it!
First, let's create a mock for our player character. In the Assets folder, click with the right mouse button and create a new 2D Sprite, I personally use squares for the player mockups, but you can pick whatever sprite you want! With your sprite created, drag it up into the scene so we can have a GameObject.
Now that you have our Player Game Object created in our scene, let's add the Input system.

Select Open Input Settings and in the newly opened window, click Create settings asset


Once the settings are created, click in Create actions in the Player Input component in you Player Game Object, this will prompt you to create a Input Manager to our player. I created a folder called Input Managers inside the asset folder and renamed the file name to PlayerInput.
If you open this file, you'll see a window with some pre-defined options, like move, which we are going to use in this tutorial!

Don't forget to check Generate C# Class int the recently created PlayerInput, so we can use in our code!

Player movement
Our setup for inputs is ready! now, we need to make it work with our player!
Extra components
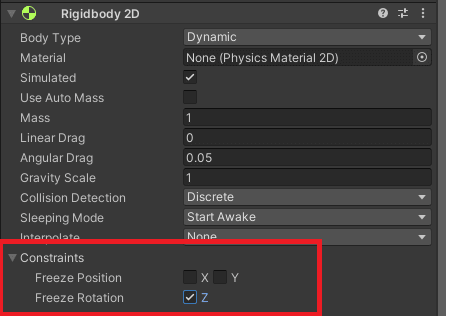
There's two components we need to add to our player game object, first, BoxCollider2D, this component will be responsible to handle collisions and triggers... let's leave it as it is. The second component is Rigidbody2D, this component will handle our physics, for this component, expand constraints and freeze rotation on the Z axis, this will prevent the game object to rotate.
Player Controller
To make things more organized, let's create a folder called Scripts and a folder called PlayerScripts inside that folder, the structure should look like this:
Assets/ Scripts/ PlayerScripts/ PlayerController.csLet's start defining some properties, let's start with speed! I like to keep these properties private and decorate them with [SerializeField]. Decorating it as Serialize Field, you can still access the property in the editor, even if it's private.
[SerializeField]private float speed = 5f;And let's get our PlayerInput.
First we create a property, and we're not going to decorate with [SerializeField] because we don't want to access it in the editor.
private PlayerInput playerInput;In the Awake method we're going to instantiate our playerInput.
We need to initialize it on Awake method because the lifecycle of the MonoBehaviour, Awake is called before everything else in the script.
void Awake(){ playerInput = new PlayerInput();}And couple of methods for the player input.
private void OnEnable(){ playerInput.Player.Enable();}private void OnDisable(){ playerInput.Player.Disable();}We also need to initialize the rigidbody in our Start method, making it look like this:
private PlayerInput playerInput;private Rigidbody body;void Awake(){ playerInput = new PlayerInput();}void Start(){ body = GetComponent<Rigidbody>();}With all this, we can attach this script to the Player Game Object, go back to the object and add the component, you can search for the script when adding a component.

GetComponent
The GetComponent<>() method is responsible for getting a component attached to the GameObject.
Player Movement
For the player movement, we'll handle the in then Update method, which is called every frame
Since the game is a platformer, let's get the X value of the input from the player.
var horizontal = Mathf.RoundToInt(playerInput.Player.Move.ReadValue<Vector2>().x);The Mathf.RoundToInt will make sure the value is -1 when the player is moving left, 0 when no input is detected and 1 when the player ,is moving to the right.
With the horizontal input known, we can calculate the velocity which we'll move the player game object.
var velocityX = speed * horizontal;And finally, MOVE THE PLAYER! By changing the body velocity.
body.velocity = new Vector2(velocityX, body.velocity.y);But there's a thing, if we start the game our Player Game Object will start falling into the void...
To fix this problem, let's create a floor for our player to be on.
Same as creating a player, create a new Square Sprite (make things a little bit easier), drag and drop into the scene and expand it on the X axis.


And add BoxCollider2D and RigidBody2D to the floor game object and mark the Body Type in the rigidbody component as Static, so it won't move.
Starting the scene
If you reached here you should have a moving player object!
The best part of it, you can move the player using A, D, Left arrow key and Right arrow key on the keyboard and if you have a controller connected, you can move it by using the left joystick!
In the next post we're making the player jump!
Original Link: https://dev.to/eduardojuliao/moving-your-character-in-unity-2d-28do
Dev To
More About this Source Visit Dev To