
An Interest In:
Web News this Week
- March 21, 2024
- March 20, 2024
- March 19, 2024
- March 18, 2024
- March 17, 2024
- March 16, 2024
- March 15, 2024
Some of Our Sources
- Just Creative
- Joshua Blankenship
- Smashing Magazine
- Six Revisions
- Noupe
- My Ink Blog
- Web Design Ledger
- Reencoded
- Spyre Studios
- Android Headlines
Help Webnuz
Referal links:
How I Created a One-Page Swag Store in 15 minutes
What if you could fit a whole ecommerce experience into just one page?
Some online sellers like to simplify ecommerce experiences, especially when they have only one or a few products to sell. Medusa.Express enables online sellers to sell products through a simple URL-link guiding them to a one-page checkout. You can see the demo here.
In this tutorial, youll learn how to set up a one-page swag store with Medusa using Medusa.Express as a frontend. This includes setting up the Medusa server, installing the Medusa admin, and finally installing the Medusa.Express storefront.
Required Stripe Account
Before going through this tutorial, you must have a Stripe development account set up as youll need to use API keys to configure both the Medusa server and Medusa.Express storefront.
Make sure that the account is set to test mode.
The 5-Minute Version of this Tutorial
If youre not interested in following along with this tutorial and want the easy way to directly deploy your one-page swag store, heres how you can do it in 5 minutes:
Deploy Medusa Server to Heroku
You can deploy the Medusa server to Heroku for free using this button:
![]()
You also need to configure the Stripe plugin.
Please keep in mind that to upload products youll need to install a file storage plugin. You can use MinIO, S3, or Spaces.
Alternatively, if you just want to test out how everything works first, you can run the following command to add demo products:
heroku run -a <APP_NAME> -- npm run seedWhere <APP_NAME> is the name you chose for the Heroku app.
Deploy Medusa Admin to Netlify
You can deploy the Medusa Admin to Netlify for free using this button:
![]()
Please keep in mind you must set the ADMIN_CORS environment variable on your Heroku server to the URL of the Medusa Admin.
Deploy Medusa.Express to Netlify
You can deploy the Medusa.Express storefront to Netlify for free using this button:
![]()
Please keep in mind you must set the STORE_CORS environment variable on your Heroku server to the URL of the Medusa.Express storefront.
Test it Out
You can test out your deployment by going to <MEDUSA_EXPRESS_URL>/<PRODUCT_HANDLE>, where <MEDUSA_EXPRESS_URL> is the URL of your Medusa.Express storefront, and <PRODUCT_HANDLE> is the handle of a product you want to test the purchase.
If youre unsure what the product handle is, you can open the product edit form on the Medusa Admin and see the value in the Handle input field.

For example, if you used the seed command, you can open <MEDUSA_EXPRESS_URL>/t-shirt and you can go through the full checkout flow.

Prerequisites
If youre following along with the rest of the tutorial, youll need Node.js installed with at least version 14.
Install Medusa Server
In this section, youll install the Medusa server locally. This is the server that the Medusa.Express storefront will connect to.
Start by installing the Medusa CLI tool:
npm install @medusajs/medusa-cli -gThen, run the following command to install the Medusa server:
medusa new swag-store --seedThis installs the Medusa server under the directory swag-store. The --seed option creates an SQLite database and seeds it with demo data.
Finally, change to the newly created directory and run the server:
cd swag-storenpm startThis runs the Medusa server on localhost:9000. You can test that its working by going to localhost:9000/store/products. You should receive a JSON response with the demo products youve seeded into your database.

Configure Stripe Plugin
In medusa-config.js, add the following to the plugins array:
const plugins = [ ..., { resolve: `medusa-payment-stripe`, options: { api_key: process.env.STRIPE_API_KEY, webhook_secret: process.env.STRIPE_WEBHOOK_SECRET, }, },];Then, add the following environment variable:
STRIPE_API_KEY=<YOUR_SECRET_KEY>Where <YOUR_SECRET_KEY> is your Stripes secret key. You can retrieve it from your Stripe dashboard by going to Developers at the top right, choosing API Keys from the left sidebar, and copying the value of the Secret Key.
Additional Steps
To upload images for your products, you must install a file storage plugin. You can do that using MinIO, S3, or DigitalOcean Spaces.
Install Medusa Admin
In this section, youll install the Medusa Admin. The Medusa Admin allows you to manage orders, products, and much more all from an intuitive dashboard.
In your terminal and in a separate directory, run the following command to install the admin:
git clone https://github.com/medusajs/admin swag-adminThen, change to the newly created directory swag-admin and install the dependencies:
cd swag-adminnpm installTest Medusa Admin
While the Medusa server is still running, run the following command to start the Medusa admin:
npm startThis runs the Medusa admin on localhost:7000 by default. If you open it in your browser, youll see a login screen.

Enter the email [email protected] and password supersecret to log in. These are the credentials of a demo user thats available when you seeded the servers database.
After you log in, click on Products on the left dashboard. You should see the demo products you added, and you should be able to create new products.

Enable Stripe Payment Provider
To ensure that Stripe is available as a payment provider on the Medusa.Express storefront, go to Settings then Choose Regions.
For each region, select the region from the left side, scroll down in the right-side form to the Payment Providers input, and choose Stripe from the list. Then, click Save.

Install Medusa.Express Storefront
The Medusa.Express storefront is available in both Gatsby and Next.js. In this tutorial, youll use the Next.js storefront.
In a separate directory than the previous ones, run the following command to install Medusa.Express storefront:
git clone https://github.com/medusajs/medusa-express-nextjs.git swag-storefrontThen, change to the newly created swag-storefront directory and install the necessary dependencies:
cd swag-storefrontnpm installNext, rename the .env.template file to .env:
mv .env.template .envAnd add the following variable to .env:
NEXT_PUBLIC_STRIPE_API_KEY=<YOUR_PUBLISHABLE_KEY>Where <YOUR_PUBLISHABLE_KEY> is your Stripes publishable key. You can retrieve it from your Stripes dashboard by going to Developers at the top right, choosing API Keys from the left sidebar, and copying the value of Publishable Key.
Test Medusa.Express
While your Medusa server is still running, run the following command to start your Medusa.Express storefront:
npm run devThis starts your storefront at localhost:8000. You can test out the one-page checkout flow by going to localhost:8000/<PRODUCT_HANDLE>, where <PRODUCT_HANDLE> is the handle of the product you want to test the checkout with.
If youre unsure of the handle of a product, you can go to the products edit form on the Medusa Admin and check out the value in the Handle input.

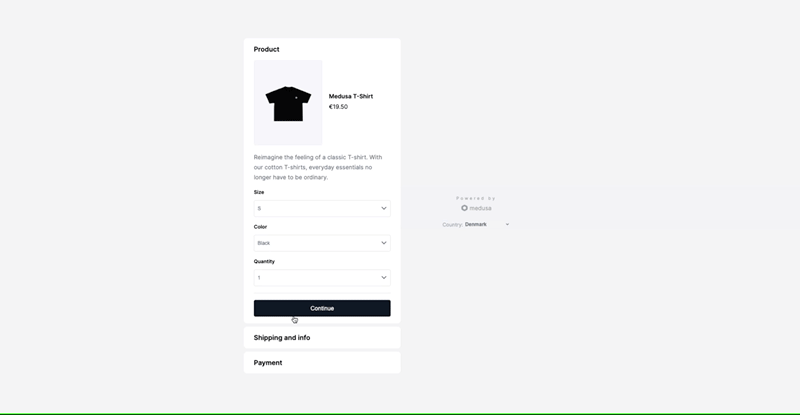
Since you seeded the database with demo products, you should be able to find a product at localhost:8000/t-shirt.

Choose the size, color, and quantity, then click Continue. In the next step, provide Shipping information. After that, you can use Stripe to purchase the item.

Once youre done, click Complete order. Youll see a confirmation message that your order was placed.

If you check your Medusa Admin dashboard, you can see the order and its details.

When to Use Medusa.Express
Medusa.Express is helpful for many cases, here are a few examples;
- Shopping on Social Media: When setting up a shop on social media platforms such as Instagram Shopping, or just linking to your products on social media, its very helpful to use a platform like Medusa.Express. The customer can use the link to directly make the purchase.
- Promotional Purposes on Blogs: Influencers and blog owners that sell swag dont need to have a full-fledged store. They can link to the items they offer in their posts and have their customers directly make the purchase.
- Unique Marketing Strategy: When marketing your store and products, youll often find that while your customer does go to your website and might even add the item to the cart, theyll often leave that cart abandoned and never make the purchase. Medusa.Express encourages customers to make the purchase directly and in a minute.
Whats Next?
After following the previous setup, youll need to deploy your Medusa server and admin. You can also deploy the Medusa Express storefront using the button shown earlier in the tutorial or following a similar process to deploying the Gatsby storefront.
After that, you can start using those product links on your social media accounts, blog, and emails, or just send them directly to your customers to make purchases!
Should you have any issues or questions related to Medusa, then feel free to reach out to the Medusa team viaDiscord.
Original Link: https://dev.to/medusajs/how-i-created-a-one-page-swag-store-in-15-minutes-8oh
Dev To
More About this Source Visit Dev To