
An Interest In:
Web News this Week
- April 16, 2024
- April 15, 2024
- April 14, 2024
- April 13, 2024
- April 12, 2024
- April 11, 2024
- April 10, 2024
Some of Our Sources
- Engadget
- Technology Review
- Joshua Blankenship
- Pearsonified
- Creative Curio
- My Ink Blog
- Specky Boy
- Freelance Switch
- Android Headlines
- Dev To
Help Webnuz
Referal links:
Hosting Azure DevOps Pipelines agents on GitHub Codespaces
Overview
Welcome to another part of my series 'GitHub Codespaces Pro Tips'. In the last part we spoke about hosting your GitHub self hosted action runners on Codespaces.
Similarly to the last post, we will cover how you can utilise your GitHub Codespace compute power, by running an Azure Pipelines agent inside of the Codespace at the same time.
We will be using a custom docker image that will automatically provision a self hosted Azure Pipelines agent and register it against your Azure DevOps projects agent pool, at the same time as provisioning the Codespace.
We will also look at the Codespace lifecycle. By default any Active codespaces that becomes idle will go into a hibernation mode after 30 minutes to save on compute costs, so we will look at how this timeout can be configured and extended (if needed).
Getting started
All of the code samples and examples are also available on my GitHub Codespaces Demo Repository.
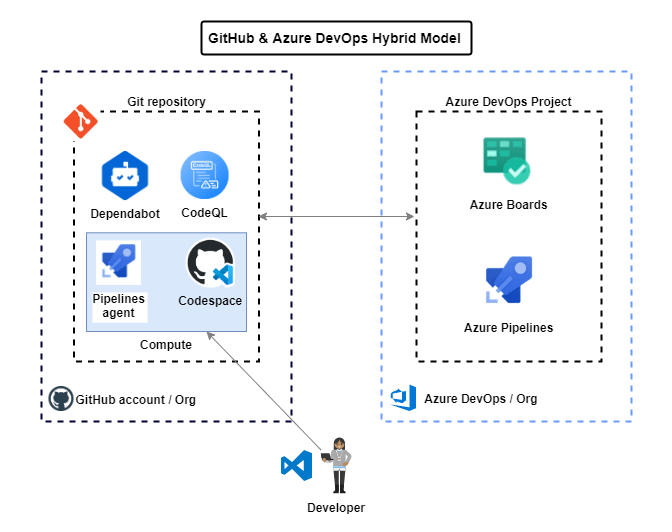
Also have a look at this blog post, Integrating Azure DevOps with GitHub - Hybrid Model, where I show how to use GitHub Codespaces with Azure DevOps as we will be building this solution based on the hybrid model described in that post.
Since Codespaces/Dev containers are based on docker images, we will create a custom linux docker image that will start and bootstrap an Azure DevOps Pipelines agent as the codespace starts up.
Azure DevOps Pre-requirements
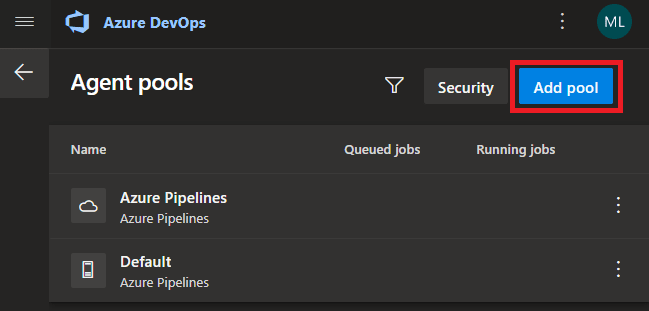
First we will create an 'agent pool' inside of our Azure DevOps project so that we can register self hosted Azure Pipeline agents.
Navigate to your Azure DevOps Organization settings.

Select Agent pools under Pipelines, on the left hand side tab.

Click on Add pool.
Select
'Self-hosted'as the pool type, give the pool a Name, Description and set the relevant Pipeline permissions. Click on 'Create'.
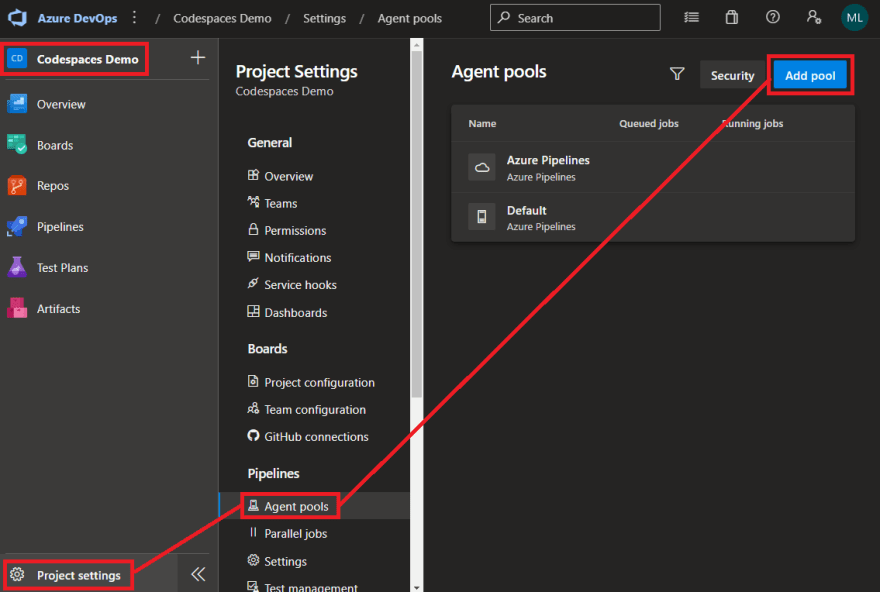
Add the agent pool to any of your projects by navigating to the 'Project settings' -> 'Agent pools' -> 'Add pool'.
Select
'Existing'under Pool to link, and select the pool we created with the relevant Pipeline permissions.
Next we will create a Personal Access Token (PAT) which we will use to register the pipelines agents against the agent pool.
See creating a personal access token on how to create an Azure DevOps PAT token. PAT tokens are only displayed once and are sensitive, so ensure they are kept safe.
The minimum permission scopes required on the PAT token to register a self hosted Azure Pipelines agent are "Agent Pools (read, manage)", make sure all the other boxes are cleared. If it's a 'deployment group agent', for the scope select "Deployment group (read, manage)" instead, and make sure all the other boxes are cleared.
Select "Show all scopes" at the bottom of the Create a new personal access token window to see the complete list of scopes.
Copy the token. You'll use this token when you configure the agent.

Tip: I recommend only using short lived PAT tokens and generating new tokens whenever new agent registrations are required.
Create GitHub Codespaces secrets
Next we will navigate to our GitHub repository where we will use Codespaces and create a few codespace secrets, these secrets are environment variables that will be used in our codespaces when we spin them up later.
Navigate to the GitHub repository 'Settings' and select 'Secrets' -> 'Codespaces'.

Create the following secrets:
| Secret | Value | Description |
|---|---|---|
| ADO_ORG | Your org name | Name of your Azure DevOps Organization |
| ADO_PAT | Your PAT token | Azure DevOps Personal Access Token created to register agent against agent pool |
| ADO_POOL_NAME | Your Agent pool name | The name of the Azure DevOps agent pool to register agents against |

Codespace Dev Container Configuration
Next, we will create the following folder structure tree in the root of our GitHub repository:

In your GitHub repository create a sub folder under '.devcontainer', in my case I have called my codespace configuration folder 'codespaceADOagent'.
Create the following Dockerfile:
# You can pick any Debian/Ubuntu-based image. FROM mcr.microsoft.com/vscode/devcontainers/base:0-bullseye# [Optional] Install zshARG INSTALL_ZSH="true"# [Optional] Upgrade OS packages to their latest versionsARG UPGRADE_PACKAGES="false"# Install needed packages and setup non-root user. Use a separate RUN statement to add your own dependencies.ARG USERNAME=vscodeARG USER_UID=1000ARG USER_GID=$USER_UIDCOPY library-scripts/*.sh /tmp/library-scripts/RUN bash /tmp/library-scripts/common-debian.sh "${INSTALL_ZSH}" "${USERNAME}" "${USER_UID}" "${USER_GID}" "${UPGRADE_PACKAGES}" "true" "true"# cd into the user directory, download and unzip the Azure DevOps agentRUN cd /home/vscode && mkdir azure-pipelines && cd azure-pipelines# input Azure DevOps agent argumentsARG ARCH="x64"ARG AGENT_VERSION="2.206.1"RUN cd /home/vscode/azure-pipelines \ && curl -O -L https://vstsagentpackage.azureedge.net/agent/${AGENT_VERSION}/vsts-agent-linux-${ARCH}-${AGENT_VERSION}.tar.gz \ && tar xzf /home/vscode/azure-pipelines/vsts-agent-linux-${ARCH}-${AGENT_VERSION}.tar.gz \ && /home/vscode/azure-pipelines/bin/installdependencies.sh# copy over the start.sh scriptCOPY library-scripts/start.sh /home/vscode/azure-pipelines/start.sh# Apply ownership of home folderRUN chown -R vscode ~vscode# make the script executableRUN chmod +x /home/vscode/azure-pipelines/start.sh# Clean upRUN rm -rf /var/lib/apt/lists/* /tmp/library-scriptsThen create a 'devcontainer.json' file. (See my previous blog post on how this file can be amended with additional features and extensions):
{ "name": "AzurePipelines", "dockerFile": "Dockerfile", // Configure tool-specific properties. "customizations": { // Configure properties specific to VS Code. "vscode": { // Add the IDs of extensions you want installed when the container is created. "extensions": [ "ms-vscode.azurecli", "ms-vscode.powershell", "hashicorp.terraform", "esbenp.prettier-vscode", "tfsec.tfsec" ] } }, // Use 'forwardPorts' to make a list of ports inside the container available locally. // "forwardPorts": [], // Use 'postStartCommand' to run commands each time the container is successfully started.. "postStartCommand": "/home/vscode/azure-pipelines/start.sh", // Comment out to connect as root instead. More info: https://aka.ms/vscode-remote/containers/non-root. "remoteUser": "vscode", // Amend Azure Pipelines agent version and arch type with 'ARCH' and 'AGENT_VERSION'. https://github.com/microsoft/azure-pipelines-agent/releases. "build": { "args": { "UPGRADE_PACKAGES": "true", "ARCH": "x64", "AGENT_VERSION": "2.206.1" } }, "features": { "terraform": "latest", "azure-cli": "latest", "git-lfs": "latest", "github-cli": "latest", "powershell": "latest" }}NOTE: You can amend the ADO Pipelines agent version and architecture by amending the build args attributes ARCH and AGENT_VERSION.
// Amend Azure Pipelines agent version and arch type with 'ARCH' and 'AGENT_VERSION'. https://github.com/microsoft/azure-pipelines-agent/releases."build": { "args": { "UPGRADE_PACKAGES": "true", "ARCH": "x64", "AGENT_VERSION": "2.206.1" }Next we will create a folder with a few scripts that will be used by our docker image.
Create a folder called 'library-scripts' and place the following two script inside: 'start.sh' and 'common-debian.sh'
Let's take a closer look at each of the scripts.
common-debian.sh: This script will install additional debian based tooling onto the dev container.
#start.sh#!/bin/bash# Pulled from GitHub Codespace secretsADO_ORG=$ADO_ORGADO_PAT=$ADO_PATADO_POOL_NAME=$ADO_POOL_NAME# Derived environment variablesHOSTNAME=$(hostname)AGENT_SUFFIX="ADO-agent"AGENT_NAME="${HOSTNAME}-${AGENT_SUFFIX}"ADO_URL="https://dev.azure.com/${ADO_ORG}"# !!!Ignore sensitive tokens from capabilities!!!export VSO_AGENT_IGNORE=ADO_PAT,GH_TOKEN,GITHUB_CODESPACE_TOKEN,GITHUB_TOKEN/home/vscode/azure-pipelines/config.sh --unattended \--agent "${AGENT_NAME}" \--url "${ADO_URL}" \--auth PAT \--token "${ADO_PAT}" \--pool "${ADO_POOL_NAME}" \--acceptTeeEula/home/vscode/azure-pipelines/run.shThe second script will start up with the Codespace/Dev container and bootstraps the ADO Pipeline agent when the Codespace starts. Notice that we need to provide the script with some parameters:
# Pulled from GitHub Codespace secretsADO_ORG=$ADO_ORGADO_PAT=$ADO_PATADO_POOL_NAME=$ADO_POOL_NAMEThese parameters (environment variables) are used to configure and register the self hosted agent against the Azure DevOps Project agent pool we created earlier.
NOTE: You can store sensitive information, such as tokens, that you want to access in your codespaces via environment variables. We already configured this earlier, but for more information see, secrets for codespaces.
Deploying the Codespace
As you can see in the screenshot below, my Azure DevOps project does not have any self hosted agents configured on the agent pool.

Navigate to your repository, click on the
'<> Code'dropdown and select the'Codespaces'tab, select the'Advanced'option to Configure and create codespace.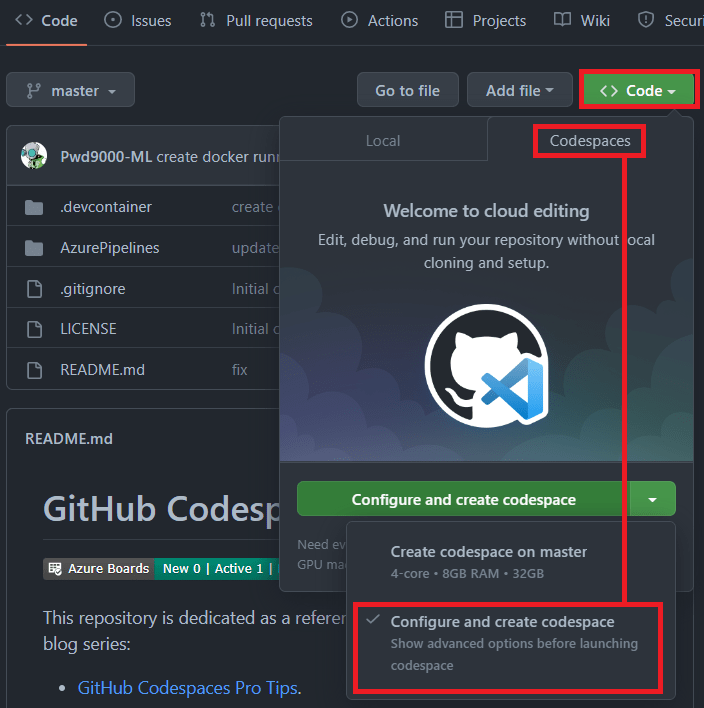
Select the relevant
'Branch','Region','Machine type'and for the'Dev container configuration', select the'codespaceADOagent'config we created and click on'Createcodespace'.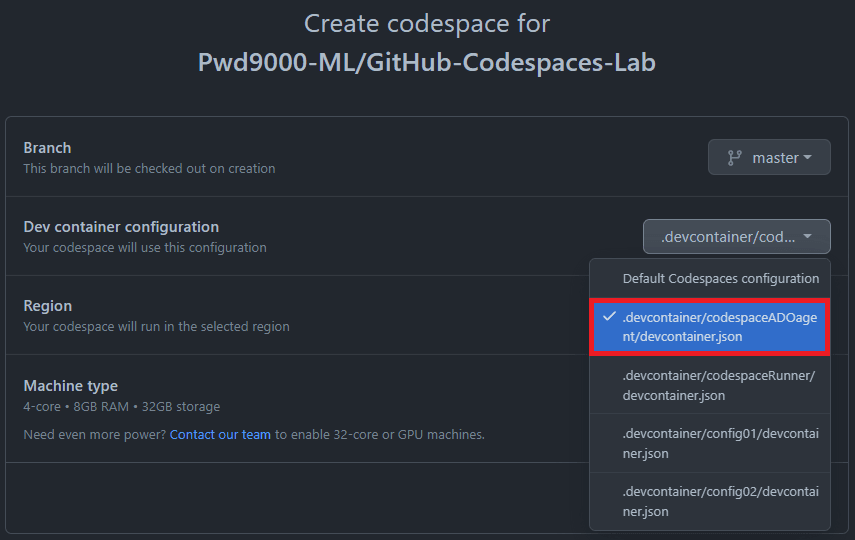
It takes a few minutes to build and start the container, but you can view the logs whilst the codespace is provisioning in real time.

To speed up codespace creation, repository administrators can enable Codespaces prebuilds for a repository. For more information, see "About GitHub Codespaces prebuilds."
Once the codespace is provisioned, you can see the hostname of the underlying compute by typing in the terminal: 'hostname'

Navigate to your Azure Devops agent pool and under the Agents tab, notice that there is now a self hosted Azure Pipelines agent registered that matches the Codepsace hostname.

Managing Codespace/Azure Pipelines lifecycle
When you stop your codepsace the self hosted agent will not be removed but will only go into an 'Offline' state, and when you start the codespace up again the Azure Pipeline agent will be available again.
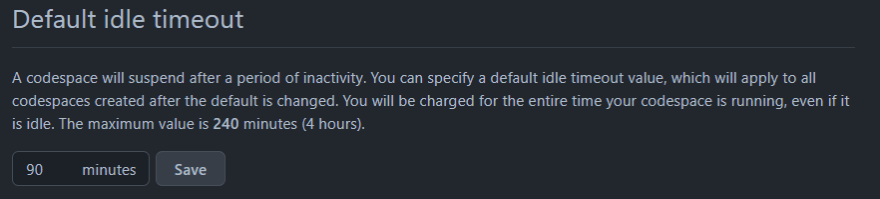
Also, as mentioned, by default any Active codespaces that are not stopped manually, will be idle and go into a hibernation mode after 30 minutes to save on compute costs. Let's take a look at how we can amend codespaces lifecycle.
In the upper-right corner of any page, click your profile photo, then click Settings and in the "Code, planning, and automation" section of the sidebar, click Codespaces.

Under "Default idle timeout", enter the time that you want, then click Save. The time must be between 5 minutes and 240 minutes (4 hours).
Conclusion
As you can see, it is pretty easy to run self hosted Azure Pipeline agents inside of your Codespace and utilize the compute power of the dev container itself.
By doing this we can solve a few problems with one solution.
- Cost - Not wasting cost and compute power by adding compute separately for self hosted DevOps agents alongside Codespaces.
- Administration - Having both services running on the same compute and sharing the same configuration and tooling saves time on administration and maintenance.
- Availability - Having self hosted DevOps agents available as part of the running codespace.
IMPORTANT: Do note that making use of 'Demands' is very important when triggring/running pipelines against DevOps Pipeline agents on a Codespace, to make sure you are running your pipelines against the correct codespace agent.
Example
Demands and capabilities are designed for use with self-hosted agents so that jobs can be matched with an agent that meets the requirements of the job.
If you have multiple agents with different users and Codespaces in the same pool, you may want to run your pipelines against specific codespaces using demands, for example:
pool: name: MyPool demands: - GITHUB_USER -equals Pwd9000-ML # equals check for GitHub user - HOSTNAME -equals codespaces-d066ef # equals check for hostname matching my CodespaceBy using Demands you can ensure that your pipelines will run against the intended Codespace.
You can check your agent capabilities to use in demands by navigating and click on your DevOps agent.
Then select the Capabilities tab.

I hope you have enjoyed this post and have learned something new. You can also find the code samples used in this blog post on my published Github page.
Author
Like, share, follow me on: GitHub | Twitter | LinkedIn


Original Link: https://dev.to/pwd9000/hosting-azure-devops-pipelines-agents-on-github-codespaces-4jm2
Dev To
More About this Source Visit Dev To