
An Interest In:
Web News this Week
- April 19, 2024
- April 18, 2024
- April 17, 2024
- April 16, 2024
- April 15, 2024
- April 14, 2024
- April 13, 2024
Some of Our Sources
- Engadget
- Technology Review
- TutsPlus - Code
- Joshua Blankenship
- Smashing Apps
- Crazy Leaf Design
- Reencoded
- Daily Now
- Dev To
- The Verge
Help Webnuz
Referal links:
Building An iOS Chat App With Swift (Tutorial Guide)
In this tutorial, we'll build a simple iOS chat app in Swift with the help of third-party SDKs.
Youll learn
- How to create an iOS app in Xcode IDE
- How to set up the app for adding chat features
- Integration of the Chat SDKs
- How to Register a User
- Connect the app to the server
- Send/ receive messages in your iOS chat app
Requirements
Throughout this article, I use Xcode as the development environment to create the chat app for iOS and Mac devices and MirrorFly's Chat SDK to integrate the messaging features into my new app. The version of Swift is 5.0 and above.
I recommend you download the latest version of Xcode - Xcode 14 from the Mac App Store. This is necessary if you need your iOS app to be compatible with all the Apple platforms.
Note: This article covers only the basic process of building an app with chat features. If youre more curious to learn about advanced stub implementations, refer to Github.
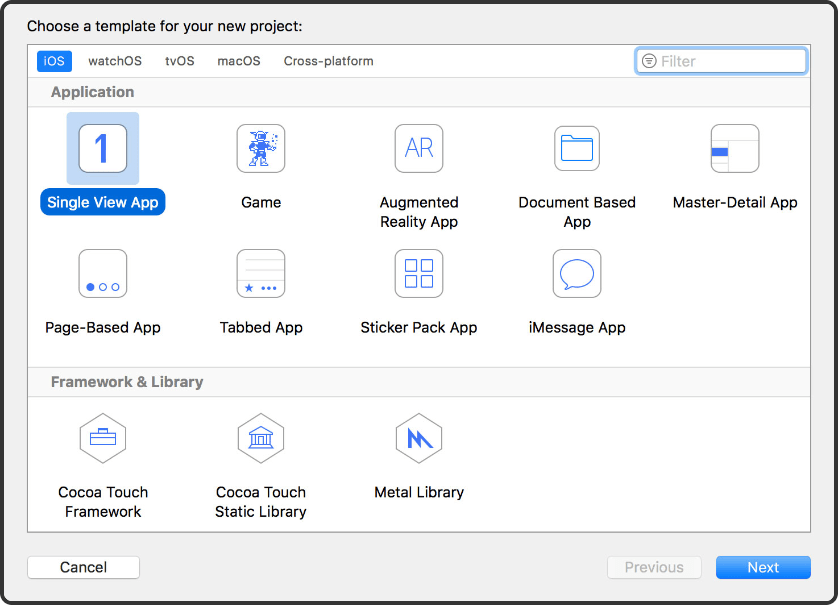
Start a Project
Once youve installed and launched Xcode, the Template page will open. Select Single View App from the available options.
After selecting the template, fill in the details of your project on the next page. Make sure that you select the Language as Swift and the User Interface as SwiftUI
Here, the Organization identifier will help the IDE create a Bundle Identifier for your app. This will help you to easily spot your app across the entire system. Once this step is done, a Project Folder will be created.
Now, you have a basic app project created. To build this further into a chat app, we will need to add the chat features using SDKs - the process is unbelievably simple!
Integrate the SDK
Once your Project Folder is created, we have to make sure that the necessary libraries to add the chat SDKs are available. For this, you will have to drag the SDK Package Folder and drop it in the IDEs Project Folder.
Note: If you need help with downloading the SDK package, check this step-by-step guide.
Otherwise, you can extract the xcframeworks and add them step by step:
Choose Project from the menu, select Target > General > Frameworks, libraries and Embedded Content

Here, you will have to add all the extracted frameworks and libraries.
The next important step is to disable the bitcode in your project. If youd ask me why is this done, Id like to remind you that we are adding third-party libraries and active bitcodes might now allow any external libraries to run on your project. So yes, we need to disable the bitcodes.
To do this,
Select Build Settings under Project, Spot Bitcode and select No from the dropdown.
After disabling bitcodes, check if any pods are initiated for this project. If there are no pods active, initiate one.
Ill give a quick briefing on what pods does to your project:
Pods are nothing but execution units of an iOS project. They have unique IP addresses which help them to communicate with other pods.
Also, they contain the storage volume and the configuration information of your app. This reduces the need for a NAT server to make the communication happen.
After pod initiation, add the code below necessary for the SDK initialization.pod 'libPhoneNumber-iOS'
pod 'Alamofire'
pod 'RealmSwift', '10.20.1'
pod 'XMPPFramework/Swift'
pod 'SocketRocket'
pod 'Socket.IO-Client-Swift'
pod 'GoogleWebRTC'
At the end of the pod file, youll need to add the pod hook.post_install do |installer|
installer.pods_project.targets.each do |target|
target.build_configurations.each do |config|
config.build_settings['IPHONEOS_DEPLOYMENT_TARGET'] = '12.1'
config.build_settings['ENABLE_BITCODE'] = 'NO'
config.build_settings['APPLICATION_EXTENSION_API_ONLY'] = 'No'
config.build_settings['BUILD_LIBRARY_FOR_DISTRIBUTION'] = 'YES'
end
end
end
Once the pods are configured, we will have to enable a few capabilities in the project.
For this, navigate to Project, click on Target and select Signing & capabilities
You will now see a + symbol at the top left corner. Click on it.
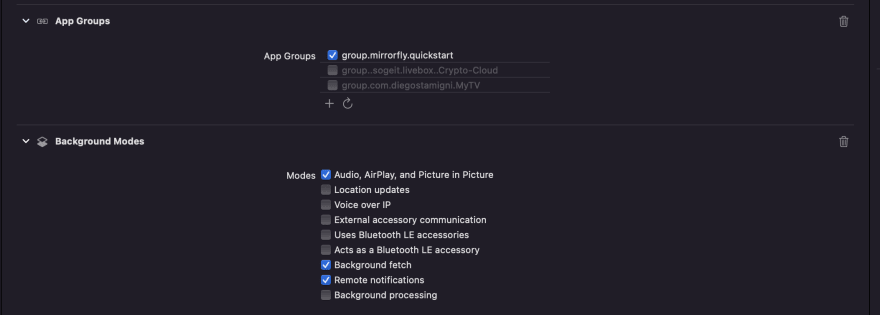
Enable the following:
App groups :
- group.mirrorfly.quickstart
Background Modes:
- Audio, Airplay, and Picture in Picture
- Background fetch
- Remote notifications
Initialize the Chat SDK
Now, it's time to start using the SDK.
In the Chat Builder function, navigate to AppDelegate class within the didFinishLaunchingWithOptions
Add the below details to the Chat Builder function:
try? ChatSDK.Builder.setAppGroupContainerID(containerID: CONTAINER_ID)
    .setLicenseKey(key: LICENSE_KEY)
    .isTrialLicense(isTrial: true)
    .setDomainBaseUrl(baseUrl: BASE_URL)
    .buildAndInitialize()

In the Chat Builder Class, use the isTrialLicense class to register a user. You will be able to acquire the license key from your MirrorFly Account
Well use the below method to register a new user:try! ChatManager.registerApiService(for: USER_IDENTIFIER ) { isSuccess, flyError, flyData in
var data = flyData
if isSuccess {
// This is your Password
guard let password = data["password"] as? String else{
return
}
// This is your Username
guard let username = data["username"] as? String else{
return
}
}else{
let error = data.getMessage()
print("#chatSDK \(error)")
}
}
Connect to Chat Server
Well need to connect the chat app to the server to establish a connection thats needed to send/ receive messages.ChatManager.connect()
Send your first message
Lets send a message from the app now.
Well have to call the below method:
FlyMessenger.sendTextMessage(TO_JID, TEXT) { isSuccess,error,chatMessage in
    if isSuccess {
        // Update the UI
    }else{
        // Handle the error
    }
 }
Receive a message
To read an incoming message, you will have to confirm the MessageEventsDelegate in the syntax mentioned below:
ChatManager.shared.messageEventsDelegate = self
Conclusion
If youve come to this part of the article, it means - you now know all the details to build an iOS app in Swift with highly interactive chat features. Also, youre well on your way to launching the best chat apps.
To close, I hope this article has helped you gather all the information you need. So, leave a comment if youd like to learn more about other development insights. Our team will be happy to help you around soon!
Original Link: https://dev.to/richard21266663/building-an-ios-chat-app-with-swift-tutorial-guide-3apc
Dev To
More About this Source Visit Dev To