
An Interest In:
Web News this Week
- April 24, 2024
- April 23, 2024
- April 22, 2024
- April 21, 2024
- April 20, 2024
- April 19, 2024
- April 18, 2024
Some of Our Sources
- Slashdot
- BoingBoing
- Technology Review
- Pearsonified
- The Logo Smith
- Abduzeedo
- Web Designer Depot
- Noupe
- Line 25
- Design Modo
Help Webnuz
Referal links:
How to Use Redux Toolkit With React Native
When developing robust web or mobile applications(apps), handling state internally, as is the norm with React Native components, isn't always ideal. If done improperly, it can quickly become very messy. In situations like these, a library tool like Redux is commonly recommended.
This article will go through the various steps for managing the state flow in a simple React Native app using the Redux Toolkit.
What is Redux & Redux Toolkit?
Redux is a Javascript global state management library designed to act as a central store for managing application state. Redux helps us build apps that behave consistently across all environments by providing a system to track all changes made to the state.
Redux Toolkit is Redux's official toolset for developing efficient React-Redux apps. It was designed to simplify the writing of common Redux logic and resolve the usual difficulties of using the core Redux library.
such as:
- Setting up the Redux store
- Creating reducer state slices
- Writing immutable state updating code
The way these are implemented, changes when using Redux Toolkit in place of core Redux.
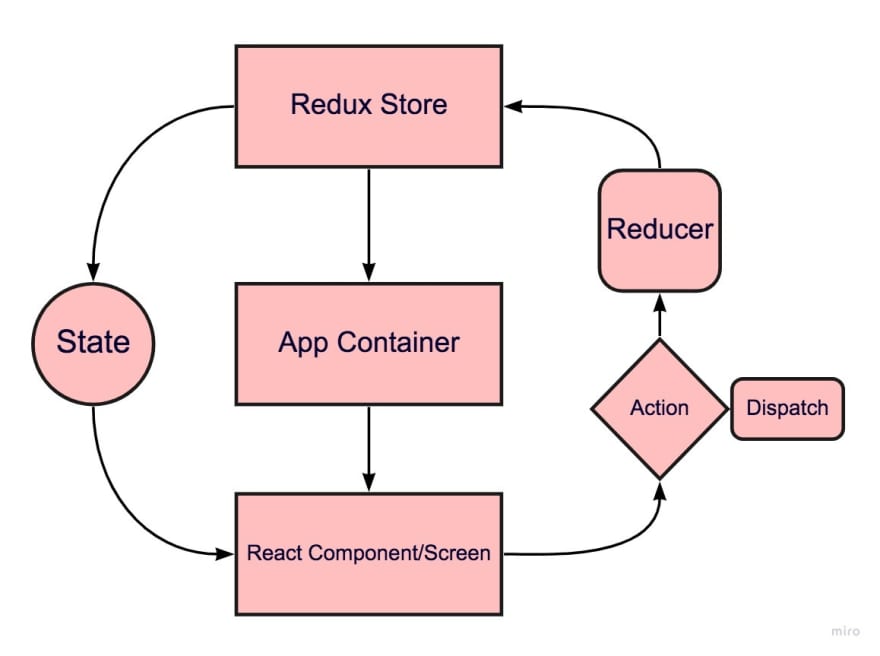
Redux Glossary
Action
An Action is a simple object that indicates a desire to modify a state in the Redux store. It is required that actions specify a payload and a type attribute that describes what kind of change is to be made to the state. Actions require Reducers to be successfully carried out.
Reducer
A Reducer is a pure function that takes two arguments; the current state and an action to return a new state result. Reducers do not modify the original state directly; rather, they make a copy of the state and modify that.
Dispatch
A "dispatch function" is a function that accepts either a synchronous or asynchronous action object and sends it to a reducer for execution.
Slice
A collection of reducers and actions that work together to implement a single app feature.
Store
According to the official Redux documentation, a store is an object that holds the app's entire state tree. Redux can only have a single store in an app.
Using Redux Toolkit with React Native
Prerequisites
- Basic knowledge of React Native.
- Node.js LTS >= v14.x.x (v16.14.2 recommended).
- A package manager like npm or yarn installed.
- Expo CLI installed.
- Knowledge of Redux concepts.
NOTE: This article is not a tutorial on React Native and will not be focusing on React Native concepts.
Project Setup
The app we will build is a simple random colour generator, and to keep things simple, we will be using the Expo CLI to create and run our app.
You can find the full source code of the app on this Github repo.
In your computer terminal, run the following commands:
expo init redux-toolkit-guidecd redux-toolkit-guideFor the template, select Managed Workflowblank.
Now, we will install some necessary dependencies for our app, including @react-navigation/native, react-native-screens, and react-native-safe-area-context.
See the official React Navigation library documentation for the latest installation instructions.
yarn add @react-navigation/nativeexpo install react-native-screens react-native-safe-area-contextBuilding the App Interface
Now that the dependencies are installed, we can open our redux-toolkit-guide app in a code editor (VS Code is recommended) and create our file structure.
- Create a
srcandstorefolder in your project's root. - Inside
store, create acolorSlice.jsandstore.jsfile. - Create a
screenfolder insidesrc. - Inside
screenscreate aHomeScreen.jsfile and import the code below.
import React from "react";import { StatusBar } from "expo-status-bar";import { Text, View, StyleSheet, TouchableOpacity, FlatList,} from "react-native";const HomeScreen = () => { return ( <View> <StatusBar style="dark" /> <TouchableOpacity onPress={() => //empty anonymous function} style={styles.button} > <Text style={{ fontSize: 20 }}>Generate Random Color</Text> </TouchableOpacity> <FlatList keyExtractor={(item) => item} data={color} style={{ marginTop: 15 }} renderItem={({ item }) => { return ( <View style={{ backgroundColor: item, height: 150, width: 150, alignSelf: "center", margin: 10, }} /> ); }} /> </View> );};export default HomeScreen;const styles = StyleSheet.create({ button: { alignSelf: "center", borderWidth: 1, borderRadius: 10, padding: 10, marginTop: 20, },});src/screens/HomeScreen.js
OverrideApp.js with the following code snippet:
import * as React from "react";import { NavigationContainer } from "@react-navigation/native";import { createNativeStackNavigator } from "@react-navigation/native-stack";import HomeScreen from "./src/screens/HomeScreen/HomeScreen";const Stack = createNativeStackNavigator();function App() { return ( <NavigationContainer> <Stack.Navigator> <Stack.Screen name="Home" component={HomeScreen} /> </Stack.Navigator> </NavigationContainer> );}export default () => { return <App />;};App.js
Running expo start in our terminal to start the developer environment. Our app should look like this:

Setting up the Redux store
Redux Toolkit shortens the length of Redux code logic we have to write in our app. It uses the configureStore API in place of the createStore API from core Redux to build a store. configureStore also automatically sets up the Redux DevTools Extension and some middleware.
import { configureStore } from "@reduxjs/toolkit";export const store = configureStore({ reducer: { },});store/colorSlice.js
The store holds a single root reducer object for all the state slices in the app.
Now we need to wrap our app component with the store using the React-Redux Provider. This ensures our Redux store is at the topmost level and is available to the entire React Native app.
...import { store } from "./store/store";import { Provider } from "react-redux";... export default () => { return ( <Provider store={store}> <App /> </Provider> );};App.js
Creating Redux Toolkit Slices
Next, we will create a state slice to handle all action and reducer functions relevant to generating a random colour in our app. Importing and calling createSlice, we define inside it;
- a
nameto identify the slice. - an
initialStatevalue (just like when using the ReactuseStatehook ). - a
reducerfunction to determine how the state is to be updated.
When writing core Redux logic, it is essential to avoid directly mutating the state value. But, with createSlice available through Redux Toolkit, we can write mutating code in reducers and have it converted into immutable copies.
NOTE: We can only write mutating code inside the createSlice or createReducer API.
import { createSlice } from "@reduxjs/toolkit";const initialState = {//Initialstate value is an empty array to hold all the colors generated value: [],};//A function to generate random RGB valuesconst randomRgb = () => { const red = Math.floor(Math.random() * 256); const green = Math.floor(Math.random() * 256); const blue = Math.floor(Math.random() * 256); return `rgb(${red}, ${green}, ${blue})`;};//state sliceexport const colorSlice = createSlice({ name: "color", initialState, reducers: { setColor: (state) => { state.value = [...state.value, randomRgb()]; }, },});// Action creators are automatically generated for each case reducer function export const { setColor } = colorSlice.actions;export default colorSlice.reducer;store/colorSlice.js
You will notice that we did not define any action objects in our code. This is because Redux Toolkit allows us to create actions on the fly. Here we set the case functions defined in our reducer to colorSlice.actions. Then an action creator is automatically generated using the name of the reducer as the action type.
Afterwards, we can import and add the slice to the root reducer of the store.
...import colorSlice from "./colorSlice";export const store = configureStore({ reducer: { color: colorSlice, },});store/store.js
UseSelector and UseDispatch
We have successfully set up a Redux system for our app. Now, all we need is to be able to read the current state in homeScreen.js and dispatch an action to our reducer.
For this, we will use the useSelector hook, which will give us access to our redux state, and the useDispatch hook, which will allow us to dispatch actions.
...import { useDispatch, useSelector } from "react-redux";import { setColor } from "../../../store/colorSlice";...const HomeScreen = () => { const color = useSelector((state) => state.color.value); //reading the state const dispatch = useDispatch(); return ( ... <TouchableOpacity onPress={() => dispatch(setColor())} ... > <Text style={{ fontSize: 20 }}>Generate Random Color</Text> </TouchableOpacity> <FlatList data={color} ... /> );};export default HomeScreen;...src/screens/homescreen.js
We import useDispatch and useSelector from React-Redux, and we also import the setColor reducer we created. Grabbing our current state with state.color.value, we set it as the data entry in our Flatlist element. Then, by calling useDispatch as dispatch and passing setColor in our onPress callback, we can send an action to the appropriate reducer case.
We're done! Our React Native app can now generate random colours.

When to use Redux?
Obviously the app we just built is too basic to use a global state manager like Redux. This tutorial was just to introduce Redux Toolkit in the most basic way possible.
So when should we use Redux?
- When there's a considerable amount of data changing over time
- When we need to track state changes
- When dealing with deeply nested components, and passing state and props becomes problematic
- When multiple components require access to the same piece of state
Conclusion
This tutorial covered what Redux is and the basic terminologies in Redux and Redux Toolkit. We also covered the basic steps for integrating Redux Toolkit into a React Native application through
- Creating a store with
configureStore - Providing that store for our app
- Creating reducer slices with
createSlice - and reading and updating the state with
useSelectoranduseDispatch
I recommend visiting the official Redux documentation for further research.
Original Link: https://dev.to/theadultnoble_6/how-to-use-redux-toolkit-with-react-native-2dm5
Dev To
More About this Source Visit Dev To