
An Interest In:
Web News this Week
- April 23, 2024
- April 22, 2024
- April 21, 2024
- April 20, 2024
- April 19, 2024
- April 18, 2024
- April 17, 2024
Some of Our Sources
- Team Treehouse
- Six Revisions
- TutsPlus - Design
- You The Designer
- Fuel Your Creativity
- Web Designer Depot
- Naldz Graphics
- Stylized Web
- Freelance Switch
- TechPowerUp
Help Webnuz
Referal links:
Creating a Developer Portfolio with Next.js and Cosmic
As a developer, one of the most valuable things you can do is create your presence on the internet. Your portfolio is a great place to showcase your proudest projects to the community or potential employers.
Today, were going to build a beautiful developer portfolio, giving you a place to store your blog posts and projects. After completing this tutorial, you will understand how building with modern developer tools comes with great benefits. Faster page loads, optimized SEO, and an intuitive developer experience will ultimately enable you to provide better products for your colleagues and clients.
Tools well be using
To build our developer portfolio, were going to use the following technologies:
- Next.js- A React framework that makes it easy to spin up a full-stack application.
- Cosmic- A Headless CMS enables the independence of the data (content) layer and gives us the ability to quickly manage template content. In this case, our blog and project posts.
- Tailwind CSS- A performant utility-first CSS framework that can be composed directly in your markup.
Highlights
While the main objective of this portfolio is to be functional and showcase who you are as a developer, I wanted to ensure that we prioritized user experience and overall website performance.
- Organized content management - With Cosmic, we can store all of our content in one place. Once we write the code for our user interface, we will not have to worry about storing content within our project. Cosmic handles all of this.
- Next.js Image optimization - With the power of Next Image, we will ensure that our images wont be slowing us down one bit. Storing local images of ourselves (if you prefer to include those) as well as the remote images we will query from our Cosmic bucket, we will make sure to utilize things like lazy loading, placeholder blur, and built-in image optimization from Next.js.
- SEO and Accessibility best practices - As a web developer, it is crucial that you cater to good semantics to ensure that your site is accessible by anyone.
TL;DR
Install the template
View the live demo
Check out the code
Starting from a blank Next.js app
To get started with this template, lets create a new Next.js application.
pnpx create-next-app@latest nextjs-developer-portfolio# oryarn create next-app nextjs-developer-portfolio# ornpx create-next-app@latest nextjs-developer-portfolioThen install the dependencies.
cd nextjs-developer-portfoliopnpm install# orcd nextjs-developer-portfolio yarn# orcd nextjs-developer-portfolio npm installLets fire up our application! After running the command below, you can open up http://localhost:3000 in your browser.
pnpm install# oryarn install# ornpm installGetting started with Cosmic
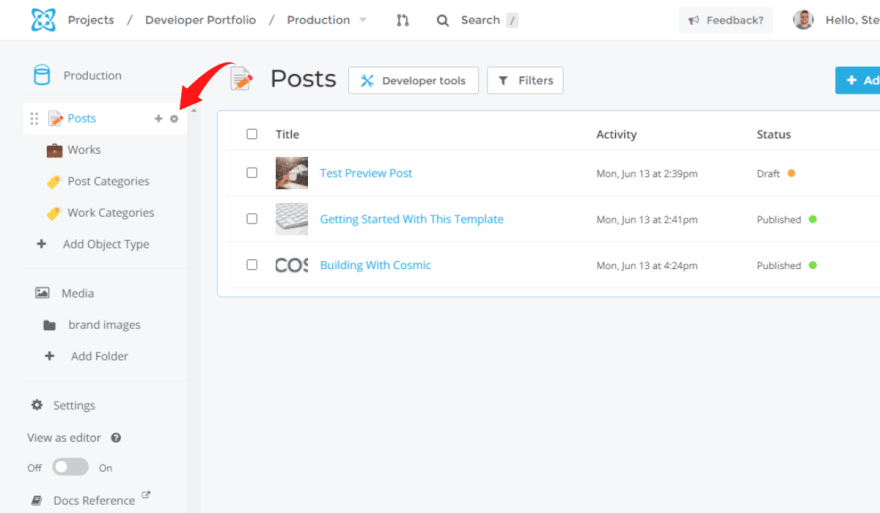
First things first, lets create a free Cosmic account. Once created, we can go ahead and create a new project. Select Start from scratch, then you can name your project. Since this is our primary bucket where we will be building and deploying our project, Im going to name the bucket environment Production. Go ahead and select Save Bucket.

Next, we can start adding objects to our Cosmic Bucket.
The Content Model
The Content Model is a blueprint for our object. It consists of data that can be as simple as one single text value or as complex as storing several data values. These could be strings, numbers, booleans, etc. The whole point of configuring this content model is so that every time we create a new blog post, all of the Metafields we created in our blueprint will be there for us to fill out.
To add our custom Metafields to the content model, we can click on the plus symbol and add a new Metafield. We will be then prompted to select from a list of Metafield Types.

Categories object
Lets create our categories object. The only piece of data we will need for our categories object is going to be the title, so we do not have to add any Metafields.

Posts object
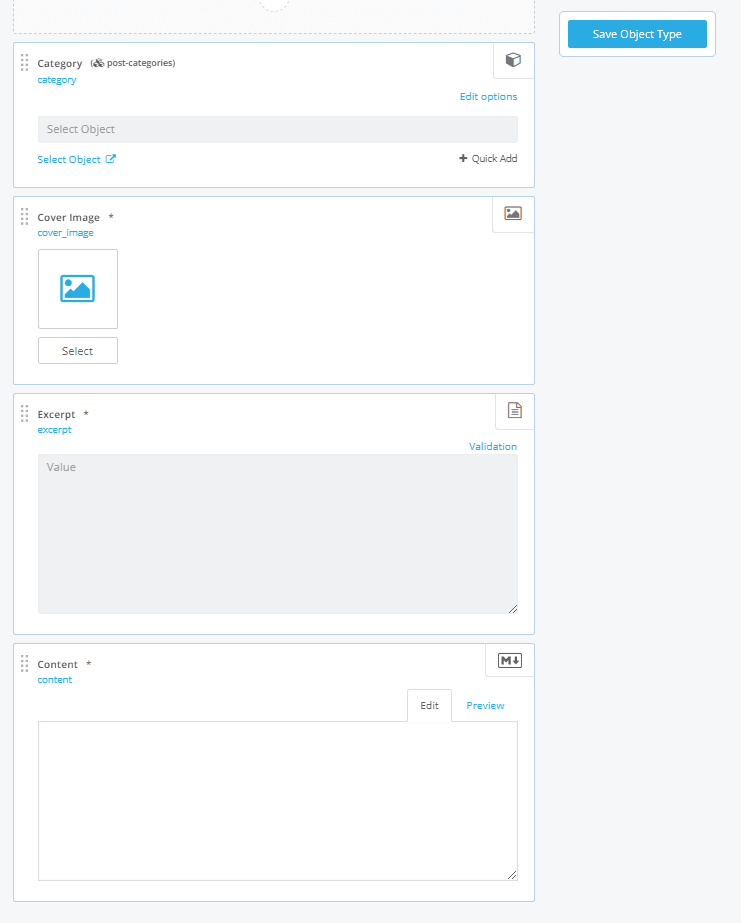
This is what our content model will look like for the posts object. The Metafields will be:
- Category - Which we will link to our Post Categories object. Type: Single Object Relationship.
- Cover Image - An image we can display at the top of our post. Type: Image / File.
- Excerpt - A short sentence summarizing our post. Type: Plain Text Input.
- Content - The text content that will go inside of our post. Type: Markdown.
Note that by default, when we create a new object it will have a content and slug field. We will be using the slug (which Cosmic generates for us) in our code to properly route our posts.
Before we dive into the code, go ahead and create a post with sample data so that we can test it later on.
Works object
We will also be making a Works object to showcase our best projects. Copy the blueprint for the Posts object, though add in two additional Metafields. These will be:
- Repo URL - A link to the projects GitHub repository. Type: Plain Text Input.
- Live URL - A link to the live website for your project. Type: Plain Text Input.

Installing the Cosmic NPM module
Lets install the Cosmic dependency into our project and start writing the code that grabs the posts from our bucket.
cd nextjs-developer-portfoliopnpm install cosmicjs# ornpm install cosmicjs# oryard add cosmicjsSetting your environment variables
We will need to create three environment variables inside of a .env file in the root of our project. The Bucket Slug and Read Key can be found in your dashboard in Settings > API Access. The preview key is something that you can define yourself, so go ahead and create your own preview secret key so that you can use it later on.
// nextjs-developer-portfolio/.envCOSMIC_BUCKET_SLUG=<your_bucket_slug>COSMIC_READ_KEY=<your_read_key>COSMIC_PREVIEW_SECRET=<your_preview_secret>Getting our Posts
Now that we have our environment variables set, we are ready to access the Cosmic API and retrieve our data.
// nextjs-developer-portfolio/src/lib/cosmic.jsconst Cosmic = require('cosmicjs')const api = Cosmic()const BUCKET_SLUG = process.env.COSMIC_BUCKET_SLUGconst READ_KEY = process.env.COSMIC_READ_KEYconst bucket = Cosmic().bucket({ slug: BUCKET_SLUG, read_key: READ_KEY,})While getting our posts, we can also create a few parameters here. In our example, getting our "Posts" and "Works" will share the same function, though we will pass in an argument when we call the function declaring which object to get. We can do this for our categories as well by passing the title of our Cosmic object as an argument.
To get a better understanding of how we are getting our data from Cosmic, lets break it down:
- Query - sending valid JSON queries on Object and Media endpoints. You can view a full guide here.
- Status - if not included, status defaults to published. You can include both published and draft content by setting status to any.
- Props - used to declare only the data you need and limit the payload size.
- Limit - the number of objects to return.
- Sort - sort your content.
// nextjs-developer-portfolio/src/lib/cosmic.jsexport async function getAllPosts(preview, postType, postCount) { const params = { query: { type: postType }, ...(preview && { status: 'any' }), props: 'title,slug,metadata.category,metadata.excerpt,metadata.published_date,created_at,status', limit: postCount, sort: '-created_at', } const data = await bucket.getObjects(params) return data.objects}Parsing the markdown
Since we will be writing our content in Markdown, we will need a way to serialize the markdown into HTML. To do this, we will install the dependencies remark and remark-html.
pnpm install remark remark-html// oryarn add remark remark-html// ornpm install remark remark-html Now that weve installed these packages, create a file in the lib folder of your project.
// nextjs-developer-portfolio/src/lib/markdownToHtml.jsimport { remark } from 'remark'import html from 'remark-html'export default async function markdownToHtml(markdown) { const result = await remark().use(html).process(markdown) return result.toString()}Creating a list of posts
Now that weve done the basic setup of our Cosmic bucket, created a .env file with the required environment variables, created the functionality to get the data, and parsed our markdown, we can create a list of posts so that users can choose from them.
For our post lit, we will display the title and the excerpt from the post. This is what it will look like:

We can create a PostList.jsx component so that we can reuse our post list with ease on several parts of our site. When we render this component on one of our pages, we will pass the data of all the posts we receive from Cosmic to the allPosts parameter.
// nextjs-developer-portfolio/src/components/PostList.jsximport Link from 'next/link'const PostList = ({ allPosts, postType }) => { return ( <> <ul className="grid grid-cols-1 md:grid-cols-2 gap-8"> {allPosts.map(post => ( <li className="flex flex-col bg-white dark:bg-gray-800 rounded p-8 shadow-sm" key={post.title} > <Link href={`/${postType}/${post.slug}`}> <a className="group flex flex-col justify-center gap-y-6"> <div className="max-w-lg"> <h3 className="text-xl font-bold mb-1 group-hover:text-accent transition-colors"> {post.title} </h3> <p className="text-fore-subtle mb-3 lg:mb-0 lg:pr-6"> {post.metadata.excerpt} </p> </div> <p className="flex items-center text-fore-subtle text-sm"> Read more </p> </a> </Link> </li> ))} </ul> </> )}export default PostListRendering the Post List
Now, lets take that post list and render it on our Posts page. If you havent yet, create a folder in your pages folder within your directory called posts. Then, lets create the index file for that page where our PostList will live.
With getStaticProps, we will call the functions we created earlier to get those posts from Cosmic. The awesome part about this is that when it comes to build time, these posts will be built statically and deployed to an edge CDN, making the pages available to users around the world within milliseconds.
We are also calling our function that gets the post categories so that we can then display them on the page and create the functionality to filter through the posts.
// nextjs-developer-portfolio/pages/posts/index.jsximport { useState } from 'react'import { getAllPosts, getAllCategories } from '@/lib/cosmic'import PostList from '@/components/PostList'const Posts = ({ allPosts, allPostCategories }) => { const [filterCategory, setFilterCategory] = useState('All') const filteredPosts = allPosts.filter( post => post.metadata.category.title === filterCategory ) return ( <> <h1 className="text-2xl md:text-3xl text-fore-primary font-bold"> Posts </h1> <ul className="flex flex-wrap gap-y-2 sm:gap-y-0 gap-x-4 my-4"> <li className={ 'All' === filterCategory ? 'cursor-pointer font-bold filter--active transition' : 'cursor-pointer text-fore-subtle transition' } onClick={() => setFilterCategory('All')} key={'All'} > All </li> {allPostCategories.map(category => ( <li className={ category.title === filterCategory ? 'cursor-pointer font-bold filter--active transition' : 'cursor-pointer text-fore-subtle transition hover:text-accent' } onClick={() => setFilterCategory(category.title)} key={category.title} > {category.title} </li> ))} </ul> <PostList allPosts={filterCategory === 'All' ? allPosts : filteredPosts} postType="posts" /> </> )}export async function getStaticProps({ preview }) { const allPosts = (await getAllPosts(preview, 'posts')) || [] const allPostCategories = (await getAllCategories('post-categories')) || [] return { props: { allPosts, allPostCategories }, }}export default PostsCreating an individual post page
In the posts folder (pages/posts), lets create a [slug].jsx file. This is where we can write the code for our individual posts.
The content for our post page will be composed of three components:
- PostHeader - Containing our PostTitle, post metadata (date and category), and cover image.
- PostTitle - The title of the post
- PostContent - The styled HTML that we converted from Markdown.
- markdown-styles.module.css - A stylesheet for our markdown
/* nextjs-developer-portfolio/src/components/markdown-styles.modules.css */.markdown { @apply text-lg leading-relaxed;}.markdown p,.markdown ul,.markdown ol,.markdown blockquote { @apply my-6 text-fore-secondary text-[16px] md:text-[18px];}.markdown h2 { @apply text-fore-primary text-2xl font-bold mt-12 mb-4 leading-snug;}.markdown h3 { @apply text-fore-primary text-xl font-bold mt-8 mb-4 leading-snug;}.markdown p a { @apply text-accent underline hover:text-opacity-70;}.markdown ul li { @apply list-disc list-inside mb-2 bg-back-subtle p-2 rounded text-[16px] md:text-[18px] font-semibold;}.markdown ol li { @apply list-decimal list-inside mb-2 bg-back-subtle p-2 rounded text-[16px] md:text-[18px] font-semibold;}.markdown img { @apply max-w-[xl] mx-auto my-12;}// nextjs-developer-portfolio/src/components/PostHeader.jsximport Date from './Date'import CoverImage from './CoverImage'import PostTitle from './PostTitle'import { ExternalLinkIcon } from '@/configs/icons'import Image from 'next/image'import avatar from '../../public/images/avatar_4.png'const PostHeader = ({ post }) => { return ( <> <PostTitle>{post.title}</PostTitle> <div className="flex items-center mb-8"> <div className="flex items-center relative"> <Image src={avatar} width={42} height={42} alt="Stefan Kudla" className="rounded-full" placeholder="blur" /> <span className="ml-2 text-sm"> Stefan Kudla |{' '} <Date dateString={post.created_at} formatStyle="LLLL dd, yyyy" /> |{' '} {post.metadata.category.title} </span> </div> </div> <CoverImage title={post.title} url={post.metadata.cover_image.imgix_url} /> <div className="flex flex-row justify-between sm:items-center pb-8 border-b"> <div className="sm:flex items-center gap-x-2">{/* For our "Works" page that contains the "liveURL" and "gitHubURL" metafields. */} {post.metadata.live_url ? ( <> <a href={post.metadata.live_url} target="_blank" rel="noreferrer" className="flex items-center text-accent hover:text-gray-500 text-sm md:ml-4 w-fit" > Live Site <span> <ExternalLinkIcon /> </span> </a> <a href={post.metadata.repo_url} target="_blank" rel="noreferrer" className="flex items-center text-accent hover:text-gray-500 text-sm" > Github Repo <span> <ExternalLinkIcon /> </span> </a> </> ) : undefined} </div> </div> </> )}export default PostHeader// src/components/PostTitle.jsxconst PostTitle = ({ children }) => { return ( <h1 className="text-fore-primary text-3xl sm:text-4xl md:text-5xl font-bold tracking-normal leading-tight md:leading-none mb-12 mt-4"> {children} </h1> )}export default PostTitle// src/components/PostContent.jsximport markdownStyles from './markdown-styles.module.css'const PostBody = ({ content }) => { return ( <div className="max-w-2xl mx-auto"> <div className={markdownStyles['markdown']} dangerouslySetInnerHTML={{ __html: content }} /> </div> )}export default PostBodyThe page itself:
// nextjs-developer-portfolio/src/pages/posts/[slug].jsximport { useRouter } from 'next/router'import PostBody from '@/components/PostBody'import PostHeader from '@/components/PostHeader'import { getAllPostsWithSlug, getPostAndMorePosts } from '@/lib/cosmic'import PostTitle from '@/components/PostTitle'import Head from 'next/head'import markdownToHtml from '@/lib/markdownToHtml'import AlertPreview from '@/components/AlertPreview'import PageNotFound from '../404'import Loader from '@/components/Loader'const Post = ({ post }) => { const router = useRouter() if (!router.isFallback && !post?.slug) { // Checking if the page exists and redirecting to a 404 page if it doesn't. return <PageNotFound /> } return ( <> {router.isFallback ? ( <PostTitle> <div className="flex justify-center items-center"> // If you have a custom loader, you can use it here, if not just fill in the text "Loading..." <Loader /> </div> </PostTitle> ) : ( <> <article className="border-b border-back-subtle py-8 mb-8"> {post.status === 'draft' && <AlertPreview />} <PostHeader post={post} /> <PostBody content={post.content} /> </article> </> )} </> )}export default Post// Here is where we get all of the posts from Cosmic, and pass the data into the { post } prop.export async function getStaticProps({ params, preview = null }) { const data = await getPostAndMorePosts(params.slug, preview)// We're calling that function we wrote earlier in /lib/markdownToHtml.js to convert our Markdown to HTML and send it to our <PostBody> component. const content = await markdownToHtml(data.post?.metadata?.content || '') return { props: { preview, post: { ...data.post, content, }, morePosts: data.morePosts || [], }, }}export async function getStaticPaths() { const allPosts = (await getAllPostsWithSlug()) || [] return { paths: allPosts.map(post => `/posts/${post.slug}`), fallback: true, }}Now that weve implemented the code into our [slug].jsx page, we can click on any of the posts from the Post List and view the content of our post.

Creating the Work list and Work page
Now that we have the structure for our post page and post index page, we can repeat this for our work page. We can create a works folder in our pages folder, followed by an index.jsx and [slug].jsx.
Copy the code from both the index.jsx and [slug].jsx in pages/posts, and simply change the instances of post(s) to work(s).
export async function getStaticProps({ preview }) { const allWorks = (await getAllPosts(preview, 'works')) || [] const allWorkCategories = (await getAllCategories('work-categories')) || [] return { props: { allWorks, allWorkCategories }, }}Using Preview Mode
With Next.js and Cosmic, we can view drafts of our posts before they are published. In Cosmic, create a post, and once you have filled out the Metafields, select Save Draft rather than Publish.

Before we can preview our post, lets set our app up so that we can utilize this functionality.
- Grab the COSMIC_PREVIEW_SECRET you created earlier. Then click on the settings icon on your object in Cosmic.
Scroll down to the Preview Link field. Replace the with your own COSMIC_PREVIEW_SECRET. What we are doing here is telling our application to go to this route if the post has a status of draft.
Note that our link is set to local host and preview mode will only work when we are running our local development server. Once your app is deployed, you can replace http://localhost:3000 with your domain name.

- Lets go back to our cosmic.js file and create a function that gets the preview post from Cosmic.
// nextjs-developer-portfolio/src/lib/cosmic.jsexport async function getPreviewPostBySlug(slug) { const params = { query: { slug }, status: 'any', props: 'slug', } try { const data = await bucket.getObjects(params) return data.objects[0] } catch (error) { // Throw error if a slug doesn't exist if (is404(error)) return throw error }}- Now lets create two API routes in our project - one for the preview itself and the other for exiting the preview. Fortunately, Next.js handles API routes out of the box.
// nextjs-developer-portfolio/src/pages/api/preview.jsimport { getPreviewPostBySlug } from '@/lib/cosmic'export default async function preview(req, res) { // Check the secret and next parameters // This secret should only be known to this API route and the CMS if ( req.query.secret !== process.env.COSMIC_PREVIEW_SECRET || !req.query.slug ) { return res.status(401).json({ message: 'Invalid token' }) } // Fetch the headless CMS to check if the provided `slug` exists const post = await getPreviewPostBySlug(req.query.slug) // If the slug doesn't exist prevent preview mode from being enabled if (!post) { return res.status(401).json({ message: 'Invalid slug' }) } // Enable Preview Mode by setting the cookies res.setPreviewData({}) // Redirect to the path from the fetched post // We don't redirect to req.query.slug as that might lead to open redirect vulnerabilities res.writeHead(307, { Location: `/posts/${post.slug}` }) res.end()}// nextjs-developer-portfolio/src/pages/api/exit-preview.jsexport default async function exit(_, res) { // Exit the current user from "Preview Mode". This function accepts no args. res.clearPreviewData() // Redirect the user back to the index page. res.writeHead(307, { Location: '/' }) res.end()}- Now we can go back to our post in Cosmic, and select the preview button and our application will open up the preview of our post.

- Before were done with our preview mode, we need to create a component that alerts us if we are in preview mode, with a link to exit the preview mode. This link takes us to that exit-preview.js API route we created above.
// nextjs-developer-portfolio/src/components/AlertPreview.jsximport Link from 'next/link'const AlertPreview = () => { return ( <div className="fixed z-20 top-12 left-0 text-fore-subtle bg-back-subtle px-8"> <div className="py-2 text-center text-sm"> <> This page is a draft.{' '} <Link href="/api/exit-preview"> <a className="underline hover:text-cyan duration-200 transition-colors cursor-pointer"> Click here </a> </Link>{' '} to exit preview mode. </> </div> </div> )}export default AlertPreview
- Now that we have our banner made, all we need to do is import it into our [slug].jsx pages. By default, our Cosmic object comes with a status key value pair. If our post is not published, it has a status of draft.
// nextjs-developer-portfolio/src/pages/{posts&works}/[slug].jsximport AlertPreview from '@/components/AlertPreview' ...<article className="border-b border-back-subtle py-8 mb-8"> {post.status === 'draft' && <AlertPreview />} <PostHeader post={post} /> <PostBody content={post.content} /> </article>...Deploying to Vercel
To deploy your project to Vercel, click here. This link will automatically clone the template into a new repository and build and deploy your new application (how cool!). All you have to do is provide the environment variables from earlier.
Conclusion
Now you have a fully functional developer portfolio that you can use to showcase your projects and share your blog posts with the tech community. I hope you enjoyed this tutorial, and if you have any feedback or questions, feel free to join us over at the Cosmic Slack Channel.
Original Link: https://dev.to/stefankudla/creating-a-developer-portfolio-with-nextjs-and-cosmic-3m52
Dev To
More About this Source Visit Dev To