
An Interest In:
Web News this Week
- April 2, 2024
- April 1, 2024
- March 31, 2024
- March 30, 2024
- March 29, 2024
- March 28, 2024
- March 27, 2024
Some of Our Sources
- Slashdot
- BoingBoing
- Six Revisions
- Web Designer Depot
- FanExtra - PSD
- 24 Ways
- Spyre Studios
- Web Resource Source
- Daily Now
- The Verge
Help Webnuz
Referal links:
AWS IoT pub/sub over MQTT
Introduction
Hello, in this post we would create an IoT thing on AWS, use it's credentials, to create two virtual clients on a Linux VM and test publishing from one client and subscribing from the other.
VM
Use your Linux machine or a VM as a virtual IoT device. We would be doing all of the CLI / coding tasks in the post, on this VM.
AWS
Install and setup the AWS CLI. Here is the region I have set as default.
$ cat ~/.aws/config [default]region = ap-south-1Endpoint
Goto ASW IoT > Settings on the cloud console, and get the Device data endpoint which is unique to the AWS account/region. Or get it from the AWS CLI.
$ IOT_DEV_EP=$(aws iot describe-endpoint --region ap-south-1 --output text --query endpointAddress)$ echo $IOT_DEV_EP<some-id>.iot.ap-south-1.amazonaws.comCheck connectivity to this endpoint from the Linux VM, which is your virtual IoT device.
$ ping -c 1 $IOT_DEV_EP---TRUNCATED---1 packets transmitted, 1 received, 0% packet loss, time 0msrtt min/avg/max/mdev = 196.145/196.145/196.145/0.000 msI have tested with 1 packet -c 1. You may send more than one though.
You can also check connectivity to the secure port for MQTT i.e. 8883 on the endpoint. Telnet should be present/installed on the machine though, for ex. sudo yum install telnet -y.
$ telnet $IOT_DEVICE_EP 8883Trying <some-ip>...Connected to <some-id>-ats.iot.ap-south-1.amazonaws.com.Escape character is '^]'.Thing
Goto AWS IoT > Manage > Things > Create Things
on the cloud console and create a new thing with the name temp-sensor, set unnamed shadow(classic) and choose
Auto-generate a new certificate (recommended).
In the policies section, create and select a new policy with the name temp-sensor and the following JSON.
{ "Version": "2012-10-17", "Statement": [ { "Effect": "Allow", "Action": [ "iot:Connect", "iot:Publish", "iot:Receive", "iot:RetainPublish", "iot:Subscribe" ], "Resource": "*" } ]}Download all the certificates/keys and name those as needed, I have named them as follows.
$ ls *.pemca-cert.pem pub-cert.pem pub-key.pem pvt-key.pemNote: If you are using a different host system like Windows with a browser, you can download these files, copy the content and then paste into the respective file on a Linux VM.
SDK
We would be using the AWS IoT SDK for Python.
# Clone the repositorygit clone https://github.com/aws/aws-iot-device-sdk-python-v2.git# Install using Pippython3 -m pip install ./aws-iot-device-sdk-python-v2# Remove the clone, if it isn't required anymore$ rm -rf aws-iot-device-sdk-python-v2Connect
We have to first import the mqtt_connection_builder package from the awsiot sdk.
from awsiot import mqtt_connection_builderWe need the endpoint, the cerificate/key paths and a client_id to initiate a connection. We can generate a client_id using the uuid package.
from uuid import uuid4client_id = 'client-' + str(uuid4())We can then pass the files as arguments using the argparse package.
##### parse argumentsimport argparseparser = argparse.ArgumentParser(description="Send and receive messages through and MQTT connection.")parser.add_argument('--ep', help="IoT device endpoint <some-prefix>.iot.<region>.amazonaws.com", required=True, type=str)parser.add_argument('--pubcert', help="IoT device public certificate file path", required=True, type=str)parser.add_argument('--pvtkey', help="IoT device private key file path", required=True, type=str)parser.add_argument('--cacert', help="IoT device CA cert file path", required=True, type=str)parser.add_argument('--topic', help="Topic name", required=True, type=str)args = parser.parse_args()You can also skip the parse arguments step and add the parameters directly.
We have the necessary parameters to initiate the connection.
mqtt_connection = mqtt_connection_builder.mtls_from_path( endpoint=args.ep, cert_filepath=args.pubcert, pri_key_filepath=args.pvtkey, ca_filepath=args.cacert, client_id=client_id)connect_future = mqtt_connection.connect()# result() waits until a result is availableconnect_future.result()print(f'{client_id} is connected!')Put the code we saw in the connect section so far in a file called connect.py and run the following.
$ python connect.py --ep $IOT_DEV_EP --pubcert pub-cert.pem --pvtkey pvt-key.pem --cacert ca-cert.pem --topic temperature client-3924e5d4-97d3-43e6-b214-169d008b2d02 is connected!Great, the connection is successful.
Publish
Before publishing, let's import certain variables from the previous connect code we wrote.
# import vars from connect.pyfrom connect import args, client_id, mqtt_connectionWe shall publish a message from our client that contains the client-id, temperature and current time. We already have the client_id with us.
We can use the datetime library for getting the timestamp.
# set timestampfrom datetime import datetimenow = datetime.now()And we can generate a random number for the temperature.
# set temperatureimport randomtemp = random.randrange(10, 40)So our message now looks like:
# form the messagemessage = f'id: {client_id}, temp: {temp}, time: {now}'Time to publish it with the publish method.
# publish the messagefrom awscrt import mqttimport jsonmqtt_connection.publish( topic=args.topic, payload= json.dumps(message), qos=mqtt.QoS.AT_LEAST_ONCE)print('Message published')Note that awscrt is the AWS common runtime library we are using to set the QoS.
Put this code in a separate file with name publisher.py and run it.
$ python publisher.py --ep $IOT_DEV_EP --pubcert pub-cert.pem --pvtkey pvt-key.pem --cacert ca-cert.pem --topic temperatureclient-cb3f69b6-b53b-42a4-973f-63abe39f2c4f is connected!Message publishedSo far we published only one message, I would be modifying the code so that it continuously sends one message per second until interrupted with Ctrl C.
$ cat publisher.py # import vars from connect.pyfrom connect import args, client_id, mqtt_connectionfrom awscrt import mqttfrom datetime import datetimeimport json, random, timewhile True: # set timestamp now = datetime.now() # set temperature temp = random.randrange(10, 40) # form the message message = f'id: {client_id}, temp: {temp}, time: {now}' # publish the message mqtt_connection.publish( topic=args.topic, payload= json.dumps(message), qos=mqtt.QoS.AT_LEAST_ONCE ) print(f'Message published: {message}') time.sleep(1)Run the code again.
$ python publisher.py --ep $IOT_DEV_EP --pubcert pub-cert.pem --pvtkey pvt-key.pem --cacert ca-cert.pem --topic temperatureclient-1102832d-a0c0-481c-b1f4-5b363f9c0890 is connected!Message published: id: client-1102832d-a0c0-481c-b1f4-5b363f9c0890, temp: 14, time: 2022-07-17 09:20:44.652955Message published: id: client-1102832d-a0c0-481c-b1f4-5b363f9c0890, temp: 29, time: 2022-07-17 09:20:45.654102Message published: id: client-1102832d-a0c0-481c-b1f4-5b363f9c0890, temp: 35, time: 2022-07-17 09:20:46.655002Publishing looks good, let's go to the subscriber.
Subscriber
Firts, import certain vars from the connect module, similar to what we did in publisher.
# import vars from connect.pyfrom connect import args, mqtt_connectionDefine a callback function that triggers when a message is received on the topic.
# call back to trigger when a message is receiveddef on_message_received(topic, payload, dup, qos, retain, **kwargs): print("Received message from topic '{}': {}".format(topic, payload))Subscribe to the topic.
##### subscribe to topicfrom awscrt import mqttsubscribe_future, packet_id = mqtt_connection.subscribe( topic=args.topic, qos=mqtt.QoS.AT_LEAST_ONCE, callback=on_message_received)# result() waits until a result is availablesubscribe_result = subscribe_future.result()print(f'Subscribed to {args.topic}')We need to the keep the program open, so that we can read the messages, as defined in the callback function. For this, we can use the threading module.
import threadingthreading.Event().wait()Keep this code in a file named subscriber.py.
Time to run the subscriber code while the publisher code is also running.
Test on console
You can also test if the publish/subscribe operations are working correctly via the handy MQQT test client on AWS cloud. So if you are publishig from the code, you can test it at the subscriber window.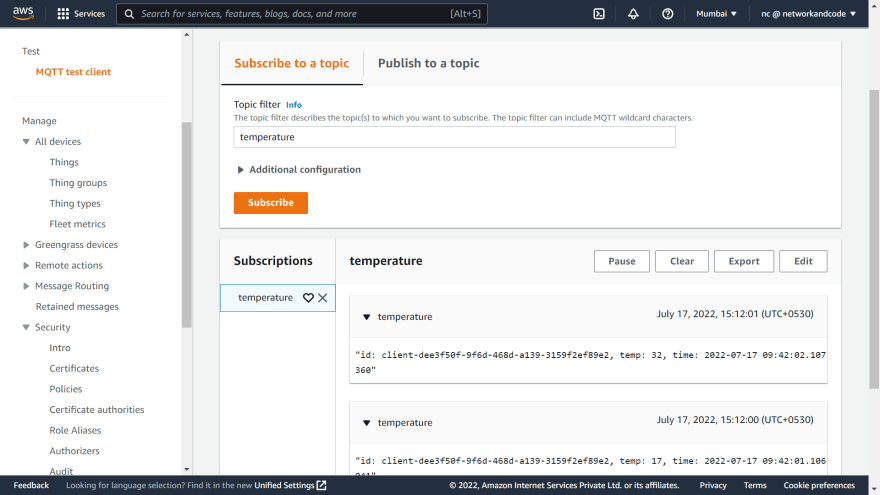
And likewise if you are subscribing on the code, you can publish a test message from the MQTT test client.
$ python3 subscriber.py --ep $IOT_DEV_EP --pubcert pub-cert.pem --pvtkey pvt-key.pem --cacert ca-cert.pem --topic temperatureclient-a17093b1-108e-4f3c-a65c-ea38900f2153 is connected!Subscribed to temperatureReceived message from topic 'temperature': b'{
  "message": "Hello from AWS IoT console"
}'
With this the post is complete ;), thank you for reading !!!. For other code examples provided by the AWS team, please checkout this github link
Original Link: https://dev.to/aws-builders/aws-iot-pubsub-over-mqtt-1oig
Dev To
More About this Source Visit Dev To