
An Interest In:
Web News this Week
- April 19, 2024
- April 18, 2024
- April 17, 2024
- April 16, 2024
- April 15, 2024
- April 14, 2024
- April 13, 2024
Some of Our Sources
- Mashable
- Simplebits
- The Logo Smith
- TutsPlus - Design
- Creative Curio
- Crazy Leaf Design
- My Ink Blog
- Wal You
- Design Modo
- Android Headlines
Help Webnuz
Referal links:
Using GitHub Actions to Test Student Code Submissions
Background
This blog is based on Bit Project's CounselorBot, which you can test out yourself!
We currently have two available courses:
Get started with this video tutorial or this walkthrough page.
Overview
GitHub Actions are often used for automated code operations, usually automatic deployments. However, they also have another handy-dandy use case: checking students' code submissions so you (being lazy) don't have to run them yourself!
In a future tutorial, we'll also talk about how output from GitHub Actions can be automatically commented on students' pull requests to provide feedback on what went wrong.
Outlining Our Plan
All of the workflow files used as examples in this tutorial can be found here.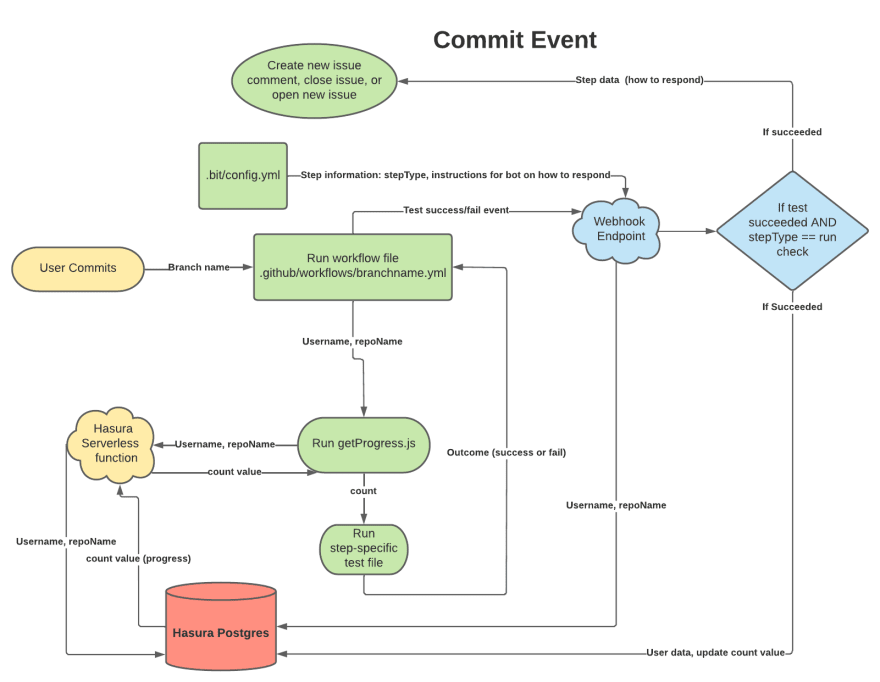
Each "step" in our curriculum requires a different test. When a student (the user) commits to the repository, we need to...
- Figure out which workflow file to run
- Figure out which step the student is on
...in order to run the correct test.
Alongside actually running the tests, we will also be using GitHub Actions to determine the answers to these two questions.
Writing the YAML File
name: Getting Startedon: push: branches: - helloThe first section of the YAML file gives the GitHub Action a display name and configures when the action should run. In this case, it'll run when a commit is pushed to the hello branch.
jobs: build: runs-on: ubuntu-latest steps: - name: Checkout Code uses: actions/checkout@v2 - name: Setup Node Environment uses: actions/setup-node@v2 with: node-version: '14' - name: Install Dependencies run: | npm install minimist npm install node-fetchThe next section provides other steps to "set up" our environment. We will mainly be using node to test code; npm dependencies can also be installed if they will be used in the tests.
- name: Get Count id: vars run: echo ::set-output name=count::$(node ./.bit/scripts/getProgress.js --repo=${{github.event.repository.name}} --owner=${{github.repository_owner}} )Our first "unique" step in this workflow involves using this script to retrieve the step that the student is currently on. This "count" value is an integer that correlates with steps in our curriculum.
Note: the
echo ::set-output name=count::part sets the output of the file that runs to a local variable namedcount, which will be accessed later withsteps.vars.outputs.count.
Testing Different Types Of Submissions
Now that the environment for our workflow is set up, we can run different test files, which provide feedback on student code. With GitHub Actions, you are essentially just running commands on a terminal. This opens up options from running JavaScript files to testing webpages to calling Azure Functions.
All test examples used in this tutorial can be found in this directory and this directory.
Testing Program Files (JS, Python)

- name: Step 1 if: ${{steps.vars.outputs.count == 1 && github.event.head_commit.message != 'Update progress'}} run: | node .bit/tests/test.1.2.js --repo=${{github.event.repository.name}} --user=${{github.repository_owner}}This step can be added onto the steps section of the YAML file for workflow configuration. A conditional statement is utilized to only run this test if the "count" value is correct. The command node .bit/tests/test.1.2.js would then execute this test.
try { hello = require('./../../week1/helloworld.js') }The test first attempts to import the student's code in the repository.
let helloworld = hello()let test_output = "Hello World"If successful, it will attempt to execute the imported functions.
await functions.throwError(`Got: '${helloworld}', was expecting: '${test_output}'.`, user, repo)console.log(`Got: "${helloworld}", was expecting: "${test_output}".`)process.exit(1)Note: Source code for the
functions.throwError()method can be found here. It includes functions used to provide feedback to students and reduce repetition in tests.
Depending on its success, the test will provide feedback by throwing errors in the workflow.
Testing Webpages with Cypress
Cypress is a powerful testing tool that allows a simulation of a user's actions on a website.
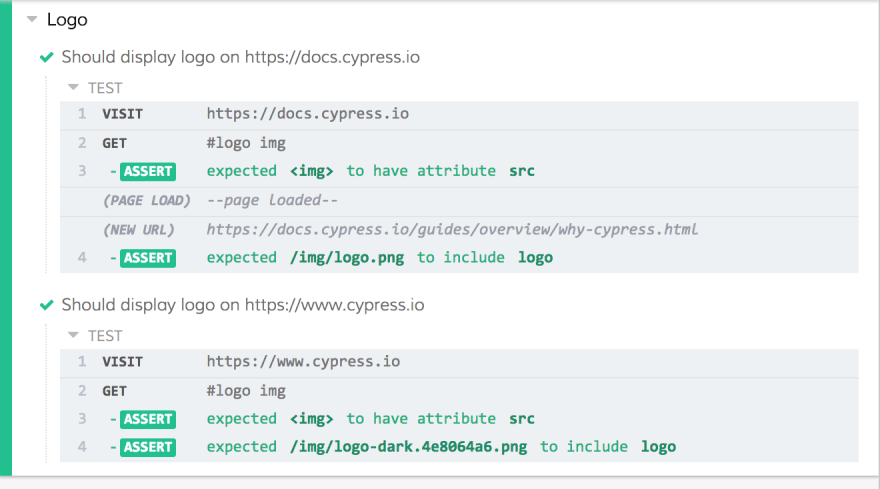
describe('Testing Bunnimage', () => { it('Testing Week 4 Step 1', () => { cy.visit('bunnimage/index.html') cy.get('input[type="text"]').type('console.log("hi yall")') cy.get('input[type="button"]').click() cy.get('#output').contains('console.log("hi yall")') })})A simple example of a test as shown here simulates typing console.log("hi yall"), clicking the specified button on the page, and checking to see if the output equals console.log("hi yall"). In the workflow's output, feedback from Cypress is provided.
Testing APIs
Student coded endpoints can also be tested with HTTP requests run in the workflow. The key to this method is asking students to add "repository secrets" that can then be accessed during the workflow as environment variables using the below syntax.
- name: Step 12 if: ${{steps.vars.outputs.count == 12 && github.event.head_commit.message != 'Update progress'}} env: MORSE_ENDPOINT: ${{ secrets.MORSE_ENDPOINT }} run: | npm install node-fetch node .bit/tests/test.1.8.js --repo=${{github.event.repository.name}} --user=${{github.repository_owner}}This example accesses the student's MORSE_ENDPOINT secret (this can be later accessed in the code with uri = process.env.MORSE_ENDPOINT).
try { const resp = await fetch(uri + "&plaintext=ilovebitproject", { method: 'GET' }); var data = await resp.text() let test = JSON.stringify(data) functions.validateResponseStatus(resp, uri)} catch (e) { console.error("We're having trouble making a request to your endpoint. Try again?") await functions.throwError("We're having trouble making a request to your endpoint. Try again?", user, repo) process.exit(1)}First, utilizing the student's endpoint, an HTTP GET request is made to see if the endpoint is alive.
if (data.length < 3) { console.error("No response... Try again!") await functions.throwError("No response... Try again!", user, repo) process.exit(1)} else if (data == answer) { console.info("Yay! Success - thanks for helping us on this top secret mission. Welcome to the team.") console.info(`We got "${answer}" with the input of ilovebitproject`)} else { console.error(`YIKES! We got "${data}" instead of "${answer}". Try again!`) await functions.throwError(`YIKES! We got '${data}' instead of '${answer}'. Try again!`, user, repo) process.exit(1)}If a response is received, the test attempts to determine if the output of the endpoint matches the correct "answer."
As demonstrated in this test shown above, multiple test cases can be at once with feedback returned to the student as output of the workflow.
Conclusion
GitHub Actions are extremely versatile as they allow developers to create their own environment, automating tasks and running scripts. Running on repositories, GitHub Actions can easily be incorporated with other services on GitHub: from bots, to branches, and to pull requests.
This use case demonstrates the power of GitHub Actions beyond automating deployment; extending into the area of learning and education.
Original Link: https://dev.to/bitproject/using-github-actions-to-test-student-code-submissions-3ef
Dev To
More About this Source Visit Dev To