
An Interest In:
Web News this Week
- March 20, 2024
- March 19, 2024
- March 18, 2024
- March 17, 2024
- March 16, 2024
- March 15, 2024
- March 14, 2024
Some of Our Sources
- Technology Review
- Simplebits
- Just Creative
- Spoon Graphics
- Inspiredology
- CSS Globe
- Specky Boy
- Android Headlines
- The Verge
- TechPowerUp
Help Webnuz
Referal links:
Medusa Nuxt.js Stripe - How to Create a Nuxt.js Ecommerce Storefront from Scratch Using Medusa Part 3
Introduction
Medusais an open source headless commerce that allows you to build online stores through its APIs with just a few commands. One of its key features is the ease to integrate different payment providers to accept payments when customers place their orders.
In the second part of this series, you added the cart functionality to your Nuxt.js storefront. Following from there, in this guide you will learn how to integrate and use Stripe as a payment provider to allow customers to make payments and place orders.
You can find the code of this tutorial atthis GitHub repository.

Prerequisites
To follow along with this tutorial you need the following:
- A Medusa server with some dummy data to work with. If you dont have one, you can follow theQuickStart guidetoinstall one.
- An admin dashboard to manage your ecommerce store. Medusa provides anintuitively designed admin dashboardthat you can use.
- The Nuxt.js storefront from the second part of the series. You can clone the
part-02/cart-flowbranch of this GitHub repository and continue on from there. - AStripe account to retrieve the API Keys and secrets to connect your Medusa server with Stripe. The account should be in sandbox mode to test out the integration.
Medusa Server Setup
This section guides you over the steps necessary to add Stripe as a payment provider to your Medusa server.
Install Stripe Plugin
Go to your Medusa server directory with cd medusa-server and in the root of the project install the Stripe plugin with the following command:
yarn add medusa-payment-stripeStripe Plugin Configuration
Once the plugin is installed, you need to add configurations for it.
Open your medusa-config.js file and look for the plugins section. Then, add the following object to the plugins array:
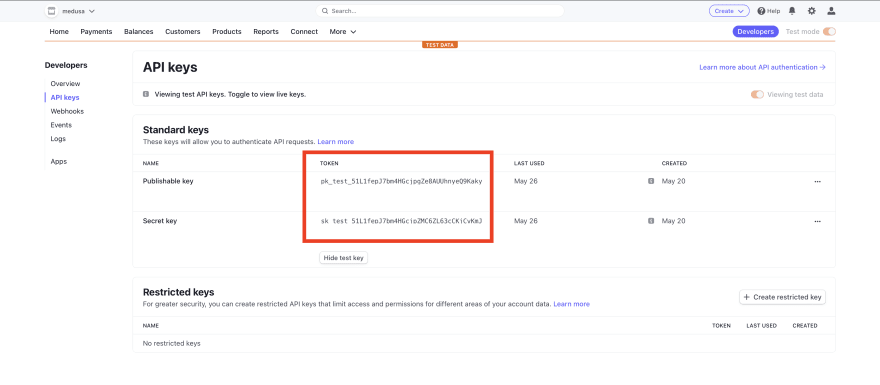
const plugins = [ //..., { resolve: `medusa-payment-stripe`, options: { api_key: process.env.STRIPE_API_KEY, webhook_secret: process.env.STRIPE_WEBHOOK_SECRET, }, },];Where STRIPE_API_KEY is the Secret key from Stripe. you can retrieve it from Stripesdashboard by click on the Developers link at the top right then choosing API Keys from the left sidebar and copying the Secret key.
Next, you need to add the secret key to your environment variables. In your Medusa server, open your.envfile and add the Stripe key:
STRIPE_API_KEY=sk_test_KALKSD313LKKMKCDJNJ...Later on you will come back to stripes dashboard to copy the Publishable key and add it to the Nuxt.js storefront.
Admin Dashboard Setup
To use Stripe as a payment provider in your storefront, you must add it as a payment provider in a region first.
This section guides you in how to do that using Medusas Admin Dashboard.
Add Stripe to a Region
Make sure your Medusa server is running. Then, start your admin panel with yarn run develop. It should run on localhost:7000 by default.
Open the Admin dashboard in your browser, log in, and click on Settings in the sidebar. Then, choose Regions.
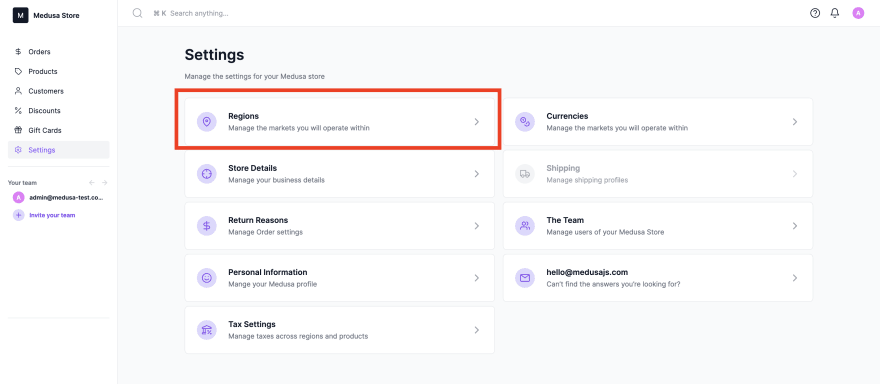
Next, for every region you want to add Stripe as a payment provider in, scroll down the form on the right to Payment Providers and choose Stripe. Then, click Save.

This set up is very important. If the region doesnt have Stripe as a payment provider, it will not be available on the storefront.
Storefront Set Up
In this section youll learn more about Medusas checkout flow and how to integrate Stripe as a payment provider.
Workflow Overview
In a nutshell, the workflow the Nuxt.js storefront has to follow to implement a full checkout workflow:
- When the user visits the website, an empty cart is created on the Medusa server with a default region and country code.
- During checkout, the user fills up a form with their email and shipping address.
- The user chooses a fulfillment provider for the shipping method.
- The user chooses a payment provider and fills any necessary information such as credit card details.
- If the payment is processed successfully, the order is placed.
At each of these steps, the cart is updated on the server with new information based on what the user chooses.
Install Nuxt.js Stripe Module
Before you start the stripe implementation, you need to install a Nuxt.js module to help you with that. Youll be using Nuxt-stripe-module to handle the payment confirmation with stripe.
In the directory of your Nuxt.js storefront, run the following command:
yarn add nuxt-stripe-moduleAfter the installation is complete, open nuxt-config.js and addnuxt-stripe-moduleto themodules section with the publishable key passed as an option:
modules: [ ... ['nuxt-stripe-module', { publishableKey: process.env.PUBLISHABLE_KEY }]],Next, go back to the Stripe developer dashboard and copy the publishable key from the API keys page.
Then, create a.envfile in the root directory of the project if it doesnt already exist and add the publishable key:
PUBLISHABLE_KEY=<YOUR_PUBLISHABLE_KEY>Where <YOUR_PUBLISHABLE_KEY> is the key you copied.
Add Checkout Page
Once the Stripe module is added to the Nuxt.js storefront, the next step is to add the checkout page and its components to actually be able to use it.
Create the file pages/checkout/index.vue with the following content:
<template> <div class="bg-ui "> <div class="container mx-auto p-8 relative"> <div class="layout-base"> <div class="flex flex-col-reverse lg:flex-row"> <div class="lg:w-1/2"> <checkout-flow /> </div> <div class="lg:w-1/2 lg:pl-16"> <checkout-summary /> </div> </div> </div> </div> </div></template><script>export default { name: 'Checkout'}</script>This is the Checkout page. It loads the <checkout-flow /> component that is in charge of all the checkout process. It also loads the <checkout-summary /> component that shows to the user a carts summary with the products in it and the totals of their cart including shipping and taxes amounts.
Add Checkout Components
Create the file components/Totals.vue with the following content:
<template> <div class="my-4 border-t bt-gray-100"> <div class="font-light text-sm space-y-3 mt-3"> <div class="flex items-center justify-between mb-2"> <p>Subtotal</p> <p class="font-medium"> {{ formatPrice(item.subtotal, currencyCode ) }} </p> </div> <div v-if="item.shipping_total" class="flex items-center justify-between mb-2"> <p>Shipping</p> <p class="font-medium"> {{ formatPrice(item.shipping_total, currencyCode) }} </p> </div> <div class="flex items-center justify-between mb-2"> <p>Taxes</p> <p class="font-medium"> {{ formatPrice(item.tax_total, currencyCode) }} </p> </div> <div class="h-px w-full bg-ui-medium mb-2" /> <div class="flex items-center justify-between"> <p>Total</p> <p class="font-medium"> {{ formatPrice(item.total, currencyCode) }} </p> </div> </div> </div></template><script>import { formatPrice } from '@/utils/format-price'export default { name: 'Totals', props: { item: { type: Object, default () { return {} } } }, computed: { currencyCode () { return this.item.currency_code || this.$store.getters['cart/cartCurrencyCode'] } }, methods: { formatPrice }}</script>This component is used to display the totals for the customer. It can be used in multiple places such as the checkout or order summary pages.
Next, create the file components/Checkout/Item.vue with the following content:
<template> <div class="flex"> <div class="bg-ui rounded-md overflow-hidden mr-4 max-w-1/4"> <img class="h-auto w-full object-cover" :src="item.thumbnail" :alt="item.title" > </div> <div class="flex justify-between w-full text-sm py-2"> <div class="flex flex-col justify-between"> <div> <p class="font-semibold mb-2"> {{ item.title }} </p> <p>Variant: {{ item.description }}</p> </div> <div> <p class="mb-2"> Quantity: {{ item.quantity }} </p> <p class="font-medium"> Total: {{ formatPrice(item.unit_price, cartCurrencyCode, item.quantity) }} </p> </div> </div> <div> <p class="font-medium"> {{ formatPrice(item.unit_price, cartCurrencyCode, 1) }} </p> </div> </div> </div></template><script>import { mapGetters } from 'vuex'import { formatPrice } from '@/utils/format-price'export default { name: 'CartItem', props: { item: { type: Object, default () { return {} } } }, computed: { ...mapGetters({ cartCurrencyCode: 'cart/cartCurrencyCode' }) }, methods: { formatPrice }}</script>This component is used to render each product that is added to the cart. It shows basic information as the products title, description, quantity, and price.
Next, create the file components/Checkout/Summary.vue with the following content:
<template> <div class="flex w-full flex-col lg:relative bg-white mb-4 lg:mb-0 rounded-lg shadow py-6 px-8 max-h-review overflow-hidden"> <div class="flex-grow overflow-y-scroll"> <checkout-item v-for="item in items" :key="item.id" :item="item" class="mb-4 last:mb-0" /> </div> <totals :item="$store.state.cart.cart" /> </div></template><script>import { mapGetters } from 'vuex'export default { name: 'CheckoutSummary', computed: { ...mapGetters({ items: 'cart/items' }) }}</script>The <checkout-summary /> component uses the two previous components to show the items in the cart and the cart totals.
For the <checkout-flow> component, youll create a placeholder component for now. Create the file components/Checkout/Flow.vue with the following content:
<template> <div class="flex flex-col"> Section for checkout flow </div></template><script>export default { name: 'CheckoutFlow',}</script>Next, open the components/Dropdowns/CartPopover.vue and replace the Checkout button with the following content:
<nuxt-link to="/checkout"> <button class="btn-ui font-medium px-4 py-2 mb-2 text-sm w-full"> Checkout </button></nuxt-link>Now, when the customer clicks on the Checkout button in the cart popover they are taken to the Checkout page.
Test it Out
Make sure your Medusa server is running. Then, run your Nuxt.js storefront:
yarn run devOnce the storefront is running, go to the products page on http://localhost:3333/products, and add a few products to your cart. Then, at the top-right click on the bag icon to see the cart popover.
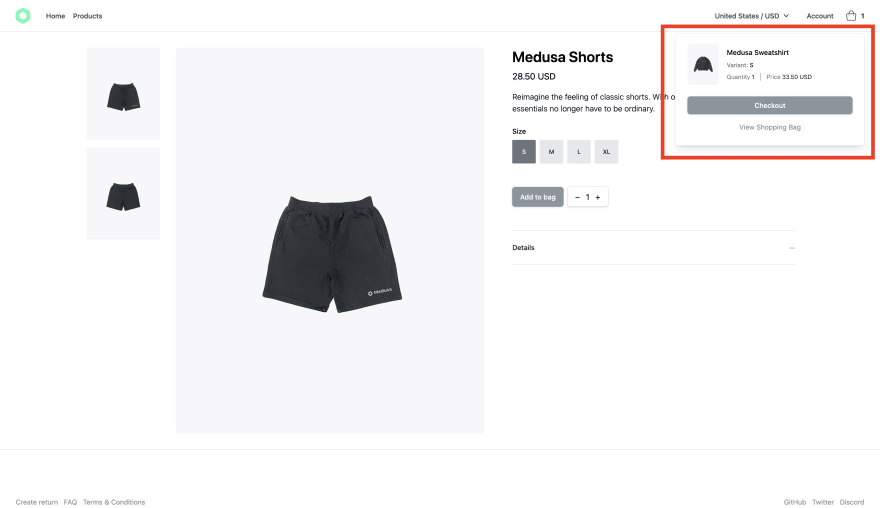
Click on the Checkout button. Youll be taken to the checkout page which shows the Summary and Flow components you created earlier.
Set Up Checkout Flow
In this part, you will go through the steps needed to implement the checkout flow in your Nuxt.js storefront including the step related to adding a custom payment provider.
To complete the checkout, the customer has to follow and complete four main steps:
- Give their email address.
- Fill up a form with their shipping address.
- Choose a shipping option.
- Choose a payment method to complete their purchase.
Each of these steps will become a component of their own and they will be rendered in the checkout-flow component.
Wrapper Components
Create the file components/Checkout/Step.vue with the following content:
<template> <div class="text-left mb-4 last:mb-0 w-full"> <div class="bg-white rounded-lg p-8 shadow"> <div class="w-full"> <div class="flex items-center justify-between w-full"> <h3 class="font-bold"> {{ title }} </h3> <checkout-check-icon v-if="showSuccessIcon" class="bg-green-400" /> </div> </div> <slot /> </div> </div></template><script>export default { name: 'CheckoutStep', props: { showSuccessIcon: { type: Boolean, default: false }, title: { type: String, default: 'Title' } }}</script>This component is the wrapper component for each of the components specific in each step. It has only two props; one for the title and the other one to show a success icon once that step has been completed.
Next, create the file components/Checkout/CheckIcon.vue with the following content:
<template> <span class="rounded-3xl flex bg-green-400 items-center justify-center" :class="`w-${size} h-${size}`" > <svg :class="`w-${size/2} h-${size/2}`" fill="#ffffff" version="1.1" xmlns="http://www.w3.org/2000/svg" xmlns:xlink="http://www.w3.org/1999/xlink" viewBox="0 0 64 64" xml:space="preserve" > <path d="M62.3,12.7c-0.7-0.7-1.8-0.7-2.5,0L23.3,48.1c-0.3,0.3-0.7,0.3-1,0L4.2,30.5c-0.7-0.7-1.8-0.7-2.5,0c-0.7,0.7-0.7,1.8,0,2.5l18.1,17.6c0.8,0.8,1.9,1.2,2.9,1.2c1.1,0,2.1-0.4,2.9-1.2l36.5-35.4C62.9,14.5,62.9,13.4,62.3,12.7z" /> </svg> </span></template><script>export default { name: 'CheckIcon', props: { size: { type: Number, default: 8 } }}</script> This component just displays a check SVG icon.
Form Input Components
Before you create the components for each of the steps, you need to install a package to help you manage form inputs.
Run the following command to install the vue-formulate package:
yarn add @braid/vue-formulateThen, update the build modules property in your nuxt.confg.js file to include the package:
export default { ... buildModules: [ ... '@braid/vue-formulate/nuxt' ], ...}You also need to install sass to override some style for the form inputs that you will use later. So, run the following command to install it:
yarn add --dev sass sass-loader@10Contact Component
This component is the simplest of the four. Here, the customer has to write their email address. Then, the email will be validated and, if everything is valid, the customer can go to the next step.
First, you have to add a new state and a new mutation to the cart store. Open the store/cart.js file and update the state function and the mutations as the following:
export const state = () => ({ cart: {...}, email: null})export const mutations = { SET_CART (state, cart) {...}, SET_CART_EMAIL (state, email) { state.email = email }}You can now save the customers email to the store and retrieve it later whenever necessary.
Next, create the file components/Checkout/Steps/Contact.vue with the following content:
<template> <checkout-step title="Contact" :show-success-icon="isCompleted"> <FormulateForm v-show="isOpen" v-slot="{ hasErrors }" class="mt-4" @submit="submitHandler" > <FormulateInput type="email" label="Email" name="email" class="w-full" validation="bail|required|email" /> <div class="flex items-center justify-end mt-6"> <FormulateInput type="submit" label="Next" :disabled="hasErrors" input-class="btn-ui" /> </div> </FormulateForm> </checkout-step></template><script>export default { name: 'Contact', props: { isCompleted: { type: Boolean, default: false }, isOpen: { type: Boolean, default: true }, step: { type: Number, default: 1 } }, methods: { submitHandler (data) { this.$store.commit('cart/SET_CART_EMAIL', data.email) this.$emit('updateSteps', this.step) } }}</script>You use the checkout-step component created previously. Inside it there is a short form with only one input field to validate the email and a submit button.
If the form is valid, it will call the submitHandler method which will commit the cart/SET_CART_EMAIL mutation to update the customer email on the cart store.
Later on the email will be sent to the Medusa server to associate it with the cart. This method also emits an event to call a function on the parent component (<checkout-flow />) to update the visibility for the current component and the next one. This component will also be marked as completed.
Address Component
This component includes the form where the customer enters their shipping info.
Create the file components/Checkout/Steps/Address.vue with the following content:
<template> <checkout-step title="Address" :show-success-icon="isCompleted"> <FormulateForm v-show="isOpen" v-slot="{ hasErrors }" name="formAddress" class="space-y-4" :keep-model-data="true" @submit="submitHandler" > <div class="flex space-x-8"> <FormulateInput name="first_name" label="First name*" validation="required" class="w-1/2" /> <FormulateInput name="last_name" label="Last name*" validation="required" class="w-1/2" /> </div> <FormulateInput name="company" label="Company" class="w-full" /> <FormulateInput name="address_1" label="Address*" validation="required" class="w-full" /> <FormulateInput name="address_2" label="Apartment, suite, etc" class="w-full" /> <div class="flex space-x-8"> <FormulateInput type="select" name="country_code" label="Country*" validation="required" class="w-1/2" :options="countries" /> <FormulateInput name="city" label="City*" validation="required" class="w-1/2" /> </div> <div class="flex space-x-8"> <FormulateInput name="province" label="Province" class="w-1/2" /> <FormulateInput name="postal_code" label="ZIP / Postal Code*" validation="required|number" class="w-1/2" /> </div> <FormulateInput name="phone" label="Phone" class="w-full" /> <div class="flex items-center justify-between mt-4"> <div class="text-gray-500 flex items-center text-sm transform transition cursor-pointer" hover="text-black -translate-x-2" @click="$emit('updateSteps', step, false)" > <span class="w-2.5 h-2.5 mr-1"> <svg fill="#000000" version="1.1" xmlns="http://www.w3.org/2000/svg" viewBox="0 0 64 64" > <g> <path d="M45,62.8c-0.5,0-0.9-0.2-1.3-0.6L18.6,35.4c-1.7-1.9-1.7-4.9,0-6.7L43.7,1.8c0.7-0.7,1.8-0.7,2.5-0.1 c0.7,0.7,0.7,1.8,0.1,2.5L21.1,31c-0.5,0.5-0.5,1.4,0,2l25.2,26.8c0.7,0.7,0.6,1.8-0.1,2.5C45.9,62.6,45.4,62.8,45,62.8z" /> </g> </svg> </span> <span>Go back</span> </div> <FormulateInput type="submit" label="Next" :disabled="hasErrors" input-class="btn-ui" class="mt-4" /> </div> </FormulateForm> </checkout-step></template><script>export default { name: 'Address', props: { isCompleted: { type: Boolean, default: false }, isOpen: { type: Boolean, default: true }, step: { type: Number, default: 1 } }, computed: { countries () { return this.$store.state.region.countries.map(country => ({ label: country.display_name, value: country.iso_2 })) } }, methods: { submitHandler (data) { this.$store.dispatch('cart/updateCart', { shipping_address: data, email: this.$store.state.cart.email }) this.$emit('updateSteps', this.step) } }}</script>Similarly, here you use the checkout-step component, but this time inside you will find a long form with several form inputs that will allow you to get the info to fill up the shipping address object needed to update the cart on the Medusa server.
If the form is submitted and valid, it will call the submitHandler method which will dispatch the next action to the cart store defined in store/cart.js.
In that action, you are sending a POST request to the endpoint /store/carts/:cartId with the customers email and shipping address. On the Medusa server, a new address will be created and associated with the customers cart.
Then, when the response from the server is received, a mutation is committed to update the cart info in the store.
Lastly, the submitHandler function will emit an event to update the visibility for the address component and mark it as completed.
Delivery Component
After the cart is updated with the customers address, you should display the shipping options to the customers so they can choose their preferred option.
To be able to do that, add the next state, mutation and action to the cart store in store/cart.js:
export const state = () => ({ //... shippingOptions: []})export const mutations = { //... SET_SHIPPING_OPTIONS (state, shippingOptions) { state.shippingOptions = shippingOptions },}export const actions = { //... async getCartShippingOptions ({ state, commit }) { const { data: { shipping_options: options } } = await this.$axios(`/shipping-options/${state.cart.id}`) commit('SET_SHIPPING_OPTIONS', options) },}In this action you are sending a GET request to the endpoint /store/shipping-options/:cartId that responds with an updated list of shipping options. Then, when the response is received, a mutation is committed to update the shipping options in the store.
These shipping options are rendered in the component youll create next to allow the customer to choose one.
Create the file components/Checkout/Steps/Delivery.vue with the following content:
<template> <checkout-step title="Delivery method" :show-success-icon="isCompleted"> <div v-show="isOpen" class="my-6"> <div class="text-gray-700 text-xs flex items-center mb-4"> <div class="bg-gray-400 text-white w-4 h-4 rounded-lg text-center mr-2"> ! </div> <p>Taxes may apply, and will be added upon continuation to the next step.</p> </div> <div class="space-y-4"> <div v-for="option in shippingOptions" :key="option.id" class="shadow rounded-md p-4 w-full border-transparent flex justify-between items-center cursor-pointer" @click="$store.dispatch('cart/addShippingMethod', option.id)" > <div> <div class="font-semibold text-sm"> {{ option.name }} </div> <div class="text-xs text-gray-500 mt-2"> {{ formatPrice(option.amount, cartCurrencyCode) }} </div> </div> <checkout-check-icon v-if="shippingMethod === option.id" /> </div> </div> <div class="w-full flex items-center justify-between mt-4"> <button class="text-gray-500 flex items-center text-sm transform transition" hover="text-black -translate-x-2" @click="$emit('updateSteps', step, false)" > <span class="w-2.5 h-2.5 mr-1"> <svg fill="#000000" version="1.1" xmlns="http://www.w3.org/2000/svg" viewBox="0 0 64 64" > <g> <path d="M45,62.8c-0.5,0-0.9-0.2-1.3-0.6L18.6,35.4c-1.7-1.9-1.7-4.9,0-6.7L43.7,1.8c0.7-0.7,1.8-0.7,2.5-0.1 c0.7,0.7,0.7,1.8,0.1,2.5L21.1,31c-0.5,0.5-0.5,1.4,0,2l25.2,26.8c0.7,0.7,0.6,1.8-0.1,2.5C45.9,62.6,45.4,62.8,45,62.8z" /> </g> </svg> </span> <span>Go back</span> </button> <FormulateInput type="button" label="Next" input-class="btn-ui" @click="$emit('updateSteps', step, true)" /> </div> </div> </checkout-step></template><script>import { mapGetters } from 'vuex'import { formatPrice } from '@/utils/format-price'export default { name: 'Delivery', props: { isCompleted: { type: Boolean, default: false }, isOpen: { type: Boolean, default: true }, step: { type: Number, default: 1 } }, computed: { ...mapGetters({ shippingOptions: 'cart/shippingOptions', cartCurrencyCode: 'cart/cartCurrencyCode', shippingMethod: 'cart/shippingMethod' }) }, created () { this.$store.dispatch('cart/getCartShippingOptions') }, methods: { formatPrice }}</script>When this component is created, it dispatches the getCartShippingOptions action to fetch all the shipping options. Then, you loop the shippingOptions array to show the list to the customer.
When the list is rendered and the customer clicks on one of the available options, an action is dispatched on the carts store to add that option as a shipping method to the current cart.
Finally, the form input button emits an event to update the visibility of the delivery component and mark it as completed.
Next, add the next action in the carts store located in store/cart.js:
export const actions = { //... async addShippingMethod ({ state, commit }, optionId) { const { cart } = await this.$axios.$post(`/carts/${state.cart.id}/shipping-methods`, { option_id: optionId }) commit('SET_CART', cart) },}You send a POST request to the endpoint /store/carts/:cartId/shipping-methods that creates ashipping methodbased on the shipping option chosen and associates it with the customers cart.
Then, add the shippingOptions and shippingMethod getters in store/cart.js to retrieve that info in an easy way:
export const getters = { //... shippingOptions: state => state.shippingOptions, shippingMethod: state => state.cart.shipping_methods[0]?.shipping_option_id,}Payment Component with Stripe
This component is the last thing to implement in the checkout workflow. In this step, you first show a list of available payment providers so customers can choose one.
Once the payment provider is selected you need to initialize a payment session so you can process the payment.
Create the file components/Checkout/Steps/Payment.vue with the following content:
<template> <checkout-step title="Payment" :show-success-icon="isCompleted"> <div v-show="isOpen"> <div class="flex space-x-4 my-8 uppercase"> <div v-for="{provider_id, id} in providers" :key="id" class="w-full px-4 py-2 border border-gray-300 rounded flex p-1 items-center justify-between cursor-pointer" :class="provider === provider_id ? 'border-green-500' : ''" @click="provider = provider_id" > <div>{{ provider_id }}</div> <checkout-check-icon v-if="provider === provider_id" class="ml-2" /> </div> </div> <div v-show="provider === 'stripe'"> <div id="stripe_container" class="bg-white rounded-md p-6 shadow mt-4" :class="errors ? 'border border-red-600' : ''" /> <div v-if="errors" class="text-red-600 text-sm mt-2"> {{ errors }} </div> </div> <div class="flex items-center justify-between mt-4"> <button class="text-gray-500 flex items-center text-sm transform transition" hover="text-black -translate-x-2" @click="$emit('updateSteps', step, false)" > <span class="w-2.5 h-2.5 mr-1"> <svg fill="#000000" version="1.1" xmlns="http://www.w3.org/2000/svg" viewBox="0 0 64 64" > <g> <path d="M45,62.8c-0.5,0-0.9-0.2-1.3-0.6L18.6,35.4c-1.7-1.9-1.7-4.9,0-6.7L43.7,1.8c0.7-0.7,1.8-0.7,2.5-0.1 c0.7,0.7,0.7,1.8,0.1,2.5L21.1,31c-0.5,0.5-0.5,1.4,0,2l25.2,26.8c0.7,0.7,0.6,1.8-0.1,2.5C45.9,62.6,45.4,62.8,45,62.8z" /> </g> </svg> </span> <span>Go back</span> </button> <FormulateInput type="button" label="Pay" input-class="btn-ui" @click="processPayment" /> </div> </div> </checkout-step></template><script>export default { name: 'Payment', props: { isCompleted: { type: Boolean, default: false }, isOpen: { type: Boolean, default: true }, step: { type: Number, default: 1 } }, data () { return { provider: null, card: null, errors: null } }, computed: { providers () { return this.$store.getters['cart/paymentProviders'] } }, watch: { async isOpen (val) { if (val && !this.providers.length) { await this.$store.dispatch('cart/createPaymentSession') await this.$store.dispatch('cart/setPaymentSession', this.providers[0].provider_id) } }, // TODO watch for changes on the selected provider }, methods: { // TODO add show UI provider and process payment methods }}</script>The providers computed property is used to fetch the providers and render them in the template section.
The watcher function isOpen is in charge of dispatching the cart/createPaymentSession and cart/setPaymentSession actions.
For this to actually work, you need to add the cart/paymentProviders getter and the ****cart/createPaymentSession and cart/setPaymentSession actions in store/cart.js:
export const getters = { //... paymentProviders: state => state.cart.payment_sessions || [],}export const actions = { //... async createPaymentSession ({ state, commit }) { const { cart } = await this.$axios.$post(`/carts/${state.cart.id}/payment-sessions`) commit('SET_CART', cart) }, async setPaymentSession ({ state, commit }, providerId) { const { cart } = await this.$axios.$post(`/carts/${state.cart.id}/payment-session`, { provider_id: providerId }) commit('SET_CART', cart) }}The paymentProviders getter is to quickly retrieve thepayment_sessions array from the carts store.
The createPaymentSession action sends a POST request to the endpoint /store/carts/:cartId/payment-sessions. This initializes thepayment_sessionsarray in thecartobject received.
The setPaymentSession action sends a POST request to the endpoint /store/carts/:cartId/payment-session to set the payment_session property in the cart if there isnt one already set or if the customer changes payment providers.
You will now use the Stripe provider module that you installed previously for this Nuxt.js storefront. This is where the actual integration with Stripe happens. So, when customers choose a payment provider, the @click event sets the provider prop to that value.
If the provider is stripe, you create a card element that the customer uses to enter their card information.
To achieve that, replace the TODO comment in watch with the following:
provider (val) { if (val === 'stripe') { this.showStripeCard() }}Then, add this function to the methods property:
methods: { showStripeCard () { const elements = this.$stripe.elements() const card = elements.create('card') card.mount('#stripe_container') this.card = card }}You watch for changes in the provider prop. If its value is stripe, you run the showStripeCard method that uses the Stripe module to create an elements object. Then, you create a card element to be mounted on a div container.
Finally, you assign the created card to the card prop. You will use it later to make the payment and complete the cart.
Next, you need to add the function that will be called by the form input to process the payment.
Inside the methods property add the following method:
async processPayment () { if (this.provider === 'stripe') { await this.$store.dispatch('cart/setPaymentSession', this.provider) const { error } = await this.$stripe.confirmCardPayment(this.$store.getters['cart/clientSecret'], { payment_method: { card: this.card, billing_details: { email: this.email } } }) if (error) { this.errors = error.message } if (!error) { const { id } = await this.$store.dispatch('cart/completeCart') this.$router.push(`order-summary/${id}`) } }}Here the setPaymentSession action updates thepayment_sessionobject in thecartobject to include data related to Stripe. This includes the payment intent and client secret.
Finally, the line this.$router.push(order-summary/${id}) function redirects the customer to an order summary page where they see the order details for the completed cart.
To get the client secret quickly from the cart, add a clientSecret getter to the getters object in store/cart.js:
export const getters = { //... clientSecret: state => state.cart.payment_session?.data.client_secret || null}To confirm a card payment, you use this.$stripe.confirmCardPayment(). This method requires two parameters: the first one is the client secret that you can get from the customers cart, and the second one is the payment method object that includes the card element and the billing details object with at least the customers email.
When that method is executed, you can receive a successful response or an error. If you get an error, you need to update the errors variable to show the message to the customer. Otherwise, the remaining dispatch actions will be dispatched.
The ****cart/completeCart action is run if the payment is confirmed successfully, so, to complete the cart add the following action in store/cart.js:
export const actions = { //... async completeCart ({ state, commit }) { const { type, data: order } = await this.$axios.$post(`/carts/${state.cart.id}/complete`) if (type === 'order') { const { cart } = await this.$axios.$post('/carts') commit('SET_CART', cart) return order } }}The action sends a POST request to the endpoint /store/carts/:cartId/complete to complete the cart and place the order.
Your Medusa server will try to authorize the payment first, then it will place the order if the authorization is successful. If the type property in the received data is order, you make a post request to the endpoint /store/carts to create a new cart then commit the SET_CART mutation.
Finally, replace the content of components/Checkout/Flow.vue with the following:
<template> <div class="flex flex-col"> <component :is="step.component" v-for="(step, stepIndex) in checkoutSteps" :key="step.component" :is-open="step.isOpen" :is-completed="step.isCompleted" :step="stepIndex" @updateSteps="updateSteps" /> </div></template><script>import { formatPrice } from '@/utils/format-price'export default { name: 'CheckoutFlow', data () { return { checkoutSteps: [ { component: 'checkout-steps-contact', isCompleted: false, isOpen: true, }, { component: 'checkout-steps-address', isCompleted: false, isOpen: false, }, { component: 'checkout-steps-delivery', isCompleted: false, isOpen: false, }, { component: 'checkout-steps-payment', isCompleted: false, isOpen: false, } ] } }, methods: { formatPrice, updateSteps (current, forward = true) { this.checkoutSteps[current].isOpen = false this.checkoutSteps[current].isCompleted = forward const nextOrBefore = forward ? current + 1 : current - 1 this.checkoutSteps[nextOrBefore].isOpen = true if (!forward && nextOrBefore === 0) { this.checkoutSteps[nextOrBefore].isCompleted = false } } }}</script><style lang="scss">.formulate-input { &-label { @apply font-semibold text-sm mb-3 block } &-element > input { @apply shadow rounded-md px-4 py-2 text-xs w-full border-transparent } &-element > select { @apply shadow rounded-md px-4 py-2 text-xs w-full border-transparent bg-white } &-element > select > option { @apply bg-gray-100 } &-error { @apply text-red-500 text-xs mt-2; }}</style>In the template section you use dynamic components to load the four components needed in the checkout flow (contact, address, delivery and payment).
For this to work, you set up in the script section the initial state of the <checkout-flow /> component. The checkoutSteps array contains the props for each step. The updateSteps method is in charge to update the visibility and completion of each step.
Lastly, in the style section you add some classes to style all the form inputs used in the contact and address steps.
Order Summary
After the customers places their order successfully, they need to be redirected to a summary page where they can see an overview of their order.
Create the file pages/order-summary/_id.vue with the following content:
<template> <div class="container mx-auto p-8"> <div v-if="order" class="layout-base flex justify-center pb-16"> <div class="max-w-xl"> <span class="text-xs font-medium mb-2">THANK YOU</span> <h1 class="text-2xl font-bold"> Order Confirmed </h1> <p class="text-md font-light mt-3"> Your order <span class="font-semibold">#{{ order.display_id }}</span> was successfully processed. You will receive an email with the tracking number of your parcel once its available. </p> <div class="my-8"> <!-- Start items section --> <order-item v-for="item in order.items" :key="item.id" :item="item" :currency="order.currency_code" /> </div> <div> <totals :item="order" /> </div> </div> </div> <div v-else> "We couldn't find your order, it might have gone through but we can't seem to find it at the moment. Please check your email for an order confirmation." </div> </div></template><script>export default { name: 'OrderSummary', data () { return { order: null } }, async beforeMount () { const { data: { order } } = await this.$axios(`/orders/${this.$route.params.id}`) this.order = order }}</script>This page loads the <order-item /> component that is used to loop and display all the products that were purchased. The <totals /> component shows the order subtotal, shipping costs, taxes and total amount.
In the beforeMount() function, you make a request to your Medusa server to retrieve the order. For that you need the order ID which you can get from the route parameter with this.$route.params.id.
All that is left is to create the <order-item /> component.
Create the file components/Order/Item.vue with the following content:
<template> <div class="flex mb-6 last:mb-0"> <div class="bg-ui rounded-md overflow-hidden mr-4 max-w-1/4"> <img class="h-auto w-full object-cover" :src="item.thumbnail" :alt="item.title" > </div> <div class="flex text-sm flex-grow py-2"> <div class="flex flex-col justify-between w-full flex-grow"> <div class="flex flex-col"> <p class="font-semibold mb-2"> {{ item.title }} </p> <p> <span class="text-ui-dark">Variant:</span> {{ item.description }} </p> </div> <div class="flex space-x-4 text-gray-400 font-light"> <p class="border-r pr-4 border-gray-500"> Quantity <span class="text-gray-700 font-semibold"> {{ item.quantity }} </span> </p> <p> Price <span class="text-gray-700 font-semibold"> {{ formatPrice(item.unit_price, currency, item.quantity) }} </span> </p> </div> </div> </div> </div></template><script>import { formatPrice } from '~/utils/format-price'export default { name: 'CartItem', props: { item: { type: Object, default () { return {} } }, currency: { type: String, default: 'USD' } }, methods: { formatPrice }}</script>This component receives the product information and renders it on the page. It shows the products title, variant, quantity and price.
Testing the Checkout Flow
Start both your Medusa server and Nuxt.js website if they arent running.
Then, go to your storefront URL http://localhost:3333 and add some products to the cart. When you are done adding products click on the bag icon at the top-right to see the cart popover and click on the Checkout button.

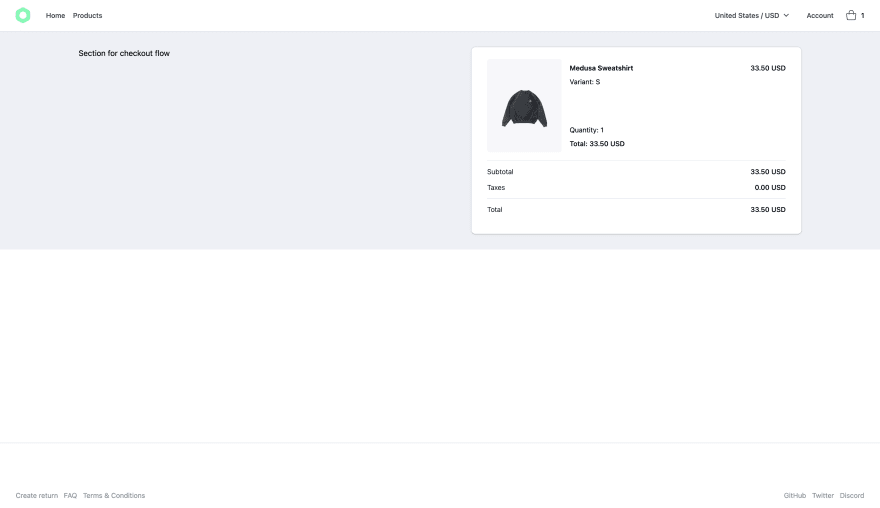
If all the components for the checkout flow are working as expected you should get the following page:

As you can see, the <checkout-summary /> component shows the info related to the products you added to the cart and gives you the total you have to pay. On the other hand, the <checkout-flow /> shows four card with one of the steps you have to follow to complete the checkout.
Fill up the email input and click on the Next button. The contact form closes and the address component opens. Then, fill up the form with the shipping address and click on the Next button.

If the validation passes, the delivery component will open next with the available shipping options rendered. Choose one option and click Next.

You then will get the payment component with the available payment providers. For this tutorial Stripe is the only provider, but if you add more providers they will be displayed here as well.
Choose stripe as payment provider and write you payment information before clicking on the pay button.
Stripe offers several test cards to simulate payments to test your integration. You can choose one of them here.

Once youre done click on Pay. The payment will be simulated and if everything is successful you will be redirected to the Order summary page.

You can check if the payment was actually successful on the Stripe Dashboard. Go to your Stripe dashboard and click on the Payments link at the top left. You should see the payment with a status of uncaptured. This means that Stripe was able to process the payment, but it needs further action to be captured and to actually charge the customer.

To capture the payment, start your Medusa admin with yarn run develop. Then, go to the Medusa admin website and click on Orders in the left sidebar. You should see that one order was created.
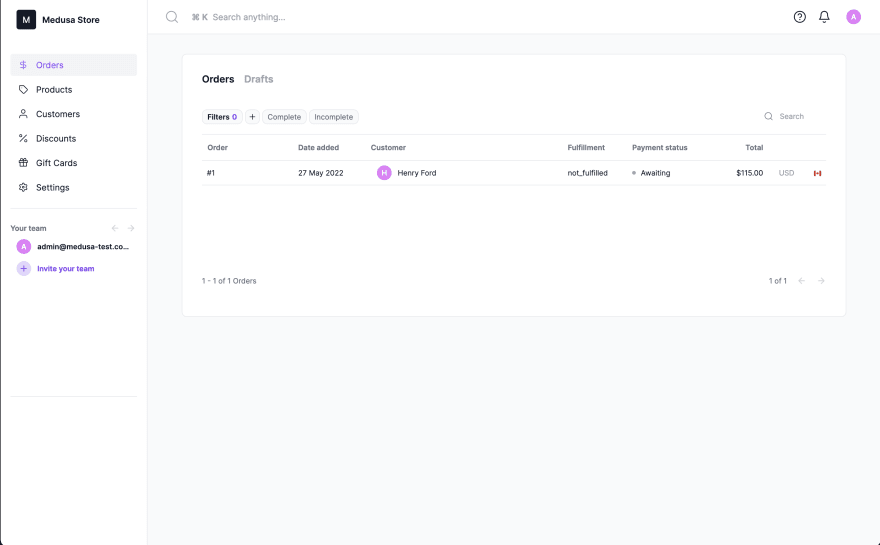
Click on it to go to the order details page. On this page, scroll down to the payment section. You will see that the status of the payment is Awaiting. Next to it is Capture payment button.

If you click on it the payment will be captured through Stripe. To confirm that the payment was captured, go back to your stripe dashboard. You should see the status for the payment that was already there changed to Succeeded.

Conclusion
In this tutorial, you learned how to set up a basic checkout process to allow your customers to place orders and perform payment with Stripe.
Going forward, you can focus on developing or adding new functionalities to your Nuxt.js storefront including:
- Add customer login and profile to give customers a way of managing their information, view their orders, and save payment details.
- Integrate other payment providers such as PayPal.
- Implement swap feature toallow customers to exchange products after purchase.
- Use a notification system such as SendGrid to send the customer emails based on different events.
If you have any issues or questions related to Medusa, feel free to reach out to the Medusa team viaDiscord.
Original Link: https://dev.to/medusajs/medusa-nuxtjs-stripe-how-to-create-a-nuxtjs-ecommerce-storefront-from-scratch-using-medusa-part-3-3jg0
Dev To
More About this Source Visit Dev To