
An Interest In:
Web News this Week
- April 19, 2024
- April 18, 2024
- April 17, 2024
- April 16, 2024
- April 15, 2024
- April 14, 2024
- April 13, 2024
Some of Our Sources
- Technology Review
- Joshua Blankenship
- The Logo Smith
- Six Revisions
- Abduzeedo
- Creative Curio
- Fudge Graphics
- Web Design Ledger
- Android Dissected
- Hashedout
Help Webnuz
Referal links:
Serverless ETL using AWS Lambda, Pandas, PostgreSQL, AWS CDK

Table of contents
- Introduction
- Compute
- Infrastructure as code
- Continuous delivery
- Conclusion
Introduction
Created in response to the #ACloudGuruChallenge posted by Forrest Brazeal.
Modern data infrastructure has become so exciting and with limitless possibilities, Today we explore a use case where we pull, transform and visualize covid-19 data from several sources in a serverless and extremely quick to deploy fashion using python as our tool of choice
Outcome
Having a job that downloads data about covid-19 for case counts, deaths and recoveries for every given day, and stores them in a database for later access and reporting
Tech stack
Compute: Python application on AWS Lambda
Storage: S3
Database: PostgreSQL on RDS
Reporting: Amazon Quicksight
IaaC and CI/CD: Github actions + AWS CDK
Data Sources
We pull data from This link and this John Hopkins dataset
Compute
AWS Lambda is a serverless platform for running small snippets of code in the cloud, in this section we will go over the code used to achieve the end goal
import boto3 import requests import pandas as pd # Creating a dataframe to store our dataimport io import json import os # accessing environment variables from db import get_latest_date, instantiate_db, load_to_db # custom modules, will be discussed belowfrom data_transformation import join_dfs, change_to_datetime, clean_dataframe, rename_cols And now we discuss the functions defined in our handler
# Instantiate our clientss3_client = boto3.client('s3')s3_resource = boto3.resource('s3')sns_client = boto3.client('sns')def download_file(url, file_name):    ''' Downloads data from a file and saves it to s3 as an object'''    body = requests.get(url).content.strip(b'
')    bucket_name = os.environ['S3_BUCKET']    s3_path = "data/" + file_name    s3_resource.Bucket(bucket_name).put_object(Key=s3_path, Body=body)def load_data(key):    ''' Loads data from s3 into a pandas Dataframe'''    obj = s3_client.get_object(Bucket=os.environ['S3_BUCKET'], Key=key)    csv_file = obj['Body'].read().strip(b'
')    df = pd.read_csv(io.BytesIO(csv_file), low_memory=False)    return dfdef send_db(df):    ''' Sends the data to the database that only has a date higher than    current latest in the db'''    latest = pd.to_datetime(get_latest_date())    data_to_send = df[df['Date'] > latest]    data_to_send.apply(lambda x: load_to_db(x), axis=1)    return len(data_to_send)def post_to_sns(message):    ''' Sends the output of the job to an SNS topic which fans out    the result to any number of interested message consumers'''    response = sns_client.publish(        TargetArn=os.environ['SNS_TOPIC'],        Message=json.dumps({'default': json.dumps(message)}),        MessageStructure='json'    )    return response
Our workflow starts with instantiating boto3 clients for communicating with other AWS services, its best practice to start your clients outside of the handler to speed up the execution of your function, refer to Lambda best practices Here
Then we define functions to handle downloading the data and saving it to a storage platform, it's also a best practice to not hard code your s3 bucket name into you functions. especially in our case because we use infrastructure as code that creates the bucket on runtime, we don't know the bucket name in advance
We then have a function for loading our final dataframe into the database
def send_db(df): ''' Sends the data to the database that only has a date higher than current latest in the db''' latest = pd.to_datetime(get_latest_date()) data_to_send = df[df['Date'] > latest] data_to_send.apply(lambda x: load_to_db(x), axis=1) return `len(data_to_send)`Let's discuss this function in detail, this job runs daily and so we only want to post the new days into the database instead of loading the entire data everytime, to handle this we query the database for its current latest date. and we apply load_to_db(record) only if this record has a date higher than the latest.
this way we also have unified logic for initial loading or daily runs. and in the end we want to know how many records we processed by returning len(data_to_send)
Lastly, we define a function that posts the results of our run to SNS. we will see how we use all these functions in the handler after we define the functions in the other modules
Lets inspect out data_transformation module first
def join_dfs(df, jh, col='Date'): ''' Takes in two dataframes and preforms a left join that happens on the Date column, change the col argument for a different column''' final = df.merge(jh, on=col, how='left') return finaldef change_to_datetime(df, col='Date'): ''' Changes a column in a dataframe to type datetime''' df[col] = df[col].astype('datetime64[ns]') returndef rename_cols(df, names_dict): ''' Renames a group of columns in a df by passing a dict of old names and new names ''' df.rename(columns=names_dict, inplace=True) returndef clean_dataframe(jh, country, columns, col='Country/Region'): ''' Filters a dataframe column from entries that don't match a specific condition and removes needless columns, used for cleaning the John Hopkins data''' jh.drop(jh[jh[col] != country].index, inplace=True) jh.drop(columns, axis=1, inplace=True) returnOur end dataframe should combine the case counts and deaths in the first data source to the recoveries column in the second data source. the second data source also contains data from many countries, for the sake of our case we only want USA data. and so we define functions for dropping the columns and data we don't need, unifying the naming structure and data types in both dataframes, and finally join them together.
And now, let's look at our database module
import psycopg2 #postgres clientimport boto3import jsonsm = boto3.client('secretsmanager')secret = sm.get_secret_value(SecretId='postgres-credentials')secrets_dict = json.loads(secret['SecretString'])def connect(): ''' Instantiates a connection to the db''' conn = psycopg2.connect( host=secrets_dict['host'], database='postgres', user=secrets_dict['username'], password=secrets_dict['password']) return conndef instantiate_db(): conn = connect() cursor = conn.cursor() try: cursor.execute('SELECT * FROM covid19 LIMIT 1;') return except UndefinedTable: print('creating table') cursor.execute( '''CREATE TABLE covid19 ( date TIMESTAMP PRIMARY KEY, cases NUMERIC, deaths NUMERIC, recovered NUMERIC ); INSERT INTO covid19 (date, cases, deaths, recovered) VALUES ('2019-01-01', 0, 0, 0);''' ) conn.commit() cursor.close() conn.close()def get_latest_date(): ''' Returns the current ltest record in the db''' conn = connect() cursor = conn.cursor() cursor.execute('SELECT * FROM covid19 ORDER BY date DESC LIMIT 1;') results = cursor.fetchall() cursor.close() conn.close() return results[0][0]def load_to_db(row): ''' Insert new rows to the db''' conn = connect() cursor = conn.cursor() cursor.execute( 'INSERT INTO covid19 (date, cases, deaths, recovered) VALUES (%s, %s, %s, %s)', (row['Date'], row['cases'], row['deaths'], row['Recovered']) ) conn.commit() cursor.close() conn.close()Firstly, we don't have the database credentials hardcoded or even known ahead of deploying. we use AWS's secrets manager to create a secure password for us and retrieve it from the API at runtime.
This approach is extremely better for security as the credentials are never visible to anyone and only available during processing
After having retrieved the credentials we instantiate a connection using psycopg2, the python API for PostgreSQL
def connect(): ''' Instantiates a connection to the db''' conn = psycopg2.connect( host=secrets_dict['host'], database='postgres', user=secrets_dict['username'], password=secrets_dict['password']) return connWe return the connection object as its essential for any database operation, this function is a dependency for all other functions in the module.
Second, we have a function for creating our table. this function will first attempt to query for the existence of the table and return a random record from it. if it fails to do so due to UndefinedTable it will create the table and insert a dummy record that dates back to before the data in our sources. this is important for the get_latest_date() function to work properly, because if it retrieves this dummy record, initial loading is performed.
lastly, we have the actual function that loads a record into the database. this function expects a dataframe row as input.
The justification behind this approach is that dataframe operations that involve iteration are slow according to this Stackoverflow question.
One of the alternatives suggested is to use df.apply(your_function), which is how we formulate our approach.
And now, we look at the actual handler code that executes at invocation of the function
def lambda_handler(event, context): try: download_file('https://raw.githubusercontent.com/nytimes/covid-19-data/master/us.csv', 'data.csv') download_file('https://raw.githubusercontent.com/datasets/covid-19/master/data/time-series-19-covid-combined.csv', 'john_hopkins.csv') df = load_data('data/data.csv') jh = load_data('data/john_hopkins.csv') rename_cols(df, {'date':'Date'}) #unify naming method clean_dataframe(jh, 'US', ['Deaths', 'Country/Region' ,'Province/State', 'Confirmed']) # remove needless columns and non US data change_to_datetime(df) change_to_datetime(jh) final = join_dfs(df, jh) instantiate_db() # create the table if it doesnt exist data_sent = send_db(final) res = post_to_sns('Job ran successfully, Updated {} records in the database'.format(data_sent)) # report if successful except Exception as e: res = post_to_sns('Job failed with error: {}'.format(e)) # report errorsInfrastructure as Code
For this project we use the AWS CDK, a framework by AWS for defining your infrastructure as actual code in your programming language of choice, which is worth saying that it is a true wonder of engineering and i had so much fun using it.
However it is worth saying that navigating the docs was extremely tedious and some of the processes are not straight forward. for the sake of keeping the project entirely in Python we deploy CDK in python flavor.
Resources in a CDK stack are defined with the following parameters:
the construct that will use the resource
an identifier
any properties specific to the resource
Learn more about the CDK in this workshop
Let's take a look at our CDK stack
class CdkStack(Stack): def __init__(self, scope: Construct, construct_id: str, **kwargs) -> None: super().__init__(scope, construct_id, **kwargs) # Define Lambda layers pandas = lambda_.LayerVersion.from_layer_version_attributes(self, 'Pandas', layer_version_arn="arn:aws:lambda:us-east-1:770693421928:layer:Klayers-p39-pandas:4") requests = lambda_.LayerVersion.from_layer_version_attributes(self, 'Requests', layer_version_arn="arn:aws:lambda:us-east-1:770693421928:layer:Klayers-p39-requests-html:4") psycopg = lambda_.LayerVersion.from_layer_version_attributes(self, 'Psycopg', layer_version_arn="arn:aws:lambda:us-east-1:770693421928:layer:Klayers-p39-psycopg2-binary:1")Before anything, Huge shoutout to Keith Rozario for providing us with this awesome Repo.
where he defined layers for lambda functions to add libraries that doesn't exist by default in the lambda runtime without you having to create them yourself. I used his repo to add the requests, pandas and psycopg2 libraries to the project.
Next up, let's define our database..
# instantiate DB credentials using secrets manager db_secrets = rds.DatabaseSecret(self, 'postgres-secret', username='postgres', secret_name='postgres-credentials' ) # Create the database db = rds.DatabaseInstance(self, "db", engine=rds.DatabaseInstanceEngine.postgres(version=rds.PostgresEngineVersion.VER_13_4), instance_type=ec2.InstanceType.of(ec2.InstanceClass.BURSTABLE3, ec2.InstanceSize.MICRO), credentials=rds.Credentials.from_secret(db_secrets), vpc=ec2.Vpc(self, 'vpc'), vpc_subnets=ec2.SubnetSelection( subnet_type=ec2.SubnetType.PUBLIC ) )db.connections.allow_default_port_from_any_ipv4()We instantiate the database secret using Secrets Manager and then create the database using this secret using the rds.Credentials.from_secret(db_secrets) method, we also launch this DB in a public subnet for easier reach from AWS Lambda.
However in a production setting and in case the database is going to hold sensitive data its best to launch it in a private subnet and configure Lambda to work in your private network, check this article for more details.
And now, let's create our S3 bucket and SNS topic. pretty straight forward
# Create the bucket used to store the data s3_bucket = s3.Bucket(self, 'dataBucket') # Create the delivery topic topic = sns.Topic(self, 'deliveryTopic')And defining our actual function with appropriate permissions..
lambda_role = iam.Role(self, "lambda_role", assumed_by=iam.ServicePrincipal("lambda.amazonaws.com") ) lambda_role.add_to_policy(iam.PolicyStatement( resources=["*"], actions=[ "s3:GetObject", "s3:PutObject", "sns:Publish", "secretsmanager:GetSecretValue"] ))function = lambda_.Function(self, "Serverless-ETL", runtime=lambda_.Runtime.PYTHON_3_9, code=lambda_.Code.from_asset("./code"), handler="lambda_function.lambda_handler", layers=[pandas, requests, psycopg], timeout=Duration.minutes(5), role=lambda_role, memory_size=512, environment={ 'S3_BUCKET':s3_bucket.bucket_name, 'SNS_TOPIC': topic.topic_arn } )# allow our function to post to snstopic.grant_publish(function)As we see here, the bucket name and SNS topic ARN are passed to the function on deployment through its environment variables. and we load the lambda code saved in a folder in the directory called "code" using the method lambda_.Code.from_asset("./code"). we also configure the function with 512MB of memory, this is because this function instantiates several clients and they take up alot of memory to work with.
Lastly, we define the Eventbridge rule to trigger our function
# Create the event rule and schedule rule = events.Rule(self, "Rule", schedule=events.Schedule.expression('cron(0 0 * * ? *)'), ) rule.add_target(targets.LambdaFunction(function))Continuous Delivery
The beauty of using the AWS CDK as your tool of choice for deploying is its simplicity in use and maintaining of infrastructure state using Cloudformation changesets. You can read more about them here
The only commands we need to launch our infrastructure are cdk diff to detect changes and cdk deploy to commit changes. we can wrap these commands in a nice and easy Github actions workflow as after having configured your AWS access keys in Github. here's a link explaining how its done.
# run only on commits to mainon: push: branches: [ "main" ] pull_request: branches: [ "main" ] workflow_dispatch:jobs: aws-cdk: runs-on: ubuntu-latest steps: - name: Check out repository code uses: actions/checkout@v3 - name: cdk diff uses: youyo/aws-cdk-github-actions@v2 with: cdk_version: 2.28.1 cdk_subcommand: 'diff' cdk_stack: CdkStack actions_comment: false env: AWS_ACCESS_KEY_ID: ${{ secrets.AWS_ACCESS_KEY_ID }} AWS_SECRET_ACCESS_KEY: ${{ secrets.AWS_SECRET_ACCESS_KEY }} AWS_DEFAULT_REGION: 'us-east-1' - name: cdk deploy uses: youyo/[email protected] with: cdk_version: 2.28.1 cdk_subcommand: 'deploy' cdk_stack: 'CdkStack' cdk_args: '--require-approval never' actions_comment: false env: AWS_ACCESS_KEY_ID: ${{ secrets.AWS_ACCESS_KEY_ID }} AWS_SECRET_ACCESS_KEY: ${{ secrets.AWS_SECRET_ACCESS_KEY }} AWS_DEFAULT_REGION: 'us-east-1This workflow uses actions from the actions marketplace, find out more here. For every new commit to change our code for the function or the infrastructure, the CDK CLI will run and show us what changed and will deploy these changes to your account.
In the end i hooked up Amazon Quicksight to my RDS database to extract insights on the data. RDS integrates with Quicksight very seamlessly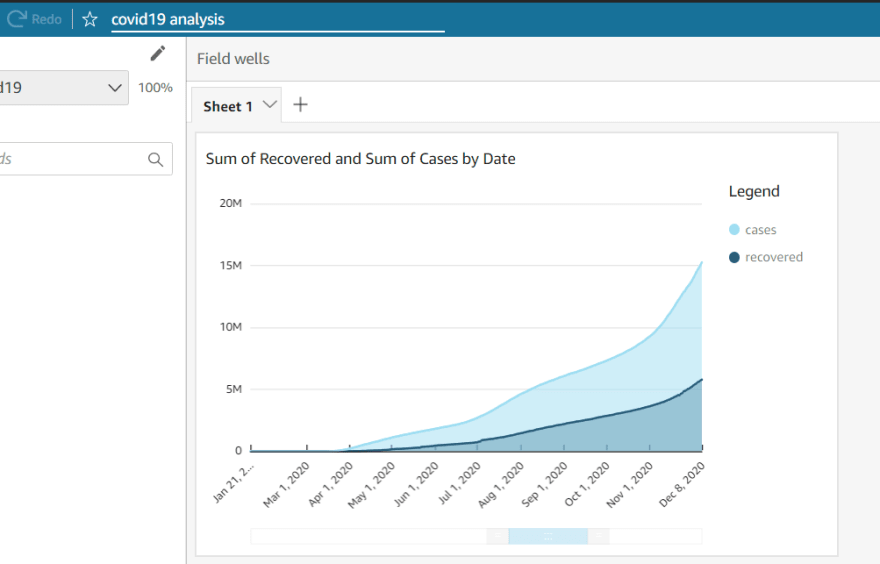
Conclusion
Modern cloud infrastructure is being pushed to entirely new limits and possibilities and its only up to your imagination how you will use it. I have enjoyed a lot and learned so much while creating this. all the code for this article can be found in this Repo
Original Link: https://dev.to/aerosouund/serverless-etl-using-aws-lambda-pandas-postgresql-aws-cdk-1l50
Dev To
More About this Source Visit Dev To