
An Interest In:
Web News this Week
- April 20, 2024
- April 19, 2024
- April 18, 2024
- April 17, 2024
- April 16, 2024
- April 15, 2024
- April 14, 2024
Some of Our Sources
- Slashdot
- Just Creative
- Smashing Magazine
- Naldz Graphics
- CSS Globe
- CSS Tricks
- Spyre Studios
- Daily Now
- The Verge
- TechPowerUp
Help Webnuz
Referal links:
What is OAuth? Setting up Github OAuth with Supabase
TL;DR: In this post, I will do a quick intro to the OAuth protocol and show how to use OAuth with Supabase by implementing Sign in with Github.
What is OAuth? Setting up Github OAuth with Supabase
OAuth is an open protocol which allows users to log into your service with an account that they already have with a third party provider (e.g. Google, Github, Twitter etc.).The benefit is that the user doesn't need to maintain a separate set of credentials for each app or web service that they interact with, they can just "log in with Google". The protocol depends on grants and tokens and works by issuing access tokens to the third-party client with the approval of the resource owner.

Figure 1 : OAuth-based authentication between a User and a Supabase based web app. 'Gotrue tenant' refers to the Supabase Auth server.
Some of the benefits of using OAuth for authentication are:
- Improved security and privacy - The OAuth 2.0 framework uses SSL to securely store access tokens, which protects user data on the wire.
- Greater control and flexibility - OAuth allows the user to choose where and how their data can be accessed, giving them greater control and flexibility.
- Better agility and user experience - OAuth lifts and shifts the responsibility of API authentication from developers to the external provider, allowing developers to focus on the application logic rather than writing and maintaining a new auth flow from scratch.
Now that we know the value of using OAuth, let's set up authentication based on native OAuth in Supabase using Github as the external provider. The full list of supported external providers can be found here.
What is Supabase?
Supabase is an open source backend for apps. It works with any client or framework (e.g. Javascript/React/Next.js, Python/Django, Mobile/Flutter/iOS, and comes with a free tier which is good for two free backends. It hosts all your data in the cloud, and comes with auth, realtime, and cloud functions.
Using OAuth in Supabase
Supabase allows you to set up auth integrations with a long list of OAuth providers. Once your Supabase account is set up, you will be able to access the Supabase dashboard. From here, go to All Project > New Project.

Give your project a name and set the database password. You can also choose the region and adjust the pricing plan based on the requirements of your project.

Once you create a new project, Supabase will begin provisioning your database and set up your API endpoint. This process may take a few minutes.

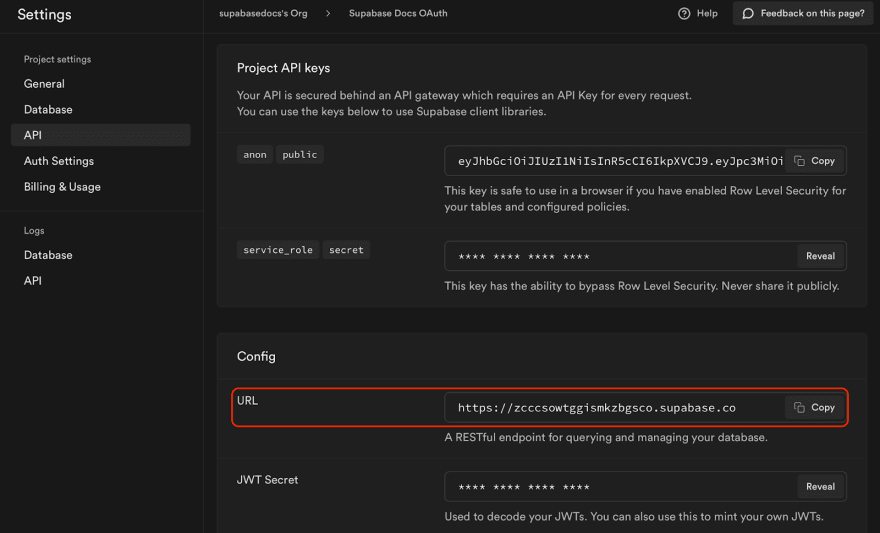
Once your project is ready, go to Settings > API and make a note of the Config URL.
Now, let's set up Supabase with Github OAuth. Once your project is set up and you have your Config URL, log into Github and go to Settings > Developer Settings > OAuth Apps, and click on Register a new application.

Give the OAuth application a name and copy <YOUR_CONFIG_URL>/auth/v1/callback in the Authorization callback URL. For the homepage URL, add the URL to your app. In this example, we will create a react app that is running locally on port 3000. Once the fields have been filled, click on the Register application.

Once the application is created, click on the Generate a new client secret button and copy the value that is generated.

In Supabase, go to Authentication > Settings and scroll down to the External OAuth Providers section and enable the Github option.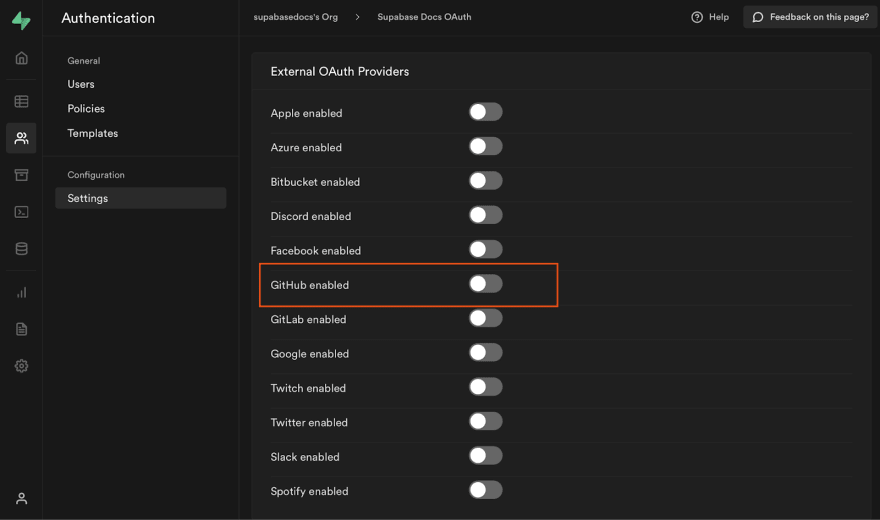
Paste the Github client ID as well as Github Secret in their respective fields and save.

Next, let's verify this functionality by creating a simple react app app to sign in with Github OAuth on the front end.
Create the app by running the following command:
npx create-react-app supabase-oauth-exampleOnce the app is created, change directory into the app and install the Supabase npm package by running:
cd supabase-oauth-examplenpm install @supabase/supabase-jsBefore creating an instance of createClient which will be used to connect to the Supabase project, make a note of the project's public API which can be found by going to Settings > API.
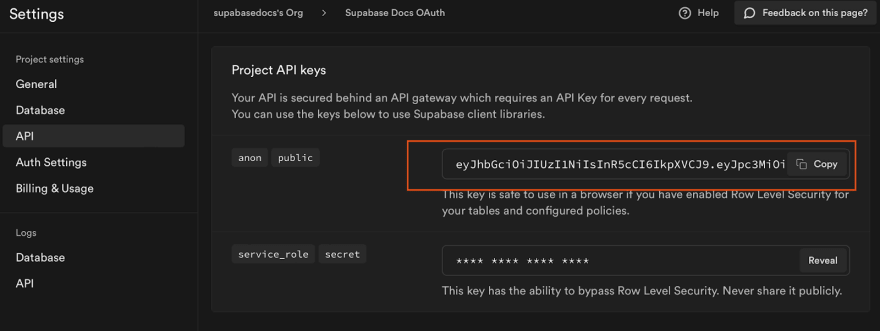
In the App.js file, create an instance of createClient which will be used to connect to your Supabase project by adding the following. The first argument for createClient is the URL Config. For the second argument, copy the Project public API key.
import { createClient } from '@supabase/supabase-js';const supabase = createClient('<https://zcc```import { createClient } from '@supabase/supabase-js';const supabase = createClient('<https://zccsowtggisnkzbgsco.supabase.co>','eyJhbGciOiJIUzI1NiIsInR5cCI6IkpXVCJ9.....')import { createClient } from '@supabase/supabase-js';
const supabase = createClient('https://zccsowtggisnkzbgsco.supabase.co','eyJhbGciOiJIUzI1NiIsInR5cCI6IkpXVCJ9.....')
Next, replace the App function with the following which adds a sign in button that will then redirect users to sign in using Github OAuth.
const provider = 'github';function App() { const [user, setUser] = useState(null); async function userStatus() { const user = supabase.auth.user(); setUser(user); }async function signIn() { await supabase.auth.signIn({ provider: provider });}async function signOut() { await supabase.auth.signOut(); setUser(null);}useEffect(() => { userStatus(); window.addEventListener('hashchange', function() { userStatus(); });}, [])if (user) { return ( <div className="App"> <h1>Hello, {user.email}</h1> <button onClick={signOut}>Sign out</button> </div> )}return ( <div className="App"> <h1>Sign in using Github OAuth</h1> <button onClick={signIn}>Sign In</button> </div> );}Start the development server by running the following from the terminal:
npm start
On a browser, go to http://localhost:3000 to access the app.

Clicking on the Sign in button will redirect you to Sign in with Github.

Log in using your Github credentials and authorize your app.
You will then be redirected back to the app and be signed in.

You can then also sign out using the Sign out button.
By following this process, you can configure your Supabase project with any supported OAuth providers. After setting up your project with a provider, you just need to pass in the provider name:
await supabase.auth.signIn({ provider: <YOUR_PROVIDER>});Conclusion
Supabase makes it very simple to use OAuth and allows you to extend access control to a large number of applications. You can easily control access using the Supabase Console or from the API. So, say goodbye to traditional password management and get access to secure user data without complex user onboarding workflows!
Now, become a Supabase developer today by starting a new project on our free tier.
Original Link: https://dev.to/supabase/what-is-oauth-setting-up-github-oauth-with-supabase-44le
Dev To
More About this Source Visit Dev To