
An Interest In:
Web News this Week
- April 19, 2024
- April 18, 2024
- April 17, 2024
- April 16, 2024
- April 15, 2024
- April 14, 2024
- April 13, 2024
Some of Our Sources
- Simplebits
- Pearsonified
- The Logo Smith
- Smashing Apps
- Fuel Your Creativity
- Inspiredology
- Crazy Leaf Design
- Fudge Graphics
- Reencoded
- Wal You
Help Webnuz
Referal links:
Enabling Preview mode in your Next.js application
There's no doubt about it - Jamstack is here to stay. Since Matt Biilmann took the concept mainstream back in 2016, a whole ecosystem based upon this architecture has sprung up (including our very own Speed layer, Enterspeed - but more on that later).
Developers love the benefits a Jamstack architecture can bring to both the site itself and the workflow of the project. We won't dive into the many benefits in this article since books could be (and have been) written about this subject.
However, a site is rarely run by developers alone, but by a wide range of people, e.g., content creators like copywriters, marketers, supporters, etc. All of these people have to be taken into account when developing a new site.

Most content creators have worked with some sort of CMS in the past, for instance, WordPress, and have gotten accustomed to the editor experience.
One of the key functionalities, that content creators often use, is the option to preview their content before publishing.
This can be kind of tricky when using SSG (Static Site Generation) since we want to render these pages at request time instead of build time.
And even though we developers consider our IDE our second home, most content creators aren't that keen on booting up a local instance of the project in order to preview their content (I know, right?).
Luckily, the awesome team behind Next.js came up with a brilliant solution to this problem - Preview mode.
Setting up Preview mode enables you to bypass SSG and render the page at request time. So how does it work and how do we enable it? Let's look into it.
Setting up Preview mode in Next.js
Note: This article is based on the Next.js' fantastic documentation, therefor similar phrasing and code examples will occur.
In the Next.js repo, you'll find plenty of examples of how to set up your headless CMS with Next.js' Preview mode. In this tutorial, we will base the examples on our own solution, Enterspeed.
What is Enterspeed?
Enterspeed is a Speed layer that lets you connect and combine all your services into a single API endpoint. Our low-editor makes it easy to transform your data, to get exactly what you need all stored in our blazing-fast edge network.
This makes it ideal for speeding up legacy systems, e.g. Umbraco solutions.
Well, enough self-promotion - this was simply to give you some context for the examples below.
1. Creating a Preview API route
Next.js provides a solution to build your API. This is done by creating a folder called api inside the pages folder (pages/api). Any file inside this folder will be treated as an API endpoint instead of a page.
Create a file called preview.js (or .ts if you're using TypeScript) inside the pages/api folder.
On the response object (res), we will call setPreviewData, which will turn on preview mode by setting some cookies.
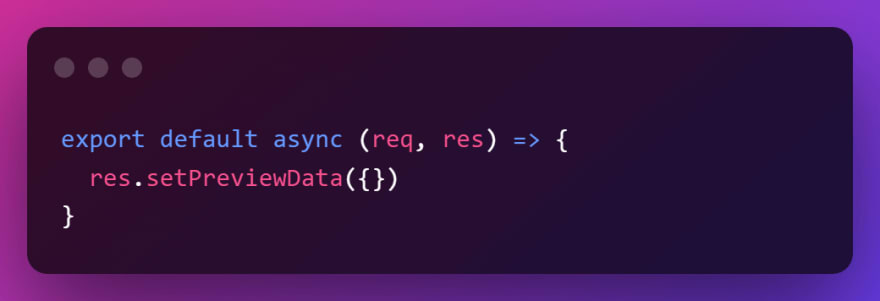
Once you've accessed the API route, you can open your browser's developer tools to see that the __prerender_bypass and __next_preview_data cookie have been set.
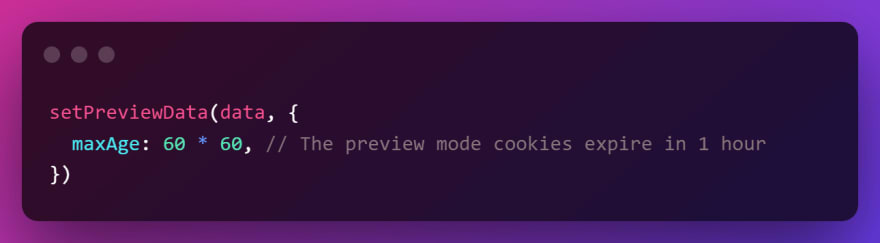
Tip: You can specify the preview mode duration. setPreviewData takes an optional second parameter (the options object). Inside the object, set the key to maxAge and the value for how long the preview session should last (in seconds).
All requests to Next.js which have these cookies will now be seen as preview mode, which will modify how statically generated pages behave.
Since you don't want anybody accessing your preview content, a good idea is to create a secret token string for your preview URL. You can use one of the many token generators out there, for instance, RandomKeygen.com to generate your secret token.
Tip: Store your secret in an environment variable and have your team save the preview URL (including the secret token) in a password manager like 1Password.
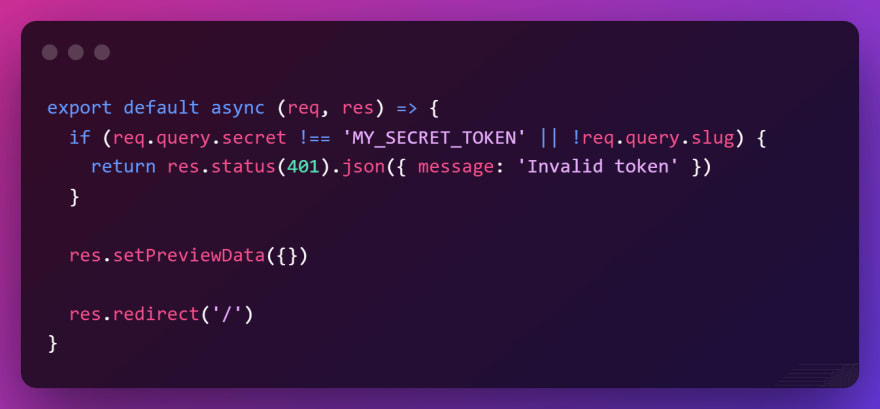
Note: If your headless CMS supports setting custom preview URLs, you can implement a fetching logic that redirects to the fetched post. In this example, we simply redirect to root.
Next, let's implement a way to disable preview mode again, by clearing the Preview mode cookies.
Create a new file in the api-folder (pages/api) called clear-preview.js. Here you need to call clearPreviewData on the response object.
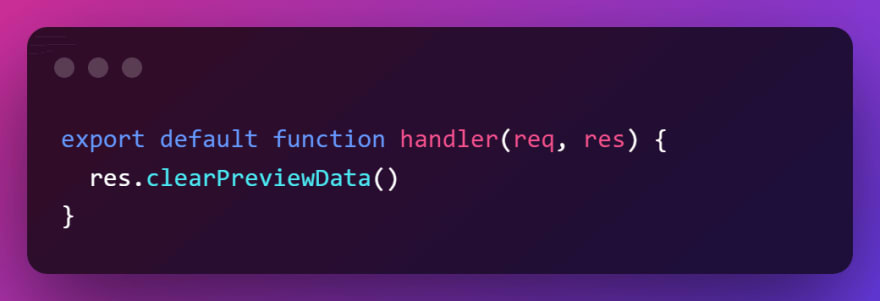
Once you've accessed this API route, you can open your browser's developer tools to see that the __prerender_bypass and __next_preview_data cookie have been removed.
Tip: For a cleaner URL structure, you can create a folder inside the api-folder called preview and rename preview.js to index.js. Then you can simply name clear-preview.js to clear.js, which will be available via /api/preview/clear.
2. Updating getStaticProps
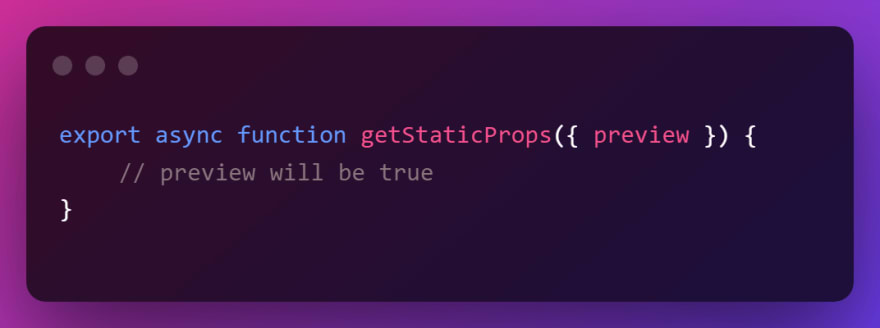
The getStaticProps function is used in SSG to pre-render a page at build time using the props returned by getStaticProps.
However, when Preview mode is enabled, getStaticProps will be called at request time instead of at build time.
It will also have a context object where context.preview will be true, which is the one we will use. To make the code easier to read, we can destruct the context object like this.
Next, we will fetch different data based on whether preview is true or not. How this is done can vary based on your CMS.
In our case, using Enterspeed, we have an API call function that takes the preview context as a parameter. Based on its value (true/false), it will either fetch content from our preview data source or production data source.
Note: Enterspeed stores preview data in a separate data source, this may not be the case for your solution.
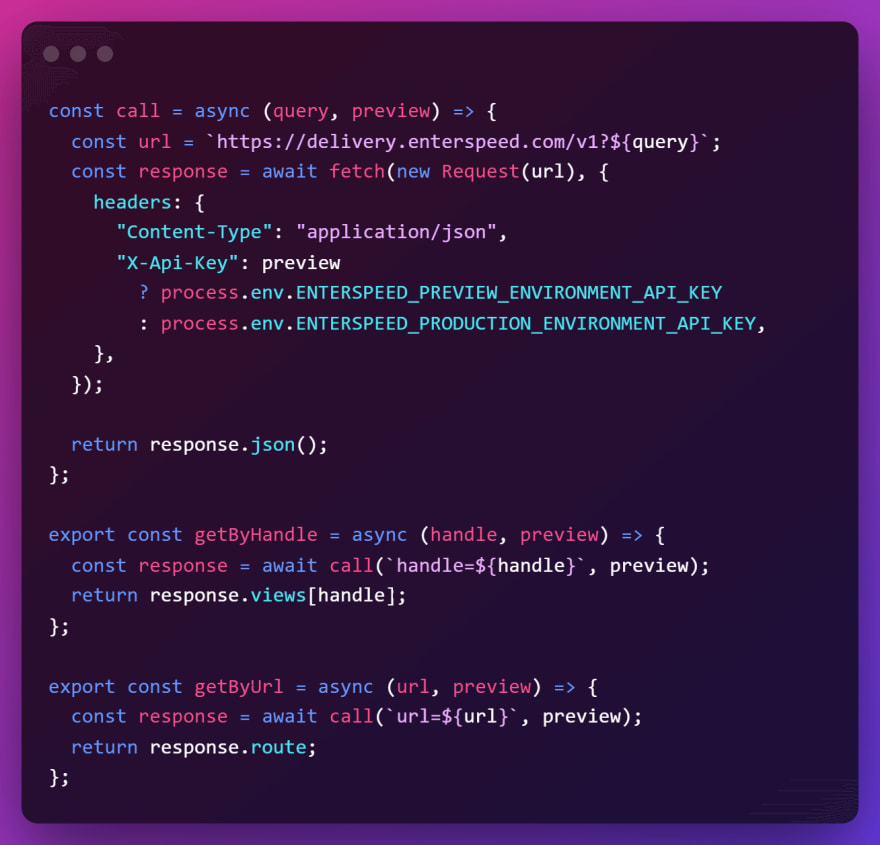
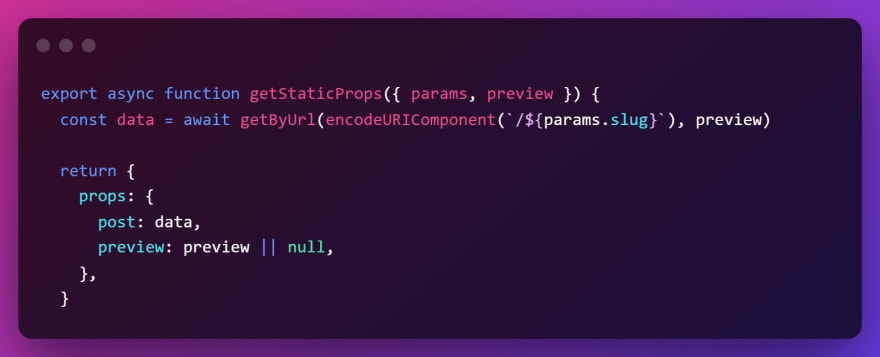
Inside our getStaticProps function, we pass the Preview context to our getByUrl function, which passes it to our API call function.
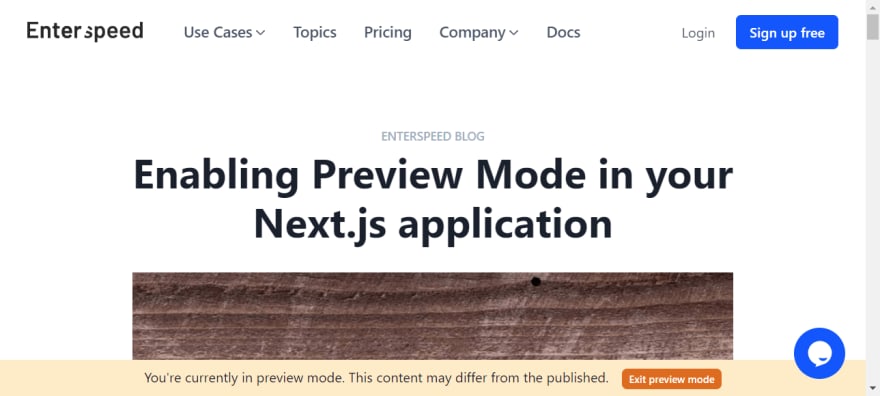
Bonus tip: Implement a preview bar
To help our content creators know if preview mode is enabled or not, we have implemented a "preview bar" in our project.
There are multiple ways of doing this, each with its own drawbacks.
Since we wanted the preview bar to be visible across our entire site (to make sure the content creator knew they had preview mode enabled), we decided to set a session cookie once Preview mode had been enabled.
We could have used getInitialProps, to check for the Preview context in our _app.js, unfortunately, this disables Automatic Static Optimization, which we are not interested in.
Since we can't set a session cookie via our API route, we passed the query /?preview=true&secret=${process.env.ENTERSPEED_PREVIEW_SECRET}
on our res.redirect in api/preview.js. The secret isn't strictly necessary, but simply to help ensure that the preview parameter is set via the API route.
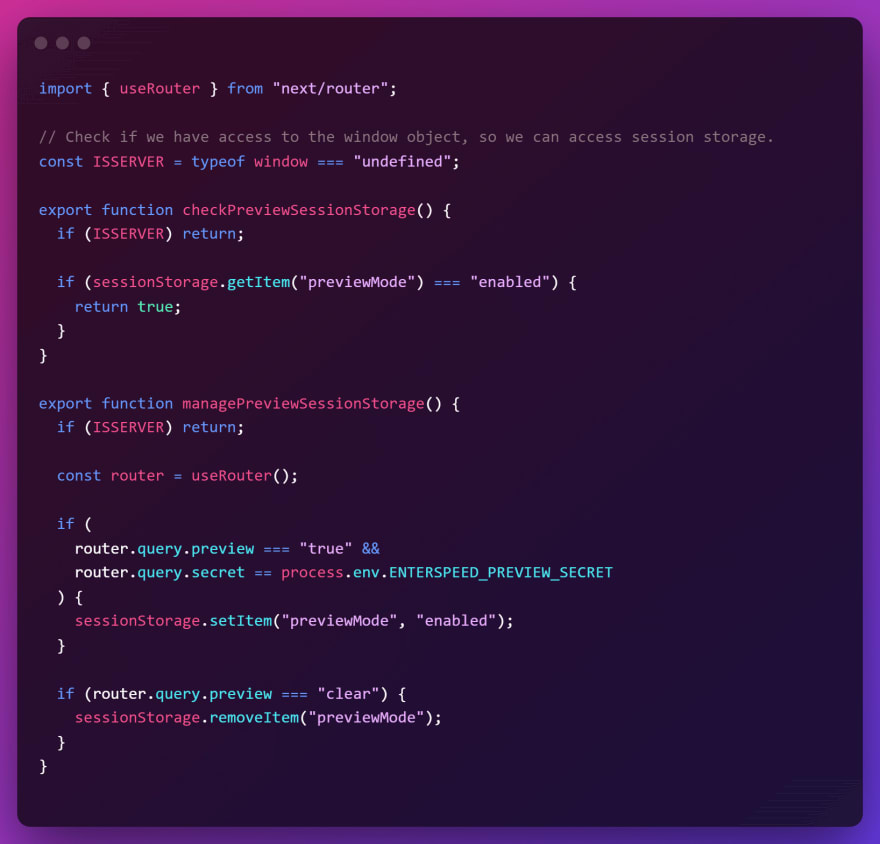
Next, we created two helper functions, one of which checks to see if the previewMode session cookie is set to enabled, and one which manages the previewMode session cookie. It checks to see if the preview parameter is true and if the secret parameter matches our secret, by using the next/router.
If so, we set the session cookie previewMode to enabled. If the preview parameter is equal to "clear", we then remove the cookie again.
In both functions, we also check to see if we have access to the window object, so we can set the cookie.
Inside our _app.js we then call our managePreviewSessionStorage() function. We also check to see if checkPreviewSessionStorage returns true, if so we render our PreviewBar component.
And that's it. Now both developers and content creators can be happy
I hope you enjoyed the article if you are interested in knowing more about Enterspeed you can check us out at enterspeed.com
Original Link: https://dev.to/kaspera/enabling-preview-mode-in-your-nextjs-application-30do
Dev To
More About this Source Visit Dev To