
An Interest In:
Web News this Week
- April 19, 2024
- April 18, 2024
- April 17, 2024
- April 16, 2024
- April 15, 2024
- April 14, 2024
- April 13, 2024
Some of Our Sources
- Slashdot
- Technology Review
- Six Revisions
- TutsPlus - Design
- Naldz Graphics
- My Ink Blog
- Web Design Ledger
- Line 25
- Freelance Switch
- Web Resource Source
Help Webnuz
Referal links:
How to Use Throttle and Debounce in React to Increase Performance
Overview
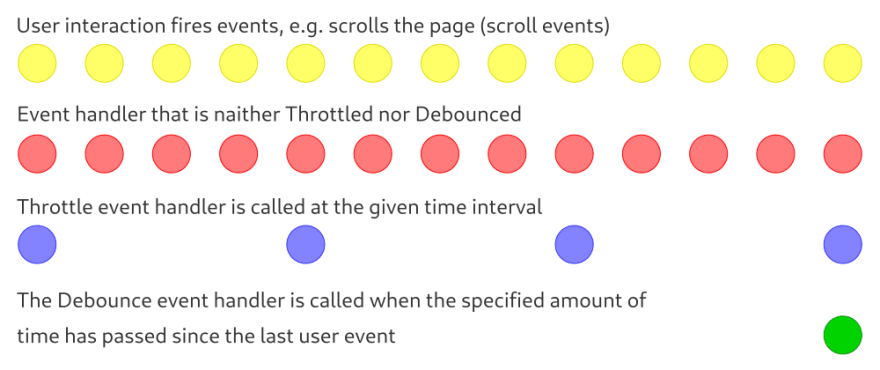
Throttle and Debounce solve optimization problems.
Throttle - skips function calls with a certain frequency.Debounce - delays a function call until a certain amount of time has passed since the last call.
Throttle & Debounce scheme:
Examples of using Throttle:
1) If the user resizes the browser window and we need to change the content of the site.
Without optimization, the following happens. On each window resize event, the window resize event handler is called. So if the user, for example, resizes the window within 10 seconds, then 100, 200, and so on events that we need to process can happen.Throttle allows us to set a time interval, more often than which the event handler will not be called. If we specify an interval of 1 second using Throttle, then the number of execution of window resize event handlers will be 10.
2) Showing the user the percentage of page scrolling. When the user scrolls the page, scroll events occur, which we need to handle. With throttle we can reduce the number of handled scroll events by setting a time interval.
Examples of using Throttle:
1) Processing the user's search query data.
When a user enters a search query, they are offered search options. It happens in the following way.
When changing the text entered by the user, a request will be sent to the server in which we transfer the characters already printed. Then we get a response from the server with possible search query options and show them to the user.
Each time the user changes the text, an event handler is called, in which a request is send to the server.
To optimize the number of requests sent to the server, we use Debounce.
When the text is changed by the user, using Debounce allows us to create a timer, for example for 1 second. If 1 second passes and the user has not changed the text a second time, then the event handler is called and the request will be sent to the server. If the user changes the text for the second time in 1 second, then the 1st timer is reset and a new timer is created again for 1 second.
Thus, if the user edits the search text quickly (less than 1 second), then the request will be sent to the server only once, after the user stops typing.
2) Sending analytics data to the server. For example, the user moves the mouse around the site, we write the mouse coordinates to an array, after which Debounce allows us to send information about the movement of the client's mouse to the server only after the client stops moving the mouse.
So, in this article, I'll show you how to use Throttle and Debounce in a React applications.
Step 1 - Application Template
Create an app template by using create-react-app and run it:
npx create-react-app throttle-debouncecd throttle-debouncenpm startWe replace the contents of the App.css file with our styles:
body { display: flex; justify-content: center; width: 100%;}h1 { text-align: center; margin: 0.5rem 0;}.l-scroll { overflow-y: scroll; overflow-x: hidden; width: 380px; height: 200px; margin-top: 0.5rem;}.scroll-content { width: 100%; background-color: bisque; padding: 0 1rem;}.l-scroll::-webkit-scrollbar { width: 10px; height: 8px; background-color: darkturquoise;}.l-scroll::-webkit-scrollbar-thumb { background-color: blueviolet;}Let's replace the contents of the App.js file with our app template:
import './App.css';import { useMemo } from 'react';function App() { return ( <> <h1>Throttle & Debounce</h1> <div className="l-scroll"> <div className="scroll-content"> <TallContent /> </div> </div> </> );}// High height scrollable contentfunction TallContent(){ const dataElements = useMemo(() => { const genData = []; for(let i=1; i<=200; i++){ genData.push( <div key={i}>Line: {i}</div> ); } return genData; }, []); return( <> {dataElements} </> );}export default App;The application template is ready, let's proceed to the second step - the usual scroll event handler.
Step 2 - Usual events hendler
Here we will add a usual events handler for scroll events and count the number of calls to this handler when the user scrolls the page element.
Let's add the state of the number of event handler invocations to the App component:
// At the beginning of the fileimport { useState, useMemo } from 'react';// Inside the App componentconst [scrollHandleCount, setScrollHandleCount] = useState(0);Then we add a scroll event handler, for this we add the onScroll attribute to the element under the h1 heading:
// Before<div className="l-scroll"> ...</div>// After<div className="l-scroll" onScroll={handleScroll}> ...</div>We will also add a function for handling the handleScroll event to the App component:
function handleScroll(){ handleUsualScroll();}Inside the handleScroll function, we placed a function in which the usual event will be handled. Let's add this function to our App component:
function handleUsualScroll(){ setScrollHandleCount((prevState) => { return ++prevState; });}It remains only to show the status of the counter to the user, for this we add a line of code under the h1 heading:
<span> Usual scroll handle count: {scrollHandleCount}</span><br />Now, when scrolling an element on the page, we should see the number of calls to the handleUsualScroll() function.

The full code of the App component at the moment:
function App() { const [scrollHandleCount, setScrollHandleCount] = useState(0); return ( <> <h1>Throttle & Debounce</h1> <span> Usual scroll handle count: {scrollHandleCount} </span> <br /> <div className="l-scroll" onScroll={handleScroll}> <div className="scroll-content"> <TallContent /> </div> </div> </> ); function handleScroll(){ handleUsualScroll(); } function handleUsualScroll(){ setScrollHandleCount((prevState) => { return ++prevState; }); } }Step 3 - Event Handler with Throttle
The Throttle event handler in our case should cause the scrollThrottleHandleCount counter to increment, while skip calls to increment the counter at certain intervals.
To implement our plans, we need a timer at the start of which the Throlle state goes into In progress. In this case, if the state is In Progerss, then the processing of user events (scrolling the page element) is skipped.
As soon as the timer fires, the Throttle state changes to Not in progress, which means our handler will process user events again. Thus, user events are skipped at a specified time interval.
We implement the above:
// Add useRef to store inProgress stateimport { useState, useRef, useMemo } from 'react';Next, in the App component, add the state of the event handler call counter with Throttle and ref to store the inProgress state:
// Number of event handler calls with Throttleconst [ scrollThrottleHandleCount, setScrollThrottleHandleCount] = useState(0);// Keeping the state in progressconst throttleInProgress = useRef();It is important to note here that throttleInProgress is part of the side effect associated with the timer, which means that we will store the state in the ref object, since useRef returns an object that exists throughout the entire life cycle of the component, while there is no extra rendering component when changing the current property of the object returned by useRef, as opposed to useState.
Now let's add the event handler itself with Throttle to the App component:
function handleThrottleScroll(){ // If the state is inProgress - exit the function, // skip event processing if(throttleInProgress.current){ return; } // Set inProgress to true and start the timer throttleInProgress.current = true; setTimeout(() => { // Increment the throttleHandleCount // state by one setScrollThrottleHandleCount((prevState) => { return ++prevState; }); // Set inProgress to false, which means // that setTimeout will work // again on the next run throttleInProgress.current = false; }, 500);}There are 2 simple steps left: add a display of the state of the counter with Throttle to the user and add handleThrottleScroll() to handleScroll():
// After heading h1<span> Throttle scroll handle count: {scrollThrottleHandleCount}</span>// In the handleScroll() function after handleUsualScroll();handleThrottleScroll();As a result, we will get:
The normal event handler called the business logic of the application 181 times, and with Throttle only 9.
The complete code for the App component with Throttle:
function App() { const [scrollHandleCount, setScrollHandleCount] = useState(0); const [ scrollThrottleHandleCount, setScrollThrottleHandleCount ] = useState(0); const throttleInProgress = useRef(); return ( <> <h1>Throttle & Debounce</h1> <span> Usual scroll handle count: {scrollHandleCount} </span> <br /> <span> Throttle scroll handle count: {scrollThrottleHandleCount} </span> <br /> <div className="l-scroll" onScroll={handleScroll}> <div className="scroll-content"> <TallContent /> </div> </div> </> ); function handleScroll(){ handleUsualScroll(); handleThrottleScroll(); } function handleUsualScroll(){ setScrollHandleCount((prevState) => { return ++prevState; }); } function handleThrottleScroll(){ if(throttleInProgress.current){ return; } throttleInProgress.current = true; setTimeout(() => { setScrollThrottleHandleCount((prevState) => { return ++prevState; }); throttleInProgress.current = false; }, 500); }}Let's move on to the final step - implement the Debounce event handler.
Step 4 Event Handler with Debounce
Debounce in our example delays incrementing the scrollDebounceHandleCount counter until a certain amount of time has elapsed since the last call of the event handler***.
Let's add the state of the number of calls to the event handler with Debounce, ref to store the timer ID in the App component:
const [ scrollDebounceHandleCount, setScrollDebounceHandleCount] = useState(0);const timerDebounceRef = useRef();Then we show the number of scrollDebounceHandleCount to the user and add our handleDebounceScroll() method to handleScroll():
// After h1<span> Debound scroll handle count: {scrollDebounceHandleCount}</span>// In handleScroll() functionhandleDebounceScroll();It remains to write the handleDebounceScroll function:
function handleDebounceScroll(){ // If the timer ID is set, reset the timer if(timerDebounceRef.current){ clearTimeout(timerDebounceRef.current); } // We start the timer, the returned timer ID // is written to timerDebounceRef timerDebounceRef.current = setTimeout(() => { // Increasing the counter for the number of // executions of the business logic // of the application with Debounce setScrollDebounceHandleCount((prevState) => { return ++prevState; }); }, 500);}As a result, the Debounce counter increments only when the user stops scrolling the page element for more than or equal to 500 milliseconds: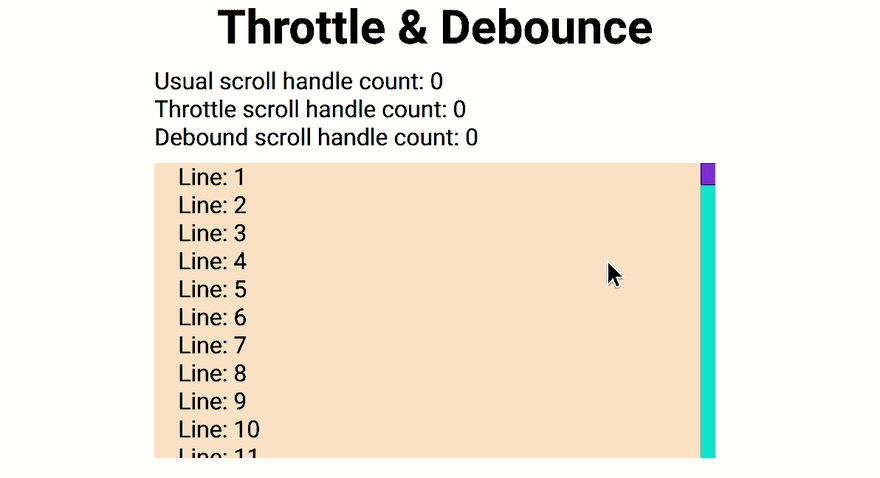
The full text of the App component:
function App() { const [scrollHandleCount, setScrollHandleCount] = useState(0); const [ scrollThrottleHandleCount, setScrollThrottleHandleCount ] = useState(0); const [ scrollDebounceHandleCount, setScrollDebounceHandleCount ] = useState(0); const throttleInProgress = useRef(); const timerDebounceRef = useRef(); return ( <> <h1>Throttle & Debounce</h1> <span> Usual scroll handle count: {scrollHandleCount} </span> <br /> <span> Throttle scroll handle count: {scrollThrottleHandleCount} </span> <br /> <span> Debound scroll handle count: {scrollDebounceHandleCount} </span> <div className="l-scroll" onScroll={handleScroll}> <div className="scroll-content"> <TallContent /> </div> </div> </> ); function handleScroll(){ handleUsualScroll(); handleThrottleScroll(); handleDebounceScroll(); } function handleUsualScroll(){ setScrollHandleCount((prevState) => { return ++prevState; }); } function handleThrottleScroll(){ if(throttleInProgress.current){ return; } throttleInProgress.current = true; setTimeout(() => { setScrollThrottleHandleCount((prevState) => { return ++prevState; }); throttleInProgress.current = false; }, 500); } function handleDebounceScroll(){ if(timerDebounceRef.current){ clearTimeout(timerDebounceRef.current); } timerDebounceRef.current = setTimeout(() => { setScrollDebounceHandleCount((prevState) => { return ++prevState; }); }, 500); }}Subscribe to the blog, put likes, add to bookmarks.
Don't forget about unicorns.
Thanks for your attention!
Original Link: https://dev.to/andreyen/how-to-use-throttle-and-debounce-in-react-app-13af
Dev To
More About this Source Visit Dev To