
An Interest In:
Web News this Week
- April 25, 2024
- April 24, 2024
- April 23, 2024
- April 22, 2024
- April 21, 2024
- April 20, 2024
- April 19, 2024
Some of Our Sources
- Slashdot
- Web Designer Wall
- Joshua Blankenship
- Web Designer Depot
- Naldz Graphics
- Fudge Graphics
- 24 Ways
- Android Dissected
- Android Headlines
- The Verge
Help Webnuz
Referal links:
The Complete Windows Developer Setup Guide
Overview
After a lot of trial and error, I've been able to piece together a pretty respectable Windows dev environment. There are plenty of guides already out there, but none of them seem to cover the entire scope. I tried to do that here, without getting too deep into any individual topic. I believe this will leave the majority of users with a smooth Windows developer experience.
The repo for this guide contains some additional info and will be continually updated.
Prerequisites
- Windows 10 version 2004 and higher (Build 19041 and higher) or Windows 11 (Which version do I have?)
- A GitHub account
WSL
The first and most important part of setting up your Windows dev environment is installing the Windows Subsystem for Linux (WSL). I recommend sticking with Ubuntu, but feel free to try out as many distributions as you like. There are no issues with having multiple distributions installed at once.
Installing WSL 2
WSL 2 is the latest version of WSL, adding new features like a full Linux kernel and full system call compatibility. There used to be a handful of steps needed to install it, but we now only need to enter the following command into PowerShell or Command Prompt:
wsl --installThis command does the following:
- Enables the optional WSL and Virtual Machine Platform components
- Downloads and installs the latest Linux kernel
- Sets WSL 2 as the default
- Downloads and installs the Ubuntu Linux distribution (a reboot may be required)
Using the --install command defaults to Ubuntu and only works if WSL is not installed yet. If you would like to change your default Linux distribution, follow these docs.
User Config
Once the process of installing your Linux distribution with WSL is complete, open the distribution (Ubuntu by default) using the Start menu. You will be asked to create a User Name and Password for your Linux distribution. When you enter your new password, nothing will display in the terminal. Your keyboard is still working! It is just a security feature.
This User Name and Password is specific to each separate Linux distribution that you install and has no bearing on your Windows user name.
Once you create a User Name and Password, the account will be your default user for the distribution and automatically sign-in on launch.
This account will be considered the Linux administrator, with the ability to run sudo (Super User Do) administrative commands.
Each Linux distribution running on WSL has its own Linux user accounts and passwords. You will have to configure a Linux user account every time you add a distribution, reinstall, or reset.
Updating Linux
It is recommended that you regularly update and upgrade your packages. In Ubuntu or Debian, we use the apt package manager:
sudo apt update && sudo apt upgradeWindows does not automatically update or upgrade your Linux distribution(s). This is a task that most Linux users prefer to control themselves.
Mapping Your Linux Drive
When you open the Windows file explorer, it displays your devices and drives. We are going to add our Ubuntu virtual drive as a network location for easy access.
- Open the
\\wsl$\location from file explorer:
- Right-click on the Ubuntu folder, and select
Map network drive:
- Select the drive letter you would like to use, leave
Reconnect at sign-inchecked andConnect using different credentialsunchecked, and then click finish (mine will look slightly different because it's already been done):
- The end result should look something like this:
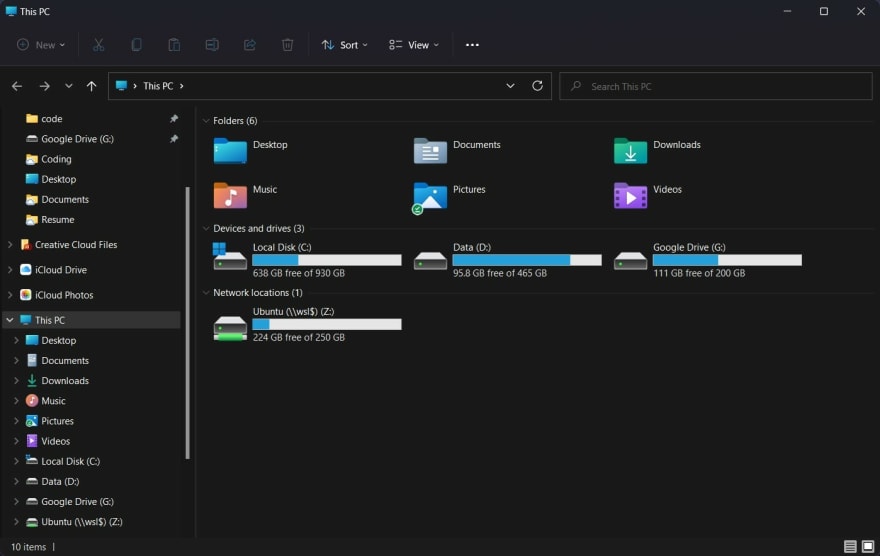
If you wanted to access your Windows files from the Linux terminal, they are found in the /mnt/ directory, so your Windows user directory would be located at /mnt/c/Users/username.
With your Ubuntu drive mapped, you can easily drag/drop or copy/paste Windows files to the Linux file system by using the file explorer.
However, it is recommended to store your project files on the Linux file system. It will be much faster than accessing files from Windows and it can also be a little buggy.
Pin Your Code Directory
Another quick tip I have is to create a code directory inside of Ubuntu, and then pin it to the quick access menu found on the left side of the file explorer. This comes in handy when transferring files quickly between Windows and Linux.
- Open file explorer and click on the Ubuntu network drive we created
- Select the home dir, and then your user directory
- Right-click and create a new folder, name it code, or anything else you'd like
Drag that new folder to the left, underneath the star icon that says
Quick access
Restarting WSL
If for some reason WSL stops working, you can restart it with these two commands from PowerShell/Command Prompt:
wsl.exe --shutdownwsl.exeIf you go back to your Linux shell everything should be back to normal.
Windows Terminal
To launch a Linux terminal we currently need to use the Ubuntu icon from the Start menu or enter the wsl or bash commands into PowerShell/Command Prompt. Another option that will give us more features like tabs, split views, themes, transparency, and key bindings, is to use the Windows Terminal. There are also a few other terminals like Cmder, ConEmu, or Hyper, but in my experience, Windows Terminal works extremely well.
Installing Windows Terminal
Windows 11 comes with Windows Terminal by default, but If you are using Windows 10, Download and install Windows Terminal through the Microsoft Store.
Terminal Settings
A couple of quick things I recommend setting up is the default profile and your starting home directory. These settings make it so launching Windows Terminal will open directly into WSL inside our user's home directory.
Default Profile
Windows Terminal will open a PowerShell or Command Prompt shell when launched by default, here is how to switch it to WSL:
- Select the
icon from Windows Terminal and go to the Settings menu:
- In the Startup section you will find the Default profile dropdown, select Ubuntu. Below it, select Windows Terminal as the Default terminal application:

Starting Directory
A default Ubuntu terminal will open to the root directory. To make finding your files a little quicker we can have it open into your home directory instead.
Under the Profiles section in the settings menu click on Ubuntu
At the General tab, you will find a Starting directory input
Enter the following replacing "username" with your Ubuntu user name:
\\wsl$\Ubuntu\home\usernameYou can leave the
Use parent process directorybox uncheckedIf it is still opening into your
/directory, change theCommand linesetting located right above theStarting directoryinput box to the following:wsl.exe -d Ubuntu
There are many more settings to explore, and there is also a JSON file you can edit for more advanced customizations.
Check out this guide for some popular Windows Terminal themes and how to install them.
Git Config
Git should come pre-installed on most, if not all of the WSL Linux distributions. To ensure you have the latest version, use the following command in an Ubuntu or Debian based distro:
sudo apt install gitName
To set up your Git config file, open a WSL command line and set your name with this command (replacing "Your Name" with your preferred username):
git config --global user.name "Your Name"Set your email with this command (replacing "[email protected]" with the email you prefer):
git config --global user.email "[email protected]"Username
And finally, add your GitHub username to link it to git (case sensitive!):
git config --global user.username "GitHub username"Make sure you are inputting user.username and not user.name otherwise you will overwrite your name and you will not be correctly synced to your GitHub account.
You can double-check any of your settings by typing git config --global user.name and so on. To make any changes just type the necessary command again as in the examples above.
GitHub Credentials
Creating your Personal Access Token
GitHub has removed the ability to use a conventional password when working in a remote repository. You are now required to create a personal access token instead.
Personal access tokens (PATs) are an alternative to using passwords for authentication to GitHub when using the or the command line.
Follow these docs for step-by-step instructions on creating your personal token.
Git Credential Manager
Once you enter in your token the first time, it can be stored via Git Credential Manager (GCM) so you won't have to authenticate yourself each time.
You can have Git installed in WSL and also in Windows at the same time. Git for Windows includes GCM and is the preferred way to install it.

You can also download the latest installer for Windows to install the GCM standalone version.
Storing Your Token
Once Git Credential Manager is installed you can set it up for use with WSL. Open your WSL terminal and enter this command:
git config --global credential.helper "/mnt/c/Program\ Files/Git/mingw64/libexec/git-core/git-credential-manager-core.exe"Zsh
Z shell works almost identically to the standard BASH shell found on default Linux installs. What makes it different is its support for plugins and themes, along with some extra features like spelling correction and recursive path expansion. It's time to throw BASH in the trash!
Installing Zsh
sudo apt install zshAfter installing, type the zsh command. Zsh will ask you to choose some configurations. We will do this later on while installing oh-my-zsh, so choose option 0 to create the config file and prevent this message from showing again.
OhMyZsh
The most popular plugin framework by far is OhMyZsh. It comes preloaded with loads of plugins, themes, helpers, and more. It can help with productivity for sure, but more importantly, it just looks cool .
cURL
First off, we need to make sure we have cURL installed. Short for "Client URL", it's a way to transfer data from the command line, and that's how we will download OhMyZsh.
sudo apt install curlInstalling OhMyZsh
Enter the following command into your terminal to install OhMyZsh:
sh -c "$(curl -fsSL https://raw.github.com/ohmyzsh/ohmyzsh/master/tools/install.sh)"That's it! You should now see a .oh-my-zsh directory inside of your home directory. To change your plugins and themes you will need to edit your .zshrc file, also found in your home dir. Here is a list of all the themes and plugins that come bundled with OhMyZsh.
More Plugins
zsh-autosuggestions
Autosuggestions for zsh, It suggests commands as you type based on history and completions.
Clone this repository into
$ZSH_CUSTOM/plugins(by default~/.oh-my-zsh/custom/plugins)git clone https://github.com/zsh-users/zsh-autosuggestions ${ZSH_CUSTOM:-~/.oh-my-zsh/custom}/plugins/zsh-autosuggestionsAdd the plugin to the list of plugins for Oh My Zsh to load (inside
~/.zshrc):plugins=(git zsh-autosuggestions)Start a new terminal session.
zsh-syntax-highlighting
This package provides syntax highlighting for the shell zsh. It enables highlighting of commands whilst they are typed at a zsh prompt into an interactive terminal. This helps in reviewing commands before running them, particularly in catching syntax errors.
Clone this repository in oh-my-zsh's plugins directory:
git clone https://github.com/zsh-users/zsh-syntax-highlighting.git ${ZSH_CUSTOM:-~/.oh-my-zsh/custom}/plugins/zsh-syntax-highlightingActivate the plugin in
~/.zshrc:plugins=(git zsh-autosuggestions zsh-syntax-highlighting)Start a new terminal session.
Node.js
Node.js is a JavaScript runtime environment that executes JavaScript code outside a web browser.
NVM
You will likely need to switch between multiple versions of Node.js based on the needs of different projects you're working on. Node Version Manager allows you to quickly install and use different versions of node via the command line.
Installing NVM
Open your Ubuntu command line and Install nvm with:
curl -o- https://raw.githubusercontent.com/nvm-sh/nvm/v0.39.1/install.sh | bashTo verify installation, enter:
command -v nvm. This should return 'nvm', if you receive 'command not found' or no response at all, close your current terminal, reopen it, and try again.List which versions of Node are currently installed (should be none at this point):
nvm ls
Install both the current and stable LTS versions of Node.js.
Install the current stable LTS release of Node.js (recommended for production applications):nvm install --ltsInstall the current release of Node.js (for testing latest Node.js features and improvements, but more likely to have issues):
nvm install nodeList what versions of Node are installed:
nvm lsNow you should see the two versions that you just installed listed.

Verify that Node.js is installed and the current version:
node --versionThen verify that you have npm installed as well:
npm --version
Changing Node Version
Use the following commands to change the version of Node you would like to use for any given project:
To switch to the Current version:
nvm use nodeTo switch to the LTS version:
nvm use --ltsYou can also use the specific number for any additional versions you've installed:
nvm use v8.2.1.To list all of the versions of Node.js available, use the command: nvm ls-remote.
Visual Studio Code
There are many amazing code editors available for free, but Visual Studio Code has become the defacto standard and my personal favorite.
Installing VS Code
VS Code is available on Windows, macOS, and Linux. You can download the latest Windows installer here. I recommend using the stable build.
Changing the Default Shell
The WSL2 shell can be chosen as the default VS Code terminal by pressing Ctrl + Shift + P and typing/choosing Terminal: Select Default Profile, then selecting zsh:

Remote Extension
Install the Remote - WSL extension on VS Code.
This allows you to use WSL as your integrated development environment and will handle compatibility and pathing for you. Learn more.
This extension will also allow you to launch VS Code right from your WSL terminal by using the code command.
If I was inside the root directory of my repository, I would use code . to launch the entire directory inside VS Code.
cd my-projectcode .More Extensions
The number of extensions available for VS Code can be overwhelming, here are some of the ones I use the most.
- Live Server - Launch a local development server with live reload feature for static & dynamic pages.
- Live Share - Includes everything you need to start collaboratively editing and debugging in real-time.
- GitLens - Quickly glimpse into whom, why, and when a line or code block was changed.
- Git History - View git log, file history, compare branches or commits
- Prettier - Prettier is an opinionated code formatter.
- ESLint - Find and fix problems in your JavaScript code
- Color Highlight - This extension styles CSS/web colors found in your document.
- Markdown All in One - Markdown keyboard shortcuts, table of contents, auto preview, and more
- markdownlint - Markdown linting and style checking for Visual Studio Code
- GitHub Markdown Preview - Adds styling, markdown checkboxes, footnotes, emoji, and YAML preamble.
- Wakatime - Metrics, insights, and time tracking automatically generated from your programming activity.
- Dash - Dash, Zeal, and Velocity integration in Visual Studio Code
- Draw.io Integration - This unofficial extension integrates Draw.io (also known as diagrams.net) into VS Code.
- Docker - Makes it easy to create, manage, and debug containerized applications.
- Python - IntelliSense, Linting, Debugging, Jupyter Notebooks, refactoring, unit tests, and more.
Note:
You will need to install any VS Code extensions for your Remote - WSL. Extensions already installed locally on VS Code will not automatically be available. Learn more.
Chocolatey
Chocolatey is a package manager like homebrew, but for Windows.
Admin Shell
Before we start the installation process, I want to cover launching an administrative shell from windows. There are a few ways to do this:
Option 1
Right-click on the Windows start menu and select Windows Terminal (Admin):

Once your terminal loads, click the icon and open a new PowerShell tab. It should say Administrator: Windows PowerShell in the new tab:

Option 2
If you have Windows Terminal on your taskbar, Shift + Right-Click on the icon and select run as administrator, and then open a new PowerShell tab:

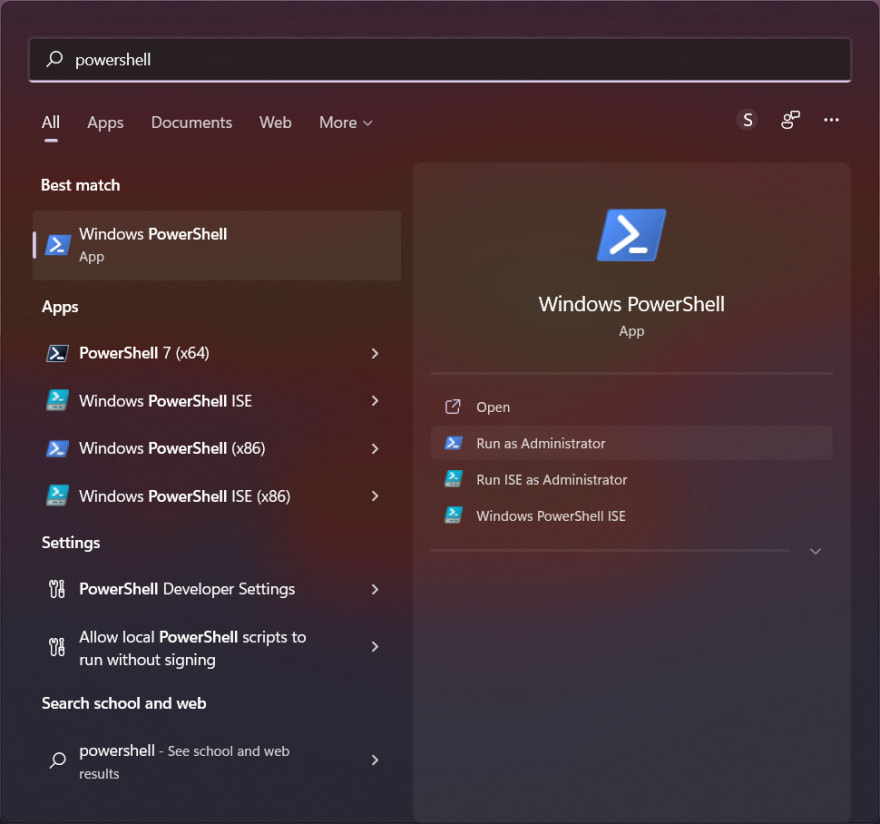
Option 3
Use the search bar from the Start menu and type in powershell. A link to Run as Administrator will display:
Installing Chocolatey
Open an administrative PowerShell terminal
Run
Get-ExecutionPolicy.If it returns
Restricted, then runSet-ExecutionPolicy AllSignedorSet-ExecutionPolicy Bypass -Scope Process.With PowerShell, you must ensure Get-ExecutionPolicy is not Restricted. We suggest using Bypass to bypass the policy to get things installed or AllSigned for quite a bit more security.
Now run the following command:
Set-ExecutionPolicy Bypass -Scope Process -Force; [System.Net.ServicePointManager]::SecurityProtocol = [System.Net.ServicePointManager]::SecurityProtocol -bor 3072; iex ((New-Object System.Net.WebClient).DownloadString('https://community.chocolatey.org/install.ps1'))If you don't see any errors, you are ready to use Chocolatey! Type
chocoorchoco -?now, or see Getting Started for usage instructions.
Basic Chocolatey Commands
We use the choco command to use chocolatey. Just remember, you must use an administrative shell for it to work. Search for available apps on the Community Package Repository.
Install a new package:
choco install filenameRemove a package:
choco uninstall filenameList all of the installed packages:
choco listUpdate:
choco upgrade filenameor to update everything at once:
choco upgrade allWindows Apps
Here are a few of my favorite (free) apps for productivity and development on Windows:
- Wox - A full-featured launcher
- RunJs - JavaScript and TypeScript playground
- Responsively - A modified web browser that helps in responsive web development.
- Zeal - the Windows version of Dash
- Figma - A collaborative UI design tool
- draw.io - Flowchart maker and diagram software
- GitHub Desktop - A GUI for Git
- Postman - API tools
- Notion - Project management and note-taking software
You can download all these at once with the following command using chocolatey in an admin shell:
choco install wox runjs responsively zeal figma drawio github-desktop postman notion -yChrome Extensions
These are all available as Firefox extensions as well.
- React Dev tools - Adds React debugging tools to the Chrome Developer Tools.
- ColorZilla - Advanced Eyedropper, Color Picker, Gradient Generator, and other colorful goodies
- Axe Accessibility - Accessibility Checker for Developers, Testers, and Designers in Chrome
- daily.dev - Get a feed of the hottest developer news personalized to you.
- Nimbus Capture - Screen Capture full Web page or any part.
- WhatFont - With this extension, you could inspect web fonts by just hovering on them.
- JSON Formatter - Makes JSON easy to read.
References
Original Link: https://dev.to/stephanlamoureux/the-complete-windows-developer-setup-guide-fie
Dev To
More About this Source Visit Dev To