
Some of Our Sources
- BoingBoing
- Smashing Magazine
- TutsPlus - Design
- FanExtra - PSD
- Fudge Graphics
- Reencoded
- Wal You
- Design Modo
- Web Resource Source
- Codrops
Help Webnuz
Referal links:
Get paid IRL: How to accept money with Stripe Terminal (Part 3/4)
Did you know that you can accept in-person payments with Stripe? In this series, were going to dive headfirst into building an in-person payments integration using Stripe Terminal.
In our last post, we started building a web-based point-of-sale application on Replit. As an initial step, we created a backend route for retrieving Stripe Terminal card readers. We finished up by using our newly created backend route to list our online readers in our reader dropdown, connecting our app to our active card readers.
In this blog post, were going to learn how to use the Payment Intents and Terminal APIs to create and handoff payments to our card readers, so that we can process them. Well also learn how to simulate tapping a credit card on a simulated reader.
Thats right, by the end of the blog post, youll be able to process and complete in-person payments with Stripe Terminal!
New to this series? Be sure to check out our first post on how to set up a card reader for testing and development and our second post on connecting them to a web application.
Processing payments with your point-of-sale app
If youve been following along with the series, youve registered real or simulated card readers and started a web application that lists which readers are online. Now, well finally give our app the ability to process payments.
A successful Stripe Terminal payment has three steps:
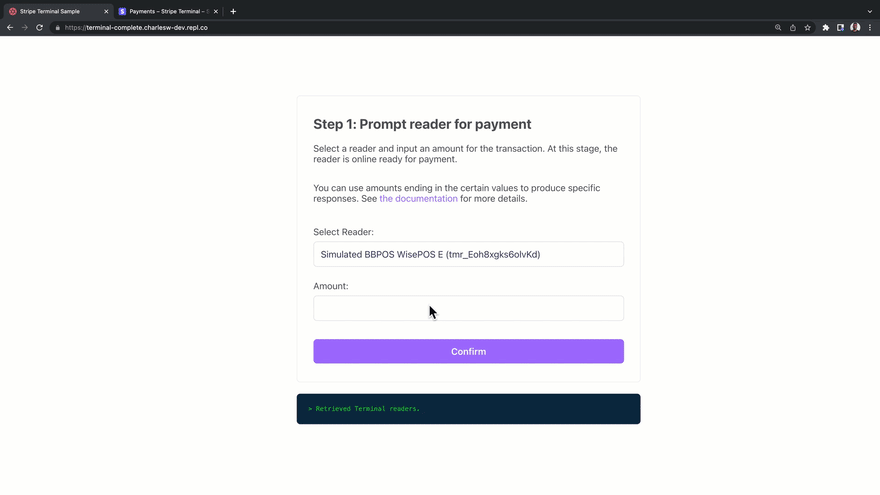
First, you set the reader to payment acceptance mode. In this step, the cashier enters an amount and pushes a button so that the reader transitions to the payment acceptance screen.
Next, you authorize the payment. At this stage, the cardholder taps, dips, or swipes their card device while the card reader is in payment acceptance mode. The card reader then securely forwards the card details to the card network for temporary authorization.
Finally, you confirm the payment. The cashier finalizes the transaction by manually confirming (or capturing) the charge. At this step, the charge has actually been finalized.
The additional step of confirming the transaction manually after it has been authorized may seem redundant, but it helps reduce fraud or unintended transactions. Its also why you may see cashiers pressing a button on their point-of-sale console even after youve tapped your credit card.
Setting the reader to payment acceptance mode
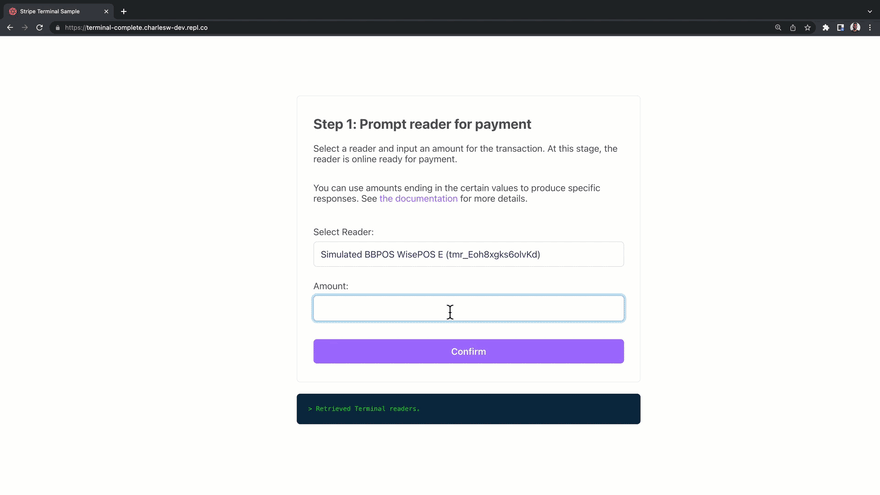
At this point, our app has a form for submitting a reader ID and amount, so let's create an API route for processing a payment using that information. This route will ensure that when a cashier helps a customer checkout at the counter, the right amount will appear on the right card reader so that they can complete their payment.
![]()
If you need a starting point for your app, feel free to start off from this repl. It has all the code from the previous post.
If you want to see the end result, check out this repl. ![]()
On the backend, well create a POST /process-payment route that will expect a request body with an amount, representing the price in cents, and a reader_id, representing the readers unique identifier. Well tell Stripe to create a payment by passing the amount to stripe.paymentIntents.create() along with the required currency, capture_method, and payment_method_type parameters. This will create a Payment Intent, a special object that Stripe uses for managing payment states. Well destructure and alias the Payment Intents id as paymentIntentId.
We can tell Stripe to prompt a specific reader to payment acceptance mode for our payment by calling stripe.terminal.readers.process_payment() with the card readers ID (readerId) and the payments ID (paymentIntentId) as arguments.
Now, when /process-payment is called with a valid amount and readerId, Stripe will create a payment of the specified amount and forward it to the specified card reader. Now we just need to update our frontend, so that we can send it a readerId and amount when we submit our form to /process-payment.
On the frontend, well create a submit event listener that passes our amount and reader ID to /process-payment. If we receive an error, well add it to our #messages div just below our form and exit the function. Otherwise, well add a message to #messages indicating that weve successfully created our payment for our reader and redirect to the /readers.html page, a page for controlling the reader after its prompted.
Now when we submit our form, well create a payment and send it to our reader. Once that's done, we'll transition the web app to the /readers page.
If you look for your payment in the Stripe dashboard, youll notice that it has created a new payment. Weve successfully passed a payment to our Stripe Terminal reader. Huzzah!
Now we just need to test a cardholder actually tapping or dipping their card against our physical or simulated reader.
Authorizing a payment in test mode
If you have a physical BBPOS WisePOS E card reader, testing a payment attempt is easy because the reader will actually transition to the payment acceptance screen. Tap your test card against the reader and itll pretend to authorize the payment.
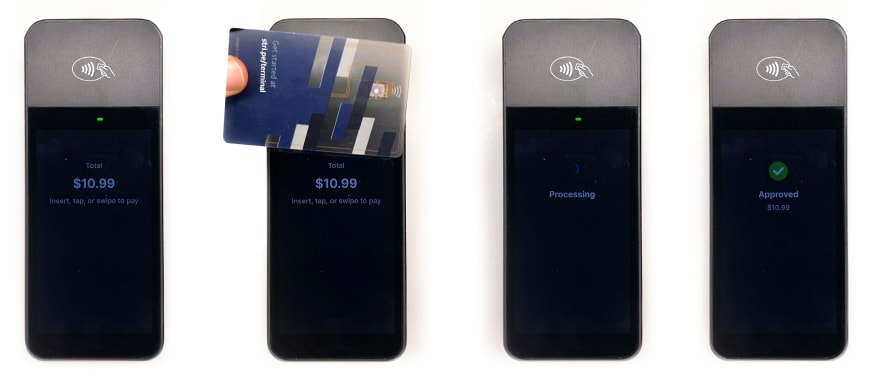
If youre using a simulated reader, youll need to use the Terminal Reader test helper to simulate a cardholder dipping or tapping their card against the simulated reader. This is helpful for development without a reader, but its also a good tool for integration tests. You should probably learn to use it even if you have a physical WisePOS E reader on hand.
Let's build a route for authorizing simulated payments on simulated readers. On the backend, in /server/server.js, add another POST API route. Here well destructure readerId from the request body and pass it as an argument stripe.testHelpers.terminal.readers.presentPaymentMethod(). This will tell Stripe to simulate a cardholder tapping or inserting their card on the reader.
On the frontend, in /client/reader.js, well add another event listener for DOMContentLoaded and get the reader_id and payment_intent_id parameters from the URL and assign them to readerId and paymentIntentId, respectively. Well need the readerId for reader actions like simulating the payment. The paymentIntentId will come in handy when its time to capture the payment in the next section.
Add a click event listener to our Simulate Payment button. Make a POST request to /simulate-payment with the readerId. As before, add a message if there are any errors. Otherwise, well add a message to our #messages div to show that the simulated payment was successful.
Go try out your Simulate Payment button in your app.
If you click on the link thats generated by the addMessage helper, itll take you to the payment in the Stripe Dashboard. Youll see that the payment has a card attached to it and is uncaptured, which means that the transaction has been authorized but not finalized.
Congratulations: youve successfully simulated your first test Terminal authorization using the simulated card reader!
Now we just need to add our own capture functionality to our point-of-sale app.
Capturing authorized payments
Stripe Terminal authorizations only last 48 hours. After that, the authorization drops off and is released back to the cards balance. Remember: if you dont capture your payments, you wont get paid!
Lets create one last API endpoint for telling Stripe to finalize the payment. On the backend, in /server/server.js, well create a new POST route, /capture-payment. This route will expect a request body with a paymentIntentId. Well capture the payment by calling stripe.paymentIntents.capture() passing in the paymentIntentId as the sole argument.
On the frontend, in client/reader.js, well add a click event listener for our Capture button. Itll use the payment_intent_id from the URL parameters. If the attempt succeeds, well forward the user to /success.html, passing along the Payment Intent ID, so that we can render the payment details.
Now were able to finalize our payment by clicking the Capture button after once a payment has been authorized. Remember how we mentioned that sometimes cashiers need to press a button to complete the transaction? In the context of our point-of-sale app, thats the Capture button.
Were officially able to accept and finalize in-person payments with Stripe Terminal.
Next up: Canceling in-flight in-person payments
Creating and completing payments with a Stripe Terminal reader is all well and good, but occasionally a customer will change their order mid-payment. In our final post, well learn how to cancel in-flight payments.
Stay connected
Want to stay up to date on Stripes latest integrations, features, and open-source projects?
Follow us on Twitter
Join the official Discord server
Subscribe to our Youtube channel
Sign up for the Dev Digest
About the author

Charles Watkins is a Developer Advocate at Stripe where he writes, codes, and livestreams about online payments. In his spare time, he enjoys drawing, gaming, and rewatching the first five seasons of Game of Thrones.
Original Link: https://dev.to/stripe/get-paid-irl-how-to-accept-money-with-stripe-terminal-part-34-13de
Dev To
More About this Source Visit Dev To