
An Interest In:
Web News this Week
- April 2, 2024
- April 1, 2024
- March 31, 2024
- March 30, 2024
- March 29, 2024
- March 28, 2024
- March 27, 2024
Some of Our Sources
- BoingBoing
- Techcrunch
- Just Creative
- Naldz Graphics
- Noupe
- My Ink Blog
- 24 Ways
- Specky Boy
- Spyre Studios
- Web Resource Source
Help Webnuz
Referal links:
Building a Web Service WhatsApp Cloud API & Flask: Sending Template Messages - Part 1
Meta has launched an API accessible for businesses or developers to extend their services or allow better communication.
In this series of articles, we will build a simple web service using Flask and the Cloud API. At the end of the series, we'll have a Flask server deployed that can be used to send messages to a phone number but also received notifications via webhooks.
Great, right? Let's start with configuring the project and sending a template message.
Requirements
You need to configure a business account with Meta developers. Here is some documentation but I'll give steps below:
- Create a Meta business account.
- Create a WhatsApp business account.
- Link the WhatsApp business account to the Meta business account.
- Create a new application under the name of the Meta business account.
- Configure Whatsapp.
Configuring the project
Create the directory that will contain the flask project.
mkdir flask-whatsapp-api cd flask-whatsapp-api After that, create a virtual environment.
python3.10 -m venv venvAnd activate the environment.
source venv/bin/activateNext, install the dependencies.
pip install Flask requests python-dotenv gunicornCreating the Flask App
At the root of the project, create a config.py file. This file will be helpful to load env variables.
from dotenv import load_dotenvload_dotenv()Adding the Whatsapp Client
Next, create a new directory called app with a __init__.py file inside it. This will tell Python that this is a package and it will help with imports.
Inside the app directory, create a file named whatsapp_client.py. This file will contain a wrapper to interact with the Whatsapp Cloud API.
It's always an interesting habit to write wrappers (classes or functions) when you will be interacting with external services.
In this case, we'll write a class called WhatsAppWrapper. Let's start with basic initialization.
# app/whatsapp_client.pyimport osimport requestsimport jsonclass WhatsAppWrapper: API_URL = "https://graph.facebook.com/v13.0/" API_TOKEN = os.environ.get("WHATSAPP_API_TOKEN") NUMBER_ID = os.environ.get("WHATSAPP_NUMBER_ID") def __init__(self): self.headers = { "Authorization": f"Bearer {self.API_TOKEN}", "Content-Type": "application/json", } self.API_URL = self.API_URL + self.NUMBER_ID def send_template_message(self, template_name, language_code, phone_number): passLet's write the send_template_message method. We'll just use the requests package to make a request to the Cloud API and return a response if possible.
... def send_template_message(self, template_name, language_code, phone_number): payload = json.dumps({ "messaging_product": "whatsapp", "to": phone_number, "type": "template", "template": { "name": template_name, "language": { "code": language_code } } }) response = requests.request("POST", f"{self.API_URL}/messages", headers=self.headers, data=payload) assert response.status_code == 200, "Error sending message" return response.status_codeGood, with the wrapper ready, we now move to write the Flask web application and add the POST endpoint.
Adding the Flask Web App
Inside the app directory, create a new file called main.py. It will contain our API routes.
import osfrom flask import Flask, jsonify, requestfrom app.whatsapp_client import WhatsAppWrapperapp = Flask(__name__)VERIFY_TOKEN = os.environ.get('WHATSAPP_HOOK_TOKEN')@app.route("/")def hello_world(): return "Hello World!"@app.route("/send_template_message/", methods=["POST"])def send_template_message(): passLet's write the send_template_message controller. Basically, we need to check for the fields and just initialize a WhatsApp client and then send the message.
@app.route("/send_template_message/", methods=["POST"])def send_template_message(): """_summary_: Send a message with a template to a phone number""" if "language_code" not in request.json: return jsonify({"error": "Missing language_code"}), 400 if "phone_number" not in request.json: return jsonify({"error": "Missing phone_number"}), 400 if "template_name" not in request.json: return jsonify({"error": "Missing template_name"}), 400 client = WhatsAppWrapper() response = client.send_template_message( template_name=request.json["template_name"], language_code=request.json["language_code"], phone_number=request.json["phone_number"], ) return jsonify( { "data": response, "status": "success", }, ), 200The route for this article is ready. Let's create and run the server with gunicorn and configure env variables.
Running the project
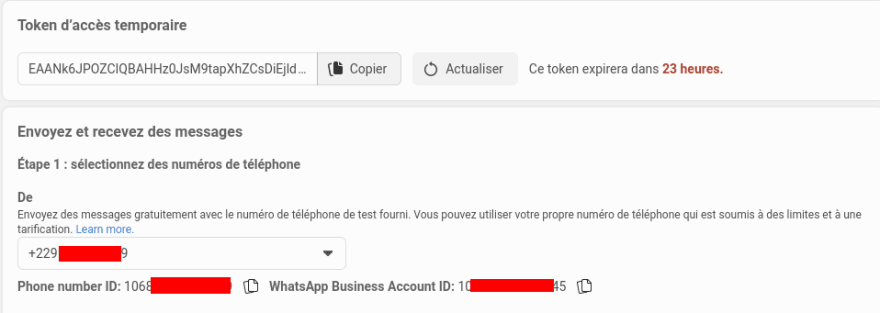
As we are working with tokens and ids provided by WhatsApp API, it's important to have them as environment variables.
Create a .env file at the root of the project and proved the following values.
WHATSAPP_API_TOKEN=WHATSAPP_NUMBER_ID=And add the values provided on your Dashboard.
At the root of the project, add a new file called wsgi.py. This will be used by gunicorn to run the Flask application.
from app.main import appif __name__ == "__main__": app.run()And then launch the project with the following command.
gunicorn -w 4 wsgi:appYour application will be running at http://127.0.0.1:8000.
Make a POST request to http://127.0.0.1:8000/send_message with the following payload.
{ "template_name": "hello_world", "language_code": "en_US", "phone_number": "RECIPIENT_PHONE_NUMBER"}And you'll receive a WhatsApp message on the number.

And we have the first version of a web service using WhatsApp Cloud API and Flask. In the next part, we'll deploy the Flask application on Heroku and configure a webhook. Stay tuned.
Want to add something or have some comments? Let's discuss this in the comments section.
Article posted using bloggu.io. Try it for free.
Original Link: https://dev.to/koladev/building-a-web-service-whatsapp-cloud-api-flask-sending-template-messages-part-1-249g
Dev To
More About this Source Visit Dev To