
An Interest In:
Web News this Week
- March 21, 2024
- March 20, 2024
- March 19, 2024
- March 18, 2024
- March 17, 2024
- March 16, 2024
- March 15, 2024
Some of Our Sources
- TutsPlus - Code
- Web Designer Wall
- Team Treehouse
- Fuel Your Creativity
- Web Designer Depot
- Crazy Leaf Design
- Web Design Ledger
- Design Modo
- Android Headlines
- Hashedout
Help Webnuz
Referal links:
Cloud Functions using the new Kotlin Runtime
One of the highlights of Appwrites latest release is the addition of four new Cloud Function runtimes! Java, Kotlin, .NET and C++ are now a part of our ever growing list of runtimes!
In this article, well take a look at writing Cloud Functions using the Kotlin runtime. If youre an Android developer, you could essentially build your app and write any necessary Cloud Functions without the need to learn any new language!
New to Appwrite?
Appwrite is open source backend-as-a-service that abstracts all the complexity involved in building a modern application by providing you with a set of REST APIs for your core backend needs. Appwrite handles user authentication and authorization, realtime databases, file storage, cloud functions, webhooks and much more! If there is anything missing, you can extend Appwrite using your favorite backend language.
Prerequisites
Before we get started, there are a couple of prerequisites. If you have the prerequisites setup already, you can skip to the following section.
In order to follow along, youll need a few things beforehand.
- An Appwrite instance
If you havent set up an Appwrite instance yet, you can follow the getting started guides to get up and running quickly. You can choose between One-click installations on DigitalOcean or Manual installations with Docker.
TL;DR - It's just a single command to install Appwrite
docker run -it --rm \ --volume /var/run/docker.sock:/var/run/docker.sock \ --volume "$(pwd)"/appwrite:/usr/src/code/appwrite:rw \ --entrypoint="install" \ appwrite/appwrite:0.14.2Once your server is up and running, head over to the Appwrite Dashboard on your servers public IP address ( or localhost if you installed locally ) and create a new user account.

- The Appwrite CLI
Well use the Appwrite CLI during this exercise as it makes the process super simple. If you have Node.js installed, the installation command is a simple
npm install -g appwrite-cliIf npm is not your thing, we have numerous installation options you can find in the getting started guide for the CLI.
Getting Started
With everything set up, we can now begin! Login to the Appwrite CLI using the following command and use the credentials we used when setting up the Appwrite server to login.
appwrite login? Enter your email test@test.com? Enter your password ******** SuccessNext, we need to create a new Appwrite project to work with. We can use the following command to set it up
appwrite init project? How would you like to start? Create a new Appwrite project? What would you like to name your project? My Awesome Project SuccessYou can give your project any name of your choice. Im going to stick to the defaults in this case. Youll notice a new appwrite.json file in the current directory which stores all the information about your project.
Its time to start writing our function! But wait, we don't need to start from scratch! The CLI can setup all the boilerplate for us using the following command
appwrite init function? What would you like to name your function? kotlin-example? What runtime would you like to use? Kotlin (kotlin-1.6) SuccessGive your function a name and choose the Kotlin 1.6 runtime. This will create a new Appwrite Function in your project and set up all the boilerplate code necessary. Feel free to examine the files created in the functions/kotlin-example directory. Youll find the CLI created a simple Kotlin function that returns a very important JSON message
{ "areDevelopersAwesome":true}Before we go ahead and modify the function, lets deploy it to get a feel of the end-to-end workflow from initializing the function to deploying it.
appwrite deploy function? Which functions would you like to deploy? kotlin-example (62863924adaff7c88a10) Info Deploying function kotlin-example ( 62863924adaff7c88a10 ) Info Ignoring files using configuration from appwrite.json Success Deployed kotlin-example ( 62863924adaff7c88a10 )The appwrite deploy function command packages your source code, uploads it to the Appwrite server and initiates the build process. During this time, all the functions dependencies are installed and a .jar file is generated for your function.
You can head over to your Appwrite Dashboard to track the progress of your deployment.
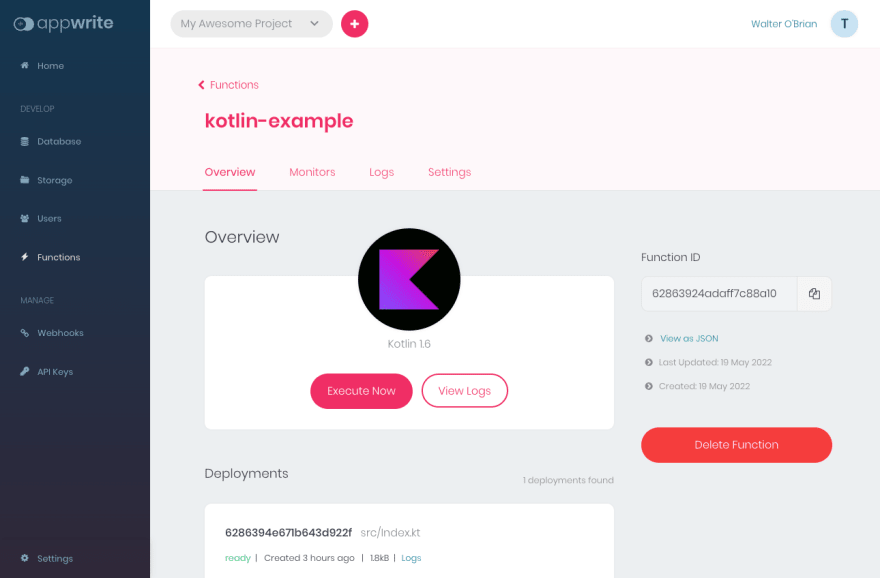
Once the deployment completes, you can execute your function by clicking the Execute Now button.

The first execution results in what we call a Cold Start. Essentially this is the first time a runtime is created, so it takes a bit longer. As you can see, the first execution took about 450ms and subsequent executions were around 4ms. Now that we have an idea of the complete workflow, we can start tinkering with the code and write some cool functions.
Answering the Most Fundamental Question in Mathematics
As the title suggests were going to write a cloud function to answer one of the most fundamental questions in Mathematics.
Is the given number odd or even? I know what youre thinking Its so easy! Why do I need a Cloud Function for it? I could just write
fun main() { val x = 12 println( x%2 == 0 ) // true println( (x/2) * 2 == x ) // true println( x and 1 == 0 ) // true println( ( x shr 1) shl 1 == x ) // true}But wait! Were taking this to the next level. Were going to decide if our number is even or odd using one of the most sophisticated and well written APIs out there! The isEven API.
Jokes aside, this example aims to illustrate how you can make API calls from your Cloud Function which will enable you to build anything youd like.
Firstly, open the kotlin-example folder in your favorite IDE. Lets start with a blank canvas and clean up our src/Index.kt file to
@Throws(Exception::class)fun main(req: RuntimeRequest, res: RuntimeResponse): RuntimeResponse { return res.json(mapOf( "message" to "Hello, World!" ))}In order to deal with JSON objects more easily, well make use of the popular [gson](https://github.com/google/gson) library. Include the following dependency in the deps.gradle file.
dependencies { implementation 'com.google.code.gson:gson:2.9.0'}Next, lets write some code to read and parse a number sent as an argument to this function.
import com.google.gson.Gsonprivate val gson = Gson()@Throws(Exception::class)fun main(req: RuntimeRequest, res: RuntimeResponse): RuntimeResponse { val payload = gson.fromJson<Map<String, Any>>( req.payload.ifEmpty { "{}" }, MutableMap::class.java ) val number = payload["number"] ?: 2 return res.json(mapOf( "message" to "Hello, World!" ))}Lets go over the code we just wrote. From the functions documentation, we see that the payload is available through the request object and is a JSON string that needs to be converted to a JSON object to parse further. If the payload is empty, we replace it with an empty JSON object.
We then retrieve the number that was passed to the function and default to the number 2 in case its empty. We also import the gson library and create an instance of it.
Next, lets make the call to the API using the native HTTP client.
import com.google.gson.Gsonimport java.io.BufferedReaderimport java.io.InputStreamReaderimport java.net.HttpURLConnectionimport java.net.URLprivate val gson = Gson()@Throws(Exception::class)fun main(req: RuntimeRequest, res: RuntimeResponse): RuntimeResponse { val payload = gson.fromJson<Map<String, Any>>( req.payload.ifEmpty { "{}" }, MutableMap::class.java ) val number = payload["number"] ?: 2 val url = URL("https://api.isevenapi.xyz/api/iseven/$number") val con = (url.openConnection() as HttpURLConnection).apply { requestMethod = "GET" responseCode } val responseString = buildString { BufferedReader(InputStreamReader(con.inputStream)).useLines { lines -> lines.forEach { append(it) } } } con.disconnect() val response = gson.fromJson<Map<String, Any>>( responseString, MutableMap::class.java ) return res.json(response)}Awesome! Were all set to test our function! If you remember the drill, all we need to do is deploy our function.
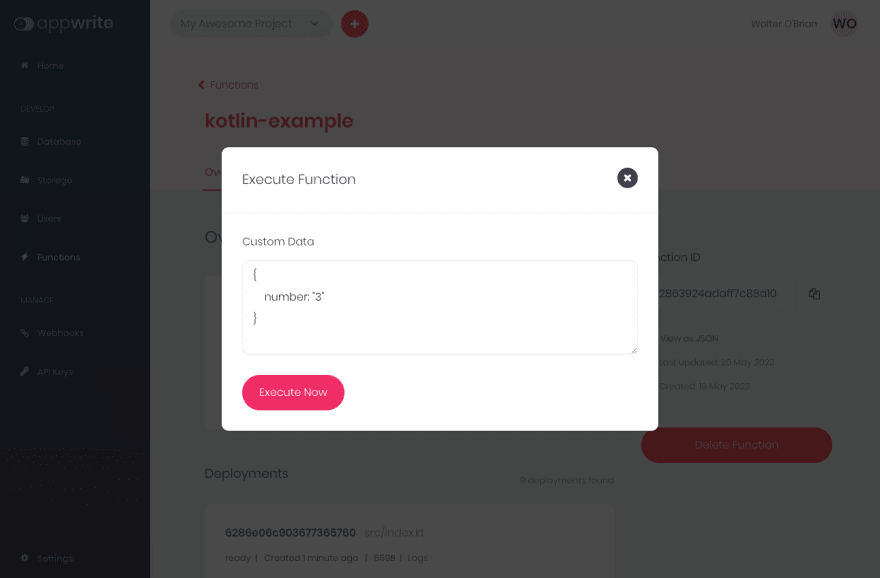
appwrite deploy function? Which functions would you like to deploy? kotlin-example (62863924adaff7c88a10) Info Deploying function kotlin-example ( 62863924adaff7c88a10 ) Info Ignoring files using configuration from appwrite.json Success Deployed kotlin-example ( 62863924adaff7c88a10 )You can now head over to the Appwrite console and execute the function with the following payload.
Head over to the Logs tab to check the status and response from the function.
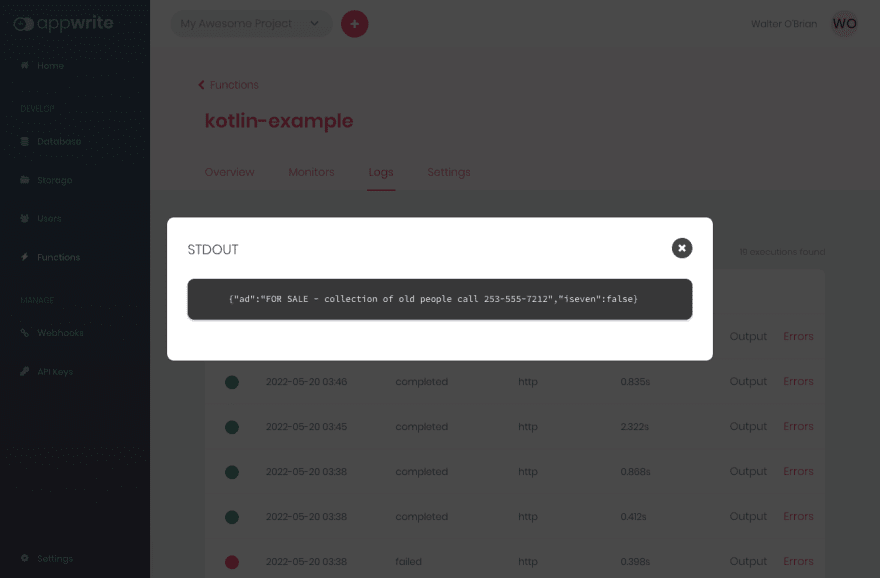
Perfect! Looks like weve managed to solve one of the most pressing problems in Mathematics after all! Not to mention, the API also comes with a host of quirky Ads! Like this one to purchase old people
And that brings us to the end of this tutorial. Feel free to modify the function to your liking and play around with the API. If youre stuck or need any help, were always here to help. Simply head over to the #support channels on our Discord Server
Resources
Here are some handy links for more information
Original Link: https://dev.to/appwrite/cloud-functions-using-the-new-kotlin-runtime-3ejo
Dev To
More About this Source Visit Dev To