
An Interest In:
Web News this Week
- April 2, 2024
- April 1, 2024
- March 31, 2024
- March 30, 2024
- March 29, 2024
- March 28, 2024
- March 27, 2024
Some of Our Sources
- Engadget
- Pearsonified
- Inspiredology
- Line 25
- Wal You
- Spyre Studios
- Freelance Switch
- Web Resource Source
- Daily Now
- The Verge
Help Webnuz
Referal links:
Kick-Off Your First Shopify App With React, NodeJS and Common Ninja
Let's start at the end. There are tons of tutorials and resources out there on how to build apps for Shopify, so what's so special about this one?
Well, I'm glad you asked!
If you had any previous experience with building Shopify apps, you probably wasted endless time on reading their documentation, trying to understand the authentication flow, connecting to webhooks, testing different ways to charge money for your app basically - trying to connect everything together.
The thing is, once youve finished building your app (and presuming that youve survived the above process) it will only be available to Shopify merchants. But what about other e-commerce platforms like WooCommerce, Wix, BigCommerce, etc.? Your app is probably suitable for them as well. But in order to make it work on those platforms, you'll need to rewrite your app from scratch and, in some cases, you'll need to add more capabilities that arent supported by these platforms, like monetization and payments.
You can read more about The Problems With Building Apps for E-Commerce Platforms in a previous post we wrote.
At Common Ninja we solve these problems by providing developers with a single interface for E-Commerce and payments platforms, allowing you to focus solely on building the business logic of your app, rather than spending too much time on integrating it with multiple platforms.
In this article, I'll walk you through the process of building your first Shopify app with Common Ninja, NodeJS, and React. And the best part? Once your app is ready, you can use the same code to monetize it on other e-commerce platforms that we support!
Requirements
Before we start, there are a few things you need to set, so make sure you have the following:
- A developer account on Common Ninja.
- A partner account on Shopify.
- An integration between Shopify and Common Ninja. See a tutorial here.
Technical requirements:
Installation
If you have all of the above installed you can start running the following code to create a comfortable environment and start working on your app with a simple integration to Common Ninja:
npx @commonninja/create-nindo-app project-nameYou'll be asked to select a template. For the purpose of this quick start tutorial, choose the Server template.

The project will automatically install all of its dependencies.
Setup
Open the generate project in VSCode - or any other code editor you're using, and edit its .env file:
# EnvPORT=4000# Common Ninja AppCOMMONNINJA_APP_ID=COMMONNINJA_APP_SECRET= Set the COMMONNINJA_APP_ID and the COMMONNINJA_APP_SECRET based on your Common Ninja app (if you haven't created an app yet, now is the time):

Next, start the development server by running:
docker compose upMake sure that the server is up and navigate to localhost:4000. You should see a Hey there! message.
Project Structure
This is a very simple and basic NodeJS project with Docker. It is already set up with TypeScript and an automatic watch on files for server restart. Under the src folder there are two files:
src app.ts routes.tsapp.ts
A very common NodeJS app entry file. Here we set up the initial Express server:
import 'dotenv/config';import express from 'express';import cookieParser from 'cookie-parser';import bodyParser from 'body-parser';import router from './routes';const port = parseInt(process.env.PORT || '3000');const app = express();// Parse cookiesapp.use(cookieParser());// Parse application/x-www-form-urlencodedapp.use(bodyParser.urlencoded({ extended: false }));// Parse application/jsonapp.use( bodyParser.json({ limit: '50mb', }));app.use('/', router);// Start serverapp.listen(port, () => { console.log(`Running at http://localhost:${port}`);});module.exports = app;Nothing special here.
routes.ts
This is an example of how to use Common Ninja's Node SDK library. Each one of the routes is initializing the CommonNinja class:
const { COMMONNINJA_APP_ID, COMMONNINJA_APP_SECRET } = process.env;function getCommonNinjaClient(req: Request) { if (!COMMONNINJA_APP_ID || !COMMONNINJA_APP_SECRET) { throw new Error('Missing Common Ninja app ID or secret key.'); } // Create a new Common Ninja instance return new CommonNinja({ appId: COMMONNINJA_APP_ID, appSecret: COMMONNINJA_APP_SECRET, accessToken: req.query.token as string, env: CommonNinja.envs.production, logs: true, });}In the routes.ts file we define 3 routes, each one interacts with different parts of Common Ninja's API.
/connect
The /connect route is responsible for redirecting your user to an authentication flow with the platforms your app supports. So if you've added the Shopify and WooCommerce integrations to your Common Ninja app - by browsing to http://localhost:4000 you'll see these platforms' logos.

By clicking on one of them you'll be redirected to the platform's authentication page. Once the authentication flow is done, Common Ninja will redirect the user to the Redirect URL you defined in the relevant section of your app's dashboard.

The code that handles this route is using the SDK's getConnectUrl method:
// Authenticationrouter.get('/connect', async (req: Request, res: Response) => { // Get a new Common Ninja instance const client = getCommonNinjaClient(req); // Get authentication url for platform const url = client.auth.getConnectUrl(); // Redirect to authentication url res.redirect(url);});/api
This route is in fact a proxy to Common Ninja's API. The SDK has a built-in proxy method that handles the incoming requests:
// API Proxyrouter.all('/api*', async (req: Request, res: Response, next: NextFunction) => { // Get a new Common Ninja instance const client = getCommonNinjaClient(req); // Proxy api requests to Common Ninja API return client.apiProxyMiddleware(req, res, next, '/api');});The 4th parameter in the apiProxyMiddleware method is the route in your app that will be rewritten.
For example:/api/ecommerce/products will be proxied to https://api.commonninja.com/integrations/api/v1/ecommerce/products.
Please note: You don't have to use the API that way, instead you can support selected APIs by using the different methods the SDK supports. For example:
router.get('/api/products', async (req, res, next) => { const client = getCommonNinjaClient(req); const data = await client.ecommerce.getProducts(); res.send(data);});/webhooks
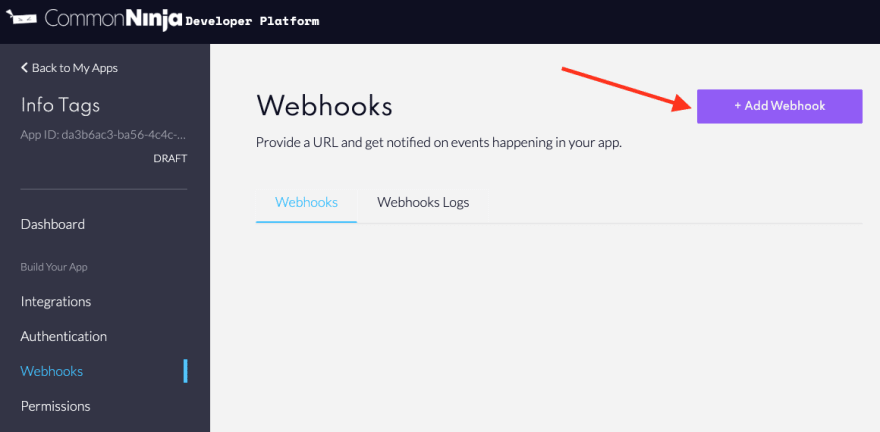
Lastly, the /webhooks route will accept webhook messages from Common Ninja's supported platforms. You may read more about Webhooks here.
Webhook messages should be validated, and our SDK will take care of that for you:
// Validate and handle Common Ninja's webhooksrouter.post('/webhooks', async (req: Request, res: Response) => { try { const client = getCommonNinjaClient(req); // Validate webhook message source const validated = client.webhooks.validateWebhook(req); if (!validated) { throw new Error('Cannot validate signature.'); } console.log('Webhook message', req.body); // Send a 200 OK response back to Common Ninja res.sendStatus(200); } catch (e) { console.error(`Cannot handle webhook message`, e); res.status(500).send((e as Error).message); }});In order to test the webhooks, you'll need to work with https protocol locally. The way we handle it is by using tunnels.
This project has another docker compose file for this purpose. Run:
docker compose -f docker-compose.https.yml upAnd you'll get a secured URL that you can use to test the webhooks integration:

Once you have the URL, simply add a new webhook URL to your Common Ninja app:
Client
Now that we have the server ready, let's create a simple react app using React CRA:
npx create-react-app client-appOpen the generated project, look for the package.json file, and add a proxy property:
{ ... "proxy": "http://localhost:4000", "scripts": { "start": "react-scripts start", "build": "react-scripts build", "test": "react-scripts test", "eject": "react-scripts eject" }, ...}React will proxy requests to the server we created.
Next, let's start the project with npm start.
Just for the sake of the simplicity, we'll see how easy it is to access Common Ninja APIs through the app, without adding a single line of code to the server.
Let's edit the App.jsx file.
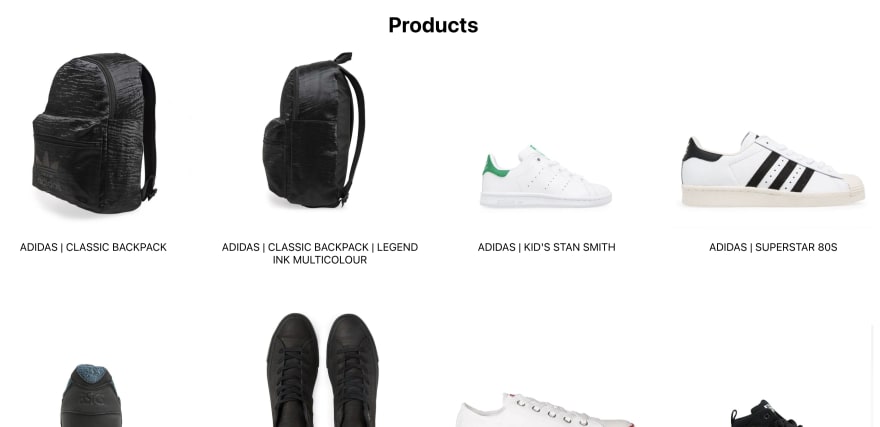
import { useState, useEffect } from 'react';import './App.css';function App() { const searchParams = new URLSearchParams(window.location.search); const [token] = useState(searchParams.get('token')); const [products, setProducts] = useState([]); async function getProducts() { try { const data = await fetch(`/api/ecommerce/products?token=${token}`); const response = await data.json(); setProducts(response.data?.items); } catch (e) { console.log(e); } } function renderProducts() { return ( <> <h1>Products</h1> <div className="products"> {products.map((product) => ( <div> <img src={product.images[0]} alt={product.name} /> <p>{product.title}</p> </div> ))} </div> </> ); } useEffect(() => { if (token) { getProducts(); } // eslint-disable-next-line }, []); return ( <div className="App"> {token ? ( renderProducts() ) : ( <a href="http://localhost:4000/connect">Click to Connect</a> )} </div> );}export default App;54 lines of code (even less) is all it takes to get a products list from Shopify API (or any other e-commerce platform), using Common Ninja.
In the first 3 lines of the function we set an initial state for the token and products list. In case the user has already gone through the authentication process, the url of the page will include a unique token, generated by Common Ninja that allows him to access his store's resources.
In the useEffect hook, we make sure there's a token in the url. If there is, we're making an API call to our server.
useEffect(() => { if (token) { getProducts(); }}, []);The getProducts function is using the fetch API to make a simple request to our server with the generated token:
async function getProducts() { try { const data = await fetch(`/api/ecommerce/products?token=${token}`); const response = await data.json(); setProducts(response.data?.items); } catch (e) { console.log(e); }}The render function is also pretty straight forward. If there's a token in the URL, we show a list of products, else, we render a connect button that leads to the /connect route we mentioned before.
return ( <div className="App"> {token ? ( renderProducts() ) : ( <a href="http://localhost:4000/connect">Click to Connect</a> )} </div>);The renderProduct function simply iterates on the products list that the API returns, as described in the docs.
function renderProducts() { return ( <> <h1>Products</h1> <div className="products"> {products.map((product) => ( <div> <img src={product.images[0]} alt={product.name} /> <p>{product.title}</p> </div> ))} </div> </> );}And vualah! Here's the result:
Summary
In this article, we've learned how to create a Shopify app using React, NodeJS, and Common Ninja.
We saw how easy and simple it is to connect your app to Shopify, without being worried about authentication, APIs, and other complexities.
This is an example of a very simple app, but Common Ninja supports much complex use cases.
You can learn more about our e-commerce and payments APIs in our docs, and as always, we'll be more than happy to help you to get your app up and running so if you have any questions feel free to reach out!
Meanwhile, join our growing Discord community!
Original Link: https://dev.to/commonninja/kick-off-your-first-shopify-app-with-react-nodejs-and-common-ninja-3821
Dev To
More About this Source Visit Dev To