An Interest In:
Web News this Week
- April 23, 2024
- April 22, 2024
- April 21, 2024
- April 20, 2024
- April 19, 2024
- April 18, 2024
- April 17, 2024
Get Hands On With Unit Testing - Jest Testing Tutorial
What Is Unit Testing?
Unit testing is a testing method that tests a single unit of source code which involves verifying the output of a function or component for a given input.
In other words, writing unit tests is an essential part of Test-Driven-Development(TDD) where we verify that our code works as expected before we begin writing the actual function.
What Is Jest?
Jest is a JavaScript Testing Framework designed to make testing simple by providing all the essential tools for running tests within one package.
In this Jest testing tutorial, we will learn about various features of Jest, its setup and see how we can use Jest with an end to end example. We will also explore about code coverage using Jest.
How To Install Jest?
Run this code in your command prompt to install the Jest Package to a new or existing project.
# NPM Codenpm install --save-dev jest @types/jest# Yarn Codeyarn add --dev jest @types/jestHow To Setup Tests With Jest?
Let's first start by updating the package.json file with a test script that calls the Jest command for us:
{ "scripts": { "start": "react-scripts start", "build": "react-scripts build", "test": "jest", "eject": "react-scripts eject" }}To run the tests, run npm test which we just defined in the package.json.
# NPM usersnpm run test# Yarn usersyarn run testBy default, Jest expects to find test files in a folder called tests in your project folder. Let's create that new folder now:
mkdir __tests__Creating Your First Test Suite
Next up create a new file within the __test__ folder that you just created and call it calculator.test.js. Every time you start writing a new test suite for a functionality wrap it in a describe block.
describe("Calculator tests", () => { //test stuff goes here });As you can see it takes two arguments: a string for describing the test suite, and a callback function for wrapping the actual test.
Visit the next line and let's create a new function called test which will be the actual test block:
describe("Calculator tests", () => { test('adding 1 + 2 should return 3', () => { // Resolve var result = calculator.sum(1,2) // assert expect(result).toBe(3); });});Whenever you write a test you'll usually need to make assertions on your code. To make an assertion, you'll need an input and an expected output.
Using Matchers
Jest uses "matchers" to let you test values in different ways.
Here are the most common ones:
- To Be: Strict equality (===)
expect(1+2).toBe(3);- Not To Be: Strict equality (!==)
expect(2+2).not.toBe(3) - To Equal: Deep equality
expect([2, 2]).toEqual([2, 2])- toBeTruthy or toBeFalsy: Note that anything that is not logically true is falsy.
expect(null).toBeFalsy();expect(undefined).toBeFalsy();expect(false).toBeFalsy();expect("Hello world").toBeTruthy();- Not: Returns the opposite of the matcher's result.
expect([2]).not.toEqual([3]);Now these are not the only matchers out there and if you want to learn more about matchers then visit Jest Docs.
Running Specific Tests
First go into your calculator.js file and copy the contents shown below:
const calculator = { sum: function(a,b) { return a + b; }, diff: function(a,b) { return a - b; }, product: function(a,b) { return a * b }, divide: function(a,b){ return a / b } }module.exports = calculator;Then go back into your calculator.test.js and specifiy the filename of the test file you want to run:
// This is how the file would look with just the importconst calculator = require('../calculator');// Test Suite Goes HereNow let's write tests for adding two numbers and validate the expected result. The numbers we'll use are 1 & 2 and expecting output as 3.
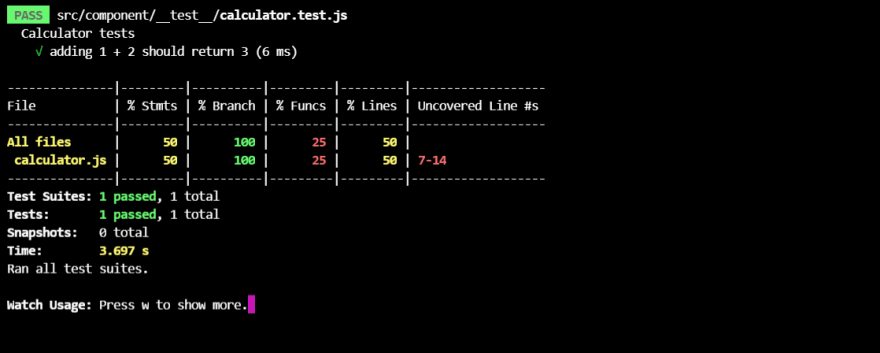
describe("Calculator tests", () => { test('adding 1 + 2 should return 3', () => { // Resolve var result = calculator.sum(1,2) // assert expect(result).toBe(3); });});In order to run this test we will need to run the following command npm run test in the terminal.
You should see the following output
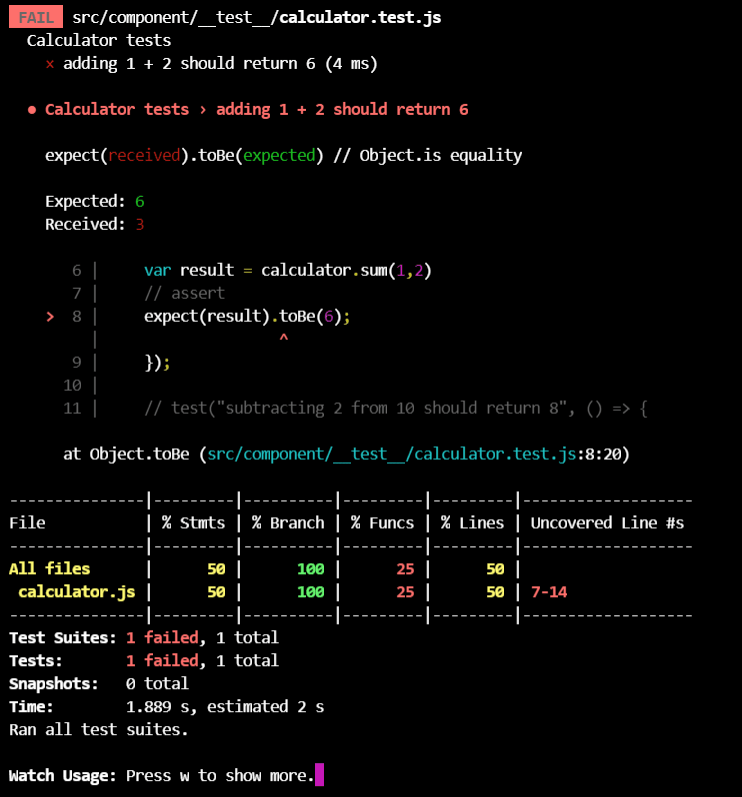
Let's try some more tests where we write a failing test case and see what output we get. Change the result to an incorrect value to get this test to work.
See how the test looks like.
describe("Calculator tests", () => { test('adding 1 + 2 should return 6', () => { // Resolve var result = calculator.sum(1,2) // assert expect(result).toBe(6); });});Now run the code above and let's see what we get.
As you can see you'll be able to get a detailed output of what was actually returned and what was expected and which line caused the error in the function under test.
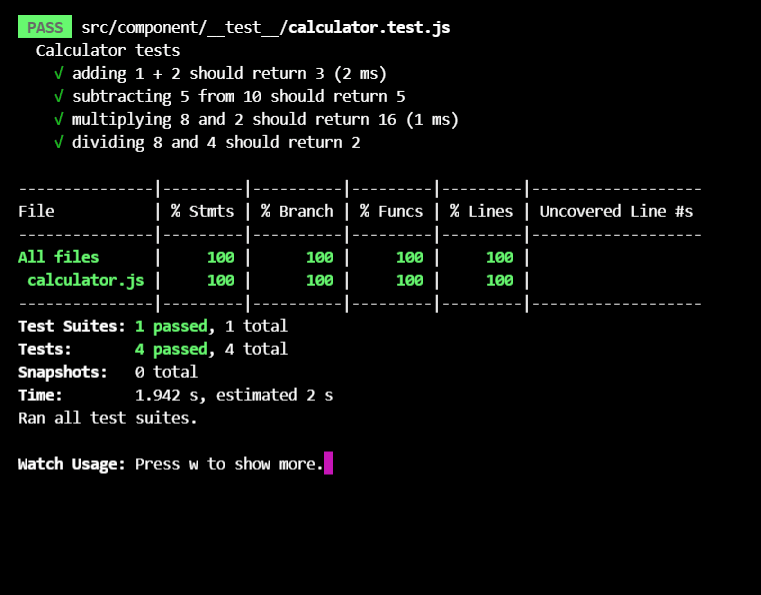
Let's finish off the test suite for the other functions i.e. subtract, product and divide.
const calculator = require('../calculator');describe("Calculator tests", () => { test('adding 1 + 2 should return 6', () => { // Resolve var result = calculator.sum(1,2) // assert expect(result).toBe(6); }); test("subtracting 5 from 10 should return 5", () => { // Resolve var result = calculator.diff(10,5) // assert expect(result).toBe(5); }); test("multiplying 8 and 2 should return 16", () => { // Resolve var result = calculator.product(2,8) // assert expect(result).toBe(16); }); test("dividing 8 and 4 should return 2", () => { // Resolve var result = calculator.divide(8,4) // assert expect(result).toBe(2); }); });Now execute the completed test suite and see what we get.
Configure Test Coverage
Inside your package.json you can easily see your code coverage with the --coverage option.
// Package Contents "scripts": { "start": "react-scripts start", "build": "react-scripts build", "test": "jest --watchAll --coverage", "eject": "react-scripts eject" }Or you can also configure it by creating a jestconfig.json file with the following contents.
{ "collectCoverage":true, "coverageReporters": ["clover", "json", "lcov", ["text", {"skipFull": true}]], "coverageDirectory": "./report/code-coverage/"}Then go back into your package.json file and add the following command to your settings.
//Package Contents "scripts": { "start": "react-scripts start", "build": "react-scripts build", "test": "jest --watchAll --config=jestconfig.json", "eject": "react-scripts eject" },Note: Run npm test and see the generated output within the terminal.
Now you should see code coverage generating a lcov-report within your project for the calculator.js file.
Visit the Code Coverage directory and open the html file like so.
Open the calculator.js file and you should see the following output.
If your looking to improve with Jest then I'll highly recommend you visit their docs!
Again thank you so much for making it to the end, have a great day!
Original Link: https://dev.to/hr21don/get-hands-on-with-unit-testing-jest-testing-tutorial-5he1
Dev To
 An online community for sharing and discovering great ideas, having debates, and making friends
More About this Source Visit Dev To


