
An Interest In:
Web News this Week
- April 2, 2024
- April 1, 2024
- March 31, 2024
- March 30, 2024
- March 29, 2024
- March 28, 2024
- March 27, 2024
Some of Our Sources
- BoingBoing
- Technology Review
- TutsPlus - Code
- Six Revisions
- Reencoded
- CSS Globe
- Stylized Web
- Freelance Switch
- Web Resource Source
- The Verge
Help Webnuz
Referal links:
How to implement Two-Factor Authentication using Next.js, Twilio and Altogic
Introduction
This article will cover two-factor authentication basics using Next.js, Twilio, and Altogic, a Backend-as-a-Service platform using its client library. This authentication method allows users to add one more security layer to their application. Many people enable their two-factor authentication settings to increase their security using their phone numbers or authentication apps for security purposes.
You can check out the source code and demo app.
How is the two-factor authentication flow?
Users who already have an account need to set their phone number to enable two-factor authentication.
An SMS with a code is sent to the specified phone number by Altogic and Twilio.
Users verify their phone number by entering the code sent to their phone number.
Users can enable or disable the two-factor authentication setting from their profile.
When users try to sign in, if two-factor authentication is enabled, a code is sent to the specified phone number by Altogic and Twilio.
Users verify their identity by entering the code on the input on the screen.
If two-factor authentication is not enabled, they can sign in without this process.
Youtube Showcase Video
Set up the Project
This project builds on top of the complete e-mail authentication app we created previously. You can follow the tutorial to build the same app or clone the project from here and continue with the rest of the tutorial.
Twilio Integration
You need to sign up for Twilio with a free/paid trial. You need to get the Account SID and Auth Token for integration with Altogic Client Library.
If you use the free trial, you will need to take the Twilio phone number to send SMS messages to the users.
Create an Account on Twilio
Open Console
Click Get a trial phone number on the left-top of the Console
Copy Account SID, Auth Token, and My Twilio phone number values to the clipboard

Now, weve copied the configuration credentials to the clipboard. You must specify the verified phone numbers in trial accounts, which we defined as to number in Altogic.
Click on the Explore Products in the left sidebar.
Be sure that Messaging and Phone Numbers products are selected.
Now you can navigate to the Verified Caller IDs page by Sidebar Phone Numbers Manage Verified Caller IDs.

You should add your phone number as a Verified Caller from here.
And finally, you have to give geo permission to your phone numbers region. You can go to this page by Sidebar Messaging Settings Geo permissions.

Create the models
Models define the data structure and data validation rules of your applications. A model is composed of basic, advanced, and sub-model fields. As an analogy, you can think of models as tables and fields as columns in relational databases or models as documents and fields as document properties in non-relational databases.

When we create our application, a user model is created by default. We need to add a boolean field to this user model to let users enable and disable the two-factor authentication.
To create a field via the Designer, you need to Navigate to Models view and select the model you would like to add the new field. You will be directed to the model details view.

In the model details view, select New field.
From the dropdown menu, select the Boolean that you would like to create.
In the field name, type twoFactorAuth and set a default value of false
Select Create

We need to create a new model called phoneVerificationCode to handle the verification code we send to users phone numbers. This data type will be a Transient data type meaning it is not stored in the database. We are defining it as Transient because we dont need it after completing the verification.
To create a model via the Designer, you have two options. You can either create a model from scratch or a sample JSON document. In either case, first, you need to navigate to the Models view in designer and select +New.

After, you can pick a Model.

And create the phoneVerificationCode model. Afterward, we need to add three fields:
code field, which is an Integer.
userId field, which is an Object reference to the users model.
phoneNumber field, which is a Text field.

Create the endpoints
Endpoints are the communication channels to access the services provided in your applications, and through endpoints, you expose your application services and data to the outside world.
To create an endpoint via the Designer, you need to navigate the Endpoints view in designer and select New->Endpoint.

After clicking, you need to enter a relevant endpoint name and optionally pick a group, pick a method, specify the path and assign a service that handles the requests to the endpoint.
We can also click on the Session required checkbox, which enforces a need for a session when a request is made to the endpoint.

In this example, our method is POST, and our path is /users/set-phone meaning that if we send a POST request to this path, the service we define will run. We created a service by clicking Add new service and by naming our service, we will be created an empty service. We will design the service next.

We will create three more endpoints to verify the code while changing the phone, signing in, and implementing the particular sign-in functionality.
Create the verify code during changing phone endpoint:

Create the verify code during the sign-in endpoint:

Create the sign-in endpoint for implementing the particular 2-FA logic:

Now that we created our endpoints and services, we can start designing the services, which is the most fun part of using Altogic!
Design the Services
Building the flow of service involves three main activities.
Adding the right node from the nodes library to the service flow area.
Customizing the added node parameters using the node properties panel.
Linking the output link point of a node to the input link point of another node using relations.
First, we will implement the Set phone number service. We have the start node, which is used to start the execution of the endpoint handling service. It runs only once at the start of the service to trigger nodes connected to its output link point. We define a query string parameter of type text named phoneNumber as input for this endpoint.

Then, we check if the phone number sent is a valid phone number with the ISMOBILEPHONE() function.

If no, return an error response.

If yes, create an object of phoneVerificationCode model. For code, we generate a random number with RANDBETWEEN() function and insert the other fields from either the input or the session.

Cache the object we created so we can access it later for verifying the code. I want the code to expire after one minute, so I set the timeout value to 1 minute.

Send the SMS message to the specified phone number with the code. Here we use the Twilio credentials we obtained.

Then we return the success response. This is the final look of our service:

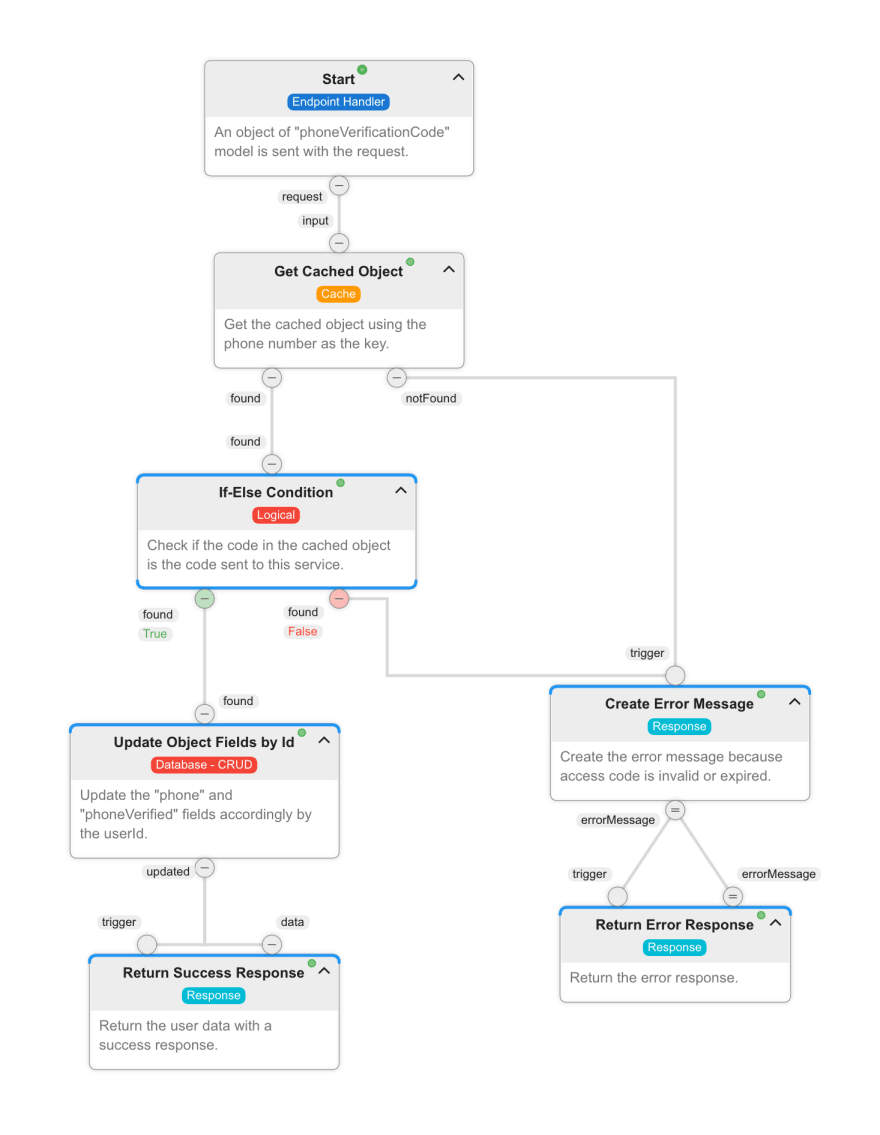
Next, we will implement the Verify code in change phone service. This service is used to verify the code when users want to change their phone numbers.
We have the start node, which is used to start the execution of the endpoint handling service. It runs only once at the start of the service to trigger nodes connected to its output link point. We define the request body structure as a single model of phoneVerificationCode as input for this endpoint.

Get the cached object with the phone number to check the code.

Return an error response if the cached object does not exist anymore. It means that the code is expired and no longer valid.
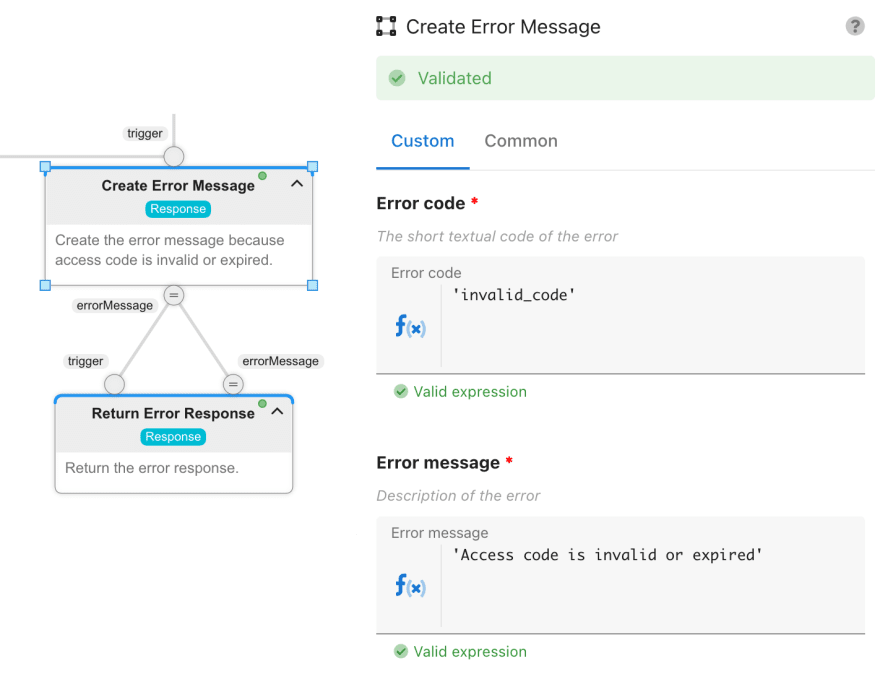
Check if the cached code is equal to the code sent in the phoneVerificationCode object.

Update the user's phone number and set the phoneVerified to true using the Update Object Fields by Id node. We need to set the updated object model to users and object id to the userId, and we do that by giving the userId we obtain from phoneVerificationCode object.

Then we return the success response. This is the final look of our service:
Next, we will implement the Verify code in sign-in service. This service is used to verify the code when users try to sign in when their two-factor authentication is enabled.
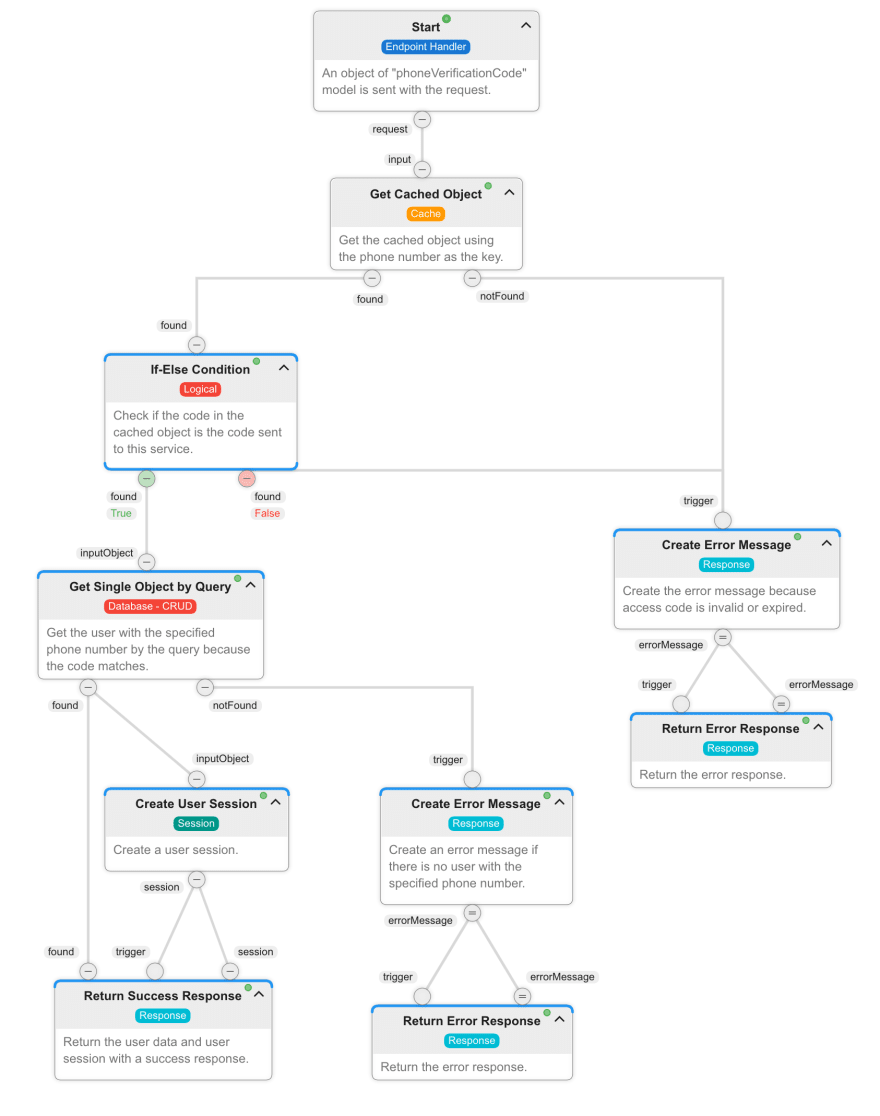
We have the start node, which is used to start the execution of the endpoint handling service. It runs only once at the start of the service to trigger nodes connected to its output link point. We define the request body structure as a single model of phoneVerificationCode as input for this endpoint.

Get the cached object with the phone number to check the code.

Return an error response if the cached object does not exist anymore. It means that the code is expired and no longer valid.
Check if the cached code is equal to the code sent in the phoneVerificationCode object.

Return error if code is not equal to the one sent in the input.

Get the user using the Get Single Object by Query node. We need to set the retrieved object model to users, and our query should be this.phone==inputObject.phoneNumber to get the user with the specified phone.

If there is no user, return an error response.

If there is a user, create a user session.

Then we return the success response. This is the final look of our service:
Next, we will implement the Sign in service. This service is used to implement the sign-in feature. Because we want to use two-factor authentication, we cant use the function in the client library, and we have to design it ourselves. But dont worry, designing complex business logic in Altogic is relatively easy! :)
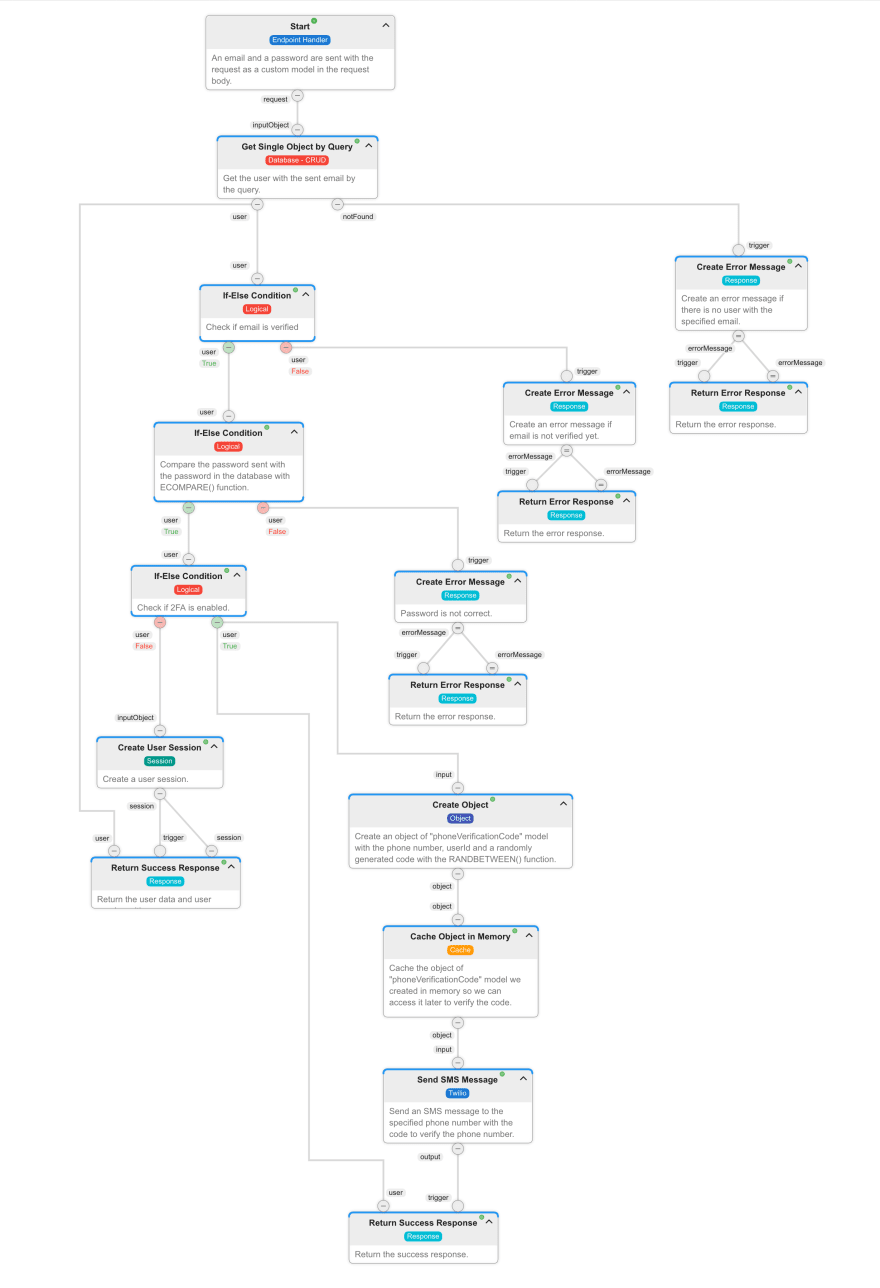
We have the start node, which is used to start the execution of the endpoint handling service. It runs only once at the start of the service to trigger nodes connected to its output link point. We define a query string parameter of type email named email and type text called password as input for this endpoint.

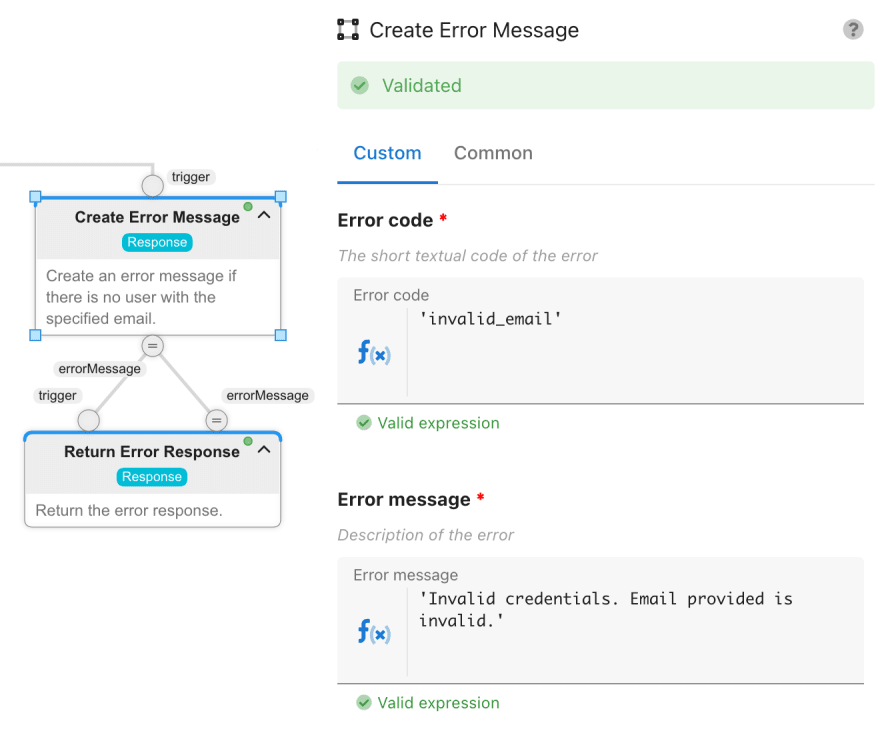
Get the user using the Get Single Object by Query node. We need to set the retrieved object model to users, and our query should be this.email==params.body.email to get the user with the specified email.

Return an error if there is no user with the specified email.
Use the If-Else Condition node to check if the emailVerified field of the user is true or not.

If the email is not verified, return an error response.

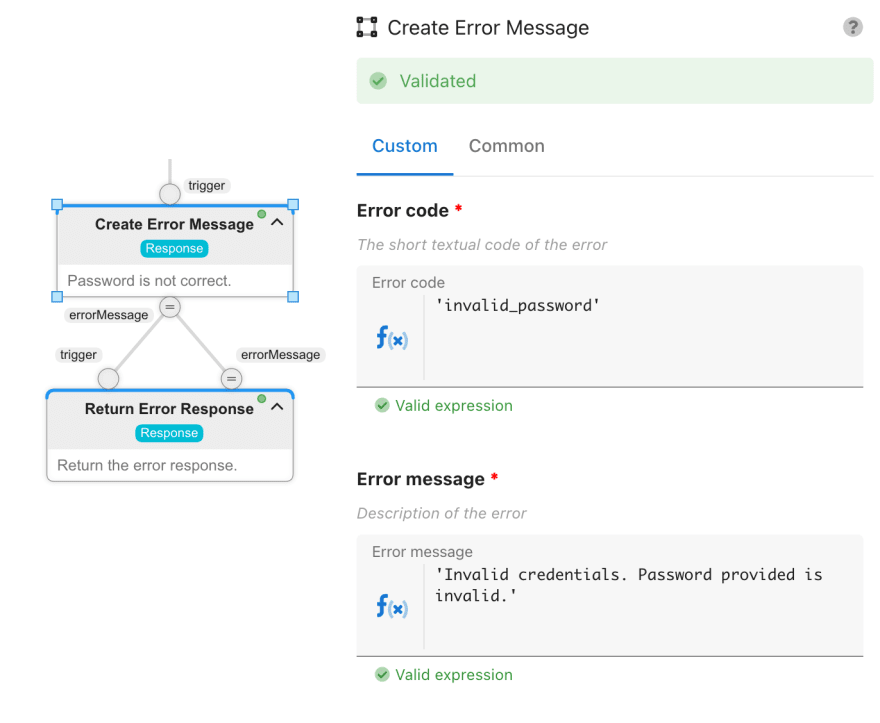
Compare the password sent with the password in the database with ECOMPARE() function. This function compares the password text in the input with the password in the database but does not expose the encrypted password. No one, including the developer, can see the user's passwords.

Return an error response if passwords do not match.
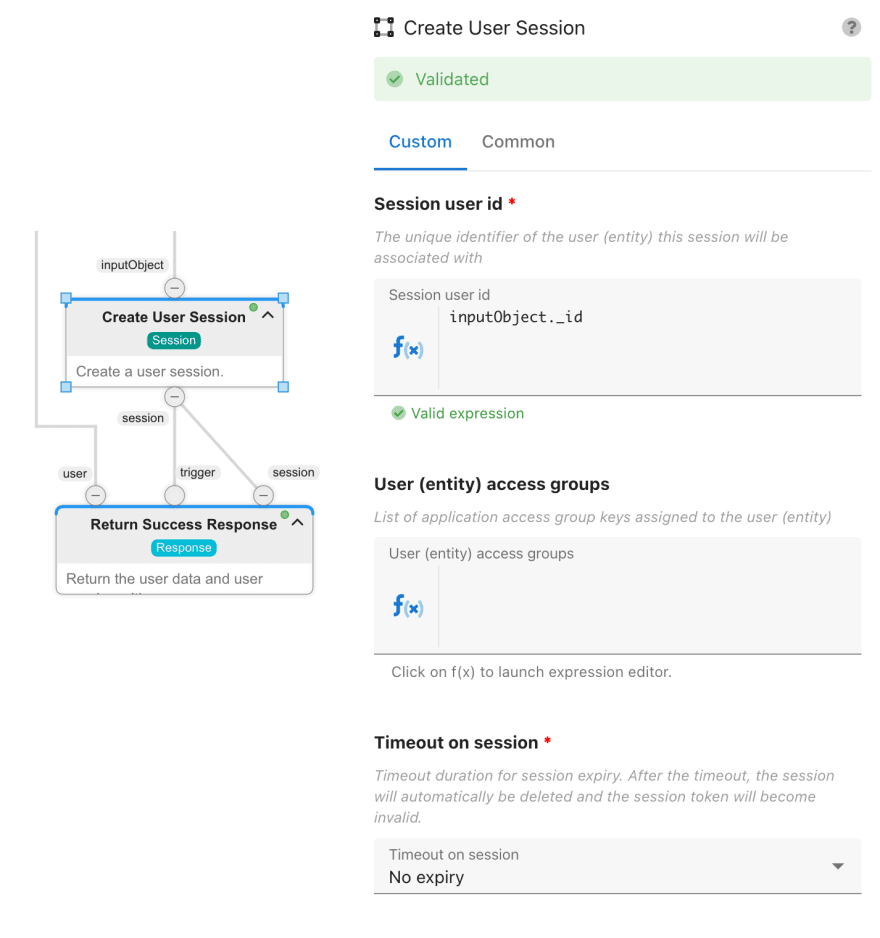
Check if the two-factor authentication of the user is enabled.

If two-factor authentication of the user is not enabled, create the user session and return it with the user data.
If enabled, create an object of phoneVerificationCode model. For code, we generate a random number with RANDBETWEEN() function and insert the other fields from the input.
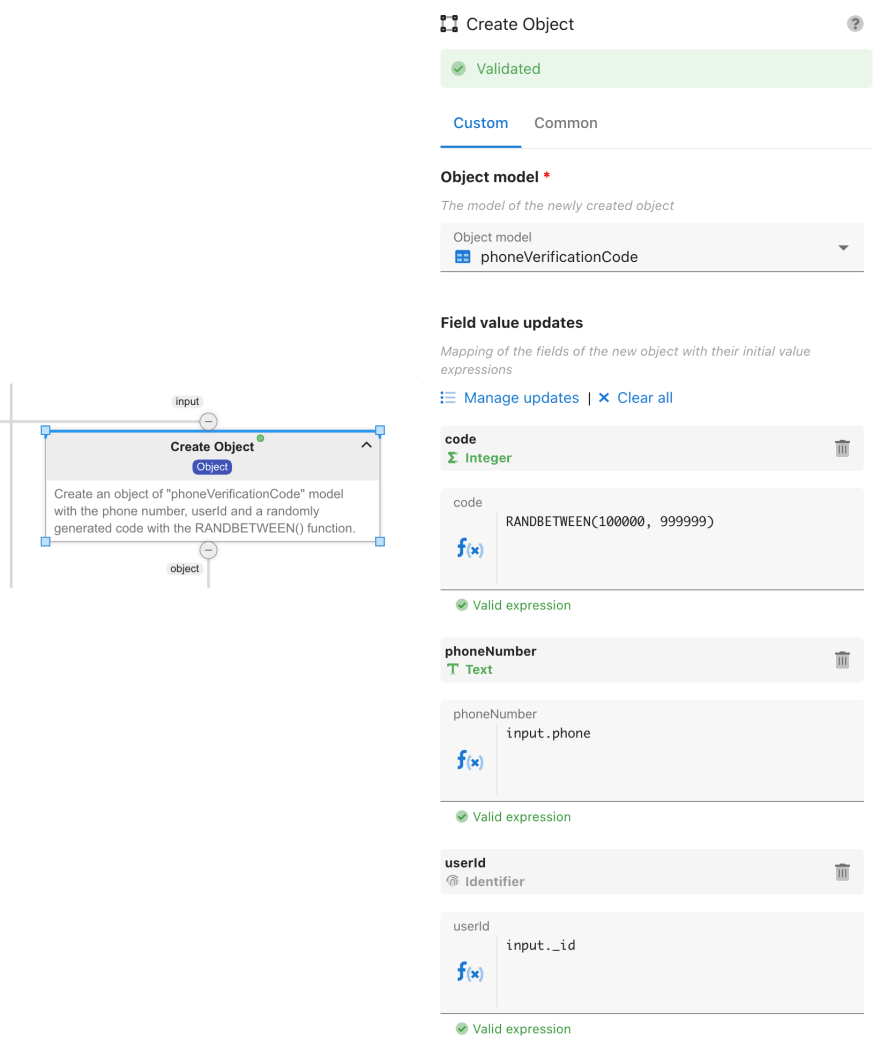
Cache the object we created so we can access it later for verifying the code. I want the code to expire after one minute, so I set the timeout value to 1 minute.

Send the SMS message to the specified phone number with the code. Here we use the Twilio credentials we obtained.

Then we return the success response. This is the final look of our service:
To learn more about building the service flows, check out the documentation.
Lets Start Coding!
Set/Change phone functionality
To enable two-factor authentication, users need to set up their phone numbers. This functionality is the same as changing the phone functionality so that we will use the same screen with some minor conditional UI changes.
We have already created the endpoint and designed the service. We need to send a request to the endpoint using Altogic Client Library using EndpointManager and the post method like altogic.endpoint.post()
SMS verify during change phone functionality
Code above runs the service for setting/changing the phone number and sending the SMS for verification code. Now, users need a screen to enter the SMS code. We have already created the endpoint and designed the service for this case. We need to send a request to that particular endpoint.
Here is the code for that:
Toggle Two Factor Authentication functionality
Users should be able to switch on and off two-factor authentication if they want to. For this, we are implementing a basic switch. We are updating the twoFactorAuth boolean field.
Sign in functionality
When users want to sign in, we will use the service we designed because we need to check if two-factor authentication is enabled and if yes, we need to send an SMS with a code. We replace the client library function with sending a request to the endpoint.
SMS verify during sign-in functionality
Code above runs the service for signing in and sending the SMS for verification code. Now, users need a screen to enter the SMS code. We have already created the endpoint and designed the service for this case. We need to send a request to that particular endpoint with code, phone number, and userId.
Here is the code for that:
Conclusion
This article covered adding the two-factor authentication method to our email authentication app using Next.js, Twilio, and Altogic Client Library. Thanks to Altogic, we can build this functionality with just a few lines of code.
You can check out the GitHub repository for other functionalities and the rest of the code. You can also clone it and build your app on top of it.
Original Link: https://dev.to/altogic/how-to-implement-two-factor-authentication-using-nextjs-twilio-and-altogic-ok0
Dev To
More About this Source Visit Dev To