
An Interest In:
Web News this Week
- April 1, 2024
- March 31, 2024
- March 30, 2024
- March 29, 2024
- March 28, 2024
- March 27, 2024
- March 26, 2024
Some of Our Sources
- Engadget
- Joshua Blankenship
- Abduzeedo
- Fuel Your Creativity
- Naldz Graphics
- Noupe
- My Ink Blog
- Line 25
- 24 Ways
- The Verge
Help Webnuz
Referal links:
How to Style Anvil Apps with CSS
About Anvil
Anvil is a platform for building full-stack web apps with nothing but Python. No need to wrestle with JS, HTML, CSS, Python, SQL and all their frameworks just build it all in Python. Get started with one of our tutorials or check out an example app. For more help, we have detailed developer documentation and a friendly Community Forum.
Using CSS in Anvil
Anvil lets you build web apps entirely in Python. You can build your UI by dragging and dropping Python components and styling them with Python code. But if you want to have even more control over the appearance of your Anvil apps, you can use CSS.
CSS is a language used to style web pages. This guide will provide an introduction to CSS and how we can use it to change the appearance of web pages. We'll see how we can target components on a web page with CSS and write rules to modify how those components look. You'll be able to test your skills with some challenges as we go along. We'll then experiment with CSS on the live Anvil homepage using the developer tools built into your browser. Then, we'll work through an example of using CSS to customize the appearance of an Anvil app with the Material Design theme.
In this guide to using CSS in Anvil, we will:
- Take a look at HTML and its relationship to CSS
- Examine CSS syntax in more detail, including:
- Using selectors and classes
- Combining selectors
- Use the browser's developer tools on the Anvil homepage to:
- Select an HTML element
- Inspect the HTML code
- Inspect the CSS code
- Learn more about using CSS to style Anvil apps, including:
- Applying CSS via Python
- Writing CSS in theme.css
- Using Anvil roles
The best external resource for learning more about CSS and HTML is the Mozilla Developer Network Web Docs. The MDN Web Docs are an open-source project that provide reference guides and tutorials for web languages and technologies. They have detailed and clear resources for beginners and advanced users. I will frequently be linking to the MDN Web Docs in this guide.
HTML and CSS
When we talk about front-end web development, we are talking about all the code that is responsible for displaying the visual part of a website or web app. When you load a web page, all the code associated with displaying the page is loaded into your browser, which is where the code runs. You can actually inspect this code and make local changes to it, which we will do with the Anvil homepage later in this guide.
In the traditional, non-Anvil, way of doing front-end development, HTML is used to define the elements that make up a web page. CSS targets those elements and defines rules that dictate how they will appear on the page. When you drag-and-drop Anvil components onto a form, these components generate their own HTML. When you edit the component's properties, this generates CSS rules that target the HTML to style the component.
HTML defines the elements on a page using "tags". The most basic HTML element is a <div>, which is just a generic container with no pre-defined styling. Very often, HTML elements are nested inside each other, just as in Anvil where we often nest components within containers like ColumnPanels and FlowPanels. For example, the following code defines a <div> and adds a button that says 'Submit' to the page:
<div> <button>Submit</button></div>With CSS, we can target the button and change the way it looks. The following code targets all buttons on the page, gives them a pink border and a gray background color:
button { border: 1px solid pink; background-color: gray;}Next, we'll take a closer look at CSS and its syntax.
CSS Syntax
With CSS, we can write rules that tell the browser what each component on our webpage should look like. CSS stands for Cascading Stylesheet. 'Stylesheet' refers to the document where the CSS styling rules are written, and 'Cascading' refers to the order in which CSS applies those styling rules. A CSS rule has three parts:
- Selector: This 'selects' which HTML element or elements to apply the rule to.
- Property: This is the feature of the element that will be targeted.
- Value: Describes how the property will be rendered by the browser.

Selectors and classes
In the previous example, we used CSS to target <button> elements. We did this by just writing the name of the tag and then defining the rule. This is called a type selector.
More often, we will target elements by giving them a class. Classes can be applied to as many HTML elements as we want. They are a way of applying the same style to multiple elements without repeating code. To add a class in HTML, we use the class attribute, and to use the class selector, we use . followed by the class name.
Let's extend our previous example and give the button a class. Then, we can apply styling rules to that class. This way, we won't change every single button on the page, just the ones we want to target. Let's give the button a class called submit and apply the same styling rules just to that class:
<div> <button class="submit">Submit</button></div>.submit { border: 1px solid pink; background-color: gray;}There are a number of different CSS selectors, which you can read about here, but the most important for this guide are type and class selectors.
Try it yourself
Now it's your turn! Open the following code in CodePen and:
- Give the second
<button>a class calledcancel - In the CSS, target that class and give it a different background color.
The background-color property can take some text-based values as well as hex and rgb values. Read more about background-color here
Combining selectors
Selectors can also be combined in different ways. Let's look at how we can use more complex selectors to target the elements that we want.
Multiple selectors
Selectors can be grouped using a , in order to apply the same rules to multiple selectors. In the example below, elements with the submit or the cancel class will have a font size of 16px:
.submit, .cancel { font-size: 16px;}Combining type and class selectors
A class selector can come directly after a type selector (without a space in between) to select elements of that type with that class. For example, we can use the following code to select <button> elements with the submit class (in case there are other types of elements that have the same class name):
button.submit { border: 1px solid pink; background-color: gray;}Selecting descendents
Sometimes, we want to select elements that are nested inside other elements. For example, we might want to select buttons that are within a card container but no other buttons. A space between two selectors will select the elements that are descendants of the first element, while a > will select the elements that are a child (a direct descendant) of the first element.
For example, the following HTML code defines a <div> element with the class card, which has another <div> with the class buttons-div nested inside. Inside that <div> are two <button> elements:
<div class="card"> <div class="buttons-div"> <button class="submit">Submit</button> <button class="cancel">Cancel</button> </div></div>Because the <button> elements are within the <div> with the card class, we can select them with the following CSS:
.card button { border: 1px solid pink; background-color: gray;}However, the <button>s are not children of the card element because they are not directly nested within the <div>, but they are children of the buttons-div element. The first rule below will not select the <button>s whereas the second rule will:
/* This won't select the buttons because they aren't children of the "card" <div> */.card > button { border: 1px solid pink; background-color: gray;}/* This will select the buttons because they are children of the "buttons-div" <div> */.buttons-div > button { border: 1px solid pink; background-color: gray;}For more on combining CSS selectors, see the MDN web docs.
Try it yourself
Now it's your turn to combine CSS selectors to target elements. For the following challenges, open the code in CodePen, and don't add any new classes:
- Select the second
<p>and give it acolorof pink. But keep the first<p>the way it is. - Give both the
submitandclearbuttons abackground-coloroflightblue, but leave thecancelbutton the way it is. - Give the
<div>within thecardaborderproperty of1px solid pink
Stuck? Check out a solution.
CSS properties
There are many different CSS properties that affect the layout and appearance of HTML elements, but it's beyond the scope of this guide to go over them in detail. For a list of all CSS properties and their corresponding values, see the MDN web docs. In general, the MDN docs are the best place to learn more about CSS properties because they are detailed, give visual examples and are easy to follow.
Using the developer tools
Your browser has built-in developer tools to help you with front-end web development. These developer tools let you see all the code and files that are loaded into the browser when you open a web page. We can use the dev tools to inspect live code and make local edits, so they are an incredibly handy tool for debugging and experimenting with styling.
Let's now use the dev tools to inspect the Anvil homepage and see how HTML and CSS works out in the wild.
Selecting an element
When you load a web page, all the code used to display that page is loaded into the browser. This means that we can see the source code for any web page we can load in our browser, and we can make local changes to that code. Let's go to Anvil's homepage and inspect the source code.
On the website, you can right click and choose 'Inspect' to bring up the browser's developer tools. (I use Google Chrome, but other browsers will have very similar dev tools).

In the dev tools, click on 'Elements' to bring up the HTML and CSS for the page. Then click on the icon that looks like a square with a mouse cursor. This will allow us to select an element on the page and inspect its HTML and CSS.

Let's select the link that says "Start with a quick tutorial" on the Anvil website. This will highlight the relevant HTML in the dev tools and show us the CSS associated with that element.
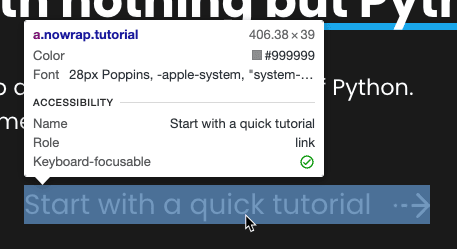
Inspecting the HTML
This is the HTML responsible for displaying that link:

Here we have an <a>, or anchor, element. Anchor elements are links, and the href attribute specifies the link's "target": usually, the URL to open when you click it The element also has a class attribute. This particular element has two classes: nowrap and tutorial.
There is also an <svg> element nested inside the <a> element. The SVG is displaying the arrow in the link. Because the <svg> is nested directly inside the <a>, we can say that it is a child of the <a>.
Inspecting the CSS
In the dev tools, we can see the CSS being applied to the element. The first rule looks like this:

The first line is the selector. This particular selector means "select the element with the tutorial class that is a descendent of an element with the sub-hero-links class which is a descendent of an element with both the col-hero and home classes".
The next line of the CSS rule is the property we want to target and how it should be displayed. This particular rule is making the color of the element a light grey.
We can actually modify the code directly in the dev tools. If I change the color of the link to be lightgreen, for example, we can see the change live in the browser.

This is incredibly handy for styling apps. You can change and add CSS properties directly in the dev tools and immediately see the results. After playing with the CSS styling in the browser, you can then go and actually change the source code of your app. The dev tools are also incredibly useful for debugging. If an element is not displaying how you think it should be, you can inspect it to see what CSS code is being applied to the element. Refreshing your browser will reload the page, and your local changes will be gone. This makes it easy to experiment without worrying about breaking the source code.
Using CSS in Anvil apps
With Anvil, you can build the front-end of your web app entirely in Python. However, even when you are styling your apps in Python, your apps still use HTML and CSS. Anvil components generate HTML, and changing the properties of those components modifies the CSS for those components. In Anvil, we can change the appearance of components using Python via the Properties Panel or client code. Every Anvil app also has a stylesheet, so we can also write CSS for our app in the traditional way. This gives us more control over the appearance of an app.
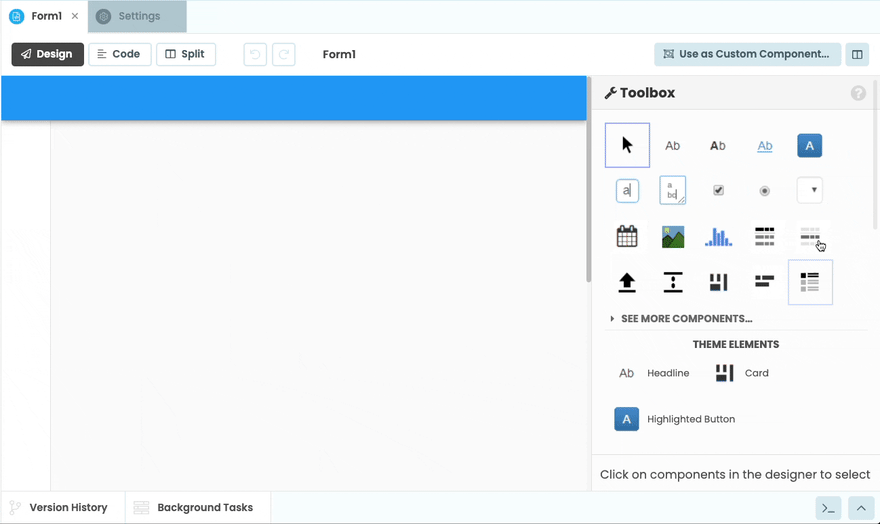
To see how CSS is used in Anvil apps, let's create a new Anvil app and choose the Material Design theme.
Applying CSS via Python
Anvil components have properties that can be modified via the Editor or through Python code. When we modify a component's properties, CSS is applied to the component's HTML in a style attribute. To see this in action, let's drag and drop a Button component onto our Anvil app and change its background color to gray in the Properties Panel:
We can also change properties from code. Let's switch to code view and change the foreground color of our button in the __init_ of our Form code.
class Form1(Form1Template): def __init__(self, **properties): # Set Form properties and Data Bindings. self.init_components(**properties) self.button_1.foreground = "white"We can now run our app and inspect the page, just like we did with the Anvil homepage. If we select the button, we can see some HTML that looks like this:
<button class="btn btn-default to-disable" ontouchstart=""style="max-width: 100%; text-overflow: ellipsis; overflow: hidden; background-color: gray ; color: white;">...</button>Within the style attribute, we can see both the background-color property that we added in the Properties Panel and the color property (foreground in Anvil) that we added in the Form code.
Writing CSS in the stylesheet
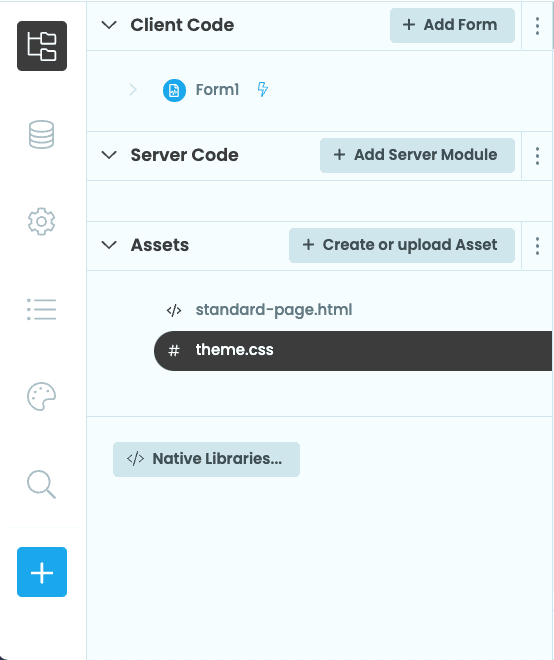
We can also target Anvil components and write CSS rules in the app's stylesheet. Every Anvil app has a stylesheet named theme.css associated with it, which can be found in the App browser under "Assets".
Because we created an Anvil app with the Material Design theme, our app's stylesheet is already populated with CSS rules. Let's open theme.css and modify some of the code.
Let's find the CSS code related to styling Buttons. Ctrl + F and search for "button". This should land us around line 548. Here we can see some CSS that is applied to components with the btn class. If we run our app and inspect the button again, we can see that it has a class called btn. In this rule, let's adjust the background-color to be something different:
.btn, .btn-default, .file-loader>label { border-radius: 2px; font-size: 14px; ... background-color: lightblue; /* This line is changed */ ...}Now, if we run the app, we can see that nothing has changed. Let's inspect the button to see what is going on. We can see the background-color we added in theme.css is crossed out, and instead the background-color that we added in the Properties Panel is taking precedence.
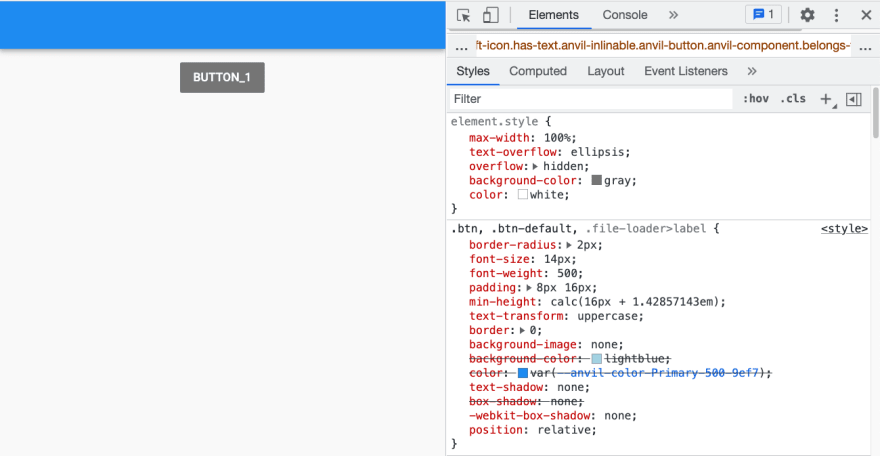
When CSS properties conflict with each other, CSS has rules to determine which property is applied. Styling rules written in the stylesheet will be applied first, then rules written in the HTML will be applied. This is why our Button is gray and not lightblue. The background-color: gray property written in the HTML will be applied last and therefore overrides the background-color: lightblue property in theme.css.
If CSS styling rules written in the stylesheet conflict, then the last rule will override preceding rules. This is why stylesheets are cascading. For example, if we had the following code in a stylesheet (and no conflicting styling rules added to the HTML), then buttons would end up having a pink background:
button { background-color: gray;}button { background-color: pink;}However, if rules have different selectors but could still conflict, then the most specific rule applies. Class selectors are more specific than type selectors. So in the following code, buttons with the submit class would have a gray background color despite the rule coming first:
.submit { background-color: gray;}button { background-color: pink;}The cascade and specificity rules can be overridden by using !important. !important is applied to a property within a rule in order to make its value more important than any other conflicting value, but this is almost always a bad idea. We'll discuss why !important should be avoided, but let's first see how it works by making the background-color property we set in theme.css !important:
.btn, .btn-default, .file-loader>label { border-radius: 2px; font-size: 14px; ... background-color: lightblue !important; ...}If we run the app again, the button now has a light blue background. Inspecting the button shows that the background-color set in the style attribute is crossed out this time. In practice, we should not use !important here. Instead, we should either set the background-color we want from the Properties Panel or remove the background-color set there and set it in theme.css without making it !important.

In general, using !important should be avoided. Occasionally, you may need to use it to override default styling rules that you don't have access to. (The example above is not one of these scenarios.) But overriding the cascade makes debugging difficult and will often cause other developers (and your future self) pain and confusion. Instead, try reordering rules and using more specific selectors. You can read more about specificity and !important here.
Anvil Roles
We can add CSS classes to Anvil components using Anvil Roles. After you create a Role, you can write CSS rules in the app's stylesheet to define how the Role will affect components. You can apply the Role to a component through the Properties Panel or in code.
Let's create a new Role in our app to apply to our Button. In the sidebar, click on "Theme", then choose "Roles". Click on "+ Add a new role" then choose a name for the role. I've named my role submit and have restricted it so that it can only be applied to Button components.

Let's now switch back to Form1 and give the Button the submit Role. Let's also remove any properties we set in the Editor or in the Form code.

We should also change the code we altered in theme.css. Right now, all buttons in our app will be light blue, but let's use the role we just defined to only make Buttons with the submit Role light blue. So the code we changed in theme.css should look like this again:
.btn, .btn-default, .file-loader>label { border-radius: 2px; font-size: 14px; ... background-color: transparent; /* this line is changed back */ ...}The Button now has the submit Role, which means Anvil will give the component a CSS class. The class name will be the Role name with the prefix anvil-role-. We can now go into theme.css and write some styling rules for the anvil-role-submit class.
At the very bottom of theme.css, let's select the anvil-role-submit class and change the background color, the font color and the font size:
.anvil-role-submit { background-color: lightblue; color: white; font-size: 22px;}Run the app to see how the code worked.
Our button doesn't quite look right, so we should inspect the app to see what is going on. If we select the element with the light blue background, we can see that it is a <div> that has the anvil-role-submit class. Inside of this <div> is the Button we actually want to target.

Let's go back to theme.css and modify the selector so we select the <button> nested inside the <div>.
There are a few ways we can do this, but let's be as specific as possible and select <button> elements that have the btn class that are children of the .anvil-role-submit class:
.anvil-role-submit > button.btn { background-color: lightblue; color: white; font-size: 22px;}Now let's rerun our app to see if we've selected the correct element.

Great, it worked!
Summary
In this guide, we have gone over the basics of using CSS in Anvil apps. We briefly covered HTML and how it relates to CSS. We also looked at how to write CSS rules using selectors and properties. We've also seen how we can use the browser's developer tools to inspect code and make local changes. When using CSS in Anvil, we can edit the properties of Anvil components with Python or by writing CSS rules in the app's stylesheet. We can also define Anvil roles to add CSS classes to Anvil components.
CSS is a very powerful tool, but we've only scratched the surface on what it can do. I highly recommend playing around with your browser's developer tools to inspect web pages and make local changes to the code. This is a great way to learn more about how CSS works.
If you'd like to learn more about how to use CSS, check out my suggested resources below:
Further reading
For a short tutorial to help you get started with CSS, check out MDN's CSS basics.
For an introduction to HTML, MDN have a good, easy-to-follow tutorial designed for beginners.
For a more in depth introduction to CSS, MDN also have a good CSS tutorial that assumes no prior CSS knowledge but assumes you have completed their HTML tutorial.
For a full list of CSS properties and examples of their use, check out the MDN web docs.
If you prefer more interactive tutorials, I highly recommend Scrimba. Their HTML and CSS crash course is designed for beginners.
For articles on CSS topics and cool tricks, see CSS Tricks.
Original Link: https://dev.to/anvil/how-to-style-anvil-apps-with-css-3mn8
Dev To
More About this Source Visit Dev To