
An Interest In:
Web News this Week
- April 23, 2024
- April 22, 2024
- April 21, 2024
- April 20, 2024
- April 19, 2024
- April 18, 2024
- April 17, 2024
Some of Our Sources
- BoingBoing
- The Logo Smith
- Inspiredology
- Reencoded
- Stylized Web
- Specky Boy
- Freelance Switch
- Android Headlines
- Hashedout
- TechPowerUp
Help Webnuz
Referal links:
Deploy Containerized Applications with ECS
DAY 31- Deploy Containerized Applications with ECS - Day Thirty One


100 days of Cloud on GitHub - Read On iCTPro.co.nz - Read on Dev.to
Get the app
Here Iam using a website with nginx server to deploy on a container with the help of ECR.
Lets get the data
git clone https://github.com/anuvindhs/CLOUD-is-AWSome.gitDocker
Building a docker file
Lets build our NGINX docker file for our website.
once you have created the docker file inside the folder, copy-paste the below commands
FROM nginx:latestCOPY ./ /usr/share/nginx/html/I am using VScode, check below to understand the folder structure

AWS Permissions
Make sure you have programmatic access via AWS CLI
Full permissions to ECS & AmazonEC2ContainerRegistryFullAccess
ECR
Create a repository
- Goto ECR from AWS console and create a repository
- Create a ECR repo ,i have named mine
webapp-ecr-repo
Login to ECR
if you open the repo, on the right-hand side you can see an option for view push commands.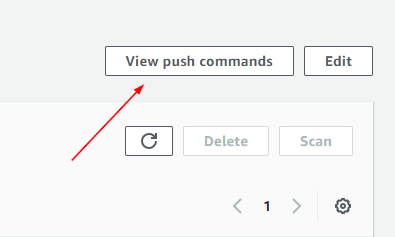
Now using AWS CLI login to ECR
aws ecr get-login-password --region xx-xxxxxx-xx| docker login --username AWS --password-stdin xxxxxxxxxx.dkr.ecr.xx-xxxxxx-xx.amazonaws.comBuild the docker image
docker build -t webapp-ecr-repo .Lets tag our image with repo name
docker tag webapp-ecr-repo:latest xxxxxxxxx.dkr.ecr.xx-xxxxxx-xx.amazonaws.com/webapp-ecr-repo:latestLets push the image to the repository
docker push xxxxxxxxxx.dkr.ecr.xx-xxxxxxx-xx.amazonaws.com/webapp-ecr-repo:latestif you are using PowerShell on windows please use windows commands to push the image to the repo.

ECS
Create a cluster
- Goto ECS dashboard and click Create Cluster.
select EC2 Linux + Networking

Enter Cluster name & EC2 instance type , am keeping it to t2.micro.

Select the default VPC and Subnets available.
Also enable Auto assign public IP
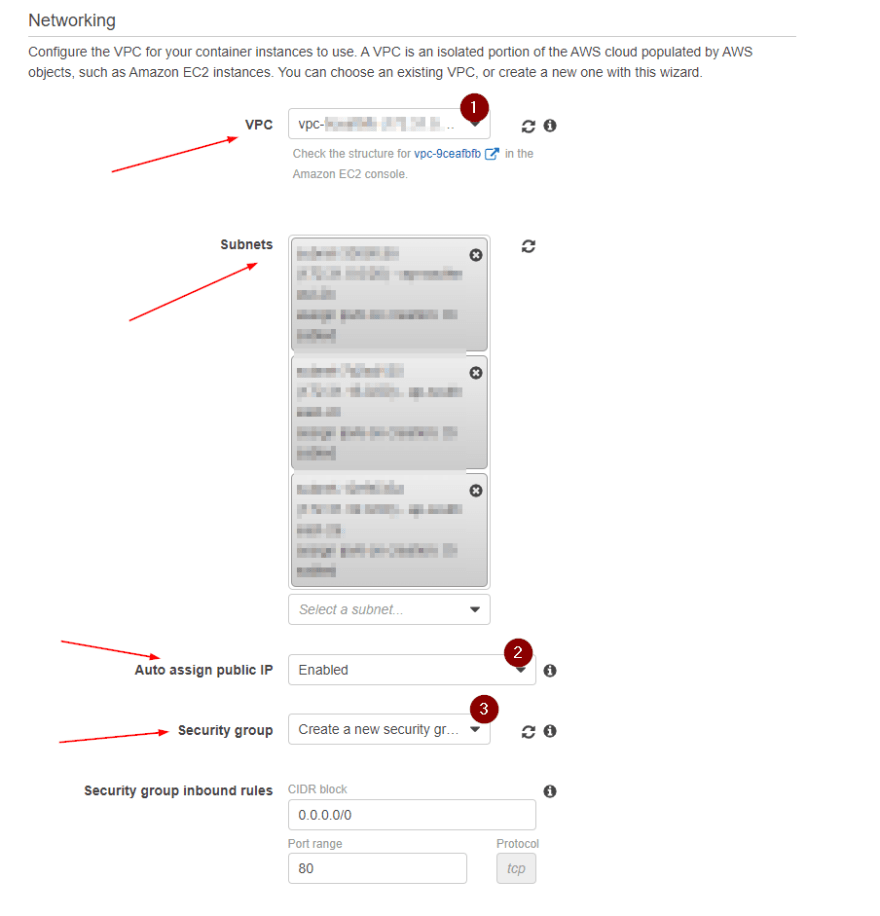
- you can use default Security group or create a new one or can attach a Security group which is already created.
- Now click Create

Creating Task Definition
- Click on create Task Definition & then select EC2

- I am naming mine as
Taskdef-webapp-ecr Update Task memory to 128 and Task CPU to 1 vCPU, then click Add Container

Add a name, mine is
container-webapp-ecrCopy your ECR repo URI from the repository and update that on the image coloumn
Map your ports, here its 80:80 ,
Now add, and create the Task definition.

Run the Task
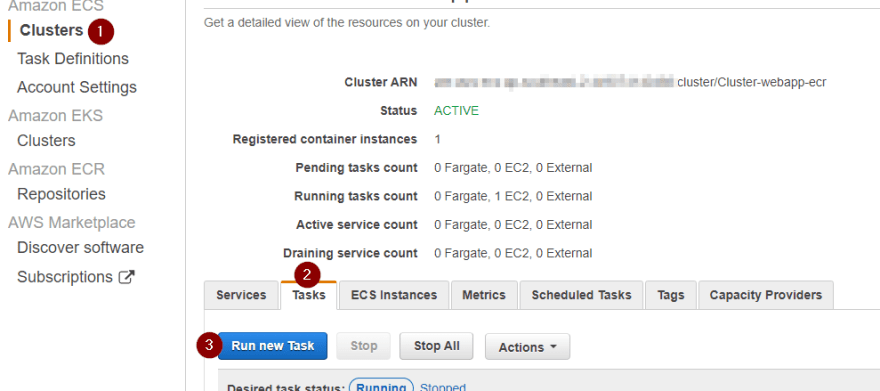
goto Clusters, select Task then click Run New task
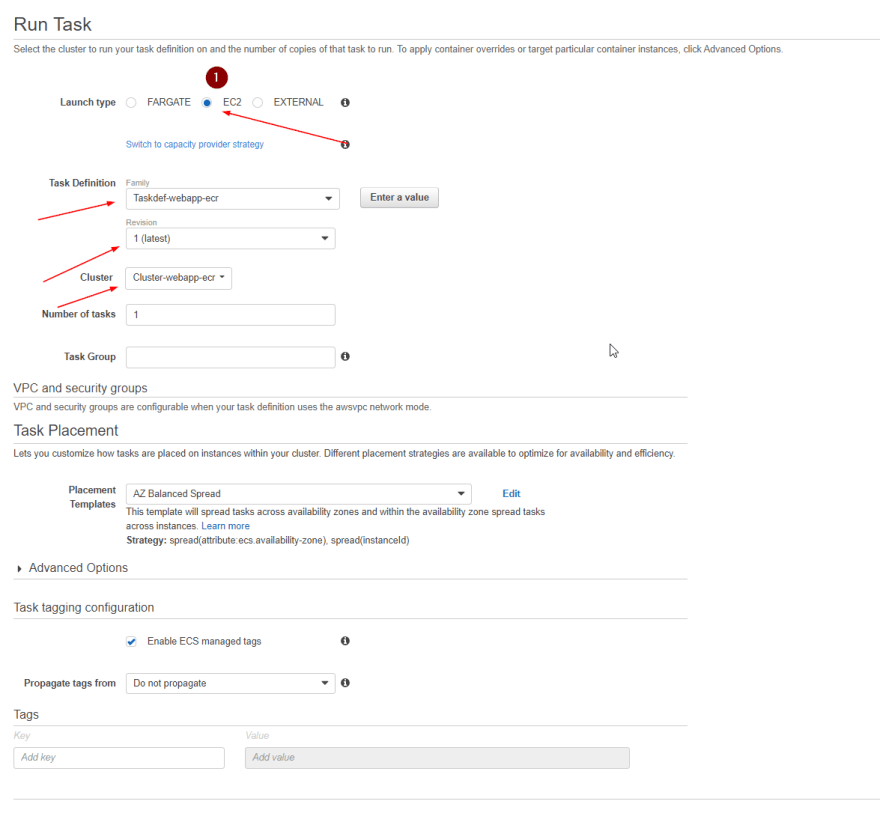
Select EC2
Select out Task Definition we created.
Select our Cluster
leave everything default and click Run Task
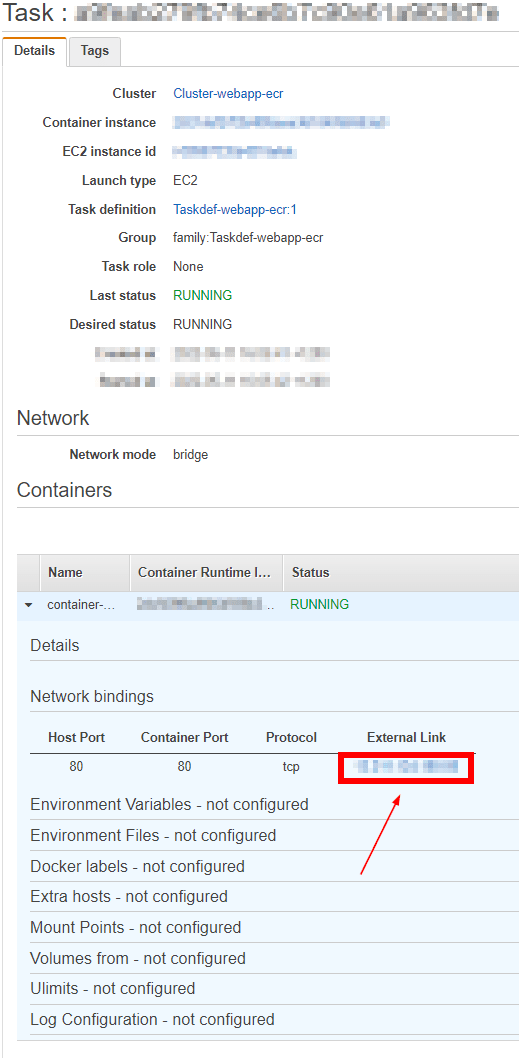
Once the Task is created you will be able to see a Running Status
if you navigate to external Link you will be able to see the live website.
Congratulations, now you have successfully configured a docker image which you have pushed to ECR and Deployed on a container with ECS.
Connect with me on Twitter
Connect with me on Linkedin
Read more post on dev.to or iCTPro.co.nz
Connect with me on GitHub

Original Link: https://dev.to/aws-builders/deploy-containerized-applications-with-ecs-55dc
Dev To
More About this Source Visit Dev To