
An Interest In:
Web News this Week
- April 18, 2024
- April 17, 2024
- April 16, 2024
- April 15, 2024
- April 14, 2024
- April 13, 2024
- April 12, 2024
Some of Our Sources
- The Logo Smith
- Spoon Graphics
- Inspiredology
- Web Designer Depot
- Noupe
- Wal You
- Specky Boy
- Design Modo
- Android Headlines
- TechPowerUp
Help Webnuz
Referal links:
building a real-time cryptocurrency info table with React, MUI(material-ui) and coinmarket cap API
We are building a real-time Crypto table that is responsive and shows lots of information about every cryptocurrency using the coinmarket cap API.The app has a simple express backend to fetch the data from the coinmarket cap.
you can checkout the full code
Table of contents:
- preparation
- backend
- frontend
- API key
building the backend
building the frontend
preparation
make a folder named crypto-table open your terminal and run the commands:
Powershell:
mkdir crypto-table;cd crypto-table;code .bash:
mkdir cypto-table && cd crypto-table && code .that would make a folder and open the vscode
frontend
inside the crypto-table folder open a terminal and install React with CRA:
npx create-react-app frontendopen the src folder and delete everything inside this folder except index.js.
now cd into the frontend folder and install @mui:
npm install @mui/material @emotion/styled @emotion/react react-transition-groupemotion packages are necessary for mui to work
backend
our express backend will be a simple server just to fetch data from the coinmarket cap API.head over to the root folder(crypto-table)and make a folder named backend.inside this folder open a terminal and install express and axios and nodemon:
npm install express nodemon axios dotenvnow we have installed the packages we need to build the project you should have a folder structure like this:
|-- crypto-table| |-- backend| |-- frontend |-- public |-- src |-- index.js |-- .gitignre |-- package-lock.json |-- package.json |-- README.mdAPI key
visit the coinmarketcap website:

Click the GET YOUR API KEY NOW button. sign up on the website and verify your email. after finish signing up and confirming your email address, it will redirect you to your account page.
if you didn't redirect to the account page visit this link and login.

(it has a generous free plan with 333 calls a day)
when you move the mouse over the API key section it shows a button that copies the key to the clipboard. now you are all set to move to the next section
building the backend
inside the backend folder make two files: server.js and .env.
open the .env file, make a variable and paste your API key like so:
COINMARKETCAP_API='(your_api_key)'now let's build our express server.
import express and make a simple server that listens on port 4000:
reuqire('dotenv').config();const express = require('express');const app = express();app.use(express.json());app.get('/', (req, res) => { res.send('GET REQUEST');});app.listen(400, () => { console.log('server is running');});on terminal cd inside backend and type:
nodemon server.jscheckout localhost:4000 you should see a text on the screen that says GET REQUEST
the coinmarket cap documentions has lots of information on different endpoints. we'll use
the v1/cryptocurrency/listing/latest endpoint, it returns a sorted list based on the highest market_cap.basically it is the same listing order on their front page.
create an instance of axios with basicURL and your API key.
const api = axios.create({ method: 'GET', baseURL: 'https://pro-api.coinmarketcap.com/v1/cryptocurrency', headers: { 'X-CMC_PRO_API_KEY': process.env.COINMARKETCAP_API_KEY, Accept: 'application/json', 'Accept-Encoding': 'deflate, gzip', },});The X-CMC_PRO_API_KEY is the coinmarketcap's authentication header parameter.
set the route as /api.now call the API inside the get request
the response has two parameters: status and data.check out the status parameter, it has useful info that you can use in your logic
app.get('/api', (req, res) => { api('/listings/latest?limit=20') .then(response => response.data) .then(value => res.json(value.data)) .catch(err => console.log(err));});visit the localhost:4000 you should see a list of cryptocurrencies
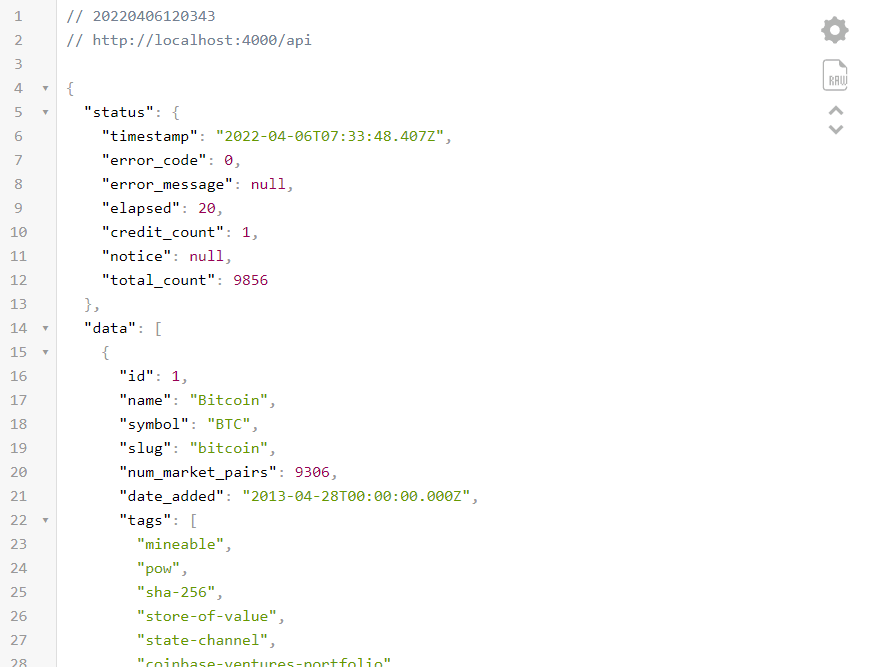
(I am using the json-viewer extension. this is the link you can download the extension from webstore.)
now we have all we need on the server-side. your server.js code should look like this:
require('dotenv').config();const express = require('express');const axios = require('axios');const app = express();app.use(express.json());const api = axios.create({ method: 'GET', baseURL: 'https://pro-api.coinmarketcap.com', headers: { 'X-CMC_PRO_API_KEY': `${process.env.COINMARKETCAP_API_KEY}`, Accept: 'application/json', 'Accept-Encoding': 'deflate, gzip', },});app.get('/api', (req, res) => { api('/v1/cryptocurrency/listings/latest?limit=20') .then(response => response.data) .then(value => res.json(value.data)) .catch(err => console.log(err));});app.listen(4000, () => { console.log('express server');});the limit at the end gives us the first 20 elements of the list. by default, it returns a list of 100 elements. there is a limit to the free plan on coinmarket API, although it is a generous free plan, I recommend implementing a cache mechanism(like with Redis) and fetching data from API on a specific time interval, then sending back the cache data to the client
building the frontend
create a new file named App.js
we want to use a dark theme for our table. the default theme mode on mui is light, so we need to create a theme and set it to dark mode.
import all necessary dependencies inside the App.js:
//App.jsimport React from 'react';import { createTheme, ThemeProvider } from '@mui/material';create a theme with dark mode :
//App.jsconst theme = createTheme({ palette: { mode: 'dark', },});now use the ThemeProvider to inject the dark mode. your App.js code should look like this:
import { createTheme, ThemeProvider } from '@mui/material';import React from 'react';const theme = createTheme({ palette: { mode: 'dark', },});export default function App() { return ( <ThemeProvider theme={theme}> <div>test</div> </ThemeProvider> );}use the npm start command to spin up the React server. visit localhost:3000you should see a text on the screen that says test.
we are all set to build our Table component.
Table component
we'll use the Table component of mui.under the hood mui uses the native table element. create two files named CoinTable.js, CoinBody.js(that's where the table body resides). first of all import the necessary components:
(we'll show the skeleton component while the data is loading)
//ConinTable.jsimport React, { useEffect, useState } from 'react';import TableContainer from '@mui/material/TableContainer';import Table from '@mui/material/Table';import { Fade, Paper, Skeleton, TableBody, TableCell, TableHead, TablePagination, TableRow, Typography,} from '@mui/material';import ArrowDropUpIcon from '@mui/icons-material/ArrowDropUp';import ArrowDropDownIcon from '@mui/icons-material/ArrowDropDown';import CoinBody from './CoinBody';in this example, we'll use 8 columns of data. let's see the code and we talk about every step:
//CoinTable.jsexport default function CoinTable() { return ( <Paper> <TableContainer> <Table sx={{ minWidth: 700, '& td': { fontWeight: 700 } }}> <TableHead> <TableRow> <TableCell>#</TableCell> <TableCell>name</TableCell> <TableCell align="right">Price</TableCell> <TableCell align="right">24h %</TableCell> <TableCell align="right">7d %</TableCell> <TableCell align="right">Market Cap</TableCell> <TableCell align="right">Volume(24h)</TableCell> <TableCell align="right">Circulating supply</TableCell> </TableRow> </TableHead> <TableBody> <CoinTableBody /> </TableBody> </Table> </TableContainer> <TablePagination component={'div'} rowsPerPageOptions={[5, 10, 20]} rowsPerPage={5} onRowsPerPageChange={e => ''} count={20} page={0} onPageChange={(e, newPage) => ''} /> </Paper> );}there are lots of data and functionality going on inside the table body.make a file named CoinTableBody.js.
//CoinBody.jsexport default function CoinTableBody() { return ( <TableRow> <TableCell>1</TableCell> <TableCell align="right">bitcoin</TableCell> <TableCell align="right">$42000</TableCell> <TableCell align="right">1%</TableCell> <TableCell align="right">2%</TableCell> <TableCell align="right">$2000000</TableCell> <TableCell align="right">$3000000</TableCell> <TableCell align="right">$19200000</TableCell> <TableCell align="right">$19200000</TableCell> </TableRow> );}- Paper: it gives us a nice surface and boxshadow.the default color is
#121212 - TableContainer:it is a wrapper around the table that gives the table a fluid width
- Table: the native table element.as you notice I gave it a
minWidthso it wouldn't shrink any fewer than700pixels.I didn't specify any unit that is becausemuiby default uses pixel for any unitless numbers. if you wish to useremor any other units you should pass your value as a string like so:sx={{ minWidth: "60rem"}}.the second parameter set thefontWeighton alltdelements inside theTablecomponent to700.if you want to set the sticky header on table you need to specify amaxHeightcss property onTableContainerand a passstickyHeaderprop toTablecomponent. - TableHead:
theadnative element - TableRow:
trnative elment - TableCell:
tdnative element.notice we set theTableCellcomponent toalign="right"except the first one.it looks much better but it's a matter of opinion you can change it if you want. - TableBody:the
tbodynative element. that's where the data resign and changes periodically - TablePagination: it is our pagination control with all the good stuff. notice we have implemented the pagination outside the
TableContainerbecause we don't want the pagination to be on the same scrolling area as the table. now the pagination won't scroll with the table on small devices.it has its own scroll bar. use the chrome devtools and toggle the device toolbar, you'll see in small devices the pagination won't scroll with the table while scrolling horizontally. we have hardcoded the count just for now.rowsPerPageOptionsreceive an array with options that the user can choose from.rowsPerPageis the initial number of rows per page.onRowsPerPageChangeandonPageChagneare the functions that we leverage to change our Table UI.
update the App.js file:
import { createTheme, ThemeProvider } from '@mui/material';import React from 'react';import Table from './CoinTable';let theme = createTheme({ palette: { mode: 'dark', },});export default function App() { return ( <ThemeProvider theme={theme}> <Table /> </ThemeProvider> );}right now our markup is finished we have the look and it's time to introduce state and fetch data from our server.
custom hook
create file named hooks-helpers.js.inside this file we implement the hook and a helper function.
open the hooks-helpers.js file. let's build a custom hook that fetches data from API and return the data and an isLoading parameter.
//hooks-helpers.jsfunction useCoinMarket() { const [state, setState] = useState({ data: [], isLoading: true }); const updateState = data => { setState(state => ({ data: data ? data : state.data, isLoading: false, })); }; async function init() { try { const res = await fetch('/api'); const data = await res.json(); updateState(data); } catch (err) { console.log(err); } } useEffect(() => { init(); const id = setInterval(() => { init(); }, 1 * 60 * 1000); return () => clearInterval(id); }, []); return state;}notice we have set two fields for the state data, isLoading.the isLoading is true initially so the table would show a skeleton and when the promise is fulfilled, we set the isLoading to false.also you can set a isError property to show some info on screen when there is an error and send a request to an analytic endpoint to log your errors.
we use setInterval to call init every 1 minute to update the table.(change the time as you wish)
this is a side note in regards to different approaches toward calling a function immediately and setting a time interval on the callee, you can skip this part if you want.
there are other interesting ways to achieve immediately calling a function and setting a time interval:1.using a setTimeout:
function mysetInterval(func, time) { func(); return setTimeout(func, time);}we call the
mysetIntevalwith theinitfunction and clearinterval with the return value
- using setInterval with IIFE :
setInterval( (function mysetInteravl() { init(); return mysetInterval; })(), 1 * 60 * 1000 //you can specify your time);it immediately calls the function and then returns itself to be called on the next time interval
Add two state hooks for page and rowsPerPage to handle the pagination state.
pass them to onRowsPerPageChange and onPageChange.notice the onPageChange props callback have two arguments.the second argument is the new page sets by the user.pass rowsPerPage,page to CoinBody component.we have to somehow send the data length to the pagination component(the count prop).in order to achieve that,make a new state hook (dataLength,setDataLength) and pass down the setDataLenght to the coninTableBody and pass the dataLength to count prop.
side note:
We could use theuseCoinMarkethook inside theCointTablecomponent. The benefit we gain, is that we have moved the state and data fetching where exactly it's needed(it is widely known as co-locating). thepaginationcomponent needs thedataLengthand we exchange the data between thepaginitaionandCoinTableBodythrough the parent component(CoinTable)
When we move the data where needed, we can avoid unnecessary re-renders. in this example, only theCoinBodycomponent re-renders on every data fetching, while it won't cause any re-renders on theCointTableandPaginationcomponents
//imports//.//.export default function CoinTable() { const [rowsPerPage, setRowsPerPage] = useState(10); const [page, setPage] = useState(0); const [dataLength, setDataLength] = useState(0); return ( <Paper> <TableContainer> <Table sx={{ minWidth: 700, '& td': { fontWeight: 700 } }}> <TableHead> <TableRow> <TableCell>#</TableCell> <TableCell colSpan={2}>name</TableCell> <TableCell align="right">Price</TableCell> <TableCell align="right">24h %</TableCell> <TableCell align="right">7d %</TableCell> <TableCell align="right">Market Cap</TableCell> <TableCell align="right">Volume(24h)</TableCell> <TableCell align="right">Circulating supply</TableCell> </TableRow> </TableHead> <TableBody> <CoinTableBody rowsPerpage={rowsPerpage} page={page} setDataLength={setDataLength} /> </TableBody> </Table> </TableContainer> <TablePagination component={'div'} rowsPerPageOptions={[5, 10, 20]} rowsPerPage={5} count={dataLength} onRowsPerPageChange={e => { setRowsPerPage(parseInt(e.target.value)); setPage(0); }} page={page} onPageChange={(e, newPage) => { setPage(newPage); }} /> </Paper> );}now import the custom hook inside the CoinBody.js file.
on the CoinTableBody component we need to extract the proportion of the data based on the number of page and rowsPerPage.isLoading parameter is used to show a skeleton while data is loading.insdie CoinBody make a componenet named BodySkeleton.pass rowsPerPAge and number of heads.
//CoinBody.js const CoinTableBody=memo(({ rowsPerpage, page, setDataLength })=> { const { data, isLoading, update } = useCoinMarket(); const dataSliced = data.slice(page * rowsPerPage, (page + 1) * rowsPerPage); useEffect(() => { setDataLength(data.length); }, [data.length]); return ( <TableBody> {isLoading ? ( <BodySkeleton rows={rowsPerPage} heads={8} /> ) : ( dataSliced.map(row => ( <TableRow> <TableCell>bitcoin</TableCell> <TableCell align="right">$42000</TableCell> <TableCell align="right">3%</TableCell> <TableCell align="right">2%</TableCell> <TableCell align="right">$19200000</TableCell> <TableCell align="right">$19200000</TableCell> </TableRow> )) )} </TableBody> );})export default CoinTableBodywe make two arrays based on the rows and head props to map over them and show the skeleton
//CoinBody.jsconst BodySkeleton = ({ rows, heads }) => { const rowArray = Array(rows).fill(null); const cellArray = Array(heads).fill(null); return rowArray.map((_, index) => ( <TableRow key={index}> {cellArray.map((_, index) => ( <TableCell key={index} align={index === 1 ? 'left' : 'right'}> {index === 1 ? ( <Box sx={{ display: 'flex', alignItems: 'center' }}> <Skeleton variant="circular" width={25} height={25} sx={{ mr: 1 }} /> <Skeleton width={100} /> </Box> ) : ( <Skeleton /> )} </TableCell> ))} </TableRow> ));};the body would house lots of data and components so it is wise to move them into a component. make a file named BodyRow.js and change the CoinTableBody like so:
//CoinTableBody.js const CoinTableBody = memo(({ rowsPerPage, page, setDataLength }) => { const { data, isLoading } = useCoinMarket(); const dataSliced = data.slice(page * rowsPerPage, (page + 1) * rowsPerPage); useEffect(() => { setDataLength(data.length); }, [data.length]); console.log('body'); return ( <TableBody> {isLoading ? ( <BodySkeleton rows={rowsPerPage} heads={8} /> ) : ( dataSliced.map(row => <BodyRow key={row.id} row={row} />) )} </TableBody> );});export default CoinTableBodythe API provides us substantial information about all aspects of cryptocurrency. In this example we are going to show 8 columns of information such as price,24 hours change,7 days change, circulating supply, market cap,24h volumne(make sure to check out other properties too)
there is not much to do in regards to processing the numbers.We show two digits after the decimal point(toFixed(2)).price, market cap, and circulating supply need to be formatted as a currency.
we use the Intl.NumberFormat object hence the numberFormat function(we'll get to it).on percent_change_24h and percent_change_7d,based on being negative or positive, the renderPercentages return our percentages in red or green color with down or up arrows. I've used the default mui theme colors success.main and error.main.check out other fields on their
default themeproperties.
switchTransition with the fade component gives us a nice fading transition effect. Whenever the key property on the fade component changes, the switchTransition triggers the in prop of the fade component.
on two table cells we have used sx with [theme.breakpoints.down('md')].it would introduce a breakpoint that triggers under the 900px width devices.it will set the row number,name and avatar in sticky position so the user can scroll horizantally and see the name alongside other colums.when using sx as a function we can use the theme object.
(https://s2.coinmarketcap.com/static/img/coins/64x64/ is an endpoint on coinmarketcap for coin icons, just add the coin id at the end)
//BodyRow.jsexport default functin BodyRow({ row }) { const { name, quote } = row; const USD = quote.USD; const price = numberFormat(USD.price); const percent_24 = USD.percent_change_24h.toFixed(2); const percent_7d = USD.percent_change_7d.toFixed(2); const circulating_supply = numberFormat(row.circulating_supply,{style:'decimal'}); const marketCap = numberFormat(USD.market_cap, { notation: 'compact', compactDisplay: 'short', }); const volume_24 = numberFormat(USD.volume_24h); const renderPercentage = num => { return num > 0 ? ( <Box display="flex" justifyContent="flex-end" alignItems="center" color={'success.main'} > <ArrowDropUpIcon color={'success'} /> <span>{num}%</span> </Box> ) : ( <Box display={'flex'} justifyContent="flex-end" alignItems="center" color={'error.main'} > <ArrowDropDownIcon /> <span> {num.replace('-', '')}%</span> </Box> ); }; return ( <TableRow sx={{ '& td': { width: 20 } }}> <TableCell sx={theme => ({ [theme.breakpoints.down('md')]: { position: 'sticky', left: 0, zIndex: 10, backgroundColor: '#121212', }, })} > {row.cmc_rank} </TableCell> <TableCell padding="none" sx={theme => ({ [theme.breakpoints.down('md')]: { position: 'sticky', left: 48, zIndex: 10, backgroundColor: '#121212', }, })} > <Box sx={{ display: 'flex', alignItems: 'center' }}> <Avatar src={bit} sx={{ width: 25, height: 25, mr: 1, }} /> <span> {name} {row.symbol} </span> </Box> </TableCell> <SwitchTransition> <Fade key={price}> <TableCell align="right">{price}</TableCell> </Fade> </SwitchTransition> <SwitchTransition> <Fade key={percent_24}> <TableCell align="right">{renderPercentage(percent_24)}</TableCell> </Fade> </SwitchTransition> <SwitchTransition> <Fade key={percent_7d}> <TableCell align="right">{renderPercentage(percent_7d)}</TableCell> </Fade> </SwitchTransition> <TableCell align="right">{marketCap}</TableCell> <TableCell align="right">{volume_24}</TableCell> <TableCell align="right"> {circulating_supply} {row.symbol} </TableCell> </TableRow> );});numberFormatfunction returns the number in currency or decimal style.maximumFractionDigits has 3 conditions.
- numbers over 1 set to 2 digits after decimal point
- numbers with less than 4 digits return the same number of digits after the decimal point
- numbers with more than 4 digits return up to 8 digits after a decimal pointthere other interesting properties on this utility (a great tool for internationalization).We have implemented a default option while we can add an object as a second parameter to modify the default. (for example, on the market cap we set
notaion:'compact',compactDisplay:'short', it will display the market cap in the short format followed by aBas in billions sign). we set the style of circulating supply todecimalto show the plain number
//hooks-helpers.jsfunction numberFormat(num, options) { let temp = 2; if (num < 1 && num > 0.0001) { temp = 4; } if (num < 0.0001) { temp = 8; } let defaultOptions = { style: 'currency', currency: 'USD', maximumFractionDigits: temp, minimumFractionDigits: 2, notation: 'standard', compactDisplay: 'long', }; return new Intl.NumberFormat('en-US', { ...defaultOptions, ...options }).format(num);}I'd be happy to hear from you, let's connect on Twitter
Original Link: https://dev.to/kevinkh89/building-a-real-time-cryptocurrency-info-table-with-react-muimaterial-ui-and-coinmarket-cap-api-91l
Dev To
More About this Source Visit Dev To