
An Interest In:
Web News this Week
- April 24, 2024
- April 23, 2024
- April 22, 2024
- April 21, 2024
- April 20, 2024
- April 19, 2024
- April 18, 2024
Some of Our Sources
- Engadget
- Mashable
- Techcrunch
- The Logo Smith
- Fuel Your Creativity
- Reencoded
- CSS Globe
- Line 25
- Hashedout
- The Verge
Help Webnuz
Referal links:
A set of handy git commands for beginners to make your life easier!
Starting out with version control is exciting however keeping track of all the commands can be difficult.
This is a simplified cheat sheet with short explanations to guide you on which command does what and if the changes made are locally, remotely or both.
| Table of Content |
| First-Time Git Setup |
|---|
| Creating A Repo |
| Managing Local Changes (including undos) |
| Managing Branches |
| Pushing And Pulling |
| Fetching |
| Merging |
1. First-Time Git Setup
Once git is installed on your system you have to customize your git environment. This can be done using the git config tool
i. To setup your Git username
git config --global user.name <username>Example
git config --global user.name janedoeii. To setup your Git username
git config --global user.email <emailAddress>Example
git config --global user.email [email protected]iii. To check Git configuration
git config -l
back to TOC
2. Creating A Repo
These are probably the first command every git enthusiast learns.
i. To create a local repo
git initYou should run this command in the folder you want to become the root(base) folder for your repo
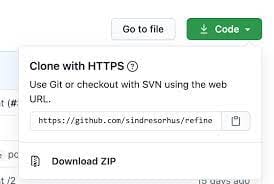
ii. To clone an existing repo
git clone <repo-clone-link>Example:
git clone https://github.com/user/repo.gitEnsure that the link is copied from the green clone button NOT the browser tab
iii. Linking to a remote repo
git remote add origin <link-to-github-remote-repo>Example:
git clone https://github.com/user/repo.git
back to TOC
3. Managing Local Changes (including undos)
i. Checking files you've worked on without committing (unstaged files)
git status ii. To stage files
- To stage particular files, you'll have to specify the filenames (including the extensions)
git add <filename>Example:
git add index.htmlgit add index.html styles.css app.jsTo check which files to add run git status
- To stage all files at once
git add .Note: Do no forget the decimal point
iii. To unstage (unadd or uncommit ) files
These can be used for commits that have not been pushed
To unstage a single file
git reset HEAD <filename>Example:
git reset HEAD index.htmlTo unstage all stage files
git reset HEADTo unstage the last file you staged
git reset HEAD~1Note: Be sure that you don't have any additional changes to the files
iv. To commit staged files
Once you've stage a file you can then commit it
git commit -m "<commit-message>"Example:
git commit -m "initial commit"Note: Do not forget the commit message
To commit means to capture a snapshot of the project's currently staged changes and "commit it to git memory"
v. To stage and commit all changes at once
git commit --am "<commit-message>"Example:
git commit -a -m "styles and design done"vi. To correct your last commit message
git commit --amend -m "<commit-message>"Example:
git commit --amend -m "Corrected: first commit"Note: Don't amend published(pushed) commits!
vii. To rollback commits
These are for commits that have been pushed
To rollback the latest commit
git revert HEADTo rollback to a specific commit
git revert <commitID>
back to TOC
4. Managing Branches
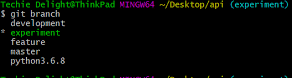
i. To list all existing local branches
git branch Example:
ii. To list all branches (remote and local)
git branch -a iii. To create a new branch on the current head
You can think of the HEAD as the "current branch". When you switch branches with git checkout (switch branches), the HEAD revision changes to point to the tip of the new branch
git branch <branch-name>Example:
git branch develop iv. To switch to an existing branch an update current working directory
git checkout <branch-name>Example:
git checkout developv. git checkout -b
Creates new branch from current branch(the branch you are currently working on) and checkout out to it.
This move can be done even when you have unstage files. The untracked files will now be in the new branch
vi. To delete a branch
To delete a merged branch locally. Do not be on the branch to be deleted.
git branch -d <branch>To delete a branch locally whether merged or not. Do not be on the branch to be deleted.
git branch -D <branch>Note: These delete the local branch only
To delete a remote branch from terminal.
git push origin --delete <branch>Note: This deletes the remote branch only
vi. To rename a branch
To rename a branch while on another branch
git branch -m <oldName> <newName>To rename your current working branch
git branch -m <newName>If you want upstream to reflect your changes, that is the branch upstream to have the same naming as your local branch
git push origin -u <newName>vii. To set local branch to track remote branch
git branch --set-upstream-to=origin/<remoteBranchName> <localBranchName>vii. Pushing a branch for the first time
If you clone a project, created a branch, worked on it and want to push it to upstream for the very first time
git push --set-upstream origin <branchName>After this is done, just do git push whenever you wish to push that branch to the one upstream
back to TOC
5. Pushing And Pulling
i. To push local branch for the first time
This is to push a branch that was created locally for the very first time. That is, it does not exist remotely.
git push --set-upstream origin <branchName>OR
For short
git push -u origin <branchname>ii. To push
To push a branch which already exists and has already been set to an upstream
git pushNote: The local branch must be set to track to remote branch. Use this command to set the branch to upstream.
iii. To push to a specific origin
git push origin <remoteBranchName>iv. To pull
To pull from the remote branch and directly merge/integrate into HEAD recursively
git pullUse this command to set the branch to upstream.
v. To pull from a specific origin
To pull from the specific remote branch and directly merge/integrate into HEAD
git pull origin <branchName>
back to TOC
6. To fetch
i. Synchronizing to the central repository
To synchronize your local repository to that of the central repository's main branch
git fetch originAny branch that was behind the central repository's main branch will be downloaded.
ii. Fetching a remote branch
To fetch and update a branch exists locally and remotely or to fetch a remote branch locally. Checkout to that branch
git fetch <remote> <branch>
back to TOC
7. Merging
Merging is simply combining (or merging) branches
As a beginner with git, when working in a team with others, I merge my branches on Github (after creating pull requests) so I could compare changes and easily resolve any conflicts. Then pull the work down to my local branch
i. Merging two local branches
On the terminal, to merge a branch into another, you have to be in the branch you want to merge into. Then run the command
git merge <branch-to-be-merged>ii. Merging a remote branch into a local branch
First fetch the branch, then merge using the merge command above
Original Link: https://dev.to/babib/a-set-of-handy-git-commands-for-beginners-to-make-your-life-easier-3i6k
Dev To
More About this Source Visit Dev To