
An Interest In:
Web News this Week
- March 22, 2024
- March 21, 2024
- March 20, 2024
- March 19, 2024
- March 18, 2024
- March 17, 2024
- March 16, 2024
Some of Our Sources
- Pearsonified
- Smashing Magazine
- Abduzeedo
- Vandelay Design
- FanExtra - PSD
- Noupe
- Reencoded
- Spyre Studios
- Freelance Switch
- Willems Lab
Help Webnuz
Referal links:
Installing Anaconda for Python Development
In this article I'll introduce you to Anaconda and show you how get a standardized Python data science environment up and running on your machine in minutes.
When I talk to people who are interested in getting started in data science in Python, my number one recommendation to them is to install Anaconda on their machine and experiment with a dataset in a Jupyter notebook.
Why? Because Anaconda is easy to set up, comes pre-configured with the most common data science libraries, and offers built-in tools that let you get started quickly with Python development.
In this tutorial, I'll introduce you to Anaconda and Jupyter Notebooks and walk you through installing them on your machine and getting started using them to evaluate Python code.
This content is also available in video form on YouTube
What is Anaconda?
Okay, so Anaconda is good, but what is it, exactly?
Anaconda is a Python development platform that comes packaged with libraries and tools useful for data science and python development purposes.
The list of libraries included with Anaconda changes over time, so make sure to check out the current documentation for a complete list, but some highlights include:
- Pandas for working with DataFrames that allow you to manipulate tabular data
- NumPy for efficient numerical analysis of series of data
- TensorFlow, PyTorch, SciKit Learn, and Keras for machine learning
- Matplotlib, plotly, and others for data visualization
- A number of dashboarding applications such as Dash for creating interactive dashboards
- Computer vision libraries like Pillow and OpenCV
These packages and others not mentioned here cover the breadth of what you'll do learning data science and on most data science projects, but you can also install additional packages into an Anaconda environment as needed.
What Version of Anaconda do I need?
The pricing page will have the most up-to-date listing of editions when you read this as well as an up-to-date feature comparison.
As of late 2021 there are currently 4 editions of Anaconda:
- Individual Edition geared at individual practitioners, researchers, hobbyists, and students
- Commercial Edition provides cloud-based repositories and curated packages and package verification and is licensed for commercial use
- Team Edition adds additional security and governance capabilities for teams
- Enterprise Edition includes additional capabilities around deploying models and machine learning projects
For most people investigating Python for learning purposes it will make sense to start with individual edition, however you may find yourself needing to consider commercial edition if you are using data science for your employer. You should consult Anaconda's terms of service or contact them directly if you have questions about whether or not it is legal for you to use individual edition in your context.
The rest of this article will assume that you are working with Anaconda Individual Edition.
Installing Anaconda
Anaconda is supported on Windows, MacOS, and Linux and installers for all 3 systems are available at the Individual Edition product page
Your most likely download is going to be highlighted near the top of the page based on what operating system you visit the site with:

However, if your preferred option is not listed there or you want a list of additional options, you can scroll down to the downloads section and select an appropriate version there.

Once you download your preferred installer, follow its instructions to get your environment up and running.
Launching Anaconda Navigator
Once Anaconda is installed on your computer, you now have access to a variety of tools and libraries.
The best way of exploring what you have available to you is by using the Anaconda Navigator by launching it on your machine.
On Windows this process involves opening the start menu (Windows menu or Windows key on your keyboard) and typing in Anaconda Navigator and selecting it from the list of options as displayed below on Windows 11:

For MacOS, you can do a similar thing by opening Launchpad and then clicking on the Anaconda Navigator icon.
For additional help in launching the navigator, see Anaconda's documentation.
Once you have launched Anaconda Navigator a series of windows will flash open and close quickly. This is normal. After a few moments the program will stabilize and launch.
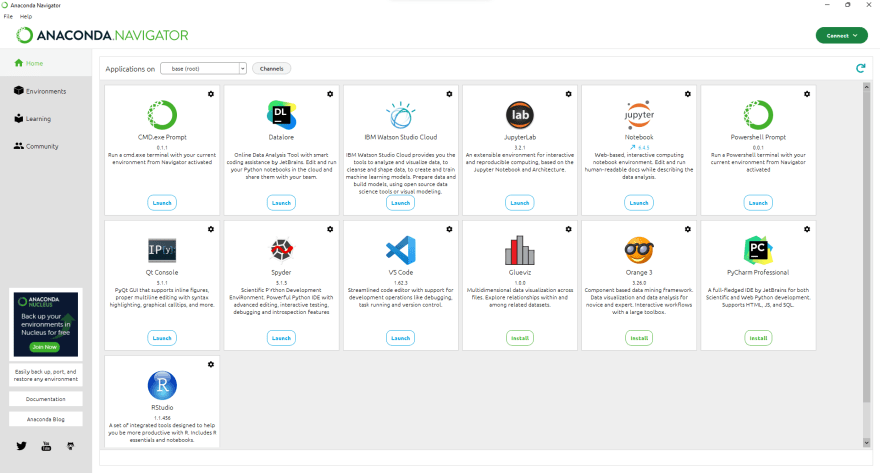
Touring Anaconda Navigator
Anaconda Navigator is a great way to get a taste of what Anaconda is and what it allows you to do.
In a nutshell, the Anaconda Navigator is a launch pad for all of the types of things you might want to do related to your Anaconda environments as well as links to ways of learning more about various aspects of data science on the Anaconda platform.
Let's go over each of the sections in the navigator:
Home
The Home tab allows you to launch development tools related to data science tasks and features most major integrated development environments (IDEs) related to Python and R development. Two notable omissions from this list are DataSpell which is currently in preview and Azure Data Studio.
Environments
The Environment tab lets you track different Anaconda environments and the packages that each environment has installed. From here you can install, update, and uninstall packages. This is also a great place to explore the packages provided by the Anaconda registry

Learning
The learn tab contains a list of helpful links to documentation, training videos, and other resources to help you get started with aspects of Anaconda development.

Community
Finally, the community tab showcases a curated list of data science events in various in-person and online communities for those wanting to connect with others and learn more about data science on Anaconda together.

Jupyter Notebooks on Anaconda
Now that we've got a running Anaconda instance, let's make sure it works by firing up Jupyter Notebooks.
To launch Jupyter Notebooks, make sure you're in Anaconda Navigator and do the following tasks:
1) Ensure you are on the Home tab
2) Click the launch button under the Jupyter notebook card as pictured below:

This should start Jupyter notebook for you in your default browser and show you a list of folders as pictured below:

Next, lets create a Jupyter Notebook file to interact with and demonstrate that Python is indeed functioning. Do this by clicking on the New button in the upper right and then selecting Python 3 (ipykernel) under the Notebook section.

Once the notebook is created, your screen will shift to the classic Jupyter Notebook interface.
Working with Jupyter Notebooks
Jupyter Notebooks are often used in data science to share the results of experiments or interactive data visualizations with other team members.
A Jupyter Notebook is an interactive way of writing Python code and performing multiple step calculations in a way that makes it easy to display results along the way to others. You can also mix markdown code and Python code together in the same notebook, allowing you to intersperse documentation and images along with live executable Python code, making for a very interactive way to share code with others.
If you've followed my steps so far you should now see a Jupyter notebook with a single blank cell of Python code as pictured below:

To showcase how Jupyter Notebooks work, copy and paste the following code into this cell and then click Run on the toolbar:
# Start our total at 0sum = 0# Loop through numbers 1 - 10for num in range(1, 11): sum += num print("Added " + str(num) + " to the total, the total is now " + str(sum))This should result in the calculation of the sum of the numbers from 1 to 10 as pictured below:
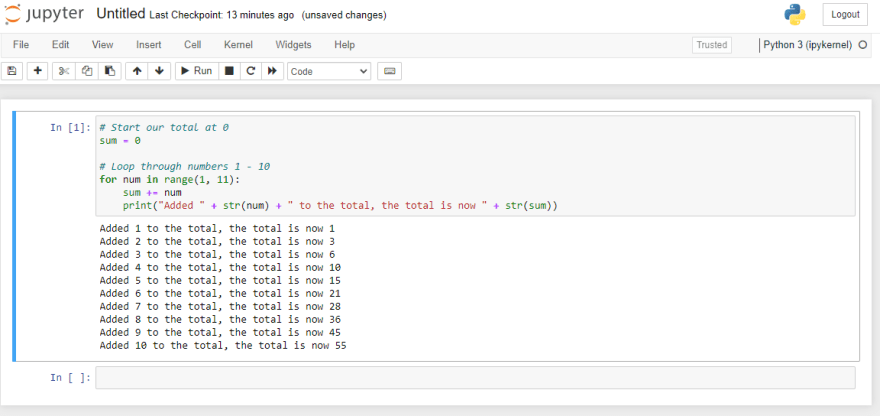
Note that every print statement resulted in a line of output being generated below your cell when the notebook ran. Also note that Jupyter created an empty cell for you put additional code for the next thing in your notebook.
In Jupyter, variables in one cell are available to other cells as well - as if they were in a larger Python program. This means we still have access to our sum variable and could print it if we wanted via a print(str(sum)) command.
However, there's a cooler way to display values in Jupyter: In Jupyter notebooks if you have a value as the last line of a cell, that value will automatically be displayed in the cell's output when the cell runs. So if you put in sum as the entire contents of your second cell and then ran it, you'd see the current value of the sum variable calculated earlier: 55.

This may not seem cool yet, but once you start using this feature to display Pandas DataFrames and various charts and visualizations you'll likely appreciate its beauty more.
Conclusion
Okay, so we've now demonstrated the basics of getting a functioning data science environment set up using Anaconda.
From here, there's so much more you can do: you can pivot into using different tools such as VS Code, you can start playing around with Pandas for tabular data, using libraries like PyTorch for machine learning, or OpenCV for computer vision. Data science is a ton of fun and Anaconda is a great way to get a robust data science environment up and running in minutes.
Let me know what you'd like to learn next and I'll try to structure some future content around it!
In the meantime, happy coding!
Original Link: https://dev.to/integerman/installing-anaconda-for-python-development-5ceb
Dev To
More About this Source Visit Dev To