
An Interest In:
Web News this Week
- April 23, 2024
- April 22, 2024
- April 21, 2024
- April 20, 2024
- April 19, 2024
- April 18, 2024
- April 17, 2024
Some of Our Sources
- Web Designer Wall
- Just Creative
- The Logo Smith
- Smashing Magazine
- FanExtra - PSD
- Fudge Graphics
- 24 Ways
- Freelance Switch
- Android Dissected
- Dev To
Help Webnuz
Referal links:
NodeJS with ExpressJS and TypeScript part 2.
In this second part we are going to see how to increase the development time with nodemon, so as not to have to compile every time we make a change in our server, since now as we have it if we make a change in the code we must interrupt the execution of our server and recompile it to start it, then to speed this up we will use nodemon which is a tool that will automatically restart the server every time it detects a change in our code without compiling.
To install nodemos we have to execute the following command:
npm i -D nodemonRemember that nodemon is to speed up development so we install only as a development dependency.
Now that we have nodemon we are going to execute:
nodemon npx ./src/index.tsThis will start our server without generating production code and when we make a change the server will automatically restart.
I will change the console message when my server starts
app.listen(8000, () => { console.log('Server on port 8000!');});Then we will see the following console output:
npx nodemon ./src/index.ts[nodemon] 2.0.15[nodemon] to restart at any time, enter `rs`[nodemon] viewing path(s): *.*[nodemon] seeing extensions: ts,json[nodemon] starting `ts-node ./src/index.ts`The application is listening on port 8000![nodemon] rebooting due to changes...[nodemon] starting `ts-node ./src/index.ts`Server on port 8000!Done now if we can move much faster in our development.
Finally I'm going to create a script in my package.json:
"hyphens": { "build": "npx tsc --project ./", "start": "node ./build/index.js", "dev": "nodemon ./src/index.ts", "test": "echo \"Error: no test specified\" && exit 1" },As you can see I have created dev command which only has nodemon, we don't use npx.
npx : This command allows you to run an arbitrary command from an npm package (either one installed locally or obtained remotely), in a context similar to running it via npm run, so when you create a script in the package. json no longer need to prepend npx.
QueryParameters
Query parameters are optional key-value pairs that appear to the right of the ? in a URL. For example, the following URL has two query parameters, rating and page, with respective values of ASC and 2:
http://example.com/articles?sort=ASC&page=2
In this url we see that we have 2 query params which take the name of "sort" and "page" you can send many query params but they must be separated by the "&" and to assign a value with the "="
Query parameters allow additional application state to be serialized to the URL that would not otherwise fit in the URL path (ie everything to the left of the ?). Common use cases for query parameters include rendering the current page number in a paginated collection, filter criteria, or sort criteria.
In web development, query parameters are used within a URL as described above, but they can also be used in API requests that retrieve data. Ember treats them as two different concepts.
Dynamic response via query params
Now we are going to see how we can return a string sent by the params of our request in the endpoint of type get that we created.
Previously we only returned hello world but now we are going to return a name that the user will provide us through the example query params:
http://localhost:8000?name=jordanOur answer should be:
hello jordanLet's see how we can do it.
In our endpoint we have a callback that takes a req (Request) and res (Response) in the request we have a very large object which brings information about the request made by the user.
Let's print req (Request) to the console:
app.get('/', (req: Request, res: Response) => { console.log(req); res.send('Hello World');});Now let's reload our server page with the following query param :
http://localhost:8000?name=jordanLet's see the console :
baseUrl: '', originalUrl: '/?name=jordan', _parsedUrl: Url { protocol: null, slashes: null, auth: null, host: null, port: null, hostname: null, hash: null, search: '?name=jordan', query: 'name=jordan', pathname: '/', path: '/?name=jordan', href: '/?name=jordan', _raw: '/?name=jordan' }, params: {}, query: { name: 'jordan' }, res: <ref *3> ServerResponse { _events: [Object: null prototype] { finish: [Function: bound resOnFinish] }, _eventsCount: 1, _maxListeners: undefined, outputData: [], outputSize: 0,This is a small part of that immense object but let's see a part that matters a lot to us since we have valuable information.
As you can see we have the base url that as it is / does not show us anything, we have the href, original url and we also have the query params:
query: { name: 'jordan' },So it means that we can access this by:
res.query.nameThen we already have the answer to our exercise, we only have to validate since the query params are optional, so we will do an if in our endpoint and it will be as follows:
app.get('/', (req: Request, res: Response) => { if (req.query.name) { res.send(`Hello ${req.query.name}`); } else { res.send('Hello guest'); }});Now we can answer the same thing in json with res.json({message : "message"})
To implement it in our exercise it would be:
app.get('/', (req: Request, res: Response) => { if (req.query.name) { // res.send(`Hello ${req.query.name}`); send response type text res.json({ message: `Hello ${req.query.name}` }); //send response type json } else { // res.send('Hello guest'); send response type text res.json({ message: 'Hello guest' }); //send response type json }});What this will do is that if you do not send a name, it will reply "hello guest"
Let's see how it turned out:
With query param: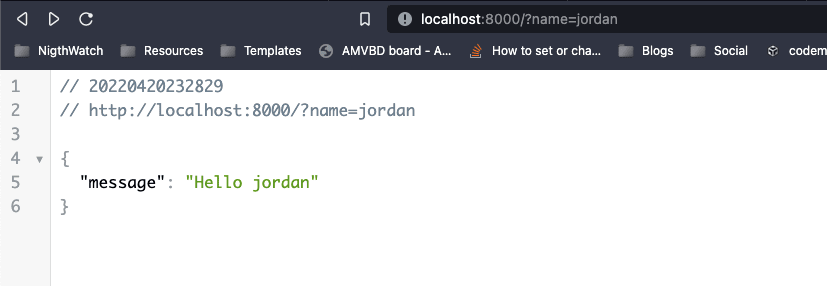
Without query param: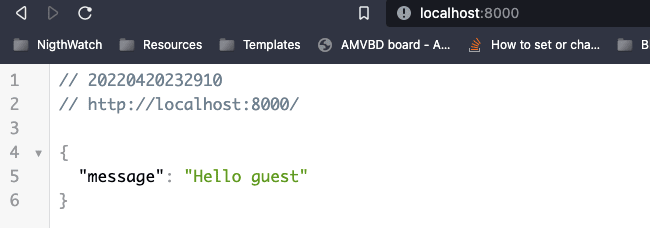
In case you are wondering why my browser looks like this when I answer json, it is because of this extension: json viewer
Challenge
As a challenge I would like you to send more properties and send them all in the response as json. Leave me your solution in the comments is much easier than it seems.
Remember that you don't know what property the user can submit, I'm excited to see your answer.
In the next blog we will see how to respond to arrays of the amount specified by the user and we will also see the posts verb.
So if you have any questions or recommendations comment. Remember to meet the challenge and show yourself that you can.
You can access the code from the repository.
Original Link: https://dev.to/jordandev/nodejs-with-expressjs-and-typescript-part-2-40lk
Dev To
More About this Source Visit Dev To