
An Interest In:
Web News this Week
- April 16, 2024
- April 15, 2024
- April 14, 2024
- April 13, 2024
- April 12, 2024
- April 11, 2024
- April 10, 2024
Some of Our Sources
- Slashdot
- BoingBoing
- Joshua Blankenship
- Creative Curio
- Fuel Your Creativity
- Web Designer Depot
- Noupe
- Wal You
- Codrops
- Willems Lab
Help Webnuz
Referal links:
Automation Testing with Selenium JavaScript [Tutorial]
Automation testing is an integral part of software development. When it comes to web applications, it is essential to test the user interface to ensure that a flawless experience is delivered to the end-users. This is where Selenium automation testing is instrumental to verify the product across different combinations of browsers & operating systems. Selenium supports a wide range of programming languages which also includes JavaScript.

In this Selenium Javascript tutorial, we take a deep dive into how Selenium Webdriver with Javascript can be used for automated testing of web products. By the end of this Selenium Javascript Tutorial, you would be in a comfortable position to perform Selenium automation testing using JavaScript.
Why Selenium Automation Testing Using JavaScript?
Before we get to the crux of the Selenium Javascript tutorial, it is essential to understand why the combination of Selenium Webdriver and Javascript is suited for automation testing? Lets answer this important question:

A number of tools and frameworks are available in the market to perform automation testing. Out of these, Selenium continues to be, hands down, the first choice of QA engineers over the past decade or so.
Few of the key features of Selenium web automation are listed below:
Open-Source and portable
Supports multiple browsers like Google Chrome, Firefox, Safari, Opera, Internet Explorer, etc.
Supports multiple languages like Java, JavaScript, Ruby, Python, etc.
Works on different OS like Windows, Linux, etc.
Easy to integrate with CI/CD tools like Jenkins, Circle CI, GitLab CI, and more
Easy to integrate with popular testing frameworks
Over & above, parallel testing in Selenium expedites the entire automation testing process by providing a platform through which the same tests can be run across different environments. You can check out our Selenium learning hub to gather more insights into Selenium web automation.
Now lets look at why Selenium Webdriver with Javascript! Well, JavaScript is one of the widely used programming languages as per the Stack Overflow 2020 annual survey.

Since JavaScript is extensively used for web development, utilizing it with Selenium web automation makes perfect sense! Since most of the developers are familiar with JavaScript, it becomes easy for them to write automation tests in JavaScript and get quick feedback.
With that said, lets proceed to the next section in this Selenium Javascript tutorial where we focus on the setup and installation process.
Ripe MD 320 Hash Calculator Free online tool for encrypting your personal data.
Getting started with Selenium automation testing using JavaScript
As mentioned earlier, the Selenium framework supports multiple languages (and frameworks) for realizing cross-browser compatibility tests. Here is how you can get started with JavaScript with Selenium WebDriver:
Prerequisites for Selenium Webdriver with Javascript
Before you start using JavaScript for Selenium automation testing, you need to ensure that your system is installed with the following pre-requisites:
- NodeJS and NPM
Verify if NodeJS and NPM are already installed in your system by running the commands node -v and npm -v on the terminal:

If Node JS (or Node.js) is not present on your machine, you can install the latest LTS version from https://nodejs.org/en/. NPM will be installed along with Node.js. So no need for separate installation.
- IDE of your choice
For implementation, we will be using Visual Studio Code as IDE. However, you can choose an IDE of your choice.
Project Setup for Selenium Webdriver with Javascript
With the required dependencies installed, lets move on to the project setup in this section of the Selenium Javascript Tutorial.
Here are the step-by-step instructions for creating a project to use JavaScript with Selenium WebDriver:
Step 1: Create a project folder in the desired location in your system. Open the folder in your IDE.
Step 2: Initialize the project in this folder. Open the IDE terminal and navigate to the project location. Run the following command
npm init -y
Here, -y stands for yes. This option is used to skip the questions asked related to project details.
You will notice that a package.json file is automatically created. The file contains details about the project configuration.
Step 3: Now, install the project dependencies. We need to install Selenium WebDriver and browser drivers.
Run the following command on the terminal to install browser drivers for Chrome and Firefox.
npm install --save selenium-webdriver chromedriver geckodriverOnce you run the command, youll notice that a node_modules folder is created in the project root. The folder contains all the dependencies. Also, package.json will be updated with these dependencies.
{ "name": "Selenium_JavaScript", "version": "1.0.0", "description": "", "main": "index.js", "scripts": { "test": "echo \"Error: no test specified\" && exit 1" }, "keywords": [], "author": "", "license": "ISC", "dependencies": { "chromedriver": "^90.0.0", "geckodriver": "^1.22.3", "selenium-webdriver": "^4.0.0-beta.3" }}With this, the setup for Selenium Webdriver JavaScript is complete. Its time to dirty our hands with code in the next section of the Selenium JavaScript Tutorial.
Paste any number of words, sentences, and paragraphs and find out the final Sentence count with a click.
Demonstration: Selenium Automation with JavaScript
In this section of the Selenium JavaScript tutorial, we run a Selenium automation test with JavaScript. Here is the test scenario:
Launch the browser
Go to www.google.com
Searches a string value
Verifies the result page title
Close the browser
Implementation:
Step 1: Create a folder named tests in the project root. Inside this folder, we create our first test file named test.js.
Shown below is the folder structure:
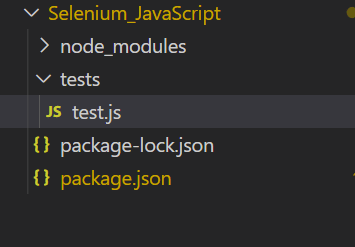
Step 2: Inside test.js, pull all the required functions from node_modules.
const {By,Key,Builder} = require("selenium-webdriver");require("chromedriver");Step 3: Create a function example(), which will be containing your test script. Feel free to provide any function name of your choice.
async function example(){}Step 4: Inside the function, let us write our test script using Selenium and JavaScript.
async function example(){ var searchString = "Automation testing with Selenium and JavaScript"; //To wait for browser to build and launch properly let driver = await new Builder().forBrowser("chrome").build(); //To fetch [http://google.com](http://google.com) from the browser with our code. await driver.get("[http://google.com](http://google.com)"); //To send a search query by passing the value in searchString. await driver.findElement(By.name("q")).sendKeys(searchString,Key.RETURN); //Verify the page title and print it var title = await driver.getTitle(); console.log('Title is:',title); //It is always a safe practice to quit the browser after execution await driver.quit();}Step 5: Now simply add the function call. Here is how the overall implementation looks like:
const {By,Key,Builder} = require("selenium-webdriver");require("chromedriver");async function example(){ var searchString = "Automation testing with Selenium"; //To wait for browser to build and launch properly let driver = await new Builder().forBrowser("chrome").build(); //To fetch [http://google.com](http://google.com) from the browser with our code. await driver.get("[http://google.com](http://google.com)"); //To send a search query by passing the value in searchString. await driver.findElement(By.name("q")).sendKeys(searchString,Key.RETURN); //Verify the page title and print it var title = await driver.getTitle(); console.log('Title is:',title); //It is always a safe practice to quit the browser after execution await driver.quit();}example()Step 6: Time for some actionlets run the code by giving the following command on the terminal:
node test.js
An instance of Chrome browser is instantiated and the necessary Selenium WebDriver actions are performed on the WebElements.

The logs can be verified in the terminal:

Congratulations! You have successfully written and executed your first test case using Selenium Webdriver and JavaScript.
Best Practices for Selenium with JavaScript
In the previous section of the Selenium WebDriver tutorial, we demonstrated the creation of automation script with Selenium and JavaScript. However, the situation will differ when you have to write Selenium automation scripts for large projects. It is essential to follow the best practices in Selenium automation when designing test automation scripts.
As QA engineers, we should come up with strategies that enable us to effectively and efficiently write test scripts, manage them, and speed up the overall execution. Here are some of the the best practices used for Selenium WebDriver with JavaScript:
Using Page Object Model (POM)
Page Object Model (POM) is a design pattern popularly used in Selenium web automation. Here we will be creating an object repository for storing all web elements. A Page Class is created for each web page. Every Page class contains details of the particular page Web elements and Page Methods that perform tasks on those web elements.
Here are the major advantage of Page Object Model for Selenium web automation:
Reduced maintenance
Minimal Code Duplication
Increased Readability and Reliability of scripts
Leveraging JavaScript Automation Frameworks
Another strategy that is gaining tremendous popularity is leveraging an automation testing framework. A framework offers multiple benefits when it comes to script maintenance, third-party tool integration, reporting, etc. A variety of JavaScript-based testing frameworks are available for automation testers. Some of the popular JavaScript-based test frameworks are Nightwatch.js, Protractor, WedriverIO, Cypress.io, etc.
Parallel Testing
Parallel testing in Selenium lets you run multiple tests simultaneously in different environments. This directly translates to increased execution speed, reduced overall execution time, and early detection of bugs. Selenium Grid supports parallel testing.
Implementing CI/CD Pipeline
CI/CD as a practice is gaining huge attention on the backdrop of software development backed by Agile and DevOps. Building a CI/CD pipeline for Selenium web automation has the following benefits:
Quicker execution leading to early bug detection.
Consistent results
Room for parallel testing capabilities
Offers greater scalability
Program automatic triggers etc.
A wide range of CI/CD tools is available from which you can choose the one matching your requirement. A few of the popular options are Jenkins, Bamboo, GitLab, etc.
Visual Testing
Since we are dealing with testing the UI of the web app, it is vital to test the visual aspects of the app as well. In Visual testing, we will compare a web page with a base or reference screenshots were taken before to expose the significant visual differences. LambdaTest provides a visual regression testing tool that lets you perform visual UI testing with ease.
Test Coverage using Cross browser testing
To stay ahead in the competitive market and gain user preference it is vital to make sure that your application is working as expected across different versions of browsers, platforms, and devices. This is exactly where test coverage and cross-browser testing comes into the picture.
Here are the major benefits of adopting cloud based cross browser testing:
Low investment cost in comparison to setting & scaling up an in-house infrastructure
Provides access to hundreds of browser and platform combinations
Extends supports to old and outdated browser versions and OS devices
No set-up or installation, or maintenance needs to be done locally
Better security, reliability, and scalability
LambdaTest is a trusted cross browser testing platform that provides you access to 2000+ browsers and operating systems online. The Selenium automation tests are executed on a secure cloud-based Selenium Grid.allows you to execute automated tests on a remote Selenium Grid. Do check why you should test websites on different browsers remotely.
SHA384 Hash calculator the program helps you determine the integrity of your data and challenge hash authentication.
How to run automation scripts with JavaScript on cloud-based Selenium Grid
In the earlier section of the Selenium JavaScript tutorial, we performed Selenium automation using JavaScript on a local grid. Now that you are aware about the shortcomings of the local Selenium Grid, its time to look at how to run JavaScript tests with Selenium Grid on a cloud-based Selenium Grid.
LambdaTest is a popular cloud-based cross browser testing platform trusted by startups as well as large enterprises. LambdaTest provides you access to thousands of browsers for mobile and web testing to help you gain the maximum test coverage during the process of Selenium web automation.
Porting existing implementations of JavaScript with Selenium WebDriver such that it runs on a cloud-based Selenium Grid requires minimal code changes. Lets look at how to run the Selenium automation test with JavaScript on LambdaTest:
Step 1: Lets get started by creating a free account on the LambdaTest platform. Once you log in, fetch your unique username and access key from the profile section of the website.
Step 2: Make the following configuration changes into your existing code.
Provide username and access key
const USERNAME = 'YOUR_USERNAME'; //replace with your username
const KEY = 'YOUR_KEY'; //replace with your accesskeyProvide the host corresponding to the LambdaTest platform
const GRID_HOST = 'hub.lambdatest.com/wd/hub';
Generate the desired browser capabilities using LambdaTest Capabilities Generator.

Select the desired browser version and OS configuration. You may also provide the build name. Provide this object inside the test function.
async function example(){var capabilities = { "build" : "JavaScript and Selenium Testing", "name" : "Google search", "platform" : "Windows 10", "browserName" : "Chrome", "version" : "90.0", "selenium_version" : "3.13.0", "chrome.driver" : "90.0" } //}Provide the gridUrl. You can also find this value from Automation Dashboard of LambdaTest.
const gridUrl = 'https://' + USERNAME + ':' + KEY + '@' + GRID_HOST;
Finally, edit the code to build and instantiate the browser on the designated platform
let driver = await new Builder()
.usingServer(gridUrl)
.withCapabilities(capabilities)
.build();
Step 3: Finally, its time to run the test on the LambdaTest Grid. Trigger the following command on the terminal to run the JavaScript Automation test with Selenium Webdriver:
node test.js
Shown below is the execution snapshot from the LambdaTest automation dashboard which indicates that the test execution was successful.
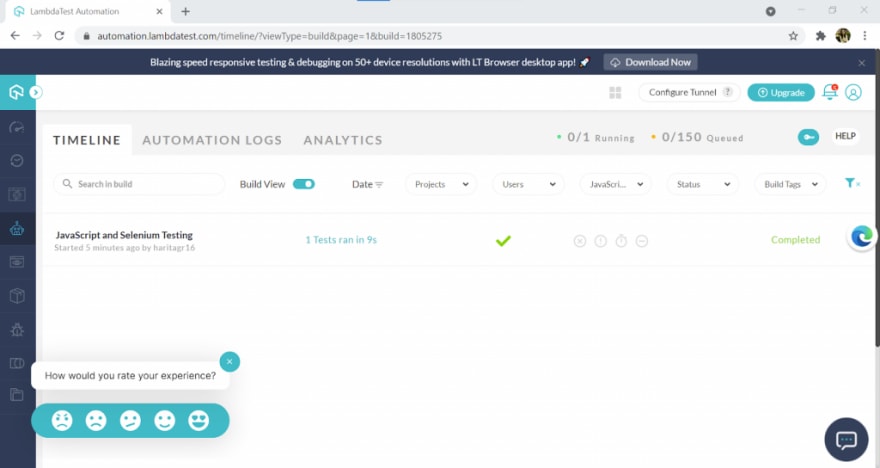
Navigate to Automation Logs to view the test report containing video and logs.

In this final section of the Selenium JavaScript tutorial, we ran the JavaScript automation test with Selenium WebDriver on a scalable and reliable cloud-based Selenium Grid by LambdaTest.
Its a Wrap!

JavaScript is one of the most preferred languages when it comes to Selenium automation testing. In this Selenium JavaScript tutorial, we deep dived into the basic aspects of Selenium WebDriver automation with JavaScript. We also explored the Selenium automation best practices that will help you create scalable automation tests with JavaScript and Selenium WebDriver.
For better scalability, reliability, and performance; it is recommended to run Selenium WebDriver JavaScript tests on a cloud-based Selenium Grid from LambdaTest. With that setup, you can make the most out of the automation tests created using Selenium and JavaScript. In the next series of this Selenium JavaScript tutorial, we would deep dive into the other vital aspects of Selenium automation testing with JavaScript.
Happy Testing!
Original Link: https://dev.to/haritalt/automation-testing-with-selenium-javascript-tutorial-pkj
Dev To
More About this Source Visit Dev To