
An Interest In:
Web News this Week
- March 22, 2024
- March 21, 2024
- March 20, 2024
- March 19, 2024
- March 18, 2024
- March 17, 2024
- March 16, 2024
Some of Our Sources
- Simplebits
- Pearsonified
- Fudge Graphics
- Reencoded
- CSS Globe
- CSS Tricks
- Web Resource Source
- Daily Now
- Hashedout
- The Verge
Help Webnuz
Referal links:
NeoPixels on the Arduino Nano RP2040
Last week I started to rebuild my RaspberryPi Zero W based Bluetooth car so it would use an Arduino Nano RP2040. Mainly because I did not want to wait minutes for every restart. And the wohle process went quite nice.
But then I got stuck on one problem. I wanted to use a 12 LED NeoPixel ring so my car could give some feedback to the operator. I went through various tutorials but I quickly found out that the RP2040 board is quite different than all the other Arduino Nano boards.
the wiring
First of all I soldered some jumper wires to the DI, GND and V5 contacts of the NeoPixel ring (be careful. The contacts fall off quickly when it gets too hot).
Then I connected the wires as followed:
DI -> D3GND -> GNDV5 -> VUSB (V5+)/** * if you are like me and just read articles to scan for code * snippets, this won't work. Take the next snippet. */I've then written one of the examples NeoPixel Library to the board, but nothing happened. So I went down the rabbit hole that costed me three evenings and two NeoPixel rings (luckily I ordered a couple of them).
By accident, I connected the V5 to the VIN and somehow it worked. I then went deeper and found out, that the VUSB is not activated by default on the RP2040. It would have been obvious if I studied the docs before. But why would anyone waste 20 minutes reading the docs when you have the chance to spend hours debugging.
Anyways, with the following connection it does work:
DI -> D3GND -> GNDV5 -> VIN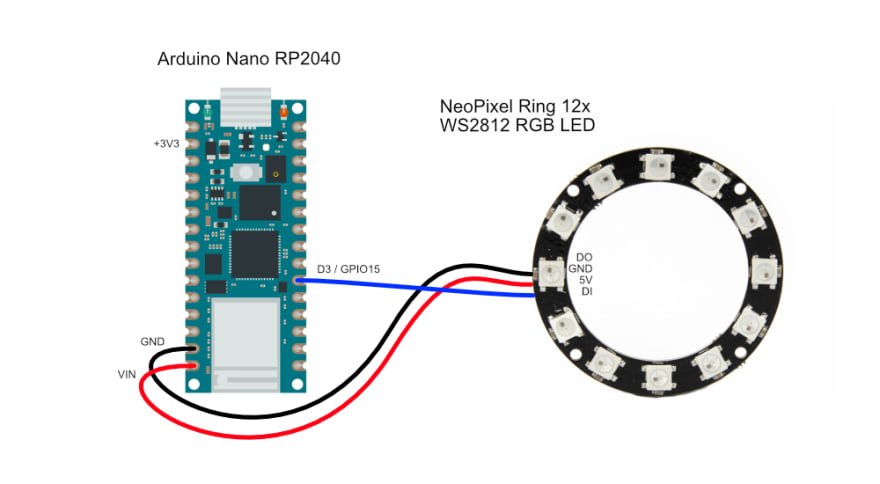
Later on I also found out, that I could also use the +3V3 pin instead of the VIN if you power the board from a battery and have the VIN occupied for this purpose. I could imagine, however, that with more LEDs this would no longer work so well.
the code
The most important question first, the Adafruit NeoPixel Library does support the RP2040 since version 1.10.2. So make sure you are using the right version. To install the library please follow the steps explained here: Adafruit NeoPixel Installation.
Now I startet with a simple sketch to test it out:
#include <Adafruit_NeoPixel.h>#define LED_PIN 15#define LED_COUNT 12Adafruit_NeoPixel strip(LED_COUNT, LED_PIN, NEO_GRB + NEO_KHZ800);void setup() { strip.begin(); strip.show(); strip.setBrightness(50);}void loop() { setRingRed(false); delay(1000); setRingRed(true); delay(1000);}void setRingRed(bool off) { for (int i = 0; i < strip.numPixels(); i++) { strip.setPixelColor(i, strip.Color(off ? 0 : 255, 0, 0)); } strip.show();}The setup and the loop functions are used by the board to setup your code and then react to changes. In my case I want to set the whole ring red, wait for 1 second and then turn it off. After that the loop starts again, so I need to add a second delay.
The setRingRed function will loop through all the LEDs, will set a new color and will then show it on the ring.
conclusion
Yes, it work. And that's all that counts in the end .
I definitely could have saved a lot of time if I had read the documentation first. But this way I will definitely not repeat my mistakes.
Debugging hardware is definitely pretty harder than expected.
In addition to the usual sources of error (out-of-date libraries, bugs), there are suddenly completely new ones: Have I soldered something wrong? Is it connected incorrectly? Are the LEDs defective?
But it's almost always worth sticking with it, as the moment of success is definitely greater the longer you mull over a problem.
Oh and huge thanks to Oli who definitely made my first steps in the Arduino cosmos way easier .
Original Link: https://dev.to/nicomartin/neopixels-on-the-arduino-nano-rp2040-3po6
Dev To
More About this Source Visit Dev To