
An Interest In:
Web News this Week
- April 18, 2024
- April 17, 2024
- April 16, 2024
- April 15, 2024
- April 14, 2024
- April 13, 2024
- April 12, 2024
Some of Our Sources
- Mashable
- Techcrunch
- TutsPlus - Code
- Joshua Blankenship
- Spoon Graphics
- Vandelay Design
- Noupe
- Wal You
- Willems Lab
- Hashedout
Help Webnuz
Referal links:
Multi-Step Form with React & Formik
Nowadays, multi-step form is the way to go if one needs to collect detailed user data. Why? because allowing users to complete their information in smaller chunks is less intimidating for them.
In this tutorial, we'll learn how to build a multi-step form with React & Formik.
Getting Started
Clone the starter code(cra w/needed dependencies) to code along with me.
Building Stepper
A stepper is an important component to show the progress. How about a design like this?

Let's begin with creating a component - Stepper.js & later import in our App.js. As we can see in the image above, we need circular divs connected to each other & positioned horizontally. The code goes like this:
// Stepper.jsimport React, { useContext, useEffect } from "react";function Stepper() { return ( <div className="w-2/3 flex flex-row items-center justify-center px-32 py-16"> <div className="stepper-item w-8 h-8 text-center font-medium border-2 rounded-full"> 1 </div> <div className="flex-auto border-t-2"></div> <div className="stepper-item w-8 h-8 text-center font-medium border-2 rounded-full"> 2 </div> <div className="flex-auto border-t-2"></div> <div className="stepper-item w-8 h-8 text-center font-medium border-2 rounded-full"> 3 </div> </div> );}export default Stepper;w-2/3 flex flex-row items-center justify-center px-32 py-16- flex layout w/children at center & positioned horizontally, will take up 2/3rd of App's width & has some padding.w-8 h-8 text-center font-medium border-2 rounded-full- equal width & height, center-aligned text, sets border radius to a very high value(~9999px) to produce perfect 1/4 circle corners, border width as 2px.flex-auto border-t-2- sizes based on initial width/height properties, but makes it fully flexible so that it absorb any extra space along the main axis, border top width as 2px.
Importing in App.js:
// App.jsimport Stepper from "./components/Stepper";function App() { return ( <div className="w-screen h-screen flex flex-col items-center justify-start"> <Stepper /> </div> );}export default App;w-screen h-screen flex flex-col items-center justify-start- flex layout w/children centered horizontally & positioned vertically at top, will take up 100vw as width & 100vh as height.
At this moment, this is how it looks:

Now, we know that stepper need to indicate the progress of the flow. We can think of having an index which will be passed to stepper & stepper will appear accordingly. As the index will be updated by the steps as the flow moves forward, we can make use of Context here.
FYI - Context provides a way to pass data through the component tree without having to pass props down manually at every level. Source: https://reactjs.org/docs/context.html
Let's create a context in App.js which passes down the information of active step:
// App.jsimport { createContext, useState } from "react";import Stepper from "./components/Stepper";export const FormContext = createContext();function App() { const [activeStepIndex, setActiveStepIndex] = useState(0); return ( <FormContext.Provider value={{ activeStepIndex }}> <div className="w-screen h-screen flex flex-col items-center justify-start"> <Stepper /> </div> </FormContext.Provider> );}export default App;export const FormContext = createContext()- creating a context object.const [activeStepIndex, setActiveStepIndex] = useState(0)- having a state variable which holds the information of the active step.<FormContext.Provider value={{ activeStepIndex }}>- using the provider to pass the values down the tree.
Now, let's consume this context in our consumer component i.e. Stepper.js and use that value to render stepper accordingly:
// Stepper.jsimport React, { useContext, useEffect } from "react";import { FormContext } from "../../App";function Stepper() { const { activeStepIndex } = useContext(FormContext); useEffect(() => { const stepperItems = document.querySelectorAll(".stepper-item"); stepperItems.forEach((step, i) => { if (i <= activeStepIndex) { step.classList.add("bg-indigo-500", "text-white"); } else { step.classList.remove("bg-indigo-500", "text-white"); } }); }, [activeStepIndex]); return ( <div className="w-2/3 flex flex-row items-center justify-center px-32 py-16"> <div className="stepper-item w-8 h-8 text-center font-medium border-2 rounded-full"> 1 </div> <div className="flex-auto border-t-2"></div> <div className="stepper-item w-8 h-8 text-center font-medium border-2 rounded-full"> 2 </div> <div className="flex-auto border-t-2"></div> <div className="stepper-item w-8 h-8 text-center font-medium border-2 rounded-full"> 3 </div> </div> );}export default Stepper;const { activeStepIndex } = useContext(FormContext)- accepts the context object and returns the current context value.
-
useEffect(() => { const stepperItems = document.querySelectorAll(".stepper-item"); stepperItems.forEach((step, i) => { if (i <= activeStepIndex) { step.classList.add("bg-indigo-500", "text-white"); } else { step.classList.remove("bg-indigo-500", "text-white"); } }); }, [activeStepIndex]);Here, we will loop through all the .stepper-items and add styles to the divs representing current & completed steps. As the dependency array in useEffect is the current context value - activeStepIndex, the code inside the hook is triggered the moment step is changed.
So, this is how it looks(say the 2nd step is active):

Building Multi-Step Form
We will have a Step component which will render the content as per the index. Think of it like a container. Let's code it:
// Step.jsimport React, { useContext } from "react";import { FormContext } from "../../App";import { Basic, Success, Workspace } from "../Forms";function Step() { const { activeStepIndex } = useContext(FormContext); let stepContent; switch (activeStepIndex) { case 0: stepContent = <Basic />; break; case 1: stepContent = <Workspace />; break; case 2: stepContent = <Success />; break; default: break; } return stepContent;}export default Step;I think the code is pretty clear what it's trying to do. It takes the current context value and renders the specific form. So, now let's build the forms which were imported in our Step component.
Let's start with the first one - Basic:
// Basic.jsimport { ErrorMessage, Field, Form, Formik } from "formik";import React, { useContext } from "react";import { FormContext } from "../../../App";import * as yup from "yup";function Basic() { const { activeStepIndex, setActiveStepIndex, formData, setFormData } = useContext(FormContext); const renderError = (message) => ( <p className="italic text-red-600">{message}</p> ); const ValidationSchema = yup.object().shape({ name: yup.string().required(), email: yup.string().email().required(), }); return ( <Formik initialValues={{ name: "", email: "", }} validationSchema={ValidationSchema} onSubmit={(values) => { const data = { ...formData, ...values }; setFormData(data); setActiveStepIndex(activeStepIndex + 1); }} > <Form className="flex flex-col justify-center items-center"> <div className="text-2xl font-medium self-center mb-2">Welcome!</div> <div className="flex flex-col items-start mb-2"> <label className="font-medium text-gray-900">Name</label> <Field name="name" className="rounded-md border-2 p-2" placeholder="John Doe" /> </div> <ErrorMessage name="name" render={renderError} /> <div className="flex flex-col items-start mb-2"> <label className="font-medium text-gray-900">Email</label> <Field name="email" className="rounded-md border-2 p-2" placeholder="[email protected]" /> </div> <ErrorMessage name="email" render={renderError} /> <button className="rounded-md bg-indigo-500 font-medium text-white my-2 p-2" type="submit" > Continue </button> </Form> </Formik> );}export default Basic;Let's walkthrough the code above:
We're using a
Formikcomponent as the root component of our Basic component. This component takes 3 props - a set of initial values, a validation schema, and a callback function to be triggered when the form is submitted. In addition to theFormikcomponent, Formik provides theForm,FieldandErrorMessagecomponents which all work together to handle form state, events, validation (based on the object schema provided byYup) and display of validation errors. This allows us to focus on the structure of the form and the submission process.When form is submitted, we first update the
formDatastate variable with the input values and then increment theactiveStepIndexby 1.The
Stepcomponent will receive the current value ofactiveStepIndexi.e. 1 and render the 2nd form. Also,Steppergets updated.
Remember to update App.js to render the Step component and also pass some needed values down the tree - setActiveStepIndex - function to update the activeStepIndex, formData - a state variable to hold the submitted answers, and setFormData - a function to update the formData.
// App.jsimport { createContext, useState } from "react";import Step from "./components/Step/Step";import Stepper from "./components/Stepper";export const FormContext = createContext();function App() { const [activeStepIndex, setActiveStepIndex] = useState(0); const [formData, setFormData] = useState({}); return ( <FormContext.Provider value={{ activeStepIndex, setActiveStepIndex, formData, setFormData }} > <div className="w-screen h-screen flex flex-col items-center justify-start"> <Stepper /> <Step /> </div> </FormContext.Provider> );}export default App;At this moment, this is how it looks:

On successful submission of basic form, we moved to the 2nd form:
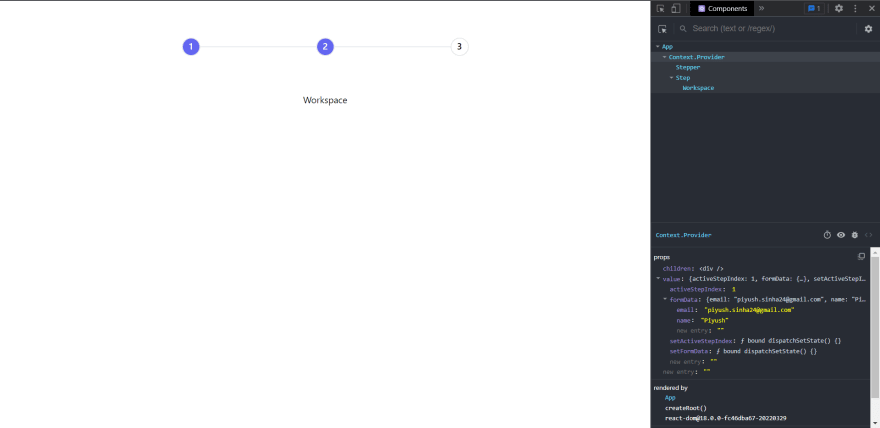
In similar way, we can build the 2nd form:
// Workspace.jsimport { ErrorMessage, Field, Form, Formik } from "formik";import React, { useContext } from "react";import { FormContext } from "../../../App";import * as yup from "yup";function Workspace() { const { activeStepIndex, setActiveStepIndex, formData, setFormData } = useContext(FormContext); const renderError = (message) => ( <p className="italic text-red-600">{message}</p> ); const ValidationSchema = yup.object().shape({ workspaceName: yup.string().required(), workspaceURL: yup.string().url().required(), }); return ( <Formik initialValues={{ workspaceName: "", workspaceURL: "", }} validationSchema={ValidationSchema} onSubmit={(values) => { const data = { ...formData, ...values }; setFormData(data); setActiveStepIndex(activeStepIndex + 1); }} > <Form className="flex flex-col justify-center items-center"> <div className="flex flex-col items-start mb-2"> <label className="font-medium text-gray-900">Workspace Name</label> <Field name="workspaceName" className="rounded-md border-2 p-2" placeholder="My Workspace" /> </div> <ErrorMessage name="workspaceName" render={renderError} /> <div className="flex flex-col items-start mb-2"> <label className="font-medium text-gray-900">Workspace URL</label> <Field name="workspaceURL" className="rounded-md border-2 p-2" placeholder="https://my-workspace.com" /> </div> <ErrorMessage name="workspaceURL" render={renderError} /> <button className="rounded-md bg-indigo-500 font-medium text-white my-2 p-2" type="submit" > Continue </button> </Form> </Formik> );}export default Workspace;The third & last one is Success - here we will just show success message:
//Success.jsimport React from 'react';function Success() { return ( <div className='font-medium'>Workspace successfully created!</div> );}export default Success;Finally, this how it looks:

Conclusion
Now, we have a basic understanding on how to build a multi-step form. If you have any questions, you can leave them in the comments section and Ill be happy to answer them.
Also, the complete code is linked for reference: Github
Original Link: https://dev.to/sinhapiyush/multi-step-form-with-react-formik-2i52
Dev To
More About this Source Visit Dev To