
An Interest In:
Web News this Week
- April 2, 2024
- April 1, 2024
- March 31, 2024
- March 30, 2024
- March 29, 2024
- March 28, 2024
- March 27, 2024
Some of Our Sources
- BoingBoing
- Technology Review
- TutsPlus - Code
- Spoon Graphics
- Creative Curio
- Inspiredology
- Fudge Graphics
- Reencoded
- Spyre Studios
- Codrops
Help Webnuz
Referal links:
Tutorial: Create an Azure Blob Storage with SFTP integration
Introduction
Azure has announced a SFTP feature for Storage Accounts. Currently, the feature is still in preview and should therefore not be used for production workloads until it reaches GA.
The new Azure Storage Account SFTP feature provides a full managed PaaS service. Before that, an SFTP service had to be provided in other ways such as:
- Custom implementation: Development of a custom service that provides the SFTP functions, which then persists the files in a blob storage. For this use case Microsoft offers a template, consisting of an Azure Storage Account fileshare and a container instance. For more information, please checkout this link.
- Virtual Machine: Deploy a VM with a SFTP service, either Windows or Linux. Especially for small use cases, this variant could be a overkill and depending on the configuration, this solution is also quite expensive. Furthermore, the administration overhead is significantly higher than with the integrated SFTP option.
Advantages of the PaaS variant:
- Easy to setup & use
- Fully managed serverless service
- Extremely cheap
I would like to emphasize the last point in particular. Azure Blob Storage is an extremely cost-effective storage option, here is an example calculation:
Storage Account Configuration:
| Configuration Property Name | Value |
|---|---|
| Region | West Europe |
| Type | Block Blob Storage |
| Performance Tier | Standard |
| Storage Account Type | General Purpose V2 |
| Access Tier | Hot |
| Redundancy | LRS |
Storage Account Pricing:
| Name | Description | Price |
|---|---|---|
| Capacity | 100 GB | 1.76 |
| Write Operations | 10 x 10.000 | 0.49 |
| List and create Container Operation | 10x 10.000 | 0.04 |
| Data Retrieval | 1000 GB | 0.0 |
| Data Write | 1000 GB | 0.0 |
| Support | Included | 0.0 |
Monthly cost: 2.78
As illustrated here, Azure Blob Storage is really affordable! In the example you get for not even 3 a complete managed storage with many different features like SFTP support and many more!
Disclaimer: This is an example configuration. Storage accounts are "pay as you go" and other prices may apply depending on configuration and region. For more precise estimation, I highly recommend using the Azure Pricing Calculator
Let's get started
Prerequisites
- Azure Account with an active subscription. In case you do not have an Azure Account, go ahead and create one for free here
- Azure CLI, you can either install the Azure CLI locally or use the Azure Cloud Shell.
If the Azure Cloud Shell is used, then the command az login is not needed. In the Cloud shell you are automatically logged in with the current user.
Enable the SFTP preview feature
In order to use this new feature, it has to be activated in advance for the respective subscription:
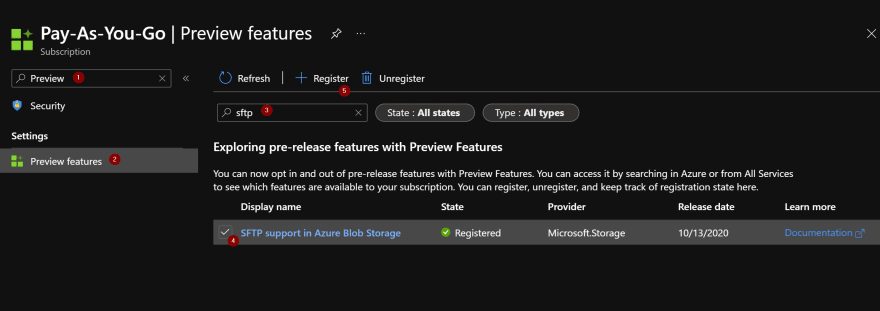
- Navigate to Azure Portal
- In the search bar, search for Subscriptions
- Select your subscription (in my case, my subscription is named Pay-As-You-Go)
- Inside your subscription, search for Preview Features
- Inside the available features, search for "sftp" and register the SFTP support in Azure Blob Storage
Azure CLI:
Install the storage-preview extension:
az extension add -n storage-previewAzure login:
az loginList available subscriptions and set active azure subscription:
az account list --allaz account set --subscription <subscription-id>Enable SFTP feature:
az feature register --namespace Microsoft.Storage --name AllowSFTP Verify feature registration:
az feature show --namespace Microsoft.Storage --name AllowSFTP Create and configure the Azure Storage Account
Microsoft provides a demo template , in order to deploy the template click on the following button:
![]()
With this template we are ready to go and can test the SFTP feature. But of course we will also deploy everything from scratch:
Create the Azure Storage Account:
az storage account create -n <storage-account-name> \-l <azure-location> \-g <resource-group> \--sku Standard_LRS \--https-only=true \--hierarchical-namespace=true \--kind StorageV2Enable SFTP:
az storage account update -g <resource-group> \-n <storage-account> \--enable-sftp=trueCreate an Azure Storage Container:
az storage container create -n <container-name> \--account-name <storage-account-name>Create local user for SFTP access:
az storage account local-user create \--account-name <storage-account> \-g <resource-group> \-n <local-user-name> \--home-directory <home-dir> \--permission-scope permissions=<permissions> service=blob resource-name=<container-name> \ --ssh-authorized-key key="<ssh-key>" \--has-ssh-key true \--has-ssh-password trueAuthentication:
For authentication, there are two options available:
- Password
- SSH Key
In order to create or regenerate a password, use this command:
az storage account local-user regenerate-password \--account-name <storage-account> \-g <resource-group> \-n <local-user-name>There are many ways to generate SSH key pairs. Just use your preferred tool, alternatively the Azure CLI can be used:
az sshkey create --name "<ssh-key-name>" \--resource-group "<resource-group>"This command creates a new SSH key Azure resource:
For more details, checkout the official documentation.
While you can enable both forms of authentication, SFTP clients can connect by using only one of them. Multifactor authentication, whereby both a valid password and a valid public and private key pair are required for successful authentication is not supported.
You can't retrieve the generated password later, so make sure to copy the password, and then store it in a place where you can find it. If you lose this password, you'll have to generate a new one.
Home directory:
Home directory is only the initial directory that the connecting local user is placed in. Local users can navigate to any other path in the container they are connected to if they have the appropriate container permissions.
Format: container/folder/...
Available container permissions:
| Permission | Permission Code | Description |
|---|---|---|
| Read | r |
|
| Write | w |
|
| List | l |
|
| Delete | d | |
| Create | c |
|
You can also specify multiple permission scopes:
--permission-scope permissions=rw service=blob resource-name=container1 \--permission-scope permissions=rwd service=file resource-name=share2Connect via SFTP to the Azure Storage Account
I will briefly go over the creation of the SFTP user again here. Lets get started! In my case, I created the following SFTP user:
az storage account local-user create --account-name <storage-account> \-g <resource-group> \-n mka \--home-directory mystoragecontainer \--permission-scope permissions=rwcdl service=blob resource-name=mystoragecontainer \--has-ssh-password trueFor the sake of simplicity, I only use password authentication. As mentioned above you can also choose SSH key authentication or even both (please note that you can't use both at the same time, you can authenticate either via password or SSH key).
In order to obtain the password of the newly created user, please use this command:
az storage account local-user regenerate-password \--account-name <storage-account> \-g <resource-group> \-n mka Do not forget to copy the password after creating it, it cannot be requested again. If you lose the password, you must create a new one.
To connect to the storage account we need the blob primary endpoint. This can be obtained with the following command:
az storage account show -n <storage-account> -g <resource-group>The previous command gives the general info about the storage account. Search for the section "primaryEndoints" and copy the "blob" URL without the prefix https or http(for example .blob.core.windows.net):
"primaryEndpoints": { "blob": "https://<storage-account-name>.blob.core.windows.net/", "dfs": "https://<storage-account-name>.dfs.core.windows.net/", "file": "https://<storage-account-name>.file.core.windows.net/", "internetEndpoints": null, "microsoftEndpoints": null, "queue": "https://<storage-account-name>.queue.core.windows.net/", "table": "https://<storage-account-name>.table.core.windows.net/", "web": "https://<storage-account-name>.z6.web.core.windows.net/" }Now you can connect to the storage account with your **preferred SFTP client*. In my case I use PowerShell with OpenSSH and password authentication:
sftp <storage-account>.mka@<storage-account>.blob.core.windows.netThe username of the SSH user is in following format: storage-account.sftp-user-name
You might be prompted to trust a host key. During the public preview, valid host keys are published here.
After that you will be asked to authenticate yourself, just enter the password here.
After successfully authenticating, a file can be uploaded with this command:
put <path-to-file>Verify the file upload either directly within the SFTP client or via the following Azure CLI command:
Retrieve Azure Storage Account Keys (for authentication):
az storage account keys list -n <storage-account> -g <resource-group>The result of this should look something like this:
[ { "creationTime": "2022-03-27T17:51:51.501304+00:00", "keyName": "key1", "permissions": "FULL", "value": "<key-value-1>" }, { "creationTime": "2022-03-27T17:51:51.501304+00:00", "keyName": "key2", "permissions": "FULL", "value": "<key-value-2>" }]Simply copy one of the keys.
List files:
az storage fs file list -f <container-name> \--recursive true \--account-name <storage-account> \--account-key <insert-previous-copied-key-here>The output should look something like this:
[ { "contentLength": 53759, "etag": "0x8DA11E2F03CABAB", "group": "$superuser", "isDirectory": false, "lastModified": "2022-03-30T20:19:21", "name": "<my-file>", "owner": "$superuser", "permissions": "rw-r-----" }]Conclusion
As mentioned before, Azure Storage Accounts are a very cost effective option to store files that now offer SFTP integration.
Since this variant is a so-called serverless, there are many exciting use-cases! Especially many legacy systems that work with files often offer an SFTP upload. These programs can now upload the files directly to the cloud and once the files are in the cloud they can be easily processed further, e.g. with an Azure function that processes the uploaded files with an "on-file-created" trigger.
If you made it this far, thanks for reading! Let me know your thoughts on this new feature.
Resources
- Storage Accounts Overview
- SSH File Transfer Protocol (SFTP) support for Azure Blob Storage
- Connect to Azure Blob Storage by using the SSH File Transfer Protocol (SFTP)
- Host keys for SSH File Transfer Protocol (SFTP) support for Azure Blob Storage
- Limitations and known issues with SSH File Transfer Protocol (SFTP) support for Azure Blob Storage
Original Link: https://dev.to/manukanne/tutorial-create-an-azure-blob-storage-with-sftp-integration-cd6
Dev To
More About this Source Visit Dev To