
An Interest In:
Web News this Week
- April 1, 2024
- March 31, 2024
- March 30, 2024
- March 29, 2024
- March 28, 2024
- March 27, 2024
- March 26, 2024
Some of Our Sources
- Mashable
- Techcrunch
- Inspiredology
- Noupe
- My Ink Blog
- 24 Ways
- Web Resource Source
- Android Dissected
- Hashedout
- The Verge
Help Webnuz
Referal links:
MongoDB Realm for React Native
Introduction
MongoDB Realm is a development platform designed for modern, data- driven applications. It provides a serverless backend that allows you to not only write and read data easily but also provides easy ways to authenticate users, keep your data synchronized across multiple devices, and more.
In this tutorial, we'll learn how to create a MongoDB Realm application, add sample data to it, create serverless functions, then how to integrate the application with React Native.
We'll create an app to show e-commerce products by fetching data with the help of realm functions.
Create a MongoDB Realm App
Create a MongoDB Cluster
Before we can create a MongoDB Realm App, we need to create a MongoDB Cluster. To do that, go to the MongoDB portal. Create an account if you dont have one and log in to continue.
If you're not redirected to the Projects page, click on the logo at the top left to get redirected.
Once you're on the Projects page, click on the New Project button at the right.
Then you will be asked to enter a project name. You can enter any name of your wish.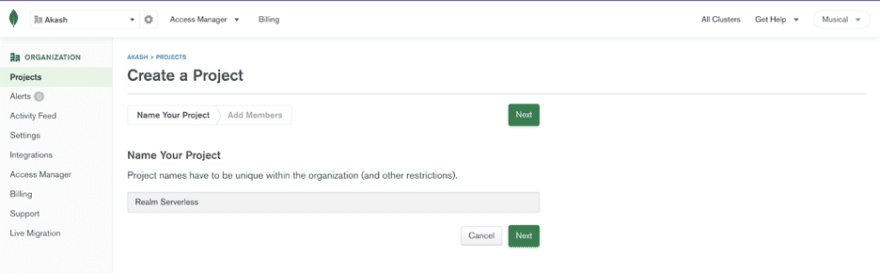
After that, you'll be asked to add members, you can add members if you want or can leave it blank and proceed further by clicking on Create Project.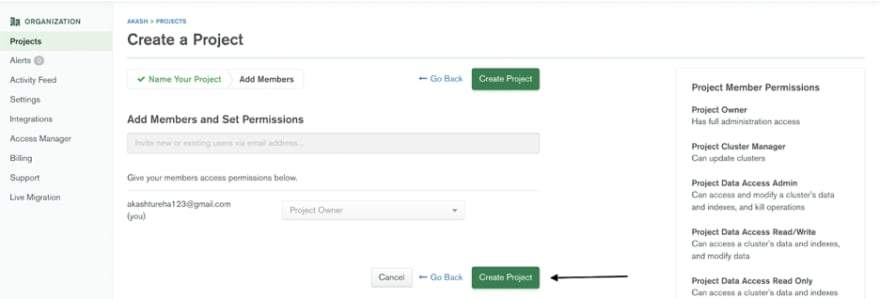
Once the project is created, you will be redirected to the database section , here you need to click on Build a database.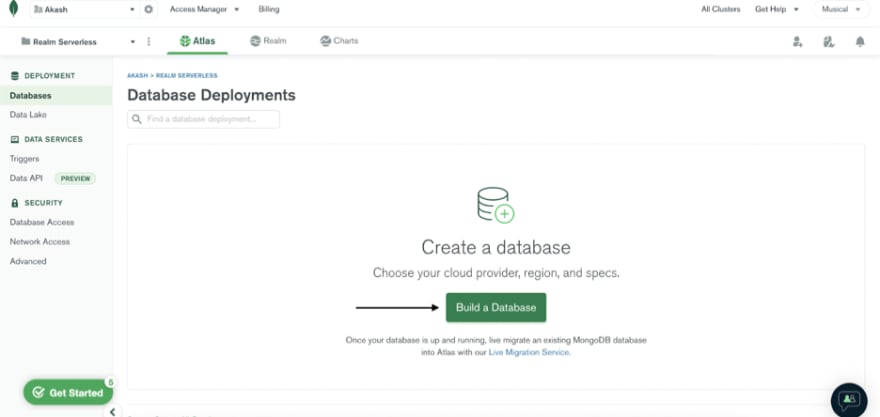
After you click on that you will see a couple of options regarding your cluster plan. For this tutorial, you can just choose the free plan and continue.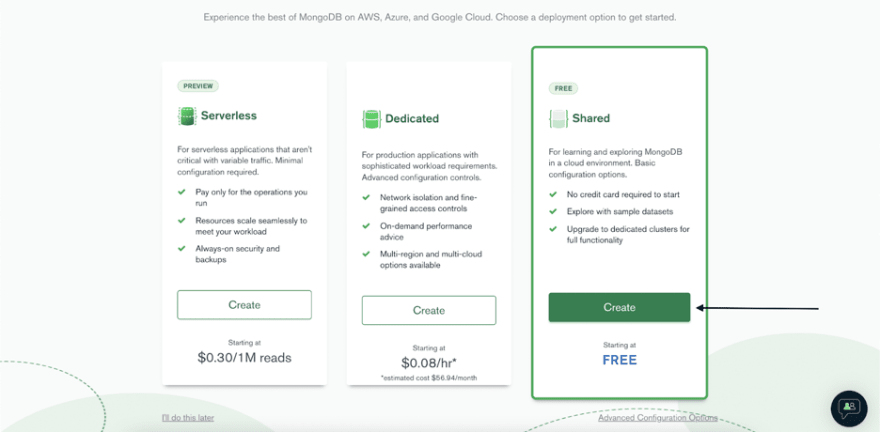
Then after that, you can just click on "Create". Moving next you will find some settings regarding the cluster you can leave them as they are and proceed by clicking on Create Cluster.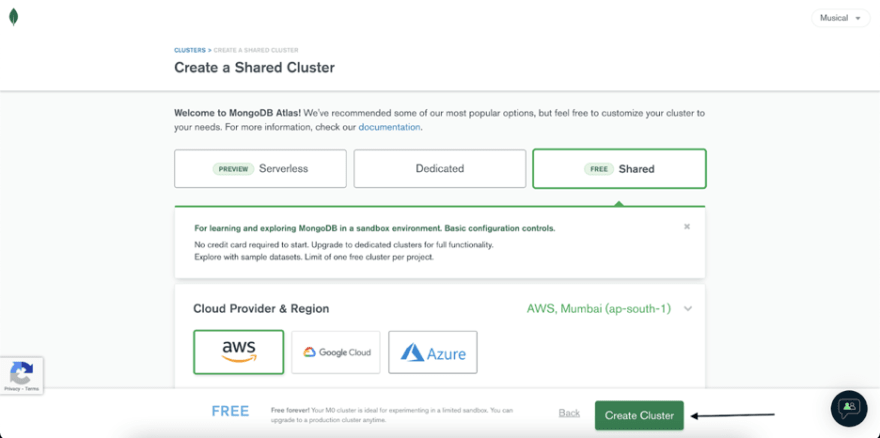
After this, your cluster will take some time to deploy. You need to wait until it's created and deployed, which can take a couple of minutes.
Creating the realm application
The next step will be to create a realm application head over to the realm portal and there will be a welcome screen pop up.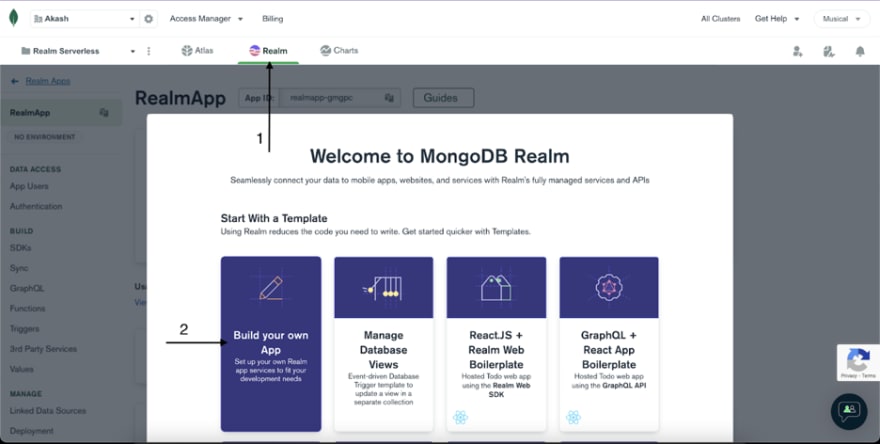
MongoDB realm provides us with various predefined templates which have some settings already configured for the project type. For this tutorial, we will choose the option labelled with build your own app and define our settings.
A dialog box will show to start creating MongoDB Realm App. You'll need to enter a name for the Realm Application which can be whatever you want. Then, you'll need to choose a cluster to link the Realm App to. Choose the cluster we just created. Once you do that, click on Create Realm Application which will be below.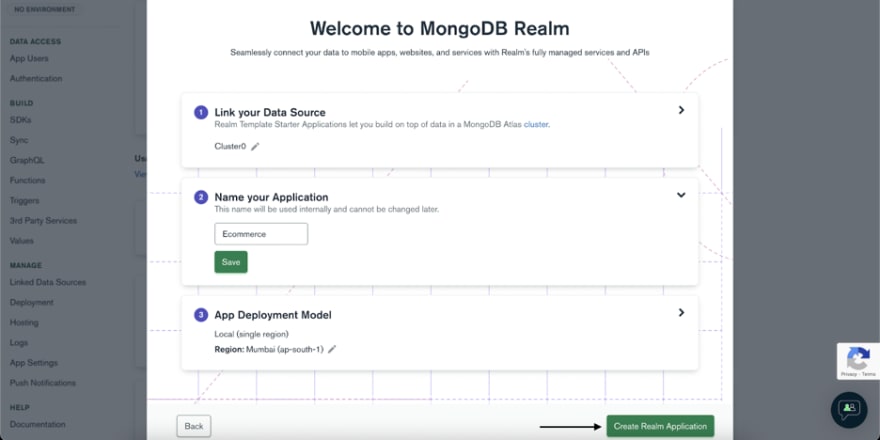
Now we have our application created and we are ready to add data to our database. Head back to the atlas and select database. There you will find an option labelled with add my own data.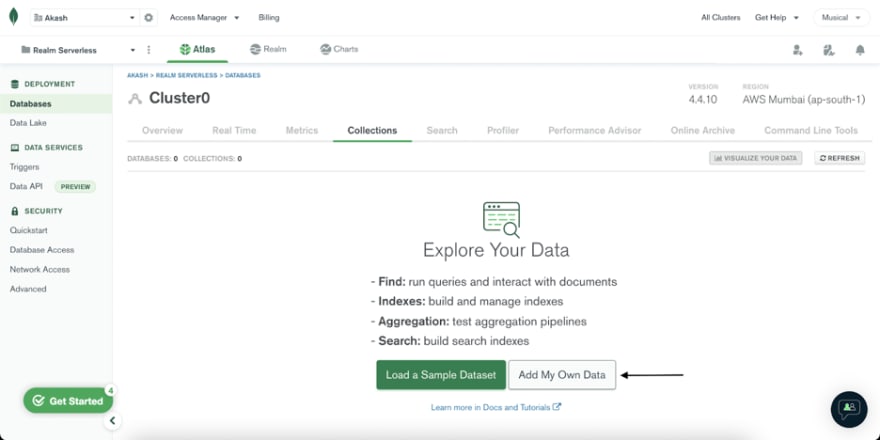
On clicking, you will see a pop up to create a database. Enter any name for the database and collection but make sure to note it as we will require it later for making a request to our database.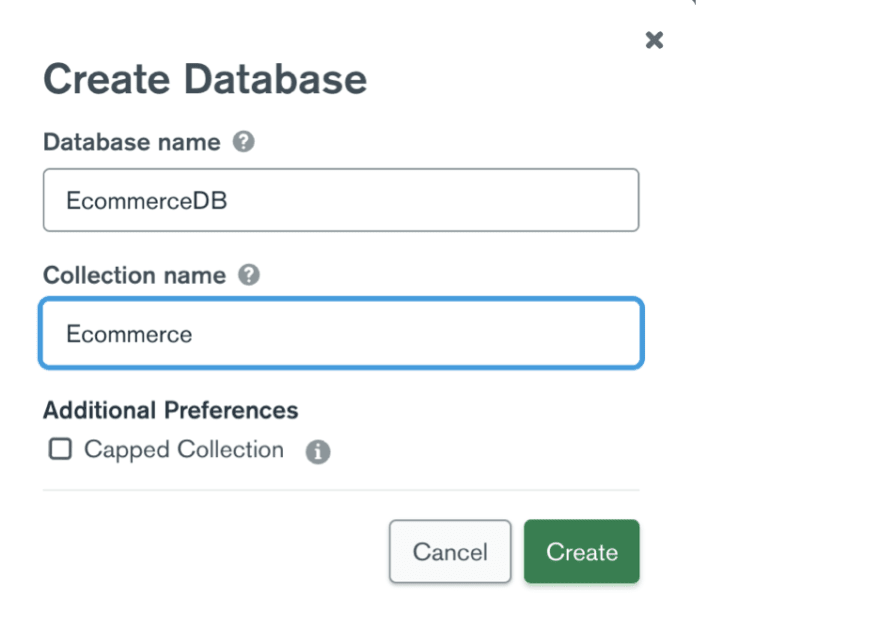
The next step will be to add e-commerce data to our Cluster. You can add your own data or else you can use this link to get data.
Click on insert document to the right to start inserting data.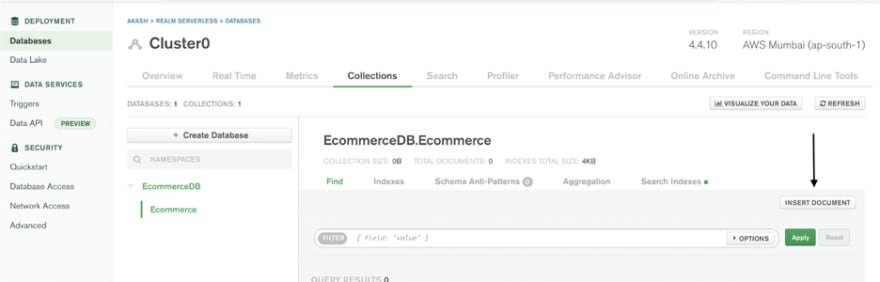
Then enter the JSON data you have in the insert box.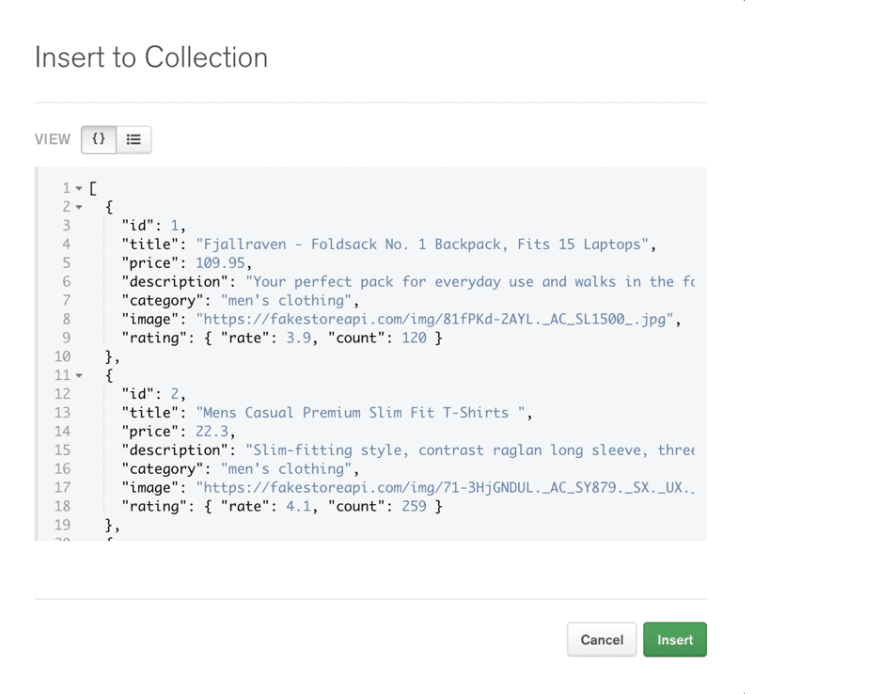
Now we have our dataset ready which we will retrieve using realm functions. Before creating realm functions we need to define rules and schema for our data.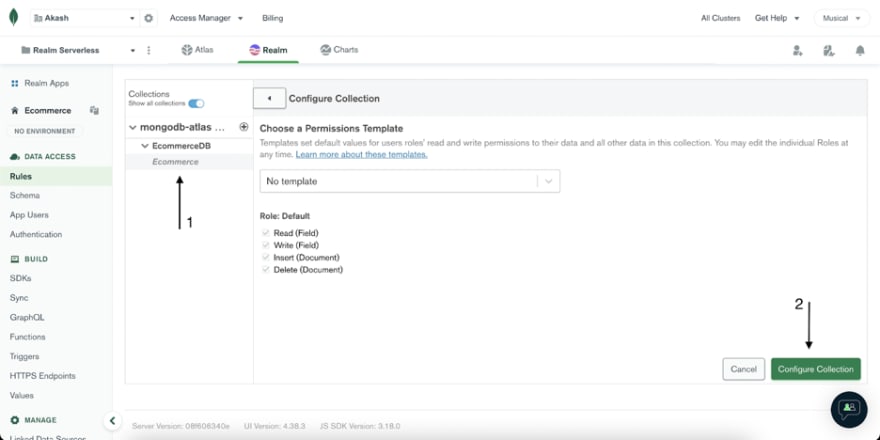
Click on the realm tab and select the rules option in your left sidebar. You will see a section to configure your collection. Select the collection which you previously made if it is not visible click the database name to make it visible.
Here we will need to select a permission template for our collection. The permission template decides who all can read and write to the data in the collection. As we don't need to write data to the database and further we will make the function as system functions it will be beneficial to select the no template option. Click on the Configure Collection button to configure the collection.
Every the time you make changes to the Realm App, you have to deploy it for changes to take effect. To deploy the changes we just made, click on "Review Draft & Deploy" in the blue banner at the top.![]()
And that saved the changes we just made. We created a Realm App that's linked to our cluster and the collections in it. This will provide a serverless backend that allows us to retrieve data to our cluster easily.
To be able to query our collections and documents we need to generate Schema definitions for each of the collections. To do that, click on Schema in the sidebar.
Then, click on Generate Schema button. This will generate the schema based on the data that's already in the collection.
Under "Choose Schemas" choose the collection name we created and for Sample type in "20" as we don't need to sample so many documents considering our data is simple. Then, click on Generate Schema.
Once it's done, you'll see the Schema generated with all the fields and their respective types.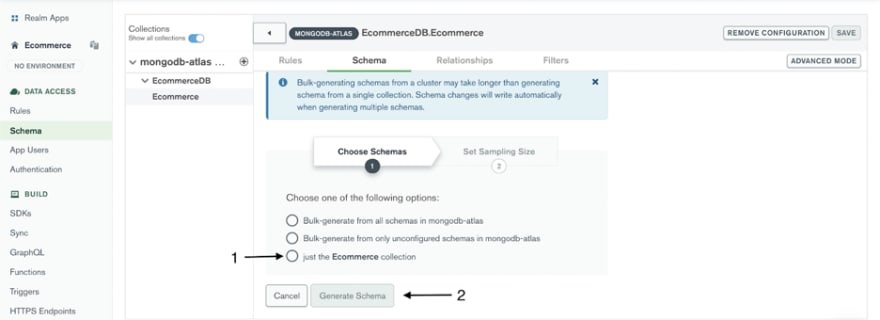
If you are using the data provided above you will get an schema similar to this.
Setup Authentication in Realm App
In our Realm app, we'll be using Email & Password authentication which means users have to log in with email and password to retrieve the data. In the Realm Portal, click on Authentication in the sidebar. You'll see a few Authentication providers that are all disabled.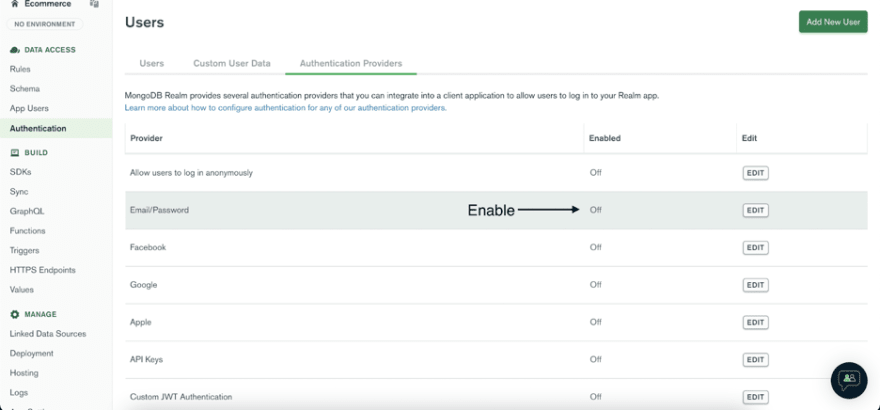
We'll enable "email/password" Click on the edit button for this one and just toggle it on. Firstly, enable the provider. Next, for "User Confirmation Method," choose "Automatically confirm users."
Next comes the "Password Reset Method." MongoDB Realm also provides a password reset method for your users. We won't be implementing it, but because we need to enter the configuration, just enter http://example.com/ in "Password Reset URL."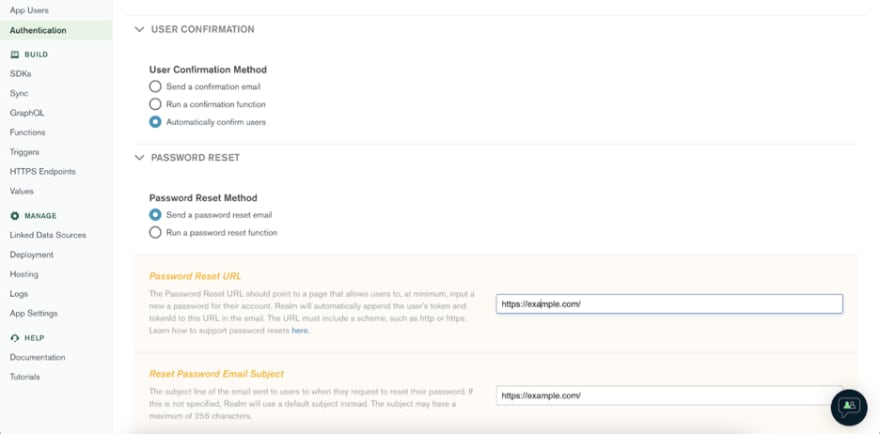
The options will be similar to these after this click on save the draft and then click on the review draft and deploy option to the top.
Now we are ready to add our user for authentication. Click on add new user button to add users.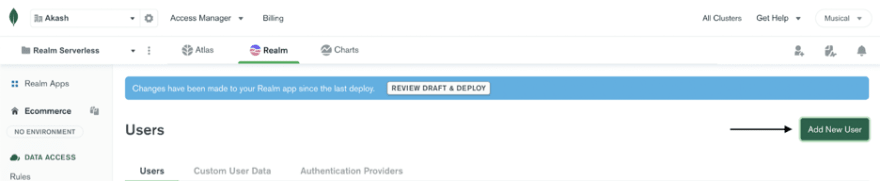
Add any email address and password once entered click on create to proceed.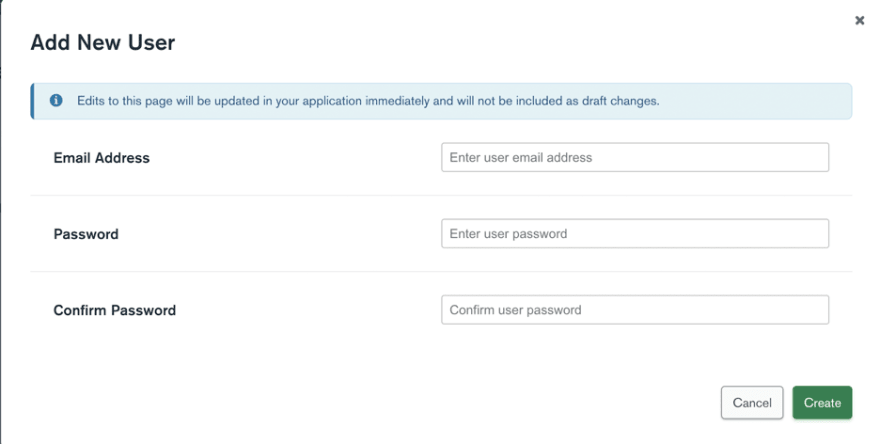
This completes our setup for authentication. We will need the email and password to make the connection to our realm backend from our react native app. Click on review draft and deploy to update the changes.
Creating realm functions
Now we will create our own serverless functions to fetch data from our database.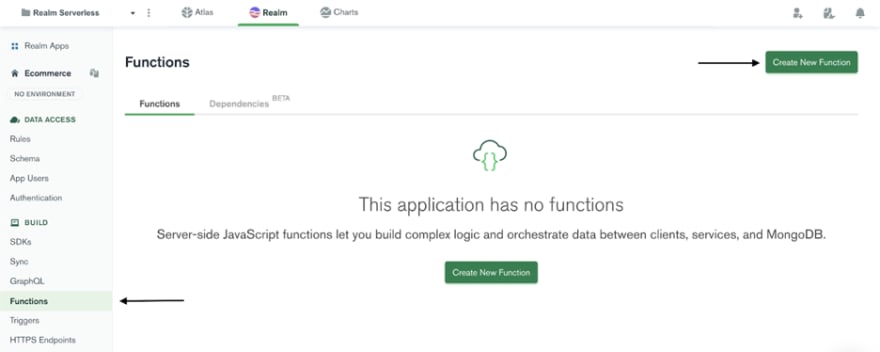
Click on functions to your left sidebar and then select Create New Function to make new functions.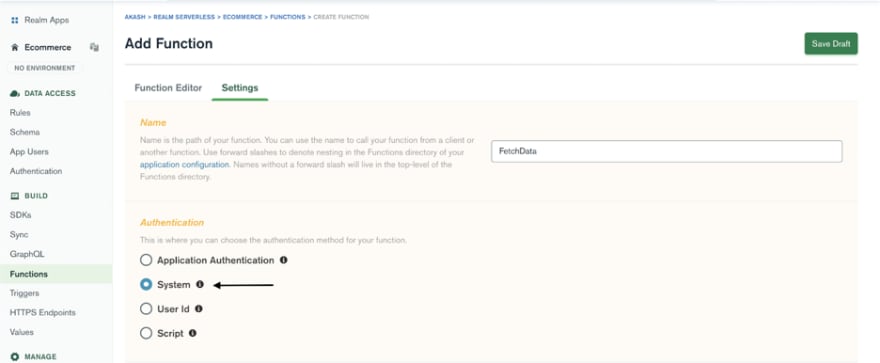
Add the function name and select system for authentication . switch to function editor to write the logic for functions.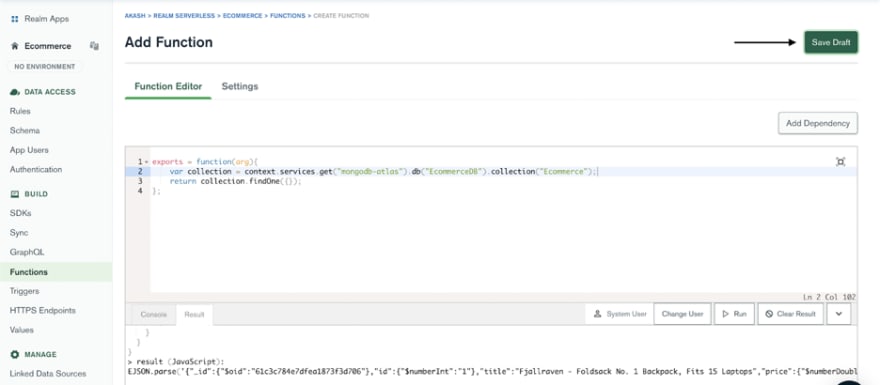
exports = function(arg) { var collection = context.services.get("mongodb- atlas ").db(" Your_Database ").collection(" Your_Collection "); return collection.find({}); };Replace the database and collection keyword in the function with your respective saved database and collection.
Click on run to the bottom right to check the working of the
function. If you get some error that means you have done something wrong please recheck with all the above steps to make it work.
Once you can see data in the result section you are good to go. Click on save draft to the right to save.
One last thing to do is make sure to click on Review Draft & Deploy for all the changes to take effect.
Now, we have our MongoDB Realm app ready for integration with React native. Next, we'll go over how to integrate it with React and use the serverless function we've been setting up.
React Native Setup
In case you don't have a React native project ready, run the following to create one:
npx react-native init EcoShop cd EcoShopNext, we'll install the MongoDB Realm SDK:
Yarn add realmWe will also install cocaopods:
cd ios && pod install We will keep a simple layout with a text with title Get products and on clicking the text we will make request with our serverless functions and display the fetched product.
Let's go over how to connect to Realm Apps first. You first need an App ID. You'll find the App ID on the Dashboard of your realm app.
Firstly create a js file name env.js for storing our email, password and id.
const username = "Your app user email";const password = "Your app user password";const id = "Your app id";export { username, password, id};Then open the app.js file and delete old code and enter the below code.
import React, { useEffect, useState } from "react";import { Text, SafeAreaView, StyleSheet } from "react-native";import { ScrollView } from "react-native-gesture-handler";import Realm from "realm";import { username, password, id } from "./env";import ProductItem from "./ProductItem";export default function App() { const [user, setUser] = useState(null); const [products, setProducts] = useState(null); const getUser = async () => { const app = new Realm.App({ id: id }); const credentials = Realm.Credentials.emailPassword(username, password); try { const data = await app.logIn(credentials); setUser(data); } catch (err) { console.error("Failed to log in", err); } }; const fetchProducts = async () => { const data = await user.functions.FetchData(); setProducts(data); }; useEffect(() => { getUser(); }, []); return ( <SafeAreaView style={styles.main}> <ScrollView> {products ? ( products.map((item: any) => { return <ProductItem key={item.id} item={item} />; }) ) : ( <Text style={styles.text} onPress={fetchProducts}> {" "} Get Products </Text> )} </ScrollView> </SafeAreaView> );}const styles = StyleSheet.create({ text: { fontSize: 24, marginTop: 200, }, main: { flex: 1, justifyContent: "center", alignItems: "center", },});Here we have two states to store our user data and the products we will receive. We first make a call with our email, password and app id to the realm backend and get the user data. This call is made in useEffect which gets called first. We store the user data in the user state.
For UI we have a conditional statement showing the text when the product state is null and it shows the product when it's not.
We have another function named fetchProducts which
fetches the e-commerce data with the help of the user data we received.
Now creating the ui for the products. Create a js file named ProductItem.js
import React, { FC } from "react";import { View, Text, StyleSheet, Image, Dimensions } from "react-native";import { Ionicons } from "@expo/vector-icons";const { width, height } = Dimensions.get("screen");const ProductItem = ({ item }) => { const { image, price, rating, title, description } = item; const rate = rating.rate; const arr = new Array(); for (let i = 1; i <= 5; i++) { if (i <= Math.ceil(rate)) arr.push(1); else arr.push(0); } return ( <View style={styles.container}> <View style={styles.ImageContainer}> {" "} <Image resizeMode="contain" style={styles.image} source={{ uri: image, }} /> </View> <View style={styles.infoContainer}> {" "} <Text style={styles.title}>{title}</Text>{" "} <View style={styles.rating}> {" "} {arr.map((item, index) => { return ( <Ionicons key={index} name={item == 1 ? "star" : "star-outline"} color={"orange"} size={20} style={{ marginLeft: 1 }} tvParallaxProperties /> ); })} <Text style={styles.ratingCount}>{rating.count}</Text>{" "} </View> <Text style={styles.price}>{`Rs ${price}`}</Text>{" "} <Text numberOfLines={4} style={styles.desc}> {" "} {description} </Text> </View> </View> );};const styles = StyleSheet.create({ container: { width: width, height: height * 0.25, backgroundColor: "white", flexDirection: "row", borderWidth: 1, borderColor: "#f2f2f2", }, image: { width: width * 0.3, height: height * 0.2, }, rating: { flexDirection: "row", alignItems: "flex-end", justifyContent: "flex-start", marginTop: height * 0.005, }, ImageContainer: { justifyContent: "center", alignItems: "center", width: width * 0.4, backgroundColor: "white", }, infoContainer: { justifyContent: "flex-start", width: width * 0.6, marginVertical: height * 0.01, padding: width * 0.03, }, title: { fontSize: width * 0.04, fontWeight: "500", }, ratingCount: { marginLeft: width * 0.02, fontWeight: "400", fontSize: width * 0.035, }, price: { fontSize: width * 0.04, fontWeight: "500", marginTop: height * 0.01, }, desc: { fontSize: width * 0.038, fontWeight: "400", marginVertical: height * 0.01, },});export default ProductItem;This completes our coding part for the app. Let us check our app now with the below command.
yarn ios //For IOSyarn android //For androidAs we can see our app is working and we are able to successfully fetch the data from our database.

Conclusion
In this tutorial we saw how to make use of realm serverless functions and integrate it in our react native app. We were able to make an simple app which retrieves data from our realm backend and display it.
Original Link: https://dev.to/metafic/mongodb-realm-for-react-native-1p5j
Dev To
More About this Source Visit Dev To