
An Interest In:
Web News this Week
- April 25, 2024
- April 24, 2024
- April 23, 2024
- April 22, 2024
- April 21, 2024
- April 20, 2024
- April 19, 2024
Some of Our Sources
- Simplebits
- The Logo Smith
- Web Designer Depot
- My Ink Blog
- Stylized Web
- Specky Boy
- Willems Lab
- Daily Now
- Dev To
- TechPowerUp
Help Webnuz
Referal links:
Laravel 8 File Upload Example
Originally posted @ https://codeanddeploy.com visit and download the sample code: https://codeanddeploy.com/blog/laravel/laravel-8-file-upload-example
In this post, I will be going to share how to implement a simple Laravel 8 file upload with a database implementation. We will save the generated file name base on time, size, mime-type, and associate it with the current user logged. When developing an application using Laravel usually the file upload is always present even on a simple system.

Just follow my simple steps and learn from them.
I assume that you have your Laravel 8 Project already in your local so we will skip that process. For more information on how to install Laravel just visit their documentation.
Okay, let's start.
Step 1: Create file upload migrations
First, we will create our files table migrations for our File model. Run the following command to do it:
php artisan make:migration create_files_tableThen we will add our migrations field. See below the complete code for our migrations.
<?phpuse Illuminate\Database\Migrations\Migration;use Illuminate\Database\Schema\Blueprint;use Illuminate\Support\Facades\Schema;class CreateFilesTable extends Migration{ /** * Run the migrations. * * @return void */ public function up() { Schema::create('files', function (Blueprint $table) { $table->id(); $table->unsignedBigInteger('user_id'); $table->string('name'); $table->string('type'); $table->string('size'); $table->timestamps(); $table->foreign('user_id') ->references('id') ->on('users') ->onDelete('cascade'); }); } /** * Reverse the migrations. * * @return void */ public function down() { Schema::dropIfExists('files'); }}Next, you have to run:
php artisan migrateStep 2: Create file upload controller and model
Use the command below to create your FileController with File model:
php artisan make:controller FilesController --model=FileStep 3: Create file upload routes
Now, let's create your routes for our file upload:
/*** File Upload Routes*/Route::get('/files', 'FilesController@index')->name('files.index');Route::get('/files/add', 'FilesController@create')->name('files.create');Route::post('/files/add', 'FilesController@store')->name('files.store');Step 4: Setup Model
Next, we will set up our File model. See below the completed setup.
<?phpnamespace App\Models;use Illuminate\Database\Eloquent\Factories\HasFactory;use Illuminate\Database\Eloquent\Model;class File extends Model{ protected $table = 'files'; protected $fillable = [ 'user_id', 'name', 'type', 'size' ]; use HasFactory;}Step 5: Setup Controller
Kindly see below the complete code of our controller including the file upload in store() method.
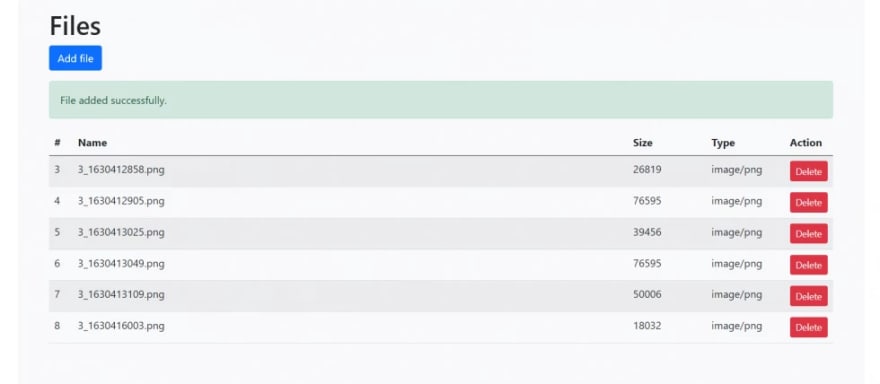
<?phpnamespace App\Http\Controllers;use App\Models\File;use Illuminate\Http\Request;use Illuminate\Http\UploadedFile;use App\Http\Requests\StoreFileRequest;class FilesController extends Controller{ /** * Display a listing of the resource. * * @return \Illuminate\Http\Response */ public function index() { $files = File::all(); return view('files.index', [ 'files' => $files ]); } /** * Show the form for creating a new resource. * * @return \Illuminate\Http\Response */ public function create() { return view('files.create'); } /** * Store a newly created resource in storage. * * @param StoreFileRequest $request * @return \Illuminate\Http\Response */ public function store(StoreFileRequest $request) { $fileName = auth()->id() . '_' . time() . '.'. $request->file->extension(); $type = $request->file->getClientMimeType(); $size = $request->file->getSize(); $request->file->move(public_path('file'), $fileName); File::create([ 'user_id' => auth()->id(), 'name' => $fileName, 'type' => $type, 'size' => $size ]); return redirect()->route('files.index')->withSuccess(__('File added successfully.')); }}Step 6: Create StoreFileRequest
Now let's create a request class for a store/uploading file. Run the command below:
php artisan make:request StoreFileRequestAfter the StoreFileRequest class is generated kindly check the code below for our validation:
<?phpnamespace App\Http\Requests;use Illuminate\Foundation\Http\FormRequest;class StoreFileRequest extends FormRequest{ /** * Determine if the user is authorized to make this request. * * @return bool */ public function authorize() { return true; } /** * Get the validation rules that apply to the request. * * @return array */ public function rules() { return [ 'file' => 'required|file|mimes:jpg,jpeg,bmp,png,doc,docx,csv,rtf,xlsx,xls,txt,pdf,zip' ]; }}Step 7: Create View
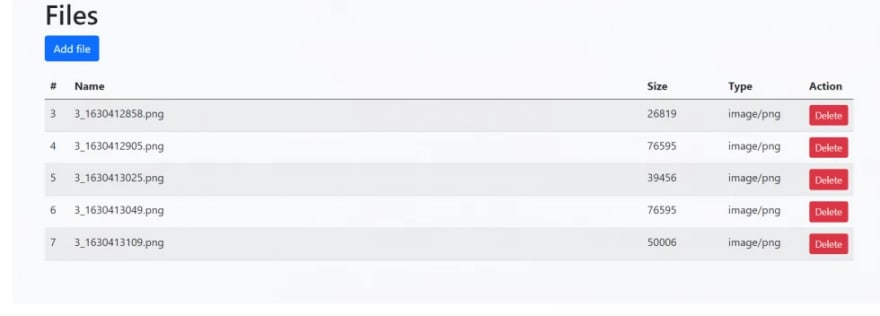
First, we will create our index.blade.php see below the complete code:
@extends('layouts.app-master')@section('content') <div class="bg-light p-5 rounded"> <h1>Files</h1> <a href="{{ route('files.create') }}" class="btn btn-primary float-right mb-3">Add file</a> @include('layouts.partials.messages') <table class="table table-striped"> <thead> <tr> <th scope="col">#</th> <th scope="col">Name</th> <th scope="col">Size</th> <th scope="col">Type</th> <th scope="col">Action</th> </tr> </thead> <tbody> @foreach($files as $file) <tr> <td width="3%">{{ $file->id }}</td> <td>{{ $file->name }}</td> <td width="10%">{{ $file->size }}</td> <td width="10%">{{ $file->type }}</td> <td width="5%"><a href="{{ $file->type }}" class="btn btn-danger btn-sm">Delete</a></td> </tr> @endforeach </tbody> </table> </div>@endsectionSecond, create.blade.php for our uploading file.
@extends('layouts.app-master')@section('content') <div class="bg-light p-5 rounded"> <h1>Add file</h1> <form action="{{ route('files.store') }}" method="post" enctype="multipart/form-data"> @include('layouts.partials.messages') @csrf <div class="form-group mt-4"> <input type="file" name="file" class="form-control" accept=".jpg,.jpeg,.bmp,.png,.gif,.doc,.docx,.csv,.rtf,.xlsx,.xls,.txt,.pdf,.zip"> </div> <button class="w-100 btn btn-lg btn-primary mt-4" type="submit">Save</button> </form> </div>@endsectionAs you can see from our input=file we added accept attribute with a value of ".jpg,.jpeg,.bmp,.png,.gif,.doc,.docx,.csv,.rtf,.xlsx,.xls,.txt,.pdf,.zip" it will help to only accept base on specified file extensions.
I hope this tutorial can help you. Kindly visit here https://codeanddeploy.com/blog/laravel/laravel-8-file-upload-example if you want to download this code.
Happy coding :)
Original Link: https://dev.to/codeanddeploy/laravel-8-file-upload-example-chk
Dev To
More About this Source Visit Dev To