
An Interest In:
Web News this Week
- April 2, 2024
- April 1, 2024
- March 31, 2024
- March 30, 2024
- March 29, 2024
- March 28, 2024
- March 27, 2024
Some of Our Sources
- BoingBoing
- Simplebits
- TutsPlus - Code
- Spoon Graphics
- Smashing Apps
- Web Designer Depot
- Android Dissected
- Android Headlines
- Willems Lab
- Hashedout
Help Webnuz
Referal links:
AWS CDK 101 - CodeCommit, CodePipeline and CodeBuild
Beginners new to AWS CDK, please do look at my previous articles one by one in this series.
If in case missed my previous article, do find it with the below links.
Original previous post at Dev Post
Reposted previous post at dev to @aravindvcyber
Reposted previous post at medium com @aravindvcyber
In this article, let us introduce writing a simple codepipeline i.e. CI/CD setup for our solution. This would help us in deploying the stack, to various environments, which we have created in our previous CDK article
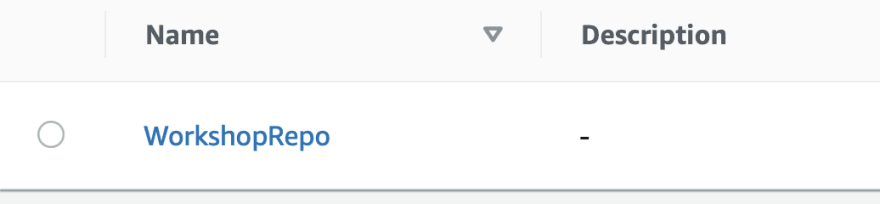
New repository in CodeCommit
Let us create a new file named lib\pipeline-stack.ts and start with importing the required modules as follows.
import * as cdk from "aws-cdk-lib";import * as codecommit from "aws-cdk-lib/aws-codecommit";import { Construct } from "constructs";import { RemovalPolicy } from "aws-cdk-lib";Now we could add a new Pipeline stack which will create a new repository as follows. CodePipeline is not limited to aws codecommit, you can even have external repositories, but let us discuss that in a separate article.
export class WorkshopPipelineStack extends cdk.Stack { constructor(scope: Construct, id: string, props?: cdk.StackProps) { super(scope, id, props); new cod const repo = new codecommit.Repository(this, "WorkshopRepo", { repositoryName: "WorkshopRepo", });}You could optionally add a statement to retain this repo when we delete the stack, as follows.
repo.applyRemovalPolicy(RemovalPolicy.RETAIN);Here you could also import your existing code commit repositories in cross regions with the below static method as follows.
Including existing Repository using repo name
codecommit.Repository.fromRepositoryName
const repo = codecommit.Repository.fromRepositoryName(this, "WorkshopRepo", "WorkshopRepo" );Including existing Repository using ARN
codecommit.Repository.fromRepositoryArn
const repo = codecommit.Repository.fromRepositoryArn(this, "WorkshopRepo", "arn:aws:codecommit:us-east-1:123456789012:MyDemoRepo" );Eventually, this will help create the source code repository for our full-stack. This includes the lambda and other resources if we never ignored in the .gitignore before we publish our stack to the repository.
Codecommit repo created with CDK
Once you do cdk deploy the pipeline-stack will be published into the environment which creates our repository as follows.
Now you could publish our source code with the stack and resources to this repo. Note the repository URL will be a public endpoint and it requires authorization using an API key credential setup for configuration locally.
Now let us copy the repository URL as follows.

Navigate to the AWS console into the IAM section. Here we have to find a user to associate this access, so choose one profile and navigate to the security credentials tab and you will find the option to generate the git credentials as shown in the screenshot below.

Now you should commit all the changes in your local repo with the appropriate message.
Then now you have to fix the repo URL and push it to the master branch as follows.
git remote add origin ****copied-repo-url*****git push --set-upstream origin masterNote you can optionally ignore any other code or resource files as per your requirement before committing.
Code Commit Folder

Create a new CodePipeline
Now let us define the pipeline as follows in our pipeline-stack.ts
const pipeline = new CodePipeline(this, "Pipeline", { pipelineName: "WorkshopPipeline", crossAccountKeys: false, enableKeyRotation: false, //default synth: new CodeBuildStep("SynthStep", { input: CodePipelineSource.codeCommit(repo, "master"), installCommands: ["npm install -g aws-cdk"], commands: ["npm ci", "npm run build", "npx cdk synth CommonEventStack"], }), });To give the Pipeline a nice, name use the prop pipelineName.
You can also notice crossAccountKeys: false which says that you don't require aws create Customer Master Keys to encrypt the assets, whereas this is very much required when you may need to allow cross-account actions.
By then you could also enforce key rotation, but both these operations incur additional costs separately and do configure them only based on demand.
enableKeyRotation: true, //defaultIn my case, these options are not needed, since it is only for training.
Stages in our code pipeline definition
You could add several stages for the pipeline defined earlier with the constructor as follows.
stages: [ { stageName: 'Source', actions: [ // to be edited ], }, { stageName: 'Build', actions: [ // to be edited ], }, { stageName: 'Deploy', actions: [ // to be edited ], }, ],You can also create and append more stage posts defining the pipeline constructor and add new stages as follows.
// Append a Stage to an end of an existing Pipelineconst sourceStage = codepipeline.Pipeline.addStage({ stageName: 'Some Stage Name', actions: [ // TBD ],});Instead, you can also insert them between the other two-stage as follows dynamically using the placement prop.
const someStage = pipeline.addStage({ stageName: 'StageB', placement: { rightBefore: StageC, // any one only! justAfter: StageA, // any one only! }});Synth build step setup
Now moving on into our specific use case as in the example pipeline.
synth: new CodeBuildStep("SynthStep", { input: CodePipelineSource.codeCommit(repo, "master"), installCommands: ["npm install -g aws-cdk"], commands: ["npm ci", "npm run build", "npx cdk synth CommonEventStack"], }),You could see that we have defined synth which is nothing but a code build step.
The synth build step produces the CDK Cloud Assembly.
The primary output of this step needs to be the cdk.out directory generated by the CDK synth command.
If you use a ShellStep here and you don't configure an output directory, the output directory will automatically be assumed to be cdk.out
The code build step has got its name SynthStep as we have defined and it has some props associated with it.
Now the build step has input which will be marked as CodePipelineSource.codeCommit(repo, "master") conveying that we have chosen this repo and master branch latest code.
You can also various libraries additionally before the build starts with installCommands.
Here we are supposed to add the global dependencies for the operations required for a clean build and synthesize npm install -g aws-cdk
Finally, we have the commands to execute as an array, which is the sequence of steps to take care for the stack to be synthesized for the appropriate stack and this outputs into the cdk.out folder.
["npm ci", "npm run build", "npx cdk synth CommonEventStack"]
SelfMutation / UpdatePipeline step
Once the build is successful the self mutate of the pipeline takes place and the synthesized assets are captured into the file assets.
This means now we can deploy that into the respective environments. Here we will deploy into the same region and account. But I just wanted to remind you that you could deploy cross-region and accounts in this approach which we could see in the later articles.
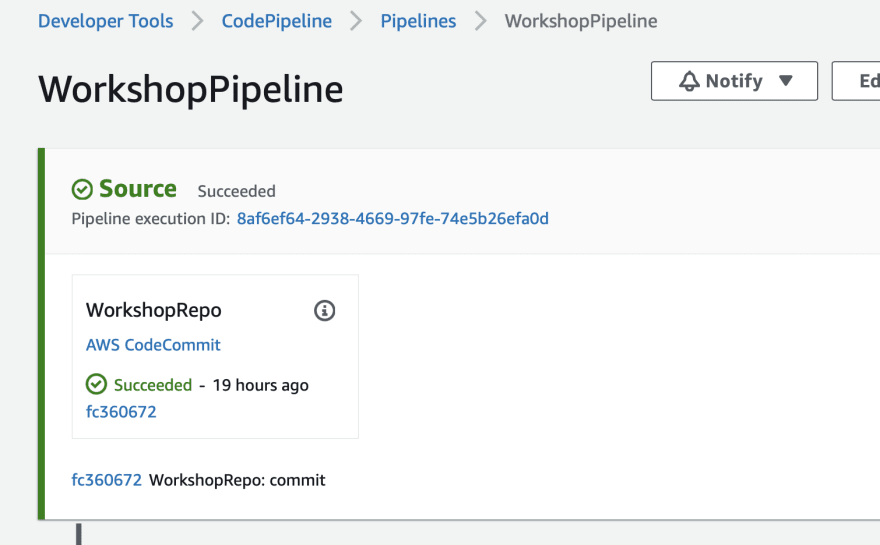
Once a new commit is done into our new repo, the pipeline will invoke an execution sequence with the source as the recent commit and immediately runs the synth in the build process as follows.
Code Pipeline
Source step
Build step
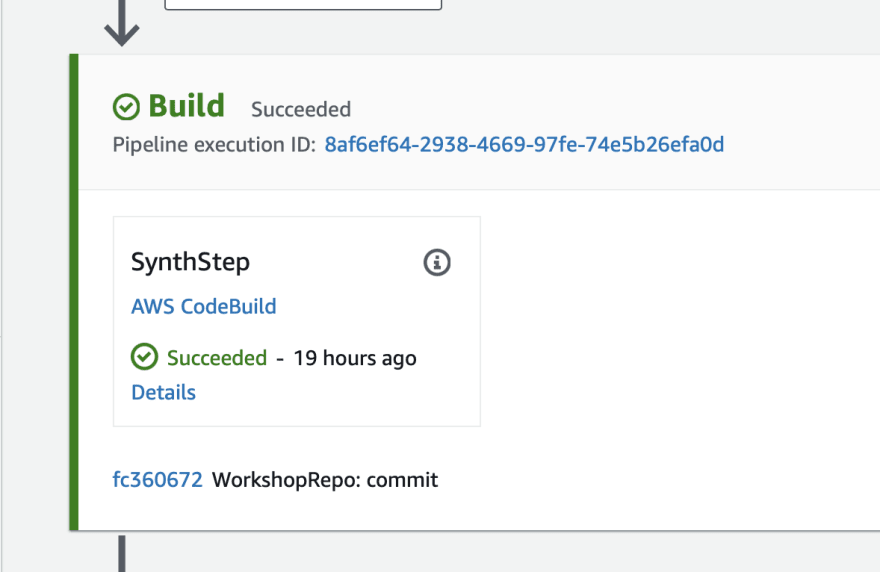
Once the build is complete since this has the pipeline stack as well along with our actual function stack. It is always required to self-mutate the pipeline if any change is required in the pipeline already configured.
Self mutate step

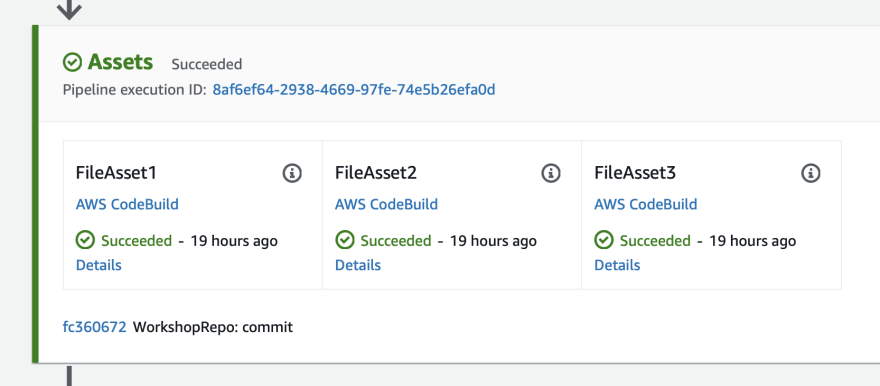
Eventually, the assets like JSON and zip will move to the bucket where we regularly use for cloud formation deployment which is configured by the CDK bootstrap process for the environment.
Asset storage step
Please find the code block for the deploy stage and how it is appending to the end of our pipeline defined above.
const deploy = new WorkshopPipelineStage(this, 'Deploy'); const deployStage = pipeline.addStage(deploy);Here the stage name is marked as Deploy and a new construct is used, which we will be defined as follows.
pipeline-stage construct
create a new construct as follows lib\pipeline-stage.ts.
Here let us import the libraries as follows.
import { CommonEventStack } from './common-event-stack';import { Stage, CfnOutput, StageProps } from 'aws-cdk-lib';import { Construct } from 'constructs';You could identify that we have imported our common event stack once again here and additionally we are also bringing in the CfnOutput construct from the core lib.
export class WorkshopPipelineStage extends Stage { public readonly hcViewerUrl: CfnOutput; public readonly hcEndpoint: CfnOutput; constructor(scope: Construct, id: string, props?: StageProps) { super(scope, id, props); const service = new CommonEventStack(this, 'WebService'); this.hcEndpoint = service.hcEndpoint; this.hcViewerUrl = service.hcViewerUrl; }}In a summary, we have defined a couple of read-only CfnOutput placeholders, which we need to use in the further post-deployment validation and export stage.
You can also find that we have initialized our stack as a service and we are bringing the outputs from the service to these read-only placeholders defined.
this.hcEndpoint = service.hcEndpoint; this.hcViewerUrl = service.hcViewerUrl;This will help in the post-deployment testing steps which we will configure in the pipeline-stack.ts file.
deployStage.addPost( new CodeBuildStep('TestViewerEndpoint', { projectName: 'TestViewerEndpoint', envFromCfnOutputs: { ENDPOINT_URL: deploy.hcViewerUrl, }, commands: [ 'curl -sf $ENDPOINT_URL' ] }), new CodeBuildStep('TestAPIGatewayEndpoint', { projectName: 'TestAPIGatewayEndpoint', envFromCfnOutputs: { ENDPOINT_URL: deploy.hcEndpoint }, commands: [ `export ENDPOINT_URL=$ENDPOINT_URL"event"`, `curl --location --request POST $ENDPOINT_URL \ --header 'x-api-key: av-******************' \ --header 'Content-Type: text/plain' \ --data-raw '{ "message": "A secret message" }'` ] }) )As you have seen we have added some post-deployment steps for simple validation of our use case, this will help us with a high-level idea of what happened in deployment in our pipeline in the respective stages.
As you have seen we appended a new deployment stage and then we added some post deployment inspection into our pipeline.
Deploy step with simple test steps

So now let us discuss at a high level what we have developed here, we have created a pipeline stack, using a pipeline stage construct which will be provisioning the actual functional stack we have earlier developed in our previous articles.
As a developer, we could continue to deploy and test our stack local directly by running CDK synth or CDK deploy with the CommonEventStack name.
Or if we simply commit this code to the repo we have created, it will trigger the pipeline defined which will invoke the build steps one of the other and synthesize and publish it to the respective environments directly.
More this can include a lot of control, audit, and validation mechanism to efficiently run a complete CI/CD suite to deliver the necessary stack necessary as per our use case, even this can include cross-account and cross-region deployments for streamlined and consistent delivery.
Find cloud formation stacks created
You can identify that while we deploy the functional stack it creates the CommonEventStack directly for local testing.
At the same time, when we deploy the CdkWorkshopPipelineStack it creates the pipeline and waits for any new commits, the pipeline runs and deploys our service which is nothing but the deployment stack for our CommonEventStack as Deploy-WebService besides also self mutating the same pipeline if we refine it in our successive commits.

We will add more connections to this API gateway and lambda stack and make it more usable in the upcoming articles, so do consider following and subscribing to my newsletter.
We have our next article in serverless, do check out
Thanks for supporting!
Would be great if you like to Buy Me a Coffee, to help boost my efforts.

Original post at Dev Post
Reposted at dev to @aravindvcyber
Original Link: https://dev.to/aravindvcyber/aws-cdk-101-codecommit-codepipeline-and-codebuild-l77
Dev To
More About this Source Visit Dev To