
An Interest In:
Web News this Week
- April 19, 2024
- April 18, 2024
- April 17, 2024
- April 16, 2024
- April 15, 2024
- April 14, 2024
- April 13, 2024
Some of Our Sources
- Just Creative
- Pearsonified
- Smashing Apps
- Six Revisions
- Abduzeedo
- Vandelay Design
- Inspiredology
- FanExtra - PSD
- Hashedout
- TechPowerUp
Help Webnuz
Referal links:
Flutter Riverpod - Part 2
In the last blog, we learned to set up Riverpod for a Flutter Project and how to use the basic of all Riverpod Provider, the Provider(). In this blog we will learn to use the most useful and basic Provider, the StateProvider().
Let's dig into why do we need a Provider?
Let's say you have an A Flutter(Riverpod) Project with the following code
import 'package:flutter/material.dart';import 'package:flutter_riverpod/flutter_riverpod.dart';int counter = 0;void main() { runApp( const ProviderScope( child: MyApp(), ), );}class MyApp extends StatelessWidget { const MyApp({Key? key}) : super(key: key); @override Widget build(BuildContext context) { return MaterialApp( title: 'Riverpod', theme: ThemeData( primarySwatch: Colors.blue, ), home: const MyHomePage(title: 'Flutter Riverpod'), ); }}class MyHomePage extends StatefulWidget { const MyHomePage({Key? key, required this.title}) : super(key: key); final String title; @override State<MyHomePage> createState() => _MyHomePageState();}class _MyHomePageState extends State<MyHomePage> { @override Widget build(BuildContext context) { return Scaffold( appBar: AppBar( title: Text(widget.title), ), body: Center( child: Column( mainAxisAlignment: MainAxisAlignment.center, children: <Widget>[ const Text( 'You have pushed the button this many times:', ), Text( '$counter', style: Theme.of(context).textTheme.headline4, ), const CounterCard() ], ), ), ); }}class CounterCard extends StatefulWidget { const CounterCard({ Key? key, }) : super(key: key); @override State<CounterCard> createState() => _CounterCardState();}class _CounterCardState extends State<CounterCard> { void _incrementCounter() { setState(() { counter++; }); } @override Widget build(BuildContext context) { return Card( child: ListTile( title: Text("$counter"), trailing: IconButton( icon: const Icon(Icons.plus_one), onPressed: _incrementCounter, ), )); }}Whats all this Provider Scope? Read my previous blog on setting up Riverpod for your Project!
So what's going on in the code above?
Its the similar Default Flutter Counter Application that we get when we create a new Flutter Project, but with Riverpod and some Changes to display the problem with state.
We have a global variable int counter which is initialised to Zero. Then that counter is used at two places, one in the upper MyHomePage Class and second in CounterCard Class. In the CounterCard, there's an IconButton with the function _incrementCounter() which increments the counter variable. Now Ideally, on pressing the button, we should see the counter getting incremented at both the places. But this doesn't happen. This is because the setState() method only refreshes the CounterCard Contents and not of MyHomePage. Flutter State works in this way to improve performance, imagine the entire screen refreshing everytime for small changes and you don't own an M1 Device. To solve this problem we have State Management Solutions. Let's figure it all out using some diagrams!! Who doesn't love diagrams right?

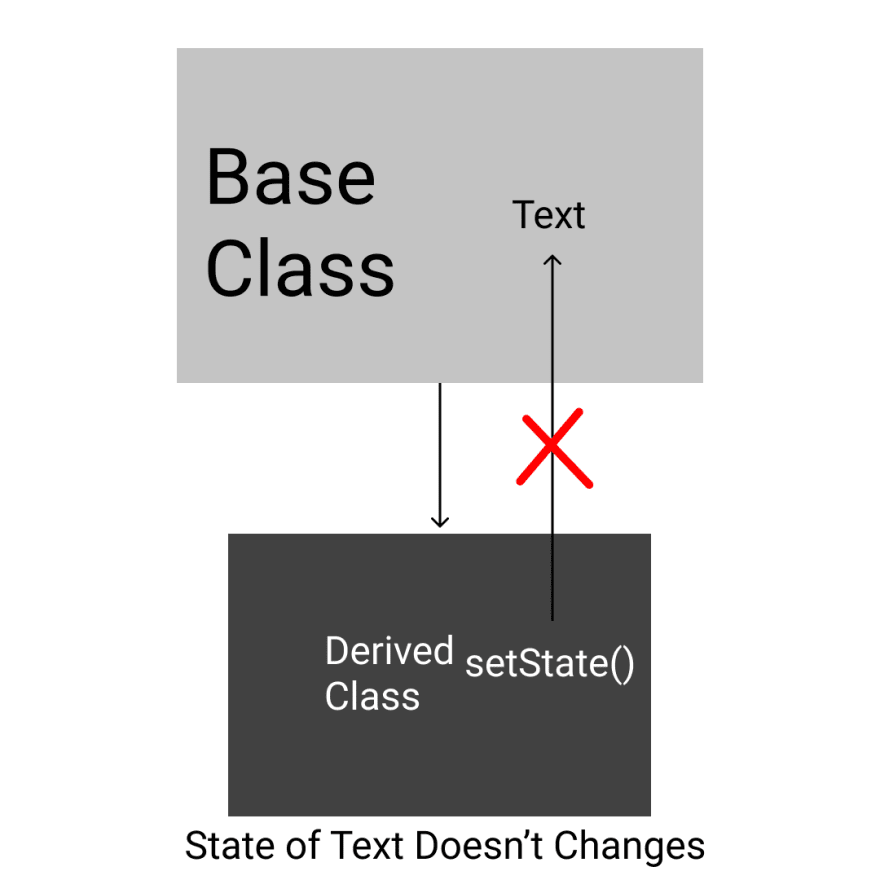
So if you want to change the state of a base class from a derived class(which happens quite frequently), it becomes quite tedious, we are gonna solve this problem with Riverpod, more specifically with a Provider that contains state or StateProvider().
So we have a counter variable right? We are going to convert it into Provider just how we learned in the previous blog.
//int counter = 0; This Changes tofinal counterProvider = Provider<int>((ref) { return 0;});And half the Magic is Done!!
Change the MyHomePage to a Stateless Widget...
class MyHomePage extends StatelessWidget { const MyHomePage({Key? key, required this.title}) : super(key: key); final String title; @override Widget build(BuildContext context) { return Scaffold( appBar: AppBar( title: Text(title), ), body: Center( child: Column( mainAxisAlignment: MainAxisAlignment.center, children: <Widget>[ const Text( 'You have pushed the button this many times:', ), Text( '$counter', style: Theme.of(context).textTheme.headline4, ), const CounterCard() ], ), ), ); }}Again cahnge the MyHomePage to a ConsumerWidget just like we learned in the previous blog and let the Text Widget watch the counterProvider()
class MyHomePage extends ConsumerWidget { const MyHomePage({Key? key, required this.title}) : super(key: key); final String title; @override Widget build(BuildContext context,WidgetRef ref) { return Scaffold( appBar: AppBar( title: Text(title), ), body: Center( child: Column( mainAxisAlignment: MainAxisAlignment.center, children: <Widget>[ const Text( 'You have pushed the button this many times:', ), Text( ref.watch(counterProvider).toString(), style: Theme.of(context).textTheme.headline4, ), const CounterCard() ], ), ), ); }}Now sometimes you need to read a provider from a StatefulWidget, and we do this using ConsumerStatefulWidget which we will do to the CounterCard StatefulWidget.
// Add Consumer to StatefulWidgetclass CounterCard extends ConsumerStatefulWidget { const CounterCard({ Key? key, }) : super(key: key); @override// Changes here ConsumerState<CounterCard> createState() => _CounterCardState();}// Changes here class _CounterCardState extends ConsumerState<CounterCard> { ...}And that's it!
Now remember before I talked about a different kind of Provider and it was the StateProvider, it basically is an a Provider but it can maintain the State of its contents.
Now go above and add State to the counterProvider
// Over Herefinal counterProvider = StateProvider<int>((ref) { return 0;});Now go to CounterCard and let the Text watch the counterProvider
class _CounterCardState extends ConsumerState<CounterCard> { @override Widget build(BuildContext context) { return Card( child: ListTile( title: Text(ref.watch(counterProvider).toString()), trailing: IconButton( icon: const Icon(Icons.plus_one), onPressed: (){ ... }, ), )); }}Now in the onPressed we have to increment the "state" of counterProvider.
To do this we use ref.read() instead of ref.watch, so here it should be,
onPressed: () { setState(() { ref.read(counterProvider.state).state++; }); },Note that here it will still work if you don't use a setState Function.
That's it and now run the program to solve the State Mangement Problem we faced earlier.
I will be soon starting a Riverpod Series on Youtube so don't forget to subscribe my Youtube Channel and Also follow me on Twitter and Instagram to get the latest updates and Tips and Tricks using Flutter.
Original Link: https://dev.to/chandramdutta/flutter-riverpod-part-2-54dp
Dev To
More About this Source Visit Dev To