
An Interest In:
Web News this Week
- April 1, 2024
- March 31, 2024
- March 30, 2024
- March 29, 2024
- March 28, 2024
- March 27, 2024
- March 26, 2024
Some of Our Sources
- Technology Review
- Creative Curio
- Fuel Your Creativity
- Web Designer Depot
- FanExtra - PSD
- My Ink Blog
- CSS Globe
- 24 Ways
- Freelance Switch
- Codrops
Help Webnuz
Referal links:
Build a Point-of Sale App with Serialized
This tutorial was originally written for the Serialized platform. You can view the original post on Serialized's blog here.
When we think of technology, we often dont think of day-to-day businesses like restaurants, kiosks, and shops. However, technology is being used in retail and food service every day! The main technological intersection between these types of businesses is a POS (which stands for point-of-sale) system. Its this program that makes sure you get those tacos you were craving from your favorite restaurant, that sweater youve been eyeballing on Poshmark, and that new iPhone on the Apple website. They allow employees to ring up and itemize orders too, providing the primary means of communication for orders across the whole business.
Since POS systems are the backbone of many retail and food businesses, I was intrigued by the idea of building one. In this article, well dive into building a POS web application that uses React, Express, and Serialized.
What Were Building
Our POS system will use React for the frontend, Express for the backend, and Serialized to create and store orders, as well as continuously add items to orders.
Serialized is a cloud-hosted API engine for building event-driven systems it helps us easily capture the comprehensive timeline and history of events and aggregate them into related groups. In relation to our POS system, well be using Serialized to keep track of events (customers ordering items) and aggregate them into related groups (customers orders).
Below is a diagram of what the user flow will look like for the application:

The three main functionalities well focus on in this tutorial are:
- creating new orders,
- adding items to existing orders, and
- marking orders as completed.
These three scenarios will capture the use cases our very basic POS system. The final product will look like this:

Getting Started
Before we get started building, make sure you set up the following:
- Node: To check if you have Node installed already, you can run
node -vin your command line. If no version pops up, youll need to install it - you can find installation directions for your machine here. - npx:
npxis a package runner for Node packages that allows you to execute packages from the npm registry without needing to install it. To check if you have it installed (typically comes with npm, which comes with Node), you can runnpx -v. If no version pops up, you can installnpxusing the instructions here. - Serialized: To use the Serialized API, youll need to create an account. Once you create an account, itll prompt you to also create a project, which is also required to start building with the API. You can name your project whatever youd like I went with
POS App. You can learn more about projects in Serialized here.
If youd prefer to walk through code rather than build, Ive got you! You can view the GitHub repository for this project here. All instructions for running the project are available in the repositorys README.md in the root directory. (Tip: the GitHub repo is also a great source of guidance if you get stuck while building alongside the tutorial!)
Project Setup
The setup for the project is based on this tutorial from freeCodeCamp.
To start, initialize the project directory on your machine in your location of choice by running
mkdir pos-appor creating apos-appfolder manually.cdinto it in you Terminal and runnpx create-react-app clientThis will create a folder named
clientwhere your applications frontend will live.Once the
clientfolder has been created, run the following commands to enter the newly createdclientfolder, and then start the frontend server:cd clientnpm startIf your project has been set up correctly, you should see the default React app in your browser at
[localhost:3000](http://localhost:3000):
If your frontend launched successfully, its time to now set up the backend! Terminate the frontend server by running CTRL + C. Then, use the command
cd ../from theclientfolder to switch back into your projects root directory. Then, run the following commands to generate an Express application in a folder calledapiand start up the backend:npx express-generator apicd apinpm installnpm startIf your backend was set up correctly, you should see this view after running
npm start:
You can learn more about the
express-generatorpackage used to set up the backend here.At this point, both the frontend and backend are wired up to
localhost:3000. Since youll need to run both servers at the same time while developing the app, youll need to change the port the backend runs on to avoid a port collision. To do this, navigate to thebin/wwwfile in theapidirectory. Update line 15 so its default value now points to port 9000. The line will look like this once updated:var port = normalizePort(process.env.PORT || '9000');Now, when running
npm startin theapifolder to start up the backend, youll be able to see the launched Express server atlocalhost:9000.
Setting up Serialized
In order to use Serialized with the application that was set up in the steps above, you can install the Serialized client for Javascript and Typescript. Since the Serialized API will be called in the Express backend, run the following command to install the client in your
apidirectory:npm install @serialized/serialized-clientOnce the client has been installed, create a
.envfile in theapidirectory to set up environment variables for the Serialized API Keys that will be passed into the client to access your account information. Your.envfile will contain these two environment variables:SERIALIZED_ACCESS_KEY=SERIALIZED_SECRET_ACCESS_KEY=To find the
SERIALIZED_ACCESS_KEYandSERIALIZED_SECRET_ACCESS_KEYvalues, go to Settings > API Keys in your Serialized dashboard for the project you created and set the environment variables to the corresponding values.
Create New Orders
Now that the Serialized API and authorization has been configured, you can make your first call from your application to the API! In this section youll focus on our first use case of the Serialized Aggregates API to create a new order in our POS system.
To get started, create an
order.jsfile within theapidirectory. This file will be the scaffolding for defining the concept of an order to Serialized. Its also where you will create or add items to orders, as well as other logic and event handlers for triggering our applications functionality.Paste the following code into the
order.jsfile:const { DomainEvent } = require("@serialized/serialized-client");class Order { get aggregateType() { return "order"; } constructor(state) { this.orderId = state.orderId; this.items = state.items; this.total = state.total; this.completed = state.completed; } createOrder(orderId) { if (!orderId || orderId.length !== 36) throw "Invalid orderId"; return [DomainEvent.create(new OrderCreated(orderId))]; } get eventHandlers() { return { OrderCreated(state, event) { console.log("Handling OrderCreated", event); return OrderState.newState(event.orderId).withOrderId(event.orderId); }, }; }}class OrderCreated { constructor(orderId) { this.orderId = orderId; }}class OrderState { constructor({ orderId, items = [], total = 0.0, completed = false }) { this.orderId = orderId; this.items = items; this.total = total; this.completed = completed; } static newState(orderId) { return new OrderState({ orderId }); } withOrderId(orderId) { return Object.assign({}, this, { orderId }); }}module.exports = { Order };To walk through this file, lets break it down class by class:
Order: This class is a representation of an actual order object. The Order object is defined as an Aggregate in Serialized, meaning that it is a process that consists of Events, which will be actions that happen to a particular Order object. In this tutorial, these events would be creating new orders, adding an item to an order, and completing the order.
- As indicated in the Order classs constructor, declaring a new Order instance will require a
stateobject representing the order and its current stats to be passed in. This is because each Aggregate is made up of Events, and theyre responsible for updating the state of the whole order as they get triggered. - Next, a
createOrder()function is initialized this will check if a givenorderIdexists and matches the 36-character UUID format specified for order IDs. Then itll initialize our new order-creation event with a call toDomainEvent.create(). - Finally, an
eventHandlers()function is declared, which takes in an Orders current state and the event that happened to the order.- At this point in the tutorial, only an
OrderCreatedevent handler has been returned for now, but there will be additional ones added for the other event types. Event handlers will log an event in the console and use theOrderStateobject to keep track of the Orders state.
- At this point in the tutorial, only an
- As indicated in the Order classs constructor, declaring a new Order instance will require a
OrderCreated: This class represents an event type in this scenario, its that a new order was created. Every new event added will require a new class that determines what information the event passes to the API. The class name should match the event handler it corresponds to (in this case,
OrderCreated. To create a new order, the only property required is anorderId, so that is the only property declared in this class.OrderState: This class defines an orders current state and keeps track of it as it changes so it can be passed in as events to the Order object, which will send the events to Serialize as they are triggered. Remember that a change in state could be anything from adding new items to the order to marking it as completed the latter of which is denoted by the
OrderStatescompletedproperty being set totrue.
Once your
order.jsfile is set up, add in anorder-client.jsfile in the same directory. This file will act as a client that wires up authentication for the Serialized Aggregates API with the functionality written inorder.js. Paste in the following code to theorder-client.jsfile:const { Order } = require("./order");const handleError = async function (handler) { try { await handler(); } catch (error) { throw new Error("Failed to process command: " + error); }};class OrderClient { constructor(serializedClient) { this.client = serializedClient.aggregateClient(Order); } async createOrder(orderId) { await handleError( async () => await this.client.create(orderId, (order) => { return order.createOrder(orderId); }) ); }}module.exports = OrderClient;The file imports the
Orderclass from the previousorder.jsfile. Then, an error handler is initialized to handle generic API request logic of calling a particular function and catching and surfacing any potential errors. Additionally, anOrderClientclass is declared. This class assumes an authenticated instance of Serializeds general authentication API client is being passed in (serializedClient), and it uses this to specifically initialize an instance of the clients Aggregates API client using theaggregateClient()function.Once
order.jsandorder-client.jshave been set up, you can create a route that will initialize an authenticated Serialized API client and make the needed API requests callable from the frontend. Go to theapi/routesdirectory and create a file calledorders.jswith the following code inside:var express = require("express");require("dotenv").config();var router = express.Router();const { Serialized } = require("@serialized/serialized-client");const OrderClient = require("../order-client");const serializedClient = Serialized.create({ accessKey: process.env.SERIALIZED_ACCESS_KEY, secretAccessKey: process.env.SERIALIZED_SECRET_ACCESS_KEY,});const orderClient = new OrderClient(serializedClient);router.post("/create", async function (req, res, next) { const { orderId } = req.body; console.dir(req.body); try { var response = await orderClient.createOrder(orderId); res.send(response); } catch (error) { console.log(error); res.status(400).json({ error: error }); }});module.exports = router;The above code initializes an authenticated instance of the Serialized client using your accounts access keys, creates a new instance of the
OrderClientdefined inorder-client.jsusing this Serialized client, and then calls a function on thatOrderClientinstance to create a new order based on the information that was passed in. Then, a/createPOST route is declared. This route that takes inorderIdin the request body. Using theOrderClientinstance declared at the top of the file, it then calls thecreateOrder()function from theorder-client.jsfile and passes in theorderId.Now that the
orders.jsroute has been created, it needs to be added to theapp.jsin theapidirectory so it can be called within the app. Add an initialization for anordersRoutervariable on line 9 inapi/app.js:var ordersRouter = require("./routes/orders");Then, in line 24 of
api/app.js, add in anapp.use()declaration for theordersRouterto point an/ordersroute to the endpoints in that file:app.use("/orders", ordersRouter);Now that this route has been added in, we can POST to the
/orders/createendpoint onlocalhost:9000, to create a new order!
Wiring up our React Frontend
Now that the API routes have been configured on the Express side, lets call it from the React frontend! We can set up the frontend application to make an API call to the newly created /orders/create route so we can make an order from the frontend.
Browsers often enforce a same-origin policy for requests, resulting in CORS (Cross-Origin Resource Policy) errors in the event that requests on a certain domain are made from a different origin domain. This example uses
[localhost:3000](http://localhost:3000)for the frontend while retrieving information from a[localhost:9000](http://localhost:9000)endpoint from our Express backend this difference in URLs will potentially create a CORS error, since the browser could say that violates the same-origin policy. To prevent CORS errors in your app once the frontend and backend are wired up, install the CORS package inapiwith the following command:npm install --save corsIn
api/app.js, add the following on line 6 to add in the CORS package that was just installed to the backend:var cors = require("cors");Then at line 23, add the following line to instruct your Express app to use the CORS package:
app.use(cors());It might be worth checking
api/app.jsagainst the GitHub repo at this point, just to make sure everything is set up right.In the
clientdirectory, create a new folder insidesrccalledcomponentsand initialize a file calledPOSHome.js:import React from "react";export default function POSHome() { async function createOrder() { var generatedOrderId = crypto.randomUUID(); var data = { orderId: generatedOrderId }; var order = await fetch("http://localhost:9000/orders/create", { method: "POST", headers: { "Content-Type": "application/json" }, body: JSON.stringify(data), }); } return ( <div> <h1>POS System </h1> <div> <button onClick={createOrder}>Create Order</button> </div> </div> );}This file declares a functional component called
POSHome(which is where the homepage of the POS system will live).On this page, there will be a button that, when clicked, calls
createOrder(). That function usescrypto.randomUUID()to generate a UUID that will fit the standards the backend is expecting, shoves it all into thedataobject, and sends it off to our new/orders/createendpoint.Replace
client/src/App.jswith the following code so that thePOSHomecomponent is being passed in to the main application and is visible from the main page:import "./App.css";import POSHome from "./components/POSHome";function App() { return ( <div className="App"> <POSHome /> </div> );}export default App;Open a new window or tab in the Terminal so that you have two tabs or windows open. In one tab, run
npm startin theapifolder. In another tab, runnpm startin theclientfolder. Once[localhost:3000](http://localhost:3000)launches the frontend, youll see the following screen:
Click the Create Order button and then go to your Serialized dashboard for your project and go to the Data Explorer page. You should see an entry for a new order the one we just created on page load from the
POSHomefrontend component calling the/orders/createendpoint: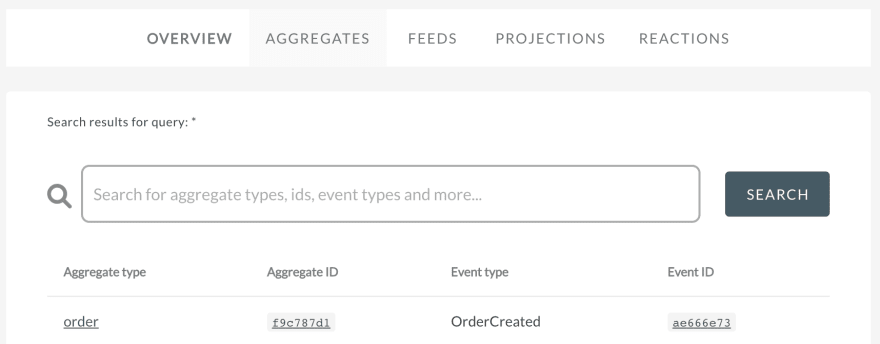
If you check the Terminal tab or window where youre running the
apiserver, youll also see something like the following:OPTIONS /orders/create 204 0.236 ms - 0{ orderId: 'd3ce8600-9e71-4417-9726-ab3b9056df48' }POST /orders/create 200 719.752 ms - -This is an event log from the backend endpoint recording the instance of the new order being created. Any
console.logstatements made from the backend will also show up here.
Integrating our functionality into our application
Now that youve taken a dive into the frontend code, lets lay out the remaining flow for creating, adding items, and then completing an order.
Lets start by initializing a dataset that will represent the items youll be selling in your POS. In
client/src, create a folder calleddataand add in anitems.jsonfile. Within the file, set up something like this:{ "items": [ { "name": "Tea", "price": 3.99 }, { "name": "Coffee", "price": 4.99 }, { "name": "Bagel", "price": 2.50 } ]}Here we added some inventory items to the
itemsproperty array, each with anameandpriceproperty.Now that data has been added for what items are sold in the POS system, it needs to be surfaced in a view. This will require a new component that is shown only when the Create Order button added in the last step is clicked. In
client/src/components, add anItemDisplay.jsfile for a new checkout flow component. Heres what that might look like:import React from "react";export default function ItemDisplay (props) { var data = require("../data/items.json"); return ( <div> <div> {data.items.map((item, index) => { return ( <button key={index}> {item.name} </button> ); })} </div> </div> );}Within the
ItemDisplaycomponent, the data fromitems.jsonis imported into thedatavariable. Then, in thereturnof the component, each item indatais iterated through and replaced with a button carrying that items name as a label.Now, lets update
client/src/components/POSHome.jsso that when an order is created, itll display theItemDisplaycomponent. Well use state variables for that its great for conditionally rendering components. To start, update theimportline at the top ofPOSHome.jsso it imports theuseStatehook too. While were there, bring in theItemDisplaycomponent from earlier.import React, { useState } from "react";import ItemDisplay from "./ItemDisplay";The
useStatehook will initialize a state variable for us and give us a way to update it in the future. Lets start withstartedOrderthis will keep track of whether an order has been started, and if so, it will display theItemDisplaycomponent. The variable will be initialized on line 5 with an initial value offalseusing the following:const [startedOrder, setStartedOrder] = useState(false);Next, update your
return()function in yourPOSHomecomponent so that it looks like the following:return ( <div> <h1>POS System </h1> {!startedOrder && ( <div> <button onClick={createOrder}>Create Order</button> </div> )} {startedOrder && ( <ItemDisplay /> )} </div>);In the above, JSX is being used to conditionally render certain elements depending on the value of the
startedOrderstate variable. The logic implement here says: If its false, render the Create Order button. If its true, render theItemDisplaycomponent.The final piece of this is setting
startedOrdertotruewhen an order is created. This can be done in thecreateOrder()function above. Add the following block inside the function on line 15:// if order was successfulif (order.status === 200) { setStartedOrder(true); setOrderId(generatedOrderId);}Now its time to test the flow! Load up the frontend and backend of your application by running
npm startin both theapiandclientdirectories in two different Terminal tabs or windows. Once theclienthas loaded, you should see your application appear inlocalhost:3000. Click the Create Order button and you should see your items appear as buttons on the page like in the screenshot below. This page, showing theItemDisplaycomponent, is where youll be able to select your items and add them to your order, which will be added in the section below.

Adding Items to Orders
Now were showing the available items, we need to be able to add those items to the running order.
To get started, lets first jump into the backend.
In
/client/api/order.js, add in anItemAddedevent class under where theOrderCreatedclass is declared:class ItemAdded { constructor(orderId, itemName, itemPrice) { this.orderId = orderId; this.itemName = itemName; this.itemPrice = itemPrice; }}This declares a class for a new event,
ItemAdded, that will take in anorderId,itemName, anditemPrice.Add an
itemAdded()function to yourOrderclass by adding the following code at line 19:addItem(itemName, itemPrice) { if (this.completed) throw "List cannot be changed since it has been completed"; return [DomainEvent.create(new ItemAdded(this.orderId, itemName, itemPrice))];}This function will first check if an order is completed - if it is, itll throw an error, as new items cannot be added. If it isnt, itll pull the
orderIddirectly from the Order object instance and take in anitemNameanditemPriceto log an event instance of what item was added in to the order.In the
Orderclass, add a new event handler for an item to be added:ItemAdded(state, event) { console.log("Handling ItemAdded", event); return new Order(state).addItem({ orderId: event.orderId, itemName: event.itemName, itemPrice: event.itemPrice });},Add the following inside the
OrderStateclass at line 64:addItem(itemName, itemPrice) { return Object.assign({}, this, { items: this.items.unshift({itemName: itemName, itemPrice: itemPrice}) });}The above code will update the
itemsarray property of theOrderStateobject so that the new item is pushed onto the array.At this point, its probably a good idea to match your
order.jsagainst the GitHub repo to make sure it lines up.Once
api/order.jshas been updated, jump into theorder-client.jsfile to add anaddItem()function that will query theaddItem()logic that was just added. Paste the following inside theOrderClientclass at line 24:async addItem(orderId, itemName) { await handleError( async () => await this.client.update(orderId, (order) => { return order.addItem(itemName); }) );}Finally, add a route in
api/routes/orders.jsso that the functionality to add an item to an order can be called from the frontend. Add this code on line 24:router.post("/add-item", async function (req, res, next) { const { orderId, itemName, itemPrice } = req.body; console.dir(req.body); try { var response = await orderClient.addItem(orderId, itemName, itemPrice); res.send(response); } catch (error) { console.log(error); res.status(400).json({ error: error }); }});The above request will create an endpoint at
/orders/add-itemthat takes in anorderId,itemName, anditemPricein its request body to add an item and take note of its properties when its added to an order of a certainorderId.
Consuming the endpoint we just made
Now that the backend is complete, lets call this endpoint in the frontend! When an item button is selected in the ItemDisplay component, it should trigger the /orders/add-item endpoint and also display an itemized receipt and total order amount of items added so far in the order.
To start, go to
/client/src/POSHome.js. Since the/add-itemrequest takes in anorderId, we need to pass it in to theItemDisplaycomponent to make the API call. To do so, youll need a state variable to keep track of order IDs. Add the following state variabl declaration:const [orderId, setOrderId] = useState("");Then, within
createOrder(), add the following line undersetStartedOrder(true);to set theorderIdstate variable to the order ID of a successfully created (and therefore current) order:setOrderId(generatedOrderId);Finally update the
<ItemDisplay />line in yourreturn()to the following to pass theorderIdstate variable in as a prop:<ItemDisplay orderId={orderId} />Perfect! To keep track of our selected items, lets do something similar in
/client/src/ItemDisplay.js. In there, import theuseStatehook at the top just like we did withPOSHomeand initialize theitemsInOrderandorderTotalstate variables like this:const [itemsInOrder, setItemsInOrder] = useState([]);const [orderTotal, setOrderTotal] = useState(0);Once the state variables have been added in, lets add in a function called
addItemToOrder()that will call the/orders/add-itemendpoint we made earlier. Add the following function to theItemDisplaycomponent above thereturn():async function addItemToOrder (name, price) { // add in item to order var data = { orderId: props.orderId, itemName: name, itemPrice: roundedPrice }; var order = await fetch("http://localhost:9000/orders/add-item", { method: "POST", headers: { "Content-Type": "application/json" }, body: JSON.stringify(data), }); // if order was successful if (order.status === 200) { var roundedPrice = price.toFixed(2); // push item name to setItemsInOrder // add total to orderTotal setItemsInOrder([...itemsInOrder, { name: name, price: roundedPrice }]); setOrderTotal(orderTotal + price); }}The function will take in an items
nameandprice. Then, thedataobject is declared that takes inorderId,itemName, anditemPrice, the requirements for the requests body. Finally, the request is made with all the necessary data passed in. If the order ends up being successful, in order to display a price that has two decimal places, thepriceis converted usingprice.toFixed(2). Then, the itemsnameandpriceare added to theitemsInOrderarray, while the itemspriceis added to the orders total.Add an
onClickevent to the<button>tag in thereturn(). Within the event, call theaddItemToOrder()function. The tag should look like this:<button key={index} onClick={() => { addItemToOrder(item.name, item.price); }}>This will fire the
addItemToOrder()function each time an items button is clicked.Within the main
<div>in thereturn()function, after the first nested<div>, add a section to show an items name and price, as well as the order total. It will dynamically update as theordreTotalanditemsInOrderstate variables are updated.<div> <h2>Items Ordered</h2> <ul className="receipt"> {itemsInOrder.map((item, index) => { return ( <li key={index}> <div className="receiptEntry"> <div className="itemName">{item.name}</div> <div className="itemPrice">{"$" + item.price}</div> </div> </li> ); })} </ul> <p> <b>Order Total:</b> ${(Math.round(orderTotal * 100) / 100).toFixed(2)} </p></div>Finally, its time to test the functionality! Start up the frontend and backend of your application. Once the application loads, click the Create Order button. You should see the following page:

As you click on the buttons, the item name and price should appear under Items Ordered, and the order total should also increase. Heres an example of what it should look like if you click Tea, Coffee, and Bagel:

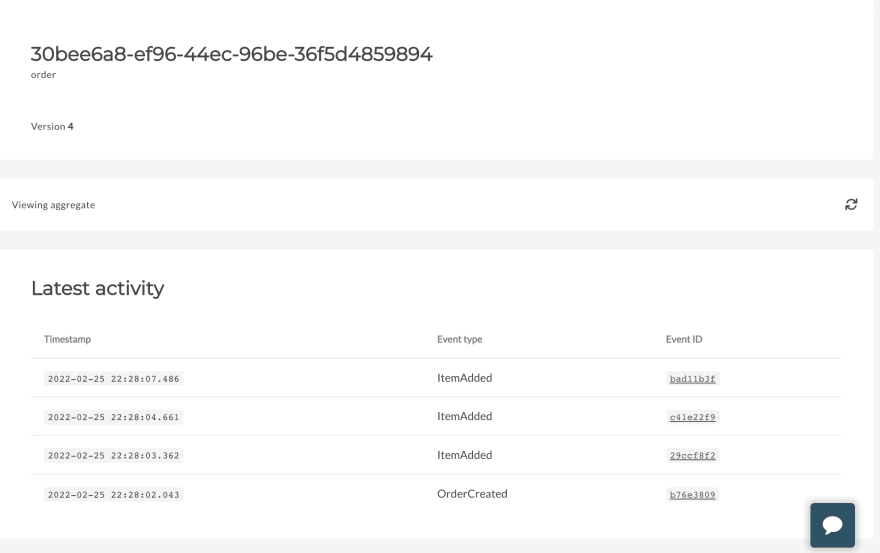
To confirm items have been added to an order, go to your Serialized Dashboard > Data explorer > Aggregates > order (under Aggregate type column) > Aggregates > click the Aggregate ID of the top (and most recent) entry. You should then see a view like this:
If you click into any of the
ItemAddedEvent IDs, youll see an object containing the data sent from theItemAddedevent in your app:
The above
ItemAddedevent was for a $2.50 bagel that was added to the order.
Completing Orders
The final use case will be completing orders. Once an order is completed from the ItemDisplay component, the component will disappear and the Create Order button will appear again to start a new order.
Lets start in the backend!
First, in
/client/api/order.js, add in anOrderCompletedevent class:class OrderCompleted { constructor(orderId, total) { this.orderId = orderId; this.total = total; }}This event class requires an
orderIdand a final ordertotalto complete the order.Similar to the
addOrderflow, well need to add a newcompleteOrder()function to theOrderclass:completeOrder(total) { if (!this.completed) { return [DomainEvent.create(new OrderCompleted(this.orderId, total))]; } else { // Don't emit event if already completed return []; }}The above function will first check if an order is completed or not. If it isnt completed, then a new event will be created of the
OrderCompletedclass type that was added above. It also passes in the necessary properties, taking theorderIdfrom the Order object instance and passing in thetotal.Next, add an
OrderCompletedevent handler:OrderCompleted(state, event) { console.log("Handling OrderCompleted", event); return new Order(state).completeOrder({ orderId: event.orderId, total: event.total, });},Then, in
OrderState, add acompleteOrderfunction:completeOrder(total) { return Object.assign({}, this, { completed: true, total: total });}Next, in
api/order-client.js, add in a function,completeOrder(), to callcompleteOrder()fromorder.js:async completeOrder(orderId, total) { await handleError( async () => await this.client.update(orderId, (order) => { return order.completeOrder(total); }) );}Finally, add in a
/orders/completeroute toapi/routes/orders.js:router.post("/complete", async function (req, res, next) { const { orderId, total } = req.body; console.dir(req.body); try { var response = await orderClient.completeOrder(orderId, total); res.send(response); } catch (error) { console.log(error); res.status(400).json({ error: error }); }});
Lets jump back to the frontend for a bit.
In order for this logic to work from
ItemDisplay, youll need to update thestartedOrderstate variable from theItemDisplaycomponent. To do this, thesetStartedOrderfunction can be passed in as a property fromPOSHome. Inclient/src/components/POSHome.js, pass insetStartedOrderto the<ItemDisplay>component so that it looks like this:<ItemDisplay orderId={orderId} setStartedOrder={setStartedOrder} />Now, in
/client/src/components/ItemDisplay.js, add a new function,completeOrder(). This will make a call to the/orders/completeendpoint and pass in anorderIdvariable from props as well as theorderTotalstate variable.async function completeOrder() { // add in item to order var data = { orderId: props.orderId, total: orderTotal }; var order = await fetch("http://localhost:9000/orders/complete", { method: "POST", headers: { "Content-Type": "application/json" }, body: JSON.stringify(data), }); // if order was successful if (order.status === 200) { props.setStartedOrder(false); }}function exitOrder() { props.setStartedOrder(false);}These two functions are the choices that a user can take when theyre on this screen. They can complete the order in which case the
setStartedOrder()function will be called and the state variable will be set tofalse, triggering that conditional statement we made earlier or they can just exit everything. Link these up to buttons in ourrenderfunction so the user can call this code. Its all coming together!Now its time to test your application! Run the frontend and backend in two different Terminal windows and test the end-to-end flow. It should look like this:

To confirm orders were marked as completed, go to your Serialized Dashboard and navigate to Data explorer Aggregates order (under Aggregate type column) Aggregates. Click the Aggregate ID of the top (and most recent) entry. You should then see a view like this:

If you click on the Event ID for the
OrderCompletedevent, it will surface data sent from the app (the orders total amount):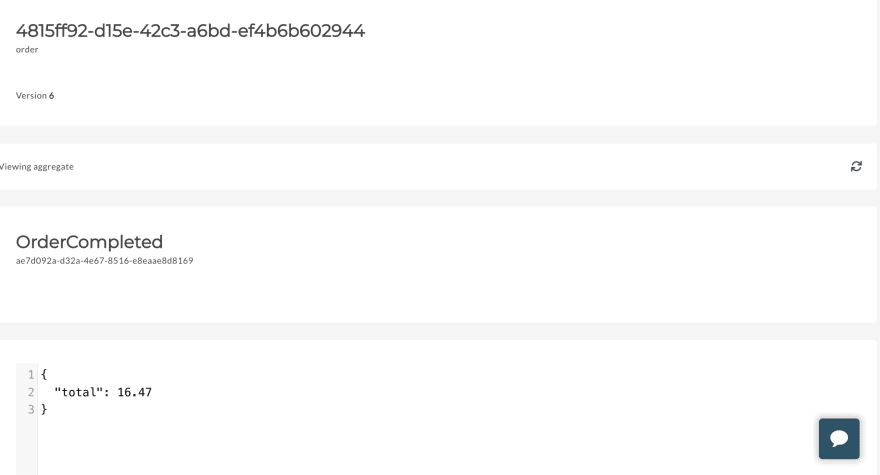
Looking back
At this point, the only thing missing is a little CSS. This tutorial is already a bit long, so Ill leave that as an exercise for the reader, but if youd like, you can always check out what I wrote in the GitHub repo. This is what it ended up looking like:

Im really satisfied with what weve created! We managed to use Serializeds Aggregates API to create a very simple POS (point-of-sale) application so users can create orders, add items to an order, and either complete or exit the order. All events that occur within this order are sent to Serialized, where they are stored in groups of events, or Aggregates, with each Aggregate instance representing an order.
We might come back to this in the future to show off the other half of Serializeds functionality that we havent even gotten to touch, but if youre looking to build more on top of this application yourself, perhaps try to:
- Experiment with making the UI more sophisticated - adding pictures for items, adding more items, even adding item descriptions and sending these to Serialized!
- Add frontend and backend testing for the components, functionality, requests, and routes.
Thanks so much for following along! You can connect with me on Twitter and feel free to reach out if there are any questions or feedback.
Original Link: https://dev.to/ashleyintech/build-a-point-of-sale-app-with-serialized-3e3m
Dev To
More About this Source Visit Dev To