
An Interest In:
Web News this Week
- April 24, 2024
- April 23, 2024
- April 22, 2024
- April 21, 2024
- April 20, 2024
- April 19, 2024
- April 18, 2024
Some of Our Sources
- TutsPlus - Code
- Web Designer Wall
- Just Creative
- Fuel Your Creativity
- Inspiredology
- Naldz Graphics
- Web Design Ledger
- 24 Ways
- Willems Lab
- Hashedout
Help Webnuz
Referal links:
How To Make Push Notification Using Node.js and Service Worker
We might find push notifications on mobile really useful because a web server can communicate directly with the app when it wants.
But app users need to grant permission to receive the push notifications first.
We can simply create the push notification using only Node.js, Express.js and Web-Push.
Sample Code
You can find sample code here this is the complete code of this tutorial.
Let's Get Started!
Let's create a directory that contains our Express.js app.
mkdir web-push-samplecd web-push-sampleThen install necessary libraries.
npm init npm i express body-parser web-pushNext we will create start script by add node index.js to your start script
{ "name": "web-push-sample", "version": "1.0.0", "main": "index.js", "license": "MIT", "dependencies": { "body-parser": "^1.19.2", "express": "^4.17.3", "web-push": "^3.4.5" }, "scripts": { "start": "node index.js" }}Generate VAPID Keys for push notifications
VAPID, which stands for Voluntary Application Server Identification is a new way to send and receive website push notifications. Your VAPID keys allow you to send web push campaigns without having to send them through a service like Firebase Cloud Messaging (or FCM). Instead, the application server can voluntarily identify itself with your web push provider.
I have two recommended ways to create VAPID Keys
1) Generate from vapidkeys.com
Just go through the website, enter the email address. It is used to give details about the sender. Use it as an identifier.
Then click the "generate" button. You should get the JSON object that contains subject which is your given email address.
And you will get both public and private keys.
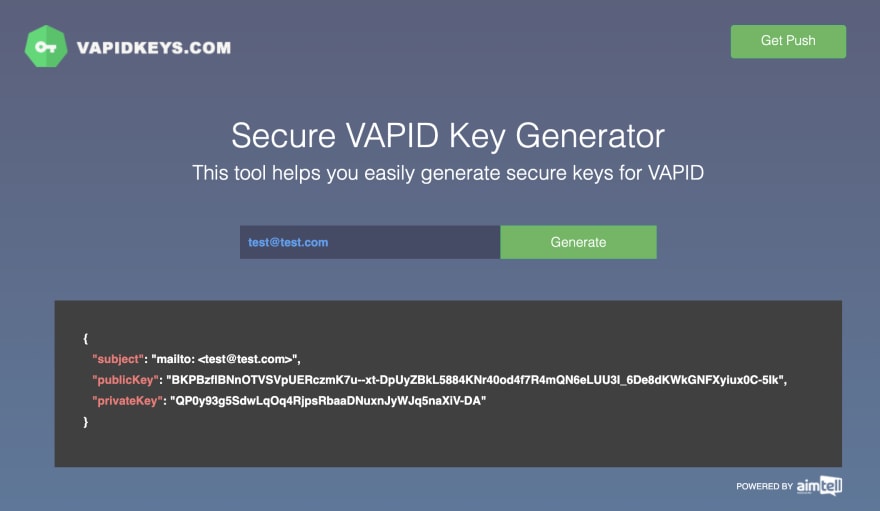
Really easy right?
2) Generate by Command Line
If you don't want to use the online services, you can generate it through the command line. So open your terminal and enter this command.
./node_modules/.bin/web-push generate-vapid-keysIt should returns something like this...
=======================================Public Key:BO4imRW5SYfMtEUyfwMrrxvzJjuoThJ1FNqiUX3Z0C93Ajdrhdy0rX5iwvGBWHffmH3nP-NhVsF5XXbnHxsUnrgPrivate Key:yI31gBBUlJYKj_7wZmPZsLGFklxNMVSk_9UVpWBXEHc=======================================Setup the Subscription Route
Next you will need to create express app and setup the route for allow client to subscribe to your push notification
const express = require('express');const webpush = require('web-push');const bodyParser = require('body-parser');const path = require('path');// Create express app.const app = express();// Use body parser which we will use to parse request body that sending from client.app.use(bodyParser.json());// We will store our client files in ./client directory.app.use(express.static(path.join(__dirname, "client")))const publicVapidKey = "BOd2EQ8LTe3KAgMX9lWwTlHTRzv1Iantw50Mw6pUnsNr3pcxl8iglUs-YlQEQLo4UbJk9oyXs_BxgyAe0TCqKME";const privateVapidKey = "4AoSsRHFaHv0Fupd2NRtrungJF2jkqgccTu-WEc781w";// Setup the public and private VAPID keys to web-push library.webpush.setVapidDetails("mailto:[email protected]", publicVapidKey, privateVapidKey);// Create route for allow client to subscribe to push notification.app.post('/subscribe', (req, res) => { const subscription = req.body; res.status(201).json({}); const payload = JSON.stringify({ title: "Hello World", body: "This is your first push notification" }); webpush.sendNotification(subscription, payload).catch(console.log);})const PORT = 5000;app.listen(PORT, () => { console.log("Server started on port " + PORT);});Inside subscribe route we will also start to sending first push notification but it need to pass the string as the value.
If you want to sending the JSON object, you will need to send as a string, and parse it on client side.
Below are the example on sending push notification to the client.
const payload = JSON.stringify({ title: "Hello World", body: "This is your first push notification" }); webpush.sendNotification(subscription, payload).catch(console.log);Create Service Worker to Consume Push Notification
We will need 3 files in client directory to start to consume our push notifications
1) index.html - Our landing page that will make use our main javascript file.
2) client.js - Our main JavaScript file which will register our service worker.
3) worker.js - Our Service Worker JavaScript file which will handle the push notifications.
Let's create index.html file
<!DOCTYPE html><html lang="en"><head> <meta charset="UTF-8"> <meta http-equiv="X-UA-Compatible" content="IE=edge"> <meta name="viewport" content="width=device-width, initial-scale=1.0"> <title>Push Notification Using Web-Push</title></head><body> <h1>Push Notification Using Web-Push</h1> <script src="./client.js"></script></body></html>Then create the client.js and register our worker.
We will need to copy our public keys and store it to some variable.
const publicVapidKey = "BOd2EQ8LTe3KAgMX9lWwTlHTRzv1Iantw50Mw6pUnsNr3pcxl8iglUs-YlQEQLo4UbJk9oyXs_BxgyAe0TCqKME";Then we write the function to subscribe the push notification.
We create the subscription object then send the POST request to our API endpoint and attach that subscription object as the payload.
async function registerServiceWorker() { const register = await navigator.serviceWorker.register('./worker.js', { scope: '/' }); const subscription = await register.pushManager.subscribe({ userVisibleOnly: true, applicationServerKey: publicVapidKey, }); await fetch("/subscribe", { method: "POST", body: JSON.stringify(subscription), headers: { "Content-Type": "application/json", } })}Finally we make use this function after we check that our current web browser supports Service Worker
if('serviceWorker' in navigator) { send().catch(console.log)}So the final look of client.js will be like this
async function registerServiceWorker() { const register = await navigator.serviceWorker.register('./worker.js', { scope: '/' }); const subscription = await register.pushManager.subscribe({ userVisibleOnly: true, applicationServerKey: publicVapidKey, }); await fetch("/subscribe", { method: "POST", body: JSON.stringify(subscription), headers: { "Content-Type": "application/json", } })}Create Service Worker
Create worker.js we will add event listener inside this file. When we show the notification, we will need to pass title and body as the parameters.
We add event listener to push event. Parse data as a JSON object. Then can self.registration.showNotification method then pass title and body.
self.addEventListener('push', function(e) { const data = e.data.json(); self.registration.showNotification( data.title, { body: data.body, } );})That is all about it!
Let's test notification service.
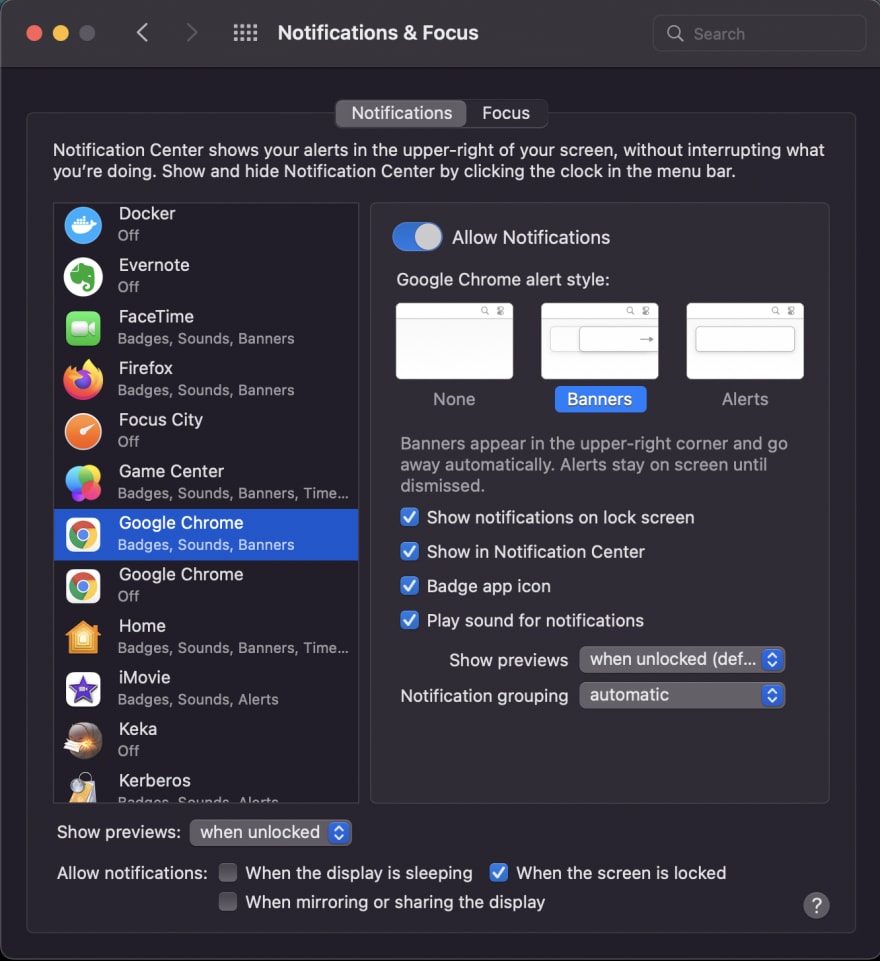
In this example I will use Google Chrome for testing.
Please make sure that you allow notification on Google Chrome.
If you using Mac it might disabled on the first time. And you will need to enable it.
Go to Notification Center then find the Google Chrome and allow notification. Make sure the Allow Notification enabled.
Start Our Service
Start the app using the command below
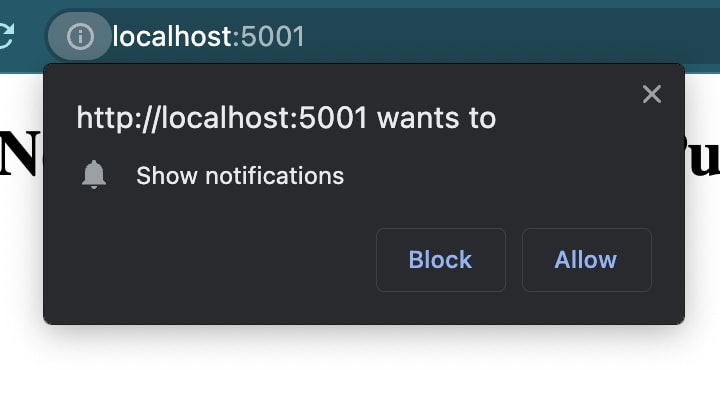
npm startServer started on port 5000Open your browser and navigate to http://localhost:5000
It should show the push notification permission request dialog. Just click allow.
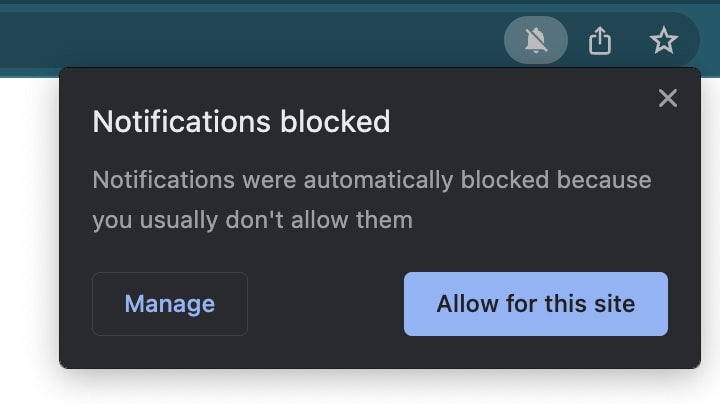
but in some case it might not show. But have the lock icon in navigation bar. Clicking on it and allow
Then you should get the first notification. (If not refresh the page once)
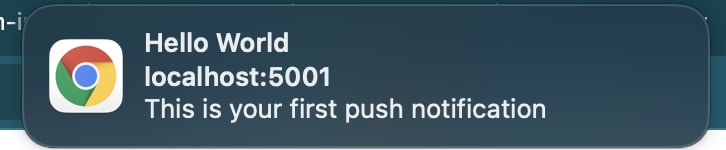
Congratulations! You did it. That's your first push notification.
Tip: Simulate More Push Notification
We can simulate more push notification that we can receive. Let assume that you still browsing through Google Chrome Right now you can open the Google Chrome DevTool and go to Application tab navigate to ServiceWorker menu.
You will see your worker.js file has been registered there.
Scroll down a bit, you can see the push text box.
Put some test JSON object there and press push button then you can see more notifications. Just enjoy with it.
That's means if you send any more push notification from your web server. It will also appeared on user's browsers as well (as long as they choose to subscribe to your push notification)
Conclusion
We can easily create our push notifications using web-push without using a 3rd party service like Firebase Cloud Messaging (FCM).
By using the new way to provide self hosted push notifications called VAPID (Voluntary Application Server Identity)
Then we create and install Service Worker that interacts after receiving the new push notifications. Showing notification is the choice. The key point is that after you subscribe to web-push successfully, you can receive push data anytime. You might use that information in ways you can't imagine.
Resources
Original Link: https://dev.to/wteja/how-to-make-push-notification-using-nodejs-and-service-worker-jaa
Dev To
More About this Source Visit Dev To