
An Interest In:
Web News this Week
- April 25, 2024
- April 24, 2024
- April 23, 2024
- April 22, 2024
- April 21, 2024
- April 20, 2024
- April 19, 2024
Some of Our Sources
- Joshua Blankenship
- Spoon Graphics
- Abduzeedo
- Vandelay Design
- Fuel Your Creativity
- FanExtra - PSD
- Fudge Graphics
- Android Dissected
- Dev To
- TechPowerUp
Help Webnuz
Referal links:
Securing a Blazor WebAssembly Hosted Apps with Azure Active Directory - Part 2
In the previous article of this series, we have created a secure project with Blazor WebAssembly Hosted and Azure Active Directory.
In this article we are going to add another level of security: the roles.
Also in this case we will use a feature of Azure Active Directory called: "App Roles".
So, let's open our application and make some changes to it!
Add App Roles to the App Registration
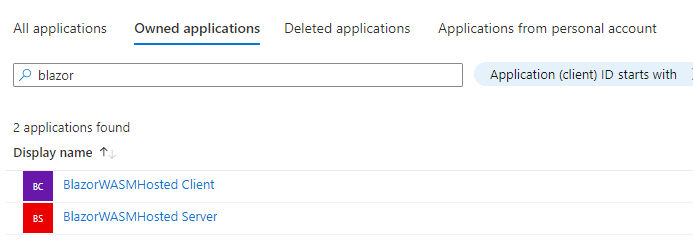
From the Azure Portal, come back to the App Registrations and search for your two apps.
Open the app registration for the server app and under the "Manage" section of the left navigation pane, click on "App roles".
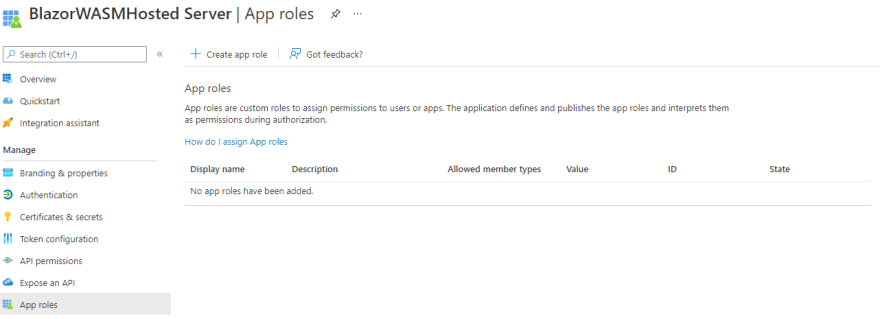
Click on the button "Create app role" on the top bar navigation and fill the form with the information about the new role.
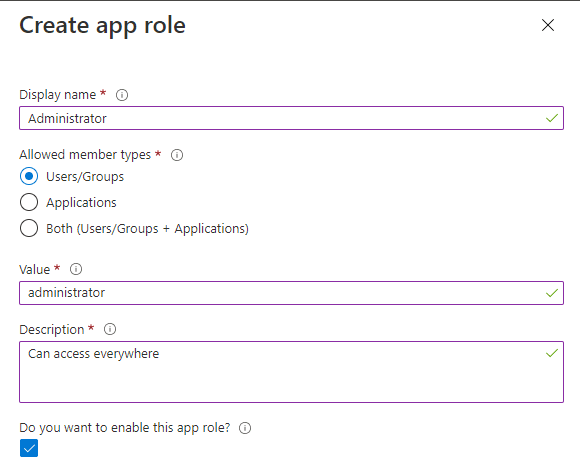
Pay attention to the field "value" because it will be the value that we will use in our code later.
It's reccomended to use lowcase letters.
Repeat these operations for other roles as: Viewer, PowerUser, etc.
Copy the App roles to the client App Registration
We have to do the same steps for the client app.
But it's very important to use the same values for this application.
The faster way is to copy the information about App roles directly from the Manifest file and put them in the manifest of the client application.
From the left navigation pane, click on "Manifest", select the Json portion of the code about appRoles and copy it in the clipboard.

Now you can open the manifest file of the client application and replase the Json node with the new values.
That's it.
Assign users to the new roles
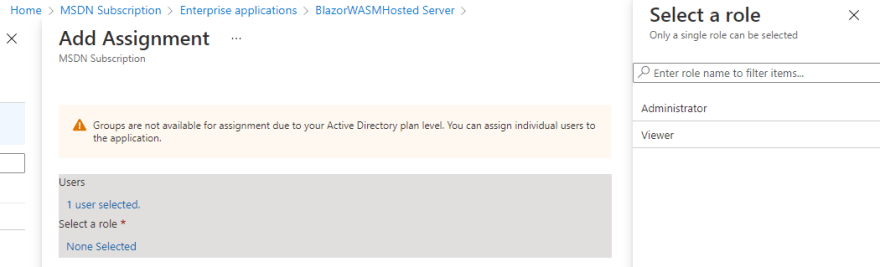
Navigate to the "Enterprise Applications and open the server app.

Under the menu "Manage" click on "Users and groups" and then "Add user/group".

In the new window, search and select a user and the role that you want to assign to him.
Now in the list you can see all the users with their role assigned.

Important: repeat all these steps for the client application.
Use the App roles in the application
Open the Client project and add a class called "SecureUserAccount" (but you can choose the name that you prefer).
This class extends the RemoteUserAccount.
public class SecureUserAccount : RemoteUserAccount { [JsonPropertyName("roles")] public string[] Roles { get; set; } = Array.Empty<string>(); }Now our application need to know how to manage the roles from Azure AD.
To do that, we can create a new class in the client project called "SecureAccountFactory"
public class SecureAccountFactory : AccountClaimsPrincipalFactory<SecureUserAccount> { public SecureAccountFactory(IAccessTokenProviderAccessor accessor) : base(accessor) { } public async override ValueTask<ClaimsPrincipal> CreateUserAsync(SecureUserAccount account, RemoteAuthenticationUserOptions options) { var initialUser = await base.CreateUserAsync(account, options); if (initialUser.Identity.IsAuthenticated) { var userIdentity = (ClaimsIdentity)initialUser.Identity; foreach (var role in account.Roles) { userIdentity.AddClaim(new Claim("appRole", role)); } } return initialUser; } }The last change in the client application is in the Program.cs file.
Replace the Msal authentication snippet with the new one:
builder.Services.AddMsalAuthentication<RemoteAuthenticationState, SecureUserAccount>(options =>{ builder.Configuration.Bind("AzureAd", options.ProviderOptions.Authentication); options.ProviderOptions.DefaultAccessTokenScopes.Add("api://957e1304-dd53-4589-b013-4a264dd19334/BlazorWASMHosted.API"); options.UserOptions.RoleClaim = "appRole";}).AddAccountClaimsPrincipalFactory<RemoteAuthenticationState, SecureUserAccount, SecureAccountFactory>();Now it's time to change the server application.
Open the Program.cs file and replace the MsalAuthentication code with the new one:
builder.Services.AddAuthentication(JwtBearerDefaults.AuthenticationScheme) .AddMicrosoftIdentityWebApi(options => { builder.Configuration.Bind("AzureAd", options); options.TokenValidationParameters.RoleClaimType = "http://schemas.microsoft.com/ws/2008/06/identity/claims/role"; }, options => { builder.Configuration.Bind("AzureAd", options); });Securing Pages, Web API and Features
Let's start to work with the roles.
First of all, the server application.
Extend the Authorize attribute of the WeatherForecastController with the roles property:
[Authorize(Roles = "administrator")] Now only a user with the Administrator role can call the controller.
In the client app, open the Fetchdata.razor file and extend the same attribute with the roles attributes:
@attribute [Authorize(Roles = "administrator")]Display only the links for your role
If you want to prevent that a user access to a page with the wrong role, you can hide portions of the pages or links in the application.
You can use one of the out-of-box features of Blazor called "AuthorizeView".
For instance, if you want to hide the page Fetch data, it's enough if you add this code in the NavMenu.razor file.
<AuthorizeView Roles="administrator"> <Authorized> <li class="nav-item px-3"> <NavLink class="nav-link" href="fetchdata"> <span class="oi oi-list-rich" aria-hidden="true"></span> Fetch data </NavLink> </li> </Authorized></AuthorizeView>Access to the App Role from the code behind
It's very easy also to access to the roles of the user from the code behind.
Very often inside an application there a lot of code that change the behaviour based on the user permissions.
Let's start with an easy example.
Open the Counter.razor page and change the code as below:
@code { [CascadingParameter] public Task<AuthenticationState> AuthState { get; set; } private int currentCount = 0; private async Task IncrementCount() { var authState = await AuthState; var user = authState.User; if (user.IsInRole("viewer")) { currentCount += 2; } if (user.IsInRole("administrator")) { currentCount -= 2; } }}Wrap up
Now you know how to create a new app on Azure Portal, assign roles to it and work with the roles in your Blazor applications.
You can find the source code of the example on GitHub.
Follow the instructions in the Readme file.
Thank you and drop me a comment if you have questions or feedbacks!
Original Link: https://dev.to/kasuken/securing-a-blazor-webassembly-hosted-apps-with-azure-active-directory-part-2-1ppd
Dev To
More About this Source Visit Dev To