
An Interest In:
Web News this Week
- April 20, 2024
- April 19, 2024
- April 18, 2024
- April 17, 2024
- April 16, 2024
- April 15, 2024
- April 14, 2024
Some of Our Sources
- Mashable
- Techcrunch
- TutsPlus - Code
- Pearsonified
- Vandelay Design
- You The Designer
- Fuel Your Creativity
- Fudge Graphics
- Stylized Web
- Android Headlines
Help Webnuz
Referal links:
How to Build a Live Streaming Web Application with Amazon IVS and Deepgram: Vue and Express Setup
Introduction
In my last post, I introduced how to build a vanilla Javascript and HTML live streaming web application with text captions. It included a barebones frontend that was just one page - the video player and captions.
Today I'm going to start building a full-stack application using the same technology, except instead of vanilla Javascript, I will use Vue 3.
The full-stack application will be expanded from the barebones version to include features that are often necessary for real-world applications, such as:
- a landing page that asks for a code to enter the site
- a router (Vue Router) to implement routes and a navigation guard so users can't access beyond the entry page unless they enter the correct code
- a state management library (Vuex) which will update state to allow access to the stream page if the correct code is entered
- a backend server (node.js and express) with two endpoints, one for getting a Deepgram temporary key so I can keep my Deepgram API key secure, and one for verifying the secret code the user must input to enter the site
I recommend reading the first post to go through how to set up the video streaming technologies, Open Broadcaster Software, and Amazon IVS. And for an introduction to Vue 3, it might be worth checking out my series Diving Into Vue 3.
What I'll Build Today
In this post, I'll set up the router (Vue Router) and Vuex so that I can put a navigation guard on the entry page. I will also set up the backend server so I can keep my entry code secure.
Here is the diagram to show the data flow and structure for what I will build today. The focus will be on building the protected entry with a navigation guard. If it seems complicated in the diagram, it won't by the end of the post because I plan to walk-through building this feature step-by-step.

Setting up the Vue Project
After installing the Vue CLI, I can create a new Vue project with this command:
vue create NAME-OF-PROJECTI'll be sure to choose 'Manually select features' so I can add some dependencies during the creation of the project:

These are the presets I selected. I definitely recommend selecting Router and Vuex since those are required for this project, but the others are just my personal preference:

I'll select Vue 3, and then I'll cd into the folder.
I can install all the rest of the dependencies now, or I can install them one by one as I need them. Here is a list of the dependencies I'll be using in this project:
- vue-router@4 (already installed when I manually selected presets)
- vuex@next (already installed when I manually selected presets)
- express
- dotenv
- cors
- body-parser
- @deepgram/sdk
I can install them all at once with this command:
npm install vue-router@4 vuex@next express dotenv cors body-parser @deepgram/sdkThe Folders Structure
A Vue application that is created using the Vue CLI starts out with this structure:

The src contains the folders that will make up the frontend, and I will add two files to the root of the project which will be required for the backend. Those two files will be a server.js file and a .env file. The final structure can be seen here at the root level of the project in its GitHub repo.
SRC Folder
I'll go over the SRC folder in more detail because the way I organize this folder reflects my thinking about how I'll make the application work when considering how the pieces should fit together.
Here is the file structure of the SRC for the final project (these folders can be set up now or as I progress through building the project):

I'll go over the pieces starting from the bottom.
main.js
This is the file where Vue will be initialized, and also where Vue Router and Vuex (the store) will be brought into the project as plugins by way of app.use().
App.vue
This is the top-most parent component, i.e., the root component. It holds all the Vue code (coming in as code in this file or code in child components) that will be injected into the index.html file, inside the div that has id="app".
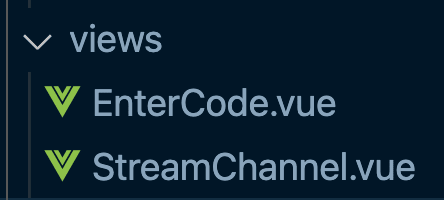
views
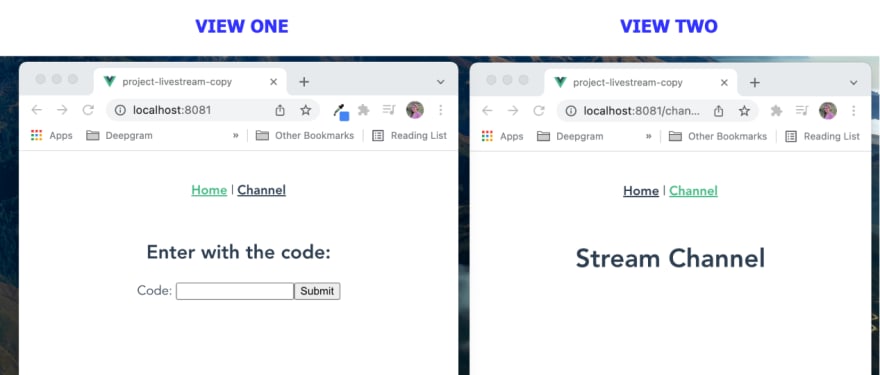
These are the pages that will be the main routes of the project. There will be a page that the user first lands on where they must enter a code. I will name it EnterCode.vue. And there will be a page that shows the live stream, with the video player and audio captions. I'll name that page StreamChannel.vue.
Here is a screenshot of what the views will look like by the end of this post. A demo of the finished project can be found in the first post, which shows the styled version with the video live stream page.
store
This is the folder that contains the Vuex store, a state management file. Some state properties need to be widely available throughout the application, not just in one component or one parent-child component. Vuex makes those state properties that I have put in the store available in any Vue files throughout the project.
router
This is the folder that contains the routes and creates the router, so that each view (page) can be navigated to when a user clicks on the link to that page. Using Vue Router means that a user can switch between page views without the page being reloaded every time the route changes.
composables
This folder contains composition functions that run the logic to make stuff happen, such as getting the user's microphone or bringing in the Amazon IVS player. Composition functions, or 'composables', are a Vue 3 way of encapsulating logic that can then be run inside the setup function inside a component. Read more about composables here.
components
The components folder contains two components that will make up the StreamChannel page - the VideoPlayer component and the AudioCaptions component. I'll build these components in the next post in this series.
Set up Vue Router and the Views
The first thing I will do is create the two main pages I intend to make as part of this application - the landing page and the live stream page.
I will create a views folder and put those two main page files in the folder:
For each file, I'll be sure to put in some HTML that will display on the page, so I can see that my router is working:
<template> <div> <h1>Enter Code</h1> </div></template>When I created my project with the Vue CLI, I opted to add the Vue Router dependency, which means I have a router already created for me - the index.js file in the router folder. The index.js already has two routes set up - home and about.
If I start up the development server, I see that the links at the top of the page will take me between the two routes.

Since my project is only going to have two pages, I am just going to change the home and about views of the bootstrapped project to be the EnterCode view and the StreamChannel View.
In the router file, the three things each route object needs to have are:
- the path - the URL path for the route
- the name - the name I want to give this route (optional, but in my case, I do need it)
- the component - the component (view file) that will be loaded for this route
Here is the code to set that up in the router:
import { createRouter, createWebHistory } from 'vue-router'import EnterCode from '../views/EnterCode.vue'const routes = [ { path: '/', name: 'EnterCode', component: EnterCode, }, { path: '/stream-channel', name: 'StreamChannel', component: () => import(/* webpackChunkName: "about" */ '../views/StreamChannel.vue'), },]const router = createRouter({ history: createWebHistory(process.env.BASE_URL), routes,})export default routerI need to go back to App.vue and change the router-links to match my new routes. Even though I've named the landing page EnterCode.vue, I'll refer to it has Home for the user. Notice that the to="" attribute contains the path:
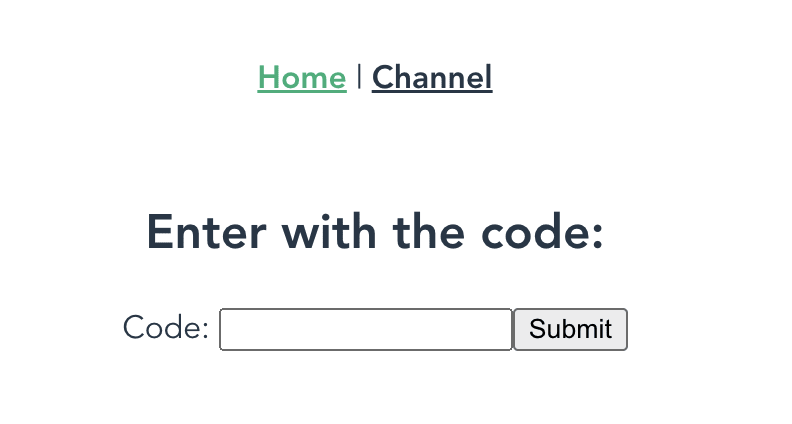
<template> <nav> <router-link to="/">Home</router-link> | <router-link to="/stream-channel">Channel</router-link> </nav> <router-view /></template>Now I see that my two main pages can be accessed (without reloading the page!) when I click the link to switch to each route:

Vue Router Navigation Guards
I want the landing page to have a form input where the user has to enter a code, and if the code is correct, they can move on to the channel page. See the code for this input here.
But if the code they enter is incorrect, I want to keep them from being able to navigate to that page. Right now, the channel page is completely open, and I can access it just by clicking the Channel link.
I can set up a navigation guard to perform some logic when the router-link is clicked (Read the docs for more information about navigation guards).
The logic will check to see if the correct code has been entered. If it has, the router will navigate to the channel page. If not, it will send them back to the home (EnterCode.vue) page.
To add a navigation guard, I use the beforeEnter guard:
{ path: "/stream-channel", name: "StreamChannel", component: () => import("../views/StreamChannel.vue"), beforeEnter(to, from, next) { // ADD LOGIC HERE to check state of allowed access next(); },},The next() function will move the navigation forward to the route. I can use an if statement to keep that from happening unless certain circumstances are met.
If I include a name of a route in the next() function, the navigation will move to the route I have identified by name. In this example, it would cause navigation to stay on the EnterCode page since I have identified that next should move me to that route.
beforeEnter(to, from, next) { // ADD LOGIC HERE to check state of allowed access next({ name: "EnterCode" });},I need to have some way of keeping track of the state of whether the correct code was entered or not. I will use the state management system, Vuex, which means I can now put this code in my router since the very next thing I will do is set up the store so there is a state property for allowAccess:
{ path: "/channel", name: "StreamChannel", component: () => import("../views/StreamChannel.vue"), beforeEnter(to, from, next) { if (store.state.allowAccess === true) { next(); } else { next({ name: "EnterCode" }); alert("Please enter the secret code"); } },}I'll probably see this error in the browser now since I've referenced store.state.allowAccess, but the router file doesn't know what the store instance is.

To make it go away, I need to import the store into the router by adding the following import statement to the router folder's index.js file.
import store from '../store'The GitHub repo has the code in its entirety for this stage of the project.
Set up Vuex to Manage State
Even though this is a small application, I am choosing to include a Vuex store because it is common to use Vuex for the purpose of keeping track of whether a user is authenticated/logged-in or not.
In this project, I will use the Vuex store to keep track of whether a correct entry code has been entered or not by the user. The state property will be called allowAccess, and its default state will be false. It will change to true when a user enters the correct code.
Here is the store with the state property I have created:
import { createStore } from 'vuex'const store = createStore({ state() { return { allowAccess: false, } },})export default storeI need to connect the input on the landing (EntryCode) page with this property in state. When the user types a correct code into that input, the submit button triggers a function that checks if the code is correct, and then if it is, dispatches an action to the store, which will cause allowAccess to update to true.
The way Vuex causes state to change is through this pattern:
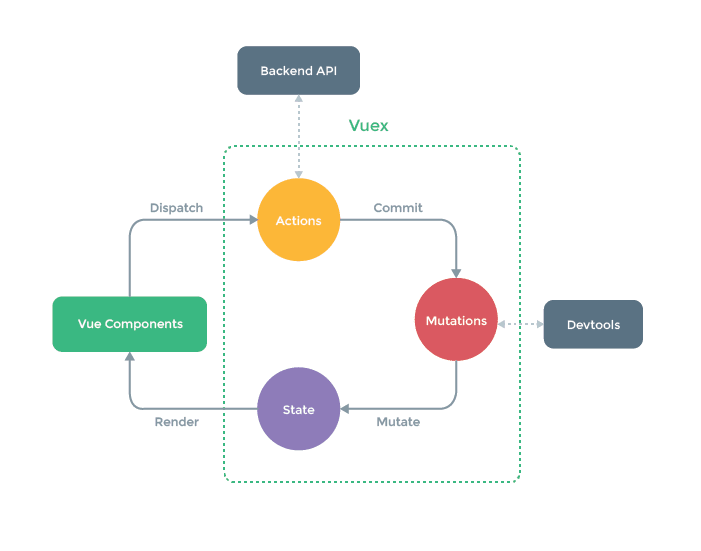
Vue Component dispatch action -> Store action commit mutation -> Store mutation change state
Here is that flow in the actual code in my project.
- The Vue component EnterCode form submit button triggers
submitCode():
<form @submit.prevent="submitCode"> <label for="code"> Code: </label> <input v-model="code" type="password" name="code" value /> <button type="submit" name="button" class="dg-btn">Submit</button></form>- The
submitCode()method dispatches theverifyCodeaction (which is passed as a string'verifyCode') with a payload oftrueorfalse:
function submitCode() { if (code.value === 'pb') { store.dispatch('verifyCode', true) } else { store.dispatch('verifyCode', false) } code.value = ''}- The
verifyCodeaction in the store commits theverifyCodemutation, sending thetrueorfalsepayload, referred to here asstatus:
actions: { verifyCode({ commit }, status) { commit("verifyCode", status); },},- The
verifyCodemutation changes state soallowAccessequals thestatuspayload oftrueorfalse
mutations: { verifyCode(state, status) { state.allowAccess = status; },},The last thing to do is navigate with the router to the StreamChannel page if a correct code has been entered (i.e., state for allowAccess in the store has changed to true) or alert the user if they have entered the wrong code.
//StreamChannel.vuefunction submitCode() { if (code.value === 'PB') { store.dispatch('verifyCode', true) } else { store.dispatch('verifyCode', false) } // Navigate if correct code, alert if not correct if (store.state.allowAccess) { router.push({ name: 'StreamChannel' }) } else { alert('Incorrect code') } code.value = ''}This version of the project, with the setup I just did for Vue Router and Vuex, can be seen in its entirety in the repo branch titled vuex-no-server-yet.
Security
The example so far is not very secure because I check for the correct code on the frontend, and that entry code is right there in plain Vue (no pun intended) in the client:
if (code.value === "pb")The more secure way to handle this would be to create a backend server file with an endpoint to check if the code is correct and store that code securely in the server, or even better (so it does not get exposed in GitHub) in a .env file.
In the next section, I'll introduce that more secure method of checking the code. I'll still use everything I just set up for Vuex, but instead of checking the code in the EnterCode.vue file, I'll use a fetch request to send that code to the backend for verification.
Create the Server with Express
Now I'll set up my server file, which I'll use today for making the entry code more secure, and which I'll use in the next post for setting up the Deepgram token endpoint.
At the root of the project, I'll create a server.js file and a .env file.
I'll add this code to create my basic server.
// bring in node modulesrequire('dotenv').config()const express = require('express')const app = express()var bodyParser = require('body-parser')const cors = require('cors')// identify port numberconst port = 8080// express use() function to add third-party middlewareapp.use(cors())app.use(bodyParser.json())// ENDPOINT WILL GO HERE// Connect host to portapp.listen(port, () => { console.log(`Example app listening at http://localhost:${port}`)})Dependencies
Here is a brief explanation of each dependency I'm using in this server file.
express
Express is a node.js framework that gives me utility methods and middleware to help with setting up routing endpoints (the endpoints deal with requests that come in from the frontend).
body-parser
Body-parser is middleware that can take an incoming request body and parse the data. I'll be using the JSON parser because the secret entry code will be sent from the frontend as JSON.
cors
This is another middleware package that will help to handle requests from the frontend, specifically cross-origin requests.
Since the client and server have a different origin from each other (such as localhost:8080 vs. localhost:8081), I would need to add a CORS response header access-control-allow-origins with information about permitted origins. The CORS middleware will add that header automatically for every request that is sent to the server.
dotenv
This is a very important node module. It allows me to use environment variables in my server file, pulling the values for those variables from the .env file. The .env file will never be tracked by git, so I can put anything super-secret in the .env file and not worry that it will end up on Github for the world to see.
Run the server
Now I can start up the server to check that everything is working so far.
I will add a script command to the package.json file to make it easier to start up the server. In my package.json, in the "scripts" object, I'll add one for "start":
"scripts": { "serve": "vue-cli-service serve", ... "start": "node server.js"},Now, in the terminal, when I'm in the project folder, I can type npm run start to start the backend server, and if I open another terminal, I can type npm run serve to start the frontend development server.
Add the secret code value to .env
Before I set up the endpoint, I want to put the expected code value in the .env file so that I can access it in the server using process.env.SECRET_CODE.
In the .env file, I will add the secret code that I want users to type into the input on the frontend to be able to enter the site. I can add any value I want. In this case, I'll just make the value 'code' (in the earlier section, I used 'pb' as the code, but I'm using 'code' here to make it more obvious that this is the code):
SECRET_CODE="code"Create the secret-code endpoint
Now I'll start on the backend creating the endpoint. The endpoint will expect a value to come in from the frontend (the code entered by the user). Since a value is being sent back, this will be a POST request endpoint.
app.post('/secret-code', async (req, res) => {})The app.post() method is available because of express, and it requires the route path as a slash and whatever I want to name the path, in this case "/secret-code".
When the code is sent from the frontend to the backend, it comes in as part of the request body (which is an object), so I will get the code value from req.body. Because I plan to send it back in a JSON object as { code: "code" }, the value will come back as req.body.code.
if (req.body.code._value === process.env.SECRET_CODE)However, the value that is sent back is put into another object, which I see when I examine the shape of the req.body.code by using console.log. I see this:
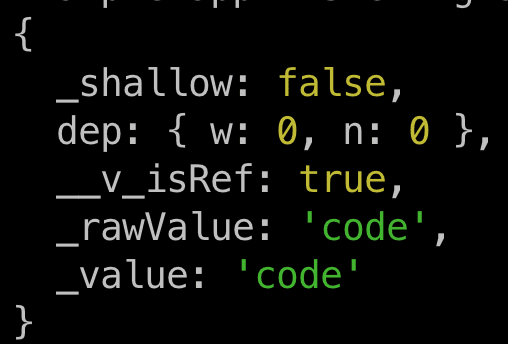
The _value property actually contains the value that I want to match to my code value I have put in the .env file. So I need to access it with req.body.code._value. This is how I can check that there is a match:
app.post('/secret-code', async (req, res) => { if (req.body.code._value === process.env.SECRET_CODE) { res.status(200).json('Correct code') } else { res.status(200).json('Incorrect code') }})The res.status() method will send back the result status code, and the .json() method will make sure it returns to the frontend as JSON data.
Now I can go back to the frontend and write a fetch request that will send the secret code that I need for this verification.
Fetch POST request
To write a fetch POST request, I will use the fetch API.
To write a fetch request, I use the fetch() method with a first argument of the endpoint path (including the port number) and the second argument an options object:
fetch('http://localhost:8080/secret-code', requestOptions)The options object will give information about the type of request (POST), the headers (to tell that the content will be of the type JSON) and the request body (I will send a JSON object that contains the code):
const requestOptions = { method: 'POST', headers: { 'Content-Type': 'application/json' }, body: JSON.stringify({ code: code }),}The fetch request will send the code to the backend server, and since that will take a little bit of time, I will use a promise to wait for the response, doing the following action once that response has been returned. To use a promise, I will attach a .then() to the request, which means that anything inside the .then() will happen after the response is returned from the fetch request.
Once the response returns, I will turn it back into JSON and then take that response data to verify if it is correct or not. Depending on if it is correct, I update the state in the store.
Remember, for a verified response of true, I am expecting the backend server to return a response with a JSON string of "Correct code":
fetch('http://localhost:8080/secret-code', requestOptions) .then((response) => response.json()) .then((data) => { if (data === 'Correct code') { //dispatch payload to store } }) .then(() => { if (store.state.allowAccess) { // navigate to channel or alert that code is wrong } })I've created a branch in the repo called vuex-with-server where the code from this step can be viewed in its entirety.
Conclusion
In this post, I set up a Vue project and added some of the common features used in a full-stack application: routes, a state management library, and a backend server with endpoints.
Now I am ready to build the Channel page, which will contain the video player for my live stream and the audio captions that display the transcript.
Previously, I went over how to build a live stream web application with Amazon IVS, using only vanilla javascript and HTML. But now, I want to use the Vue framework to help me build this in a way that is more reusable, and that incorporates common practices for using Vue.js.
In my next post, I will introduce how to build the Amazon IVS player using Vue 3 composables, which will give me a chance to discuss more specifically some of the new features of Vue 3.
I will also introduce how to use Vue 3 composables to create the Deepgram captions, and I'll include a more secure way of connecting to Deepgram by requesting a Deepgram token from the backend.
I hope you'll join me for my next post. As always, feel free to reach out on Twitter.
Original Link: https://dev.to/deepgram/how-to-build-a-live-streaming-web-application-with-amazon-ivs-and-deepgram-vue-and-express-setup-2p33
Dev To
More About this Source Visit Dev To