
An Interest In:
Web News this Week
- April 23, 2024
- April 22, 2024
- April 21, 2024
- April 20, 2024
- April 19, 2024
- April 18, 2024
- April 17, 2024
Some of Our Sources
- Slashdot
- Simplebits
- The Logo Smith
- Creative Curio
- Web Designer Depot
- Line 25
- Specky Boy
- Design Modo
- Codrops
- Willems Lab
Help Webnuz
Referal links:
Laravel 8 - SweetAlert2 with AJAX (3 Easy Steps)
What is SweetAlert2?
SweetAlert2 is a beautiful, customizable, accessible replacement for javascript's pop-up boxes with zero dependencies!
Read more about sweetalert2 here.
Now that you have a good understanding of sweetalert2, lets start!
STEP 1: Create Controller
Create user controller using this command:
php artisan make:controller UserControllerOpen user controller and paste this code:
<?phpnamespace App\Http\Controllers;use App\Models\User;use Illuminate\Http\Request;class UserController extends Controller{ // all users public function users() { $users = User::all(); return view('users', compact('users')); } // delete user public function delete($id) { $delete = User::destroy($id); // check data deleted or not if ($delete == 1) { $success = true; $message = "User deleted successfully"; } else { $success = true; $message = "User not found"; } // return response return response()->json([ 'success' => $success, 'message' => $message, ]); }}Here weve created two functions. One for getting all users and another for deleting user.
Step 2: Define Routes & Insert Fake data
Lets define routes for those two functions:
<?phpuse App\Http\Controllers\UserController;use Illuminate\Support\Facades\Route;Route::get('users', [UserController::class, 'users']);Route::post('delete/{id}', [UserController::class, 'delete']);Now let's insert some fake user data using factory and seeder:
\App\Models\User::factory(5)->create(); // 5 fake user dataRead more about factory and seeder here.
Step 3: Set SweetAlert2 with AJAX in the Blade File
Create a view named users.blade.php and paste this code:
<!doctype html><html lang="en"><head> <!-- meta tags --> <meta charset="utf-8"> <meta name="viewport" content="width=device-width, initial-scale=1, shrink-to-fit=no"> <!-- csrf-token --> <meta name="csrf-token" content="{{ csrf_token() }}"> <!-- Bootstrap CSS --> <link rel="stylesheet" href="https://stackpath.bootstrapcdn.com/bootstrap/5.0.0-alpha2/css/bootstrap.min.css"> <!-- jquery --> <script src="https://code.jquery.com/jquery-3.5.1.min.js"></script> <!-- SweetAlert2 --> <link rel="stylesheet" href="https://cdnjs.cloudflare.com/ajax/libs/limonte-sweetalert2/10.5.1/sweetalert2.min.css"> <script src="https://cdnjs.cloudflare.com/ajax/libs/limonte-sweetalert2/10.5.1/sweetalert2.all.min.js"></script> <title>How to Use SweetAlert2 with AJAX in Laravel 8.x</title></head><body class="container" style="margin-top: 40px;"><div class="row" style="margin-bottom: 20px;"> <div class="col-lg-12 margin-tb"> <div class="pull-left"> <h3>Users</h3> </div> </div></div><table class="table table-bordered"> <tr> <th>ID</th> <th>Name</th> <th>Email</th> <th width="280px">Actions</th> </tr> @foreach ($users as $user) <tr> <td>{{ $user->id }}</td> <td>{{ $user->name }}</td> <td>{{ $user->email }}</td> <td> <button class="btn btn-danger" onclick="deleteConfirmation({{$user->id}})">Delete</button> </td> </tr> @endforeach</table><script type="text/javascript"> function deleteConfirmation(id) { swal.fire({ title: "Delete?", icon: 'question', text: "Please ensure and then confirm!", type: "warning", showCancelButton: !0, confirmButtonText: "Yes, delete it!", cancelButtonText: "No, cancel!", reverseButtons: !0 }).then(function (e) { if (e.value === true) { var CSRF_TOKEN = $('meta[name="csrf-token"]').attr('content'); $.ajax({ type: 'POST', url: "{{url('/delete')}}/" + id, data: {_token: CSRF_TOKEN}, dataType: 'JSON', success: function (results) { if (results.success === true) { swal.fire("Done!", results.message, "success"); // refresh page after 2 seconds setTimeout(function(){ location.reload(); },2000); } else { swal.fire("Error!", results.message, "error"); } } }); } else { e.dismiss; } }, function (dismiss) { return false; }) }</script></body></html>Now that we've finished setting everything up, let's check it out!
Run and See Output
Run the Laravel project
php artisan serveVisit this route http://localhost:8000/users and you will see a page like this:

Click Delete button and the SweetAlert2 confirmation box will appear:
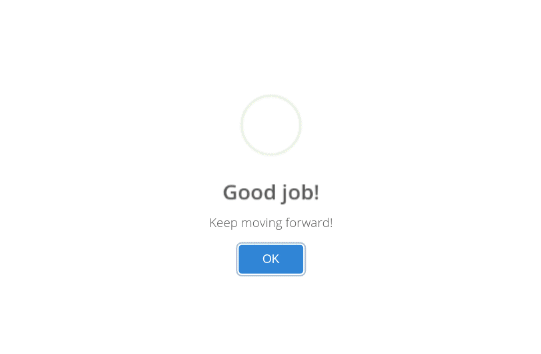
Click Yes button, the data will be deleted via AJAX and you will see a confirmation message like this:
Hurray! We have succesfully created and tested
sweetalert2, use this on your future projects to make it more beautiful!

Original Link: https://dev.to/dalelantowork/laravel-8-sweetalert2-with-ajax-for-beginners-3-easy-steps-1p6d
Dev To
More About this Source Visit Dev To