
Some of Our Sources
- TutsPlus - Code
- Team Treehouse
- Pearsonified
- Vandelay Design
- Creative Curio
- Naldz Graphics
- Fudge Graphics
- Wal You
- Design Modo
- Dev To
Help Webnuz
Referal links:
Making an automatic Spotify Playlist with Serverless Cloud and Slack
Originally published at Serverless
Fast and reliable data is one of the most important requirements for any cloud application. **Serverless Cloud** provides access to Serverless Data (our powerful serverless NoSQL database service) automatically, giving our users a built-in, zero-configuration solution. However, there are a lot of amazing database services out there, and we completely understand that some users might want to stick with the familiar, or already have databases in production with lots of existing data. With Serverless Cloud, you can securely integrate with third-party data services. In this article, Ill explain in detail how to connect Serverless Cloud to the widely popular MongoDB.
Creating the Serverless Cloud App
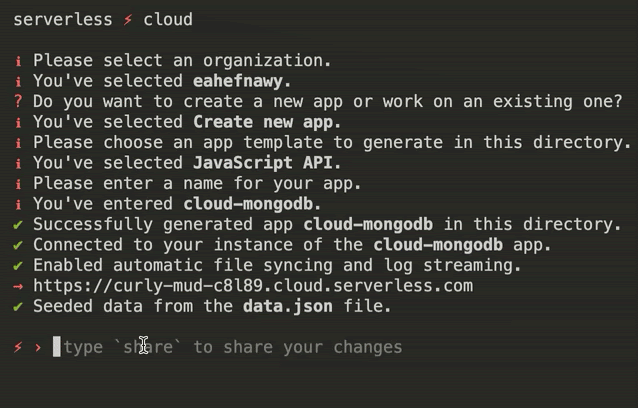
Create a new empty directory called cloud-mongodb, then open this new directory in your favorite IDE. This will be the directory containing your app files. Then, using your IDEs built-in terminal, initialize a new Serverless Cloud project by entering the following command:
You may be prompted to login if you havent already. The CLI will ask you to select a template to get started. Choose the JavaScript API template.

Initialize a new Serverless Cloud project and select the JavaScript API template
After you make your selection, a new app will be generated in the directory you just created. The CLI will connect to your development sandbox and start the interactive shell. Now you can install the MongoDB client by typing install mongodb in the shell.
Install the mongodb npm package right from the interactive cloud shell
This will install the mongodb npm package, and automatically update your live developer sandbox. Your app is now ready to connect to a MongoDB database, so lets create one.
Creating the MongoDB Database
To illustrate, well use MongoDB Atlas as our MongoDB provider, but using any other hosted MongoDB provider should work the same way. Youll need to create a MongoDB serverless instance. Like the app above, well call it cloud-mongodb.

Create a new Serverless MongoDB Atlas instance
Like any other serverless environment, Serverless Cloud does not have a static IP address. So your servers IP address (yes there actually is a server!) always changes as it scales up and down. Because of that, youll need to make sure you configure access to your database from anywhere. You can do that in the MongoDB Atlas dashboard by navigating to Network Access > Add IP Address > Allow Access From Anywhere.

Allow Access from Anywhere to your MongoDB cluster. It will still be protected by your database credentials.
Then go back to the Databases tab, and if your database serverless instance is provisioned, click on the Connect **button, then choose Connect your application* from the list. Make sure the Node.js* driver is selected, then copy the connection string you see on the screen.

Copy your connection string for the Node.js driver
As instructed, youll need to replace the placeholders with your username and password. Please do not confuse your MongoDB Atlas account password with your database user password as they could be different. To make sure you know what your database user password is, click on Database Access on the left and check your user settings. Auto generate a new password if necessary. If you choose your own password, make sure that you encode any special characters as instructed here.
Because the connection string contains sensitive information, well securely save it with Serverless Clouds Parameters feature. To do that, type open in the cloud shell to open a web browser with your apps dashboard page, then click on Parameters > Add new param. Make sure you name your param MONGO_URI and add the connection string after replacing the username and password as instructed above.
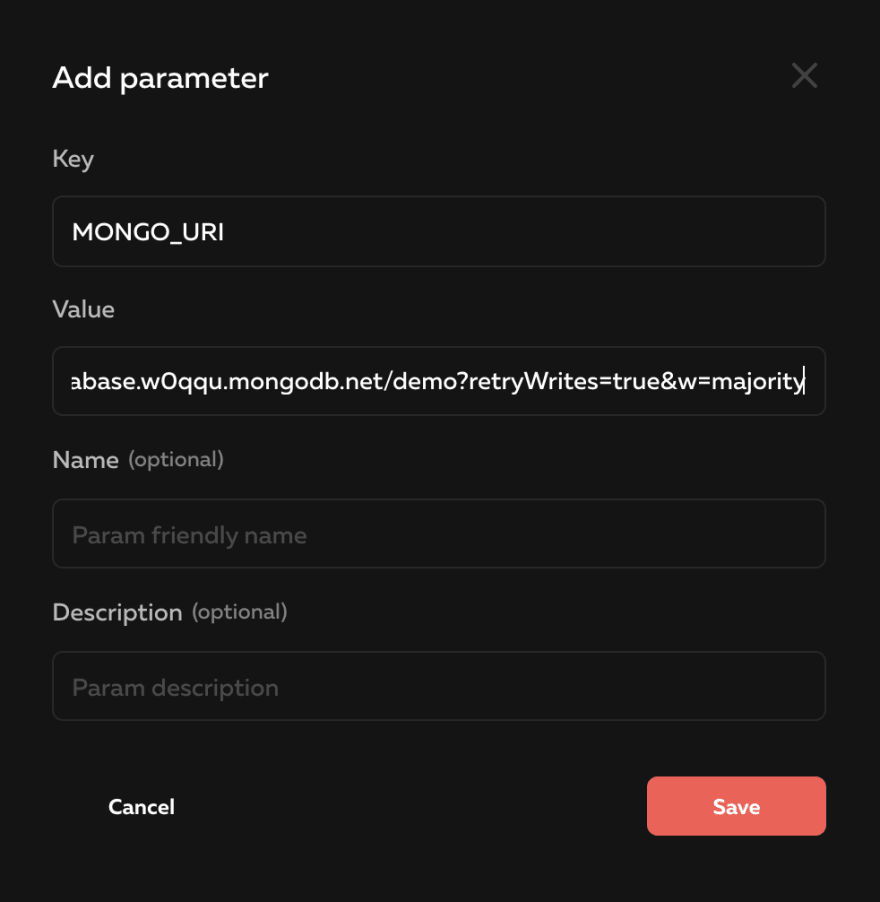
Add the MONGO_URI parameter with your MongoDB connection string
Next, we need to securely connect to your MongoDB database in your apps code using this parameter. Lets do that now.
Connecting the App to the Database
In the root of the application that was generated, create a new mongo.js file with the following code snippet.
All youre doing here is importing the official MongoDB NPM package, connecting to your database by using the serverless parameter you added above, and exporting the users collection to be used by your application. Dont worry too much about the database and collection names, as they get created automatically if they dont exist.
You can now import this mongo.js file into your application and use all the mongodb collection methods youre familiar with. To try this, open the index.js file, remove the references to Serverless Data, and replace it with the following code snippet that uses MongoDB by importing the users collection we just exported. Well insert some data into the database and query for the response.
If you visit your developer sandbox URL (type url in the shell if you need this again), you should get a response similar to this:
And the more requests you make, the more data is inserted into the database and returned. So congratulations! Youve successfully connected to your MongoDB database from Serverless Cloud.
Publishing to Production
When youre ready to publish your Serverless Cloud app to production, simply type deploy production in the interactive shell. This will deploy a production-optimized version of your app into a new isolated environment with its own URL. Now you can continue to work in your developer sandbox without affecting your production environment. However, the MONGO_URI you set up before is still pointing to the database and collection we set up earlier. If you want to use separate databases and/or collections for your production instance, we can override the MONGO_URI parameter just for that environment!
Go back to your apps dashboard in the browser (or type open in the shell). Click on the Instances tab and then click on the production instance. Click the Parameters tab and then Override on the MONGO_URI parameter. Here you can enter the connection string for your production MongoDB instance. And just like that, you have separate databases for your development and production environments.
Summary
In this article, youve seen how easy it is to use Serverless Cloud with MongoDB. Youve learned how to create a Serverless Cloud app, how to create a MongoDB database using MongoDB Atlas, and how to connect your Serverless Cloud app to your MongoDB database securely using Parameters. The complete example app can be found in the examples repo, and more information about Serverless Cloud can be found in the docs. If you have any questions, feel free to reach out on Twitter.
Original Link: https://dev.to/goserverless/making-an-automatic-spotify-playlist-with-serverless-cloud-and-slack-3b8n
Dev To
More About this Source Visit Dev To