
An Interest In:
Web News this Week
- April 25, 2024
- April 24, 2024
- April 23, 2024
- April 22, 2024
- April 21, 2024
- April 20, 2024
- April 19, 2024
Some of Our Sources
- Techcrunch
- Technology Review
- Simplebits
- Spoon Graphics
- Six Revisions
- Creative Curio
- Fudge Graphics
- Android Headlines
- Daily Now
- TechPowerUp
Help Webnuz
Referal links:
SHA-256 Encryption - VSCode to GitHub
TLTR (Too Long Too Read)
G3t $t@rt3d W!th $$H (Get Started With SSH)
With privacy so critical today, having end to end encryption is such a MUST have.
So just a brief overview before we get into it. This blog posting is meant for someone that is interested in Encryption and was curious about it. This documentation was also made to help me figure out how to encrypt my connection between Github and my workstation (Computer) while not exposing my connections; data - information (personal or business, or public, private) to the outside world. This would also include any pictures, videos, media files from encrypted connections.
Basic knowledge questions and answers most ask.
- What is SHA256?
- SSH Encryption?
SSH Encryption
The Secure Shell Hash Protocol (SSH) is a cryptographic network protocol for operating network services securely over an unsecured network. This network communication protocol that enables two computers, cell phones, etc to communicate and share data over the web or between devices or hardware.
Is meant to connect those devices without someone being able to eavesdrop communications between the 2 devices that are connected to one another. Also known as the man in the middle. That is how Man-in-the-middle attacks are done. More on that later.
SHA256
"SHA-256 Algorithm" SHA stands for Secure Hash Algorithm. The significance of the 256 in the name is the hash value that will always be 256 bits. Without going too deep into the subject, feel free to scroll to the bottom and check out the sites i've referenced for more information.
Is today's industries standard for data encyption among clients and servers, peer-to-peer, end-to-end applications and phone apps. And is a must have for any real project that involves others private information.
Some of the standout features of the SHA algorithm are as follows:
Message Length:
The length of the cleartext should be less than 264 bits. The size needs to be in the comparison area to keep the digest as random as possible.
Digest Length:
The length of the hash digest should be 256 bits in SHA 256 algorithm, 512 bits in SHA-512, and so on. Bigger digests usually suggest significantly more calculations at the cost of speed and space.
Irreversible:
By design, all hash functions such as the SHA 256 are irreversible. You should neither get a plaintext when you have the digest beforehand nor should the digest provide its original value when you pass it through the hash function again.
SALT Encryption
One encryption that doesn't get much love is SALT encryption. Ever wonder if your passwords that you are entering onto sites really safe? Some of the best sites will have Salt Encryption implemented on their platform. Instead of inputting you password and being saved onto a database or server just as you are inputting it.
Is added to your password and hashed into a more complicated password and saved onto a database or server. This is for all passwords, but can also be used for other applications.
SALT is made up of random bits added to each password instance before its hashing. SALTS create unique passwords even in the instance of two users choosing the same passwords. SALTS help us mitigate hash table attacks by forcing attackers to re-compute them using the salts for each user.
See the diagram below.

Windows 10 How-To
This is a brief overview of how I was able to get going with SSH. I started having problems when I was trying to add and find SSH keys on my workstation. After figuring it out and making everything work, I figured I'd add this documentation for anybody else that may need it also.
PREREQUISITIES
Thanks to our lovely friends at Microsoft, they have a funny way of controlling our computers through window-updates. I hate this control they have on us! Let's see if they disabled OpenSSH Authentication Agent and OpenSSH SSH Server in our services.msc file in Windows 10 or Any Windows for that matter, or if its activated.
Inside Powershell Terminal type:
Get-Service ssh-agent
You should see this:
Status Name DisplayName------ ---- -----------Running ssh-agent OpenSSH Authentication Agent
Check your Status to see if on your end it is Disabled, Running or Automatic. We want it to show Running and/or Running.
If you have it disabled or If you are getting an error unable to start ssh-agent service, error :1058, just follow the link here to see how to activate it.
If everything checks out as Activated or Running continue to the next steps.
MAKE SURE TO READ EVERYTHING ONCE BEFORE YOU START, TO GET A BRIEF OVERVIEW OF WHAT YOU WILL BE DOING, THEN WHEN YOU NEED TO, COME BACK TO REFERENCE IT STEP BY STEP.
From Your Workstation To GitHub
STEP 1
Open an Administrative Powershell Terminal, this will be directed into your ROOT of your workstation. Inside Terminal type:
(Open Powershell Terminal) - Inside Windows 10
- Hit Windows Start Button
- Type
powershell - Open as administrator
Type this in Powershell Terminal:
ssh-keygen -t ed25519 -C "[email protected]"
This creates a new SSH key, using the provided email as a label. It will say something like this:
Generating public/private ed25519 key pair.
When you're prompted to "Enter a file in which to save the key," press Enter. This accepts the default file location.
Before you do, you can enter a profile name here if you like, or just leave it blank. It is wise however to make a profile for this SSH Key you are about to make so in the event of an issue you can back track your mistakes. This is an example below:
> Enter a file in which to save the key (C:\Users\Workstation/.ssh/id_ed25519):[Press Enter]
At the prompt, type a secure passphrase. I use a strong password generator for all my passwords. Easy press of a button and it will generate 1-1000 random alphabet or special character password. Giving me the ability to copy and paste into places that require new passwords or revised passwords. This is what your Powershell Terminal should show you:
> Enter passphrase (empty for no passphrase): [Type a passphrase]
> Enter same passphrase again: [Type passphrase again]
Verifying your SSH key(s)
STEP 2
Once we generate our new SSH Key, they need to be verified they exist. This can be done in 2 ways. One way can be done by searching your folders, it will be saved into C:/Users/Workstation/.ssh folder.
Now if you try looking for that folder, chances are it will be invisible. And if that is the case, you will need to open up folder options within Windows 10 and give yourself access to see those hidden folders & files. If you need help with that, [go here](https://dev.to/jasoncruzdev/revealing-your-hidden-folders-in-windows-10-15jl).
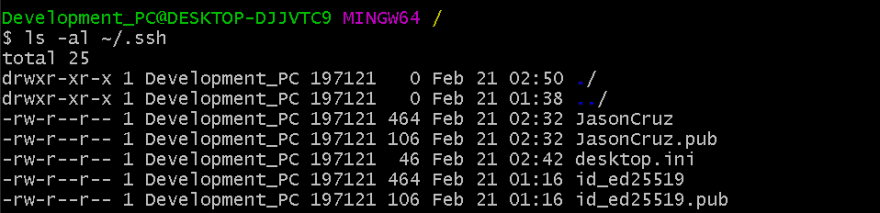
Inside your /.ssh folder, you should have 2 files inside there if this is your first time generating ssh-keys. They will look like this:

The best way this should be done is by using your GitBash If you dont have GitBash, go download it!
- Open up your GitBash but not as an Administrator
- Next type
ls -al ~/.ssh
This will show you a list the files in your /.ssh directory, if they do exist. Check the directory listing to see if you already have a public SSH key. By default, the filenames of supported public key pairs for GitHub are one of the following listed below:
- *id_rsa * This is a Private SSH Key
id_rsa.pub This is a Public SSH Key
*id_ecdsa * This is a Private SSH Key
*id_ecdsa.pub * This is a Public SSH Key
id_ed25519 This is a Private SSH Key
id_ed25519.pub This is a Public SSH Key
If you don't have a supported public and private key pair, or don't wish to use any that are available, generate a new SSH key with the correct credentials. And repeat this step.
If you see an existing private and public key pair listed (for example, id_rsa and id_rsa.pub) that you would like to use to connect to GitHub, you can add the private SSH key to the ssh-agent.
Adding your SSH Key to your SSH-AGENT (Your Workstation)
STEP 3
What is the ssh-agent?
The SSH-AGENT is a helper program that keeps track of user's identity keys and their passphrases. The agent can then use the keys to log into other servers without having the user type in a password or passphrase again. This implements a form of single sign-on (SSO).
Let's start by using the GitBash Teminal:
Type ls -al ~/.ssh
As an example you should see something like the picture below:
If you do, GREAT!
Let's move on..
Adding your Public SSH Key to Github
STEP 4
- LOGIN on to your GitHub Account
Go to SETTINGS
Under Access go to SSH and GPG Keys

- Once there, click on the green button that says NEW SSH KEY.

- Add a
New Title- Like Private Laptop, etc - Under Key, either copy and paste your public code or drag and drop the id_ed25519.pub inside the comment section.
If you would like to find out how to access that code on that id_ed25519.pub file, you can either use VS Code to open it, or drag and drop into the Chrome Browser, either one will tell you what is on that file.`
After you have finished adding a new SSH key to GitHub. Now we will add it to our SSH-AGENT and you can test your connection afterward. Please note, when you test your connection, you'll need to authenticate this action using the password you initially used to setup your SSH Keys.
- Open POWERSHELL
- Access your folder with the SSH keys
C:\Users\<username>/.ssh/, now look for the name of the ssh key you just created. - Inside PowerShell Terminal type
ssh-add .\<private-key>In my case, I will inputssh-add .\id_ed25519
Now verify the SSH-Key was inputted correctly.
- Inside your PowerShell Terminal type
ssh-add -l -E sha256
If done correctly, it will print this out: 256 SHA256:<ssh-key> [email protected] (ED25519)
( will be your own unqiuq ssh key you recieved when creating the ssh-keys, and your email will be the one you use to create a new ssh-key.
Connecting to Github
STEP 5
Now we need to connect GitHub with your workstation. Lets do this first by:
Access your PowerShell Terminal and enter:
- Enter the following:
ssh -T [email protected]
You may see a warning like this:
The authenticity of host 'github.com (IP ADDRESS)' can't be established.RSA key fingerprint is SHA256:nThbg6kXUpJWGl7E1IGOCspRomTxdCARLviKw6E5SY8.Are you sure you want to continue connecting (yes/no)?
Now for this to work properly, you have to be 100% sure that the steps you did, were correct to both your workstation and on GitHub. If you get your SSH Keys switched or crossed you will get tons of errors. So save yourself from this headache.
When you are asked Are you sure you want to continue connecting (yes/no)? answer yes
Once it connects, that error will be different if you try it again. Because what happens here is that it was overwritten by the new SSH-Key. Now you can connect to GitHub with your workstation.
The next trick kids is getting your VSCode to automatically connect to GitHub soon as you open VSCoode! Its awesome when all the bells and whistles are working as they should be.
Let me know how you this post helped you, and or if there is anything i can do to add to this for easier reference for others to follow.
References:
SHA256 Encryption
SSH - Secure Shell
OpenSSH
Salt Encryption
Github Authentication Docs
Current News:

Original Link: https://dev.to/jasoncruzdev/sha-256-3nrypt0n-h0w-t0-2755
Dev To
More About this Source Visit Dev To