
An Interest In:
Web News this Week
- March 29, 2024
- March 28, 2024
- March 27, 2024
- March 26, 2024
- March 25, 2024
- March 24, 2024
- March 23, 2024
Some of Our Sources
- Technology Review
- Just Creative
- Smashing Magazine
- Abduzeedo
- Web Designer Depot
- FanExtra - PSD
- CSS Globe
- 24 Ways
- CSS Tricks
- Android Dissected
Help Webnuz
Referal links:
Create a Reddit clone with RedwoodJS
Redwood is an opinionated full-stack javascript web application framework. It is also serverless-ready, meaning it can be deployed on the edge with services like AWS Lambda and Cloudflare Workers. Redwood is super opinionated. It decides your project/directory structure, it decides the frameworks and libraries you use, and it configures everything for you. Some may see a downside to this, but if you're experienced with Redwood's choosing of frameworks, you will have a pleasant time using Redwood.
Redwood was created by Tom Preston-Werner. You may have heard of him before, because he is the guy behind
- Github, which is the most popular code host
- Jekyll, a ruby-based static-site generator
- Gravatar, a very popular avatar service
- Semver, the semantic versioning system
- TOML, a configuration language, like JSON or YAML, and much more.
Prerequisites
- Redwood uses React for the frontend framework, so you'll need to know React.
- Redwood uses GraphQL instead of REST APIs, so knowledge of that is required. You can learn it on the official website.
- Redwood uses Prisma for interacting with databases, but it's very easy to use, and you can pick it up from this tutorial itself. Prisma works with SQL databases.
- A Postgres database running. You can either have the Postgres server installed, or use Docker. I'll be doing the latter in this tutorial.
- There are various other libraries used like Jest and Storybook, but these are not needed to follow this tutorial.
- I'll be using TypeScript in this tutorial, but feel free to use plain JavaScript. Just be sure to remove any code that is TypeScript-specific.
There are also a few things you'll need installed on your computer:
- NodeJS v14 or higher. I'll be using v16. (Psst: For an easy way to manage versions of NodeJS and many others, try https://asdf-vm.com).
- The Yarn Package Manager installed. Redwood leverages yarn workspaces, so yarn is needed. You can install it using
npm i -g yarn. - A powerful code editor like VSCode or (Neo)Vim. If you're using VSCode, be sure to install the Redwood extension.
Step 0 Creating your Redwood app
Open an empty folder in your favorite IDE and run the below command in the terminal.
yarn create redwood-app .If you're like me however, and you've fallen in love with TypeScript, you can create a Redwood typescript app by adding the --typescript flag to the above command like so:
yarn create --typescript redwood-app .If you want to convert an existing Redwood project to TypeScript, you can run
yarn rw setup tsconfigand change your.jsfiles to.ts.
Now open the project in your favorite IDE. I'll use VSCode in this tutorial, since Redwood has first-class support for it. Launch the editor and open the folder, or just run code . in the terminal.
You may be prompted to install recommended extensions, so feel free to install them all, or just some if you don't need certain extensions (like Gitlens, in my case).
Step 1 Getting to know your project
Let's take a look at the project structure.
There are a few files in the root project. Most of them are configuration files, like jest.config.js. Let's take a look at a specific file called redwood.toml.
[web] title = "Redwood App" port = 8910 apiUrl = "/.redwood/functions" # you can customise graphql and dbauth urls individually too: see https://redwoodjs.com/docs/app-configuration-redwood-toml#api-paths includeEnvironmentVariables = [] # any ENV vars that should be available to the web side, see https://redwoodjs.com/docs/environment-variables#web[api] port = 8911[browser] open = trueRedwood recommends so many extensions, but not a TOML one! Install this extension for VSCode for TOML highlighting.
If you're unfamiliar with TOML syntax, don't worry, I'll guide you through the config. For now, let's change the port of both the [web] and [api] projects to 3000 and 5000 respectively.
Where your code lives
There are many directories, but the main two directories are web, and api. This is where your Redwood code lives. As the name suggests, web is the frontend project, and api is the backend project.
These two directories are actually their own projects, and Redwood uses Yarn Workspaces to link these two folders together.
Inside the web folder:
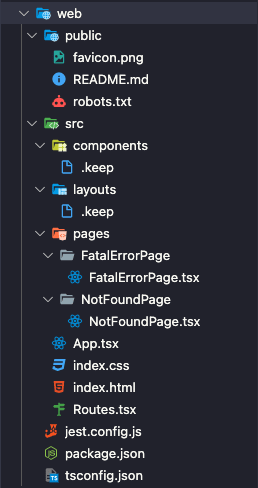
The web folder is a regular ol' React application. If you know react, you should be able to read through the structure of this directory. There are just a few things that are different. In the src folder, you can see three more subfolders, components, layouts and pages. The components folder holds any re-usable React components. The layouts folder holds page layouts, which are also React components, and the pages folder, which contains React components mapped to routes.
What is a
.keepfile?.keepfiles are just files that are placed in empty directories so they get committed to a git project. Git doesn't commit empty folders, so.keepfiles are created to make the folder not empty, and hence, get it committed. These.keepfiles don't even have to be called.keep, they can be called anything else, but by convention, they're called.keepand.gitkeep.
Inside the api folder:

The api folder is the backend server. This is running fastify under the hood, which is just a faster backend server than express. There are a few config files, and there are three subdirectories.
The db folder contains the schema.prisma file, which is the schema for your database models that is used by Prisma ORM.
The src folder contains all of your source code for the backend.
From the redwood documentation:
directiveswill contain GraphQL schema directives for controlling access to queries and transforming values.functionswill contain any lambda functions your app needs in addition to thegraphql.jsfile auto-generated by Redwood. This file is required to use the GraphQL API.graphqlcontains your GraphQL schema written in a Schema Definition Language (the files will end in.sdl.js).libcontains a few files:auth.jsstarts as a placeholder for adding auth functionality and has a couple of bare-bones functions in it to start,db.jsinstantiates the Prisma database client so we can talk to a database andlogger.jswhich configures, well, logging. You can use this directory for other code related to the API side that doesn't really belong anywhere else.servicescontains business logic related to your data. When you're querying or mutating data for GraphQL (known as resolvers), that code ends up here, but in a format that's reusable in other places in your application.
Start the server:
Let's start the server by running the below command:
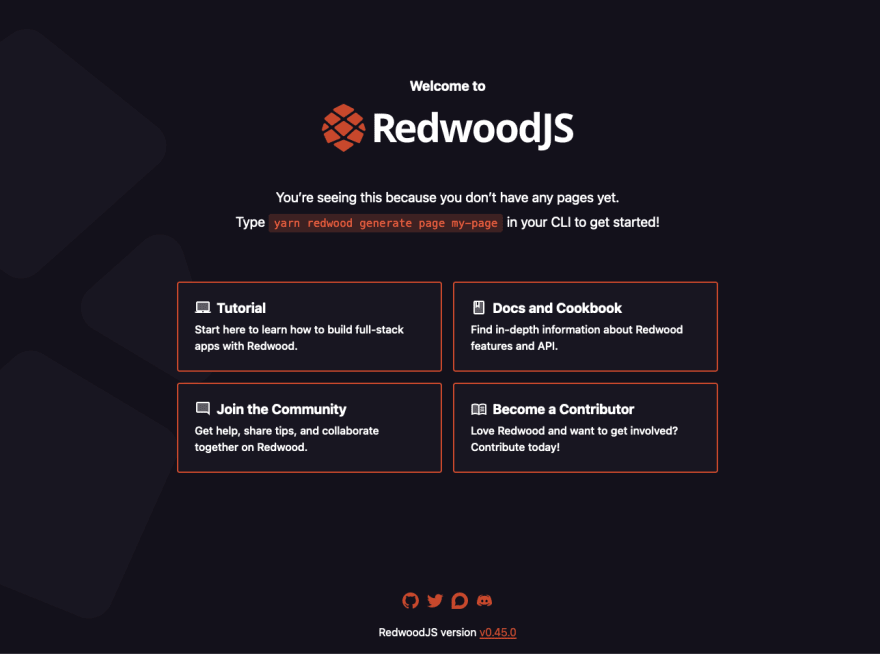
yarn rw devYou should now see your application running on http://localhost:3000, or http://localhost:8911, if you didn't change the port in the config. The backend will run on port 5000, or 8910 if you didn't change the port in the config.
If this is what you see, you've successfully created your redwood project!
Replacing SQLLite with Postgres:
SQLLite is the default database used by Redwood, since it doesn't expect everyone to have a fully-fledged database installed and running on their computer. But SQLLite is a file-system based database, and it also lacks in features when compared to Postgres. A file-system based database isn't the best for production, so let's switch over to Postgres.
Postgres needs to be installed on your computer. You can download it and install it, and have a system-wide install of postgres, or you can use Docker to containerize it, which is easier to do. You'll need docker installed, however, and you can get it from here.
Once docker is running, you can create a postgres container using the command below:
docker run -d -p 5432:5432 --name postgres -e POSTGRES_PASSWORD=YOUR_STRONG_PASSWORD postgresBe sure to replace
YOUR_STRONG_PASSWORDto a strong password, since that will be the password of your root account in postgres.
The above command will run the postgres image as a container, with the name postgres (with the --name flag), adds the environment variable POSTGRES_PASSWORD to it (with the -e flag), exposes port 5432 (postgres' default port) back to the host (with the -p flag) and finally, it runs it in the background with the -d flag.
Now, create a new database in the fresh postgres container you just created. Run the below command to get shell access to the container:
docker exec -it postgres bashIf your shell prompt changed, you now have the ability to run commands directly in the postgres container! Now run the below command to create a new database.
createdb -U postgres NAME_OF_YOUR_DATABASEThe -U postgres flag makes it run as the postgres user, which is the default root user. Change NAME_OF_YOUR_DATABASE to anything you want. In my case, I changed it to reddit, which means that a new database with the name reddit has been created for me. Once that's done, exit out of the shell by typing exit and hitting Enter.
Now that you have a postgres database, you just need to tell Prisma to use it. Open the .env file in the project root and add the below code to it.
DATABASE_URL=postgres://postgres:YOUR_STRONG_PASSWORD@localhost:5432/YOUR_DATABASE_NAMEBe sure to replace YOUR_STRONG_PASSWORD and YOUR_DATABASE_NAME with the relevant values. And finally, change the line that says provider = "sqlite" to provider = "postgresql" in the api/db/schema.prisma.
datasource db { provider = "postgresql" url = env("DATABASE_URL")}Step 2 Creating Prisma models
Prisma models are definitions for how your database tables will look like. They are written in prisma's own model language in the schema.prisma file. If you're not familiar with this syntax, don't fear, since it looks similar to GraphQL syntax, and I'll guide you with it.
Creating the User model
Open the src/db/schema.prisma file in the api project. Let's delete the example UserExample project, and replace it with our own User model.
model User { id String @id @default(cuid()) @db.VarChar(255) username String @unique email String @unique password String @db.VarChar(255) avatarUrl String @map("avatar_url") roles String @default("member") bio String? isBanned Boolean @default(false) @map("is_banned") @@map("users")}If you can't see any syntax highlighting, be sure to install the Prisma extension for VSCode.
What the above Prisma code does, is it creates a model named User. A Prisma model is mapped to a table in the database, which in this case will be users, because of the @@map("users"). These are the fields that will be created:
- An
idfiled, which will be the primary key (denoted by@id). It will be a String with theVarChardatatype in Postgres. SinceVarCharisn't supported by all databases Prisma supports (like MongoDB), we have to use@db.VarCharinstead of directly declaring it as aVarChartype. Theidwill also be a generatedCUIDby default. A CUID is a randomly-generated string, like a UUID. - A
usernameand anemailfield, both of which areStrings and areunique, meaning no two users can have the sameemailorusername. By default, aStringwill be mapped to Postgres'Textdatatype. - A
password, which is aStringin Prisma, but aVarCharin Postgres - An
avatarUrl, which is aString. This will be accessed in JavaScript withavatarUrl, but will be stored in the database asavatar_url, because of@map. I did this because Postgres followssnake_casing, while JavaScript followscamelCasing. - A
roles, which is aString, which will contain a comma-separated string of roles. You could use an array here, but I feel like that would be overkill for a field that would usually only have one role. Alsomemberis the default. - A
bio, which is an optional string (nullable, in database lingo). This is indicated by the?afterString. - And finally,
isBanned, which is aBooleanthat defaults tofalse, and is stored asis_bannedin the database.
Now you need to sync the models to your database. Currently, they're only present in the schema.prisma file. To create the tables in the database, run the below command:
yarn redwood prisma migrate devYou can use the alias
rwinstead ofredwood, and that's what I'll be doing from now on.
Be sure to give it a meaningful name. Treat it like a git commit the name should reflect the changes you've made. In this case, we've created a User model, so I named it add-user-model.
Now your database will have a table called users with all these fields that you just defined.
Creating the Post model
Now it's time to create a model for holding our posts.
model Post { id String @id @default(cuid()) @db.VarChar(255) title String content String hasMedia Boolean @default(false) @map("has_media") mediaUrl String? authorId String @map("user_id") @db.VarChar(255) author User @relation(fields: [authorId], references: [id]) @@map("posts")}You may see a squiggly line under the
authorfield. Don't worry, we'll solve that soon.
The fields in this model are pretty similar to the ones in the User model, except they have different names. There is one odd one out however, and that is authorId. This authorId field will point to the id of the User that created this post, and this is denoted by the author User line. It has an @relation directive that relates the id field of User to the authorId field of Post. Prisma also requires that we include a backref a field on the other table that points back to this one indicating the relation. Since this will be a one-to-many (O2M) relation, i.e. one user can have many posts, the post backref in the User model should be an array. You can denote that by putting square brackets ([]) after the type, just like in regular TypeScript.
model User { id String @id @default(cuid()) @db.VarChar(255) username String @unique email String @unique password String @db.VarChar(255) avatarUrl String @map("avatar_url") roles String @default("member") bio String? isBanned Boolean @default(false) @map("is_banned") post Post[] // Add this line to your User model. This is the backref! @@map("users")}model Post { id String @id @default(cuid()) @db.VarChar(255) title String content String hasMedia Boolean @default(false) @map("has_media") mediaUrl String? authorId String @map("user_id") @db.VarChar(255) author User @relation(fields: [authorId], references: [id]) @@map("posts")}While we're at it, let's also add a Comment model, which will store comments on a post. This model will have two relations both O2M one with the User model, and the other with the Post model.
model User { id String @id @default(cuid()) @db.VarChar(255) username String @unique email String @unique password String @db.VarChar(255) avatarUrl String @map("avatar_url") roles String @default("member") bio String? isBanned Boolean @default(false) @map("is_banned") post Post[] // backref to Post comments Comment[] // backref to Comment @@map("users")}model Post { id String @id @default(cuid()) @db.VarChar(255) title String content String hasMedia Boolean @default(false) @map("has_media") mediaUrl String? authorId String @map("user_id") @db.VarChar(255) author User @relation(fields: [authorId], references: [id]) comments Comment[] // backref to Comment @@map("posts")}// Our comment modelmodel Comment { id String @id @default(cuid()) @db.VarChar(255) content String authorId String @map("user_id") @db.VarChar(255) author User @relation(fields: [authorId], references: [id]) postId String @map("post_id") @db.VarChar(255) post Post @relation(fields: [postId], references: [id]) @@map("comments")}You should notice that the fields that are in a relation have the same type as the field they're in a relationship with. This is important, since they'll be storing the same type of data.
Let's migrate our database! Run the same command as before, and this time, you can give it a name directly in the command line with the --name argument.
yarn rw prisma migrate dev --name add-post-and-comment-modelsWith that, our three basic models have been created. Let's now use them in the Redwood project.
Step 2 Adding authentication to your app
Redwood makes it really easy to add authentication to your application. It handles almost everything that is boring, like sessions and stuff like that.
Let's use the Redwood CLI and sets up authentication for you. Run the below command to do that:
yarn rw setup auth dbAuthThis will setup a local authentication provider that saves your users' credentials on the database. Redwood also supports some authentication-as-a-service providers out-of-the-box, like Auth0 and Magic. Read more about that here.
A few new files have been created. You need to edit these files to make it work with your schema. First, let's edit src/lib/auth.ts. This file contains methods that are used by Redwood under-the-hood to determine if a user is authenticated and authorized to access a resource.
You only need to do one small edit make Redwood read the roles stored in the users table in the hasRole function. But first. let's make the getCurrentUser function return the whole user, instead of just the user's id:
export const getCurrentUser = async (session) => { return await db.user.findUnique({ where: { id: session.id }, })}In the above snippet, I just removed the select {...} from the query so it returns all fields of the user. We can now use this in the hasRole function. Change out the hasRole function to the one below:
export const hasRole = ({ roles }: { roles: AllowedRoles }): boolean => { if (!isAuthenticated()) { return false } // If your User model includes roles, uncomment the role checks on currentUser if (roles) { if (Array.isArray(roles)) { // the line below has changed if (context.currentUser.roles) return context.currentUser.roles .split(',') .some((role) => roles.includes(role)) } if (typeof roles === 'string') { // the line below has changed if (context.currentUser.roles) return context.currentUser.roles.split(',').includes(roles) } // roles not found return false } return true}This code should now check the roles in the database instead of returning false by default.
Adding some fields to the User model:
Redwood gives you a hashedPassword, a salt, a resetToken and a resetTokenExpiresAt to store in your database, but the current User model can only store the password. Let's change that by adding three new fields to the User model by changing the User model in schema.prisma to this:
model User { id String @id @default(cuid()) @db.VarChar(255) username String @unique email String @unique password String @db.VarChar(255) // added the below three lines salt String @db.VarChar(255) resetToken String? @db.VarChar(255) resetTokenExp DateTime? @db.Timestamptz() avatarUrl String @map("avatar_url") roles String @default("member") bio String? isBanned Boolean @default(false) @map("is_banned") post Post[] comments Comment[] @@map("users")}If you were messing around and created a few users, your migration will fail because
saltis empty, andsaltis not allowed to be empty. So, just add@default("")to thesaltfield in the schema to ensure that already-existing users won't havenullvalues for required fields.
Next, migrate with the below command:
yarn rw prisma migrate dev --name add-fields-to-userOf course, you can use your own migration name.
Next, you'll need to generate types so Redwood knows about the new User.
yarn rw generate typesAnd finally, you need to restart the dev server. Press Ctrl+C (maybe twice) to stop the current running dev server and run yarn rw dev to start it again.
Configuring authentication:
There are just a few final changes you need to make to the src/functions/auth.ts file, such as setting an avatarUrl. For the avatarUrl, we'll use Gravatar, which is a popular avatar service. For that, you just need to use the below URL as the avatarUrl
https://gravatar.com/avatar/EMAIL_HASH?d=mp&s=64The EMAIL_HASH should be an md5 hash of the user's email. For generating an md5 hash, let's install the md5 package (along with its typescript definitions) with the below commands:
yarn workspace api add md5 && yarn workspace api add -D @types/md5We're using
workspace api addinstead of justaddbecause there are two workspaces here, and we just want to addmd5to theapifolder, not thewebfolder.
Now, let's change the src/functions/auth.ts file to make sure it works with our requirements:
import { db } from 'src/lib/db'import { DbAuthHandler } from '@redwoodjs/api'import md5 from 'md5'export const handler = async (event, context) => { const forgotPasswordOptions = { // handler() is invoked after verifying that a user was found with the given // username. This is where you can send the user an email with a link to // reset their password. With the default dbAuth routes and field names, the // URL to reset the password will be: // // https://example.com/reset-password?resetToken=${user.resetToken} // // Whatever is returned from this function will be returned from // the `forgotPassword()` function that is destructured from `useAuth()` // You could use this return value to, for example, show the email // address in a toast message so the user will know it worked and where // to look for the email. handler: (user) => { return user }, // How long the resetToken is valid for, in seconds (default is 24 hours) expires: 60 * 60 * 24, errors: { // for security reasons you may want to be vague here rather than expose // the fact that the email address wasn't found (prevents fishing for // valid email addresses) usernameNotFound: 'Email not found', // if the user somehow gets around client validation usernameRequired: 'Email is required', }, } const loginOptions = { // handler() is called after finding the user that matches the // username/password provided at login, but before actually considering them // logged in. The `user` argument will be the user in the database that // matched the username/password. // // If you want to allow this user to log in simply return the user. // // If you want to prevent someone logging in for another reason (maybe they // didn't validate their email yet), throw an error and it will be returned // by the `logIn()` function from `useAuth()` in the form of: // `{ message: 'Error message' }` handler: (user) => { return user }, errors: { usernameOrPasswordMissing: 'Both email and password are required', usernameNotFound: 'Email ${username} not found', // For security reasons you may want to make this the same as the // usernameNotFound error so that a malicious user can't use the error // to narrow down if it's the username or password that's incorrect incorrectPassword: 'Incorrect password for ${username}', }, // How long a user will remain logged in, in seconds expires: 60 * 60 * 24 * 365 * 10, } const resetPasswordOptions = { // handler() is invoked after the password has been successfully updated in // the database. Returning anything truthy will automatically logs the user // in. Return `false` otherwise, and in the Reset Password page redirect the // user to the login page. handler: (user) => { return user }, // If `false` then the new password MUST be different than the current one allowReusedPassword: true, errors: { // the resetToken is valid, but expired resetTokenExpired: 'resetToken is expired', // no user was found with the given resetToken resetTokenInvalid: 'resetToken is invalid', // the resetToken was not present in the URL resetTokenRequired: 'resetToken is required', // new password is the same as the old password (apparently they did not forget it) reusedPassword: 'Must choose a new password', }, } const signupOptions = { // Whatever you want to happen to your data on new user signup. Redwood will // check for duplicate usernames before calling this handler. At a minimum // you need to save the `username`, `hashedPassword` and `salt` to your // user table. `userAttributes` contains any additional object members that // were included in the object given to the `signUp()` function you got // from `useAuth()`. // // If you want the user to be immediately logged in, return the user that // was created. // // If this handler throws an error, it will be returned by the `signUp()` // function in the form of: `{ error: 'Error message' }`. // // If this returns anything else, it will be returned by the // `signUp()` function in the form of: `{ message: 'String here' }`. handler: (payload) => { const { username: email, hashedPassword, salt, userAttributes } = payload return db.user.create({ data: { email, password: hashedPassword, avatarUrl: `https://gravatar.com/avatar/${md5(email)}?d=mp&s=64`, salt: salt, username: userAttributes.name, }, }) }, errors: { // `field` will be either "username" or "password" fieldMissing: '${field} is required', usernameTaken: 'Email `${username}` already in use', }, } const authHandler = new DbAuthHandler(event, context, { // Provide prisma db client db: db, // The name of the property you'd call on `db` to access your user table. // ie. if your Prisma model is named `User` this value would be `user`, as in `db.user` authModelAccessor: 'user', // A map of what dbAuth calls a field to what your database calls it. // `id` is whatever column you use to uniquely identify a user (probably // something like `id` or `userId` or even `email`) authFields: { id: 'id', username: 'email', hashedPassword: 'password', salt: 'salt', resetToken: 'resetToken', resetTokenExpiresAt: 'resetTokenExp', }, forgotPassword: forgotPasswordOptions, login: loginOptions, resetPassword: resetPasswordOptions, signup: signupOptions, }) return await authHandler.invoke()}All I did above was change the hashedPassword field to password, and the username field to email. I also replaced instances of Username in messages to Email, and I added the avatarUrl field.
Adding login and signup pages
Let's add login and signup pages to the frontend. Redwood makes this really easy by providing a generator for us. Run the below command to create a login page, a signup page, and a forgot and reset password page.
yarn rw g dbAuthI will delete the ForgotPassword and ResetPassword pages, since I won't be adding that functionality to this project.
Next, you need to replace the username field in both Login and SignUp to email, and in SignUp, add a new field called username. I've done it below and here's how your code should look like:
// Routes.tsximport { Router, Route } from '@redwoodjs/router'const Routes = () => { return ( <Router> <Route path="/login" page={LoginPage} name="login" /> <Route path="/signup" page={SignupPage} name="signup" /> <Route notfound page={NotFoundPage} /> </Router> )}export default Routes// LoginPage.tsximport { Link, navigate, routes } from '@redwoodjs/router'import { useRef } from 'react'import { Form, Label, TextField, PasswordField, Submit, FieldError,} from '@redwoodjs/forms'import { useAuth } from '@redwoodjs/auth'import { MetaTags } from '@redwoodjs/web'import { toast, Toaster } from '@redwoodjs/web/toast'import { useEffect } from 'react'const LoginPage = () => { const { isAuthenticated, logIn } = useAuth() useEffect(() => { if (isAuthenticated) { navigate(routes.home()) } }, [isAuthenticated]) const emailRef = useRef<HTMLInputElement>() useEffect(() => { emailRef.current.focus() }, []) const onSubmit = async (data) => { const response = await logIn({ ...data }) if (response.message) { toast(response.message) } else if (response.error) { toast.error(response.error) } else { toast.success('Welcome back!') } } return ( <> <MetaTags title="Login" /> <main className="rw-main"> <Toaster toastOptions={{ className: 'rw-toast', duration: 6000 }} /> <div className="rw-scaffold rw-login-container"> <div className="rw-segment"> <header className="rw-segment-header"> <h2 className="rw-heading rw-heading-secondary">Login</h2> </header> <div className="rw-segment-main"> <div className="rw-form-wrapper"> <Form onSubmit={onSubmit} className="rw-form-wrapper"> <Label name="username" className="rw-label" errorClassName="rw-label rw-label-error" > Email </Label> <TextField name="username" className="rw-input" errorClassName="rw-input rw-input-error" ref={emailRef} validation={{ required: { value: true, message: 'Email is required', }, }} /> <FieldError name="username" className="rw-field-error" /> <Label name="password" className="rw-label" errorClassName="rw-label rw-label-error" > Password </Label> <PasswordField name="password" className="rw-input" errorClassName="rw-input rw-input-error" autoComplete="current-password" validation={{ required: { value: true, message: 'Password is required', }, }} /> <FieldError name="password" className="rw-field-error" /> <div className="rw-button-group"> <Submit className="rw-button rw-button-blue">Login</Submit> </div> </Form> </div> </div> </div> <div className="rw-login-link"> <span>Don't have an account?</span>{' '} <Link to={routes.signup()} className="rw-link"> Sign up! </Link> </div> </div> </main> </> )}export default LoginPageimport { Link, navigate, routes } from '@redwoodjs/router'import { useRef } from 'react'import { Form, Label, TextField, PasswordField, FieldError, Submit,} from '@redwoodjs/forms'import { useAuth } from '@redwoodjs/auth'import { MetaTags } from '@redwoodjs/web'import { toast, Toaster } from '@redwoodjs/web/toast'import { useEffect } from 'react'const SignupPage = () => { const { isAuthenticated, signUp } = useAuth() useEffect(() => { if (isAuthenticated) { navigate(routes.home()) } }, [isAuthenticated]) // focus on email box on page load const emailRef = useRef<HTMLInputElement>() useEffect(() => { emailRef.current.focus() }, []) const onSubmit = async (data) => { const response = await signUp({ ...data }) if (response.message) { toast(response.message) } else if (response.error) { toast.error(response.error) } else { // user is signed in automatically toast.success('Welcome!') } } return ( <> <MetaTags title="Signup" /> <main className="rw-main"> <Toaster toastOptions={{ className: 'rw-toast', duration: 6000 }} /> <div className="rw-scaffold rw-login-container"> <div className="rw-segment"> <header className="rw-segment-header"> <h2 className="rw-heading rw-heading-secondary">Signup</h2> </header> <div className="rw-segment-main"> <div className="rw-form-wrapper"> <Form onSubmit={onSubmit} className="rw-form-wrapper"> <Label name="username" className="rw-label" errorClassName="rw-label rw-label-error" > Email </Label> <TextField name="username" className="rw-input" errorClassName="rw-input rw-input-error" ref={emailRef} validation={{ required: { value: true, message: 'Email is required', }, }} /> <FieldError name="username" className="rw-field-error" /> <Label name="name" className="rw-label" errorClassName="rw-label rw-label-error" > Username </Label> <TextField name="name" className="rw-input" errorClassName="rw-input rw-input-error" ref={emailRef} validation={{ required: { value: true, message: 'Username is required', }, }} /> <FieldError name="name" className="rw-field-error" /> <Label name="password" className="rw-label" errorClassName="rw-label rw-label-error" > Password </Label> <PasswordField name="password" className="rw-input" errorClassName="rw-input rw-input-error" autoComplete="current-password" validation={{ required: { value: true, message: 'Password is required', }, }} /> <FieldError name="password" className="rw-field-error" /> <div className="rw-button-group"> <Submit className="rw-button rw-button-blue"> Sign Up </Submit> </div> </Form> </div> </div> </div> <div className="rw-login-link"> <span>Already have an account?</span>{' '} <Link to={routes.login()} className="rw-link"> Log in! </Link> </div> </div> </main> </> )}export default SignupPageNotice how I've only changed the text but not the
nameof the inputs? This is because under-the-hood, Redwood still expects yourusername.
For one final step, let's add a home page so we don't have to see the Redwood logo anymore. Use the below command to generate an index page at /.
yarn rw g page home /This command will generate a page called home, but map it to /, instead of /home. Change the code of the newly created HomePage.tsx to this:
import { MetaTags } from '@redwoodjs/web'const HomePage = () => { return ( <> <MetaTags title="Redwoodit" description="A clone of Reddit using RedwoodJS" /> <h1>Redwoodit</h1> </> )}export default HomePageAnd with that, you've added authentication to your Redwood application.
If you visit http://localhost:3000/signup, you can create an account and if you visit http://localhost:3000/login, you can log in to an account.
Conclusion
You've successfully created a Redwood application and added authentication to it. In the next part of this tutorial, you will add support for fetching, creating, updating and deleting posts and comments. If you've gotten stuck anywhere, be sure to check out the source code, the Redwood documentation, or ask in the Redwood Discord/Discourse Forums for help.
Stay tuned for Part 2!
Original Link: https://dev.to/arnu515/create-a-reddit-clone-with-redwoodjs-pcp
Dev To
More About this Source Visit Dev To