
An Interest In:
Web News this Week
- April 19, 2024
- April 18, 2024
- April 17, 2024
- April 16, 2024
- April 15, 2024
- April 14, 2024
- April 13, 2024
Some of Our Sources
- Joshua Blankenship
- The Logo Smith
- Naldz Graphics
- FanExtra - PSD
- Fudge Graphics
- Reencoded
- Line 25
- Wal You
- The Verge
- TechPowerUp
Help Webnuz
Referal links:
AWS CLI - do it right
This time something easier. This time I show how to install AWS CLI 2, add autocompletion and possibility to use MFA from command line.
Simple doesn't mean short, however :) Also, the complexity of what will be done is growing through the tutorial.
We will go through the whole process of preparing our CLI to work with reasonably secure way. All these steps might be found on AWS documentation, but in multiple documents. I used AWS documentation to check myself during work on this tutorial :)
What it is about then?
- First, we will create an user which we will use in the tutorial
- We will install AWS CLI
- And verify it with gpg
- We will add auto-completion to make our lives easier
- Then we will enable MFA for our user
- And on the end we change almost everything to make it right.
So, let's get started!
IAM
First, we need to create a user with MFA enabled.
I created standard user, I called him clitest (very creative) and I enabled programmatic access only. To do it, go to IAM, click Users menu and Create user.

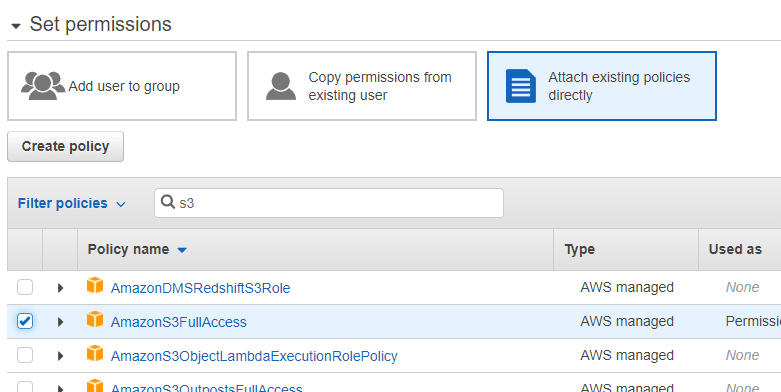
For this tutorial I attached the policy directly to the newly created user, but DO NOT DO IT IN REAL WORLD! This user here is a prerequisite and we do not use it in real work. Maybe I'll write tutorial with best practices about users :)
On the end of the user create process, I copied the credentials.
Ok, user is created. Navigate to his configuration, click Security credentials tab and now it is time to enable MFA.
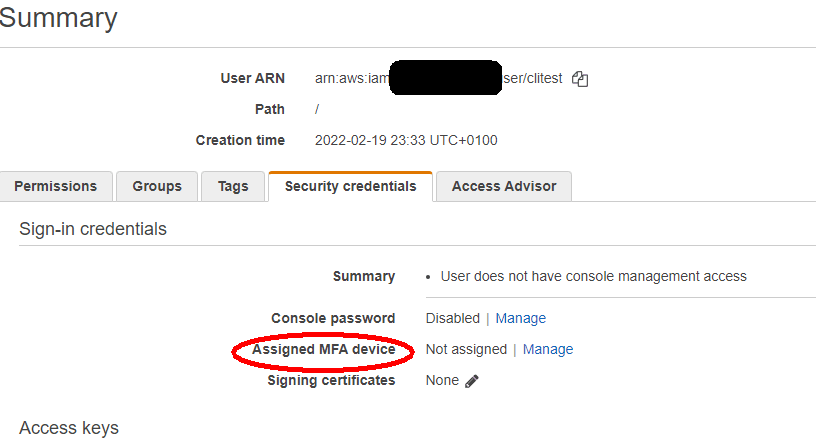
The process is quite simple. Click Manage next to the setting called Assigned MFA device (the red oval on the screen above).
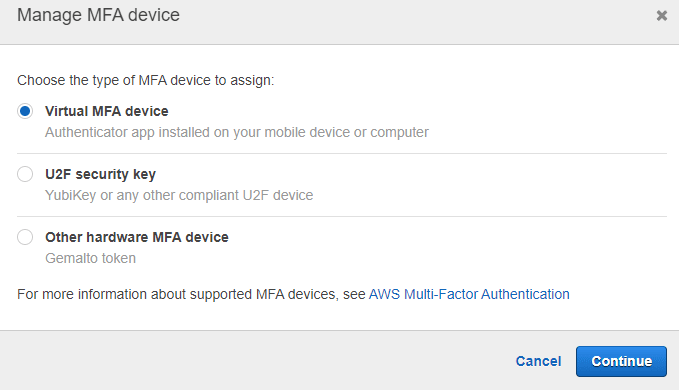
With Virtual MFA device the process is almost instant. It is required that you have some MFA app installed (on your phone, not your laptop, where you usually login to the service; this should be a Multifactor Authentication!). There are many applications which can be used. Google Authenticator, Duo, to name two of them.
So, select Virtual MFA device, and click Continue.

Here we can see what is needed. Installation of compatible app (and list of these apps is provided to you by AWS), then open your app, scan the code, and put two number sequences into proper fields. Done!
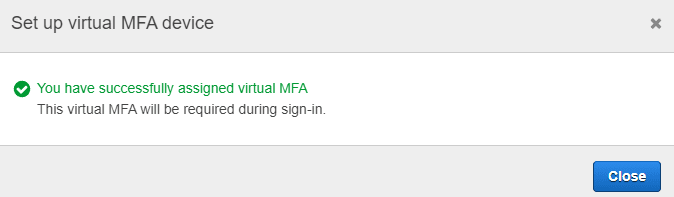
So, we have created IAM User with MFA enabled.
It is time to...
Instal AWS CLI
In this tutorial I show how to install AWS CLI on Linux. In fact, CLI can be installed on Mac (with brew or from command line) or Windows (with Chocolatey or from Powershell), or as a Python package (with pip) as well.
First, we need to download the package. Please remember, we work on the latest version here. Commands might be different when specific version is in scope.
curl "https://awscli.amazonaws.com/awscli-exe-linux-x86_64.zip"Before we unzip the file, we will do...
Integrity verification
We do it to make sure that this is valid and proper package. We will verify the PGP signature of downloaded file with the one provided by AWS.
I assume you have gpg installed, if not, please install it. First, we need to create public key file using the snippet provided by AWS. So, we simply create a text file and paste there this code:
-----BEGIN PGP PUBLIC KEY BLOCK-----mQINBF2Cr7UBEADJZHcgusOJl7ENSyumXh85z0TRV0xJorM2B/JL0kHOyigQluUGZMLhENaG0bYatdrKP+3H91lvK050pXwnO/R7fB/FSTouki4ciIx5OuLlnJZIxSzxPqGl0mkxImLNbGWoi6Lto0LYxqHN2iQtzlwTVmq9733zd3XfcXrZ3+LblHAgEt5GTfNxEKJ8soPLyWmwDH6HWCnjZ/aIQRBTIQ05uVeEoYxSh6wOai7ss/KveoSNBbYzgbdzoqI2Y8cgH2nbfgp3DSasaLZEdCSsIsK1u05CinE7k2qZ7KgKAUIcT/cR/grkC6VwsnDU0OUCideXcQ8WeHutqvgZH1JgKDbznoIzeQHJD238GEu+eKhRHcz8/jeG94zkcgJOz3KbZGYMiTh277Fvj9zzvZsbMBCedV1BTg3TqgvdX4bdkhf5cH+7NtWOlrFj6UwAsGukBTAOxC0l/dnSmZhJ7Z1KmEWilro/gOrjtOxqRQutlIqG22TaqoPGfYVN+en3Zwbt97kcgZDwqbuykNt64oZWc4XKCa3mprEGC3IbJTBFqglXmZ7l9ywGEEUJYOlb2XrSuPWml39beWdKM8kzr1OjnlOm6+lpTRCBfo0wa9F8YZRhHPAkwKkXXDeOGpWRj4ohOx0d2GWkyV5xyN14p2tQOCdOODmz80yUTgRpPVQUtOEhXQARAQABtCFBV1MgQ0xJIFRlYW0gPGF3cy1jbGlAYW1hem9uLmNvbT6JAlQEEwEIAD4WIQT7Xbd/1cEYuAURraimMQrMRnJHXAUCXYKvtQIbAwUJB4TOAAULCQgHAgYVCgkICwIEFgIDAQIeAQIXgAAKCRCmMQrMRnJHXJIXEAChLUIkg80uPUkGjE3jejvQSA1aWuAMyzy6fdpdlRUz6M6nmsUhOExjVIvibEJpzK5mhuSZ4lb0vJ2ZUPgCv4zs2nBd7BGJMxKiWgBReGvTdqZ0SzyYH4PYCJSE732x/Fw9hfnh1dMTXNcrQXzwOmmFNNegG0Oxau+VnpcR5Kz3smiTrIwZbRudo1ijhCYPQ7t5CMp9kjC6bObvy1hSIg2xNbMAN/DoikebAl36uA6Y/Uczjj3GxZW4ZWeFirMidKbtqvUz2y0UFszobjiBSqZZHCreC34Bhw9bFNpuWC/0SrXgohdsc6vK50pDGdV5kM2qo9tMQ/izsAwTh/d/GzZv8H4lV9eOtEis+EpR497PaxKKh9tJf0N6Q1YLRHof5xePZtOIlS3gfvsH5hXA3HJ9yIxb8T0HQYmVr3aIUes20i6meI3fuV36VFupwfrTKaL7VXnsrK2fq5cRvyJLNzXucg0WAjPFRrAGLzY7nP1xeg1a0aeP+pdsqjqlPJom8OCWc1+6DWbg0jsC74WoesAqgBItODMBrsal1y/q+bPzpsnWjzHV8+1/EtZmSc8ZUGSJOPkfC7hObnfkl18h+1QtKTjZme4dH17gsBJr+opwJw/Zio2LMjQBOqlm3K1A4zFTh7wBC7He6KPQea1p2XAMgtvATtNeYLZATHZKTJyiqA===vYOk-----END PGP PUBLIC KEY BLOCK-----(this is available in public documentation on AWS pages. Please verify if nothing changed.)
Import the signature (as I am very creative, I named my file... signature)
gpg --import signatureThe output should be like this:
gpg: keybox '/home/vagrant/.gnupg/pubring.kbx' createdgpg: /home/vagrant/.gnupg/trustdb.gpg: trustdb createdgpg: key A6310ACC4672475C: public key "AWS CLI Team <[email protected]>" importedgpg: Total number processed: 1gpg: imported: 1Now it is time to download the signature from remote:
wget https://awscli.amazonaws.com/awscli-exe-linux-x86_64.zip.sigWe are ready to verify the package
gpg --verify awscli-exe-linux-x86_64.zip.sig awscli-exe-linux-x86_64.zipThe output should be similar to
gpg: Signature made Thu Feb 17 23:19:34 2022 UTCgpg: using RSA key FB5DB77FD5C118B80511ADA8A6310ACC4672475Cgpg: Good signature from "AWS CLI Team <[email protected]>" [unknown]gpg: WARNING: This key is not certified with a trusted signature!gpg: There is no indication that the signature belongs to the owner.Primary key fingerprint: FB5D B77F D5C1 18B8 0511 ADA8 A631 0ACC 4672 475CNow it is the time to unzip the file.
unzip awscli-exe-linux-x86_64.zipAll files are unpacked to aws directory. We can remove not needed files now.
rm awscli-exe-linux-x86_64.zip*It is time to do the installation.
sudo aws/installIn my case (Ubuntu 20.04), CLI was installed in /usr/local/bin/aws. As I have path configured, I can easily use
aws --versionSo, this sterp is done too!
Auto-complete
Well, AWS CLI is cool, but typing all these long commands in the terminal... no, thank you.
Example:
aws cloudformation batch-describe-type-configurations .......Well, it is not comfortable. But we can have auto-completion! Let's configure it now (for bash on Linux).
First, AWS recommends to check if we have one specific piece of software and if this piece is in proper directory. Let's check
which aws_completerIn my case all is ok:
/usr/local/bin/aws_completerIf it isn't for you, you have to find the executable, and make sure it is in your PATH.
In case of bash, add to your .bashrc (or .bash_profile) this line
complete -C '/usr/local/bin/aws_completer' awsAnd reload it
source ./.bashrcAnd that is it!
Let's type
aws cloAnd and press < TAB > twice. First, it will complete to cloud. Hit < TAB > once more:
aws cloudcloud9 clouddirectory cloudfront cloudhsmv2 cloudsearchdomain cloudwatchcloudcontrol cloudformation cloudhsm cloudsearch cloudtrailPerfect.
CLI configuration
It is time to configure our credentials. Type
aws configurePass Access Key for the user we created in first step, next Secret Access Key, for Region use your default one (for me it is eu-central-1), and the output can be left empty.
And... that's it!
Let's test it!
aws s3 lsHint: This is the fastest way to check if your credentials work :)
And... they work! We saw bucket list (or emplty list).
But hey! One moment please! What about... MFA??? Where is it?
Well... Good catch! MFA works, but only for interactive login (and during the login process).
Now you think "so... why? Why we did it?"
My answer is: Surprise! I promised to write the tutorial for the IAM Users, so... now it will come! :)
The easy way to work with MFA from CLI
IAM Policy with conditions
The point here is that our policy which we used does not expect to control if session is or not using MFA. As you remember, during the assignment of the device, we saw the message, which explained it will be used during the login (in fact, interactive login to the GUI console). But we have a way to force IAM to control it for CLI as well.
First, we need to create new policy. Go to IAM service, Policies, click Create policy button.
Let's use visual editor for this case. Select S3 for Service. All actions for Actions, and All resources for Resources, like on picture below.
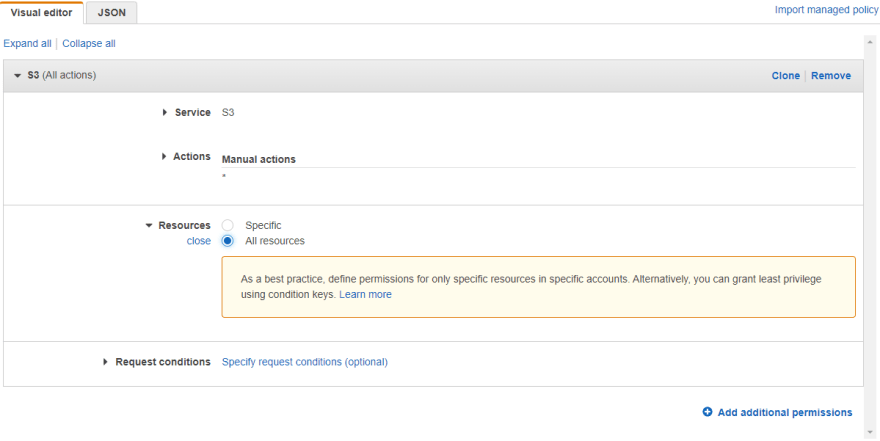
This is the way, how standard policy looks like. Now, we will add condition for MFA.
Open the Request conditions field and check MFA required. And that's it!

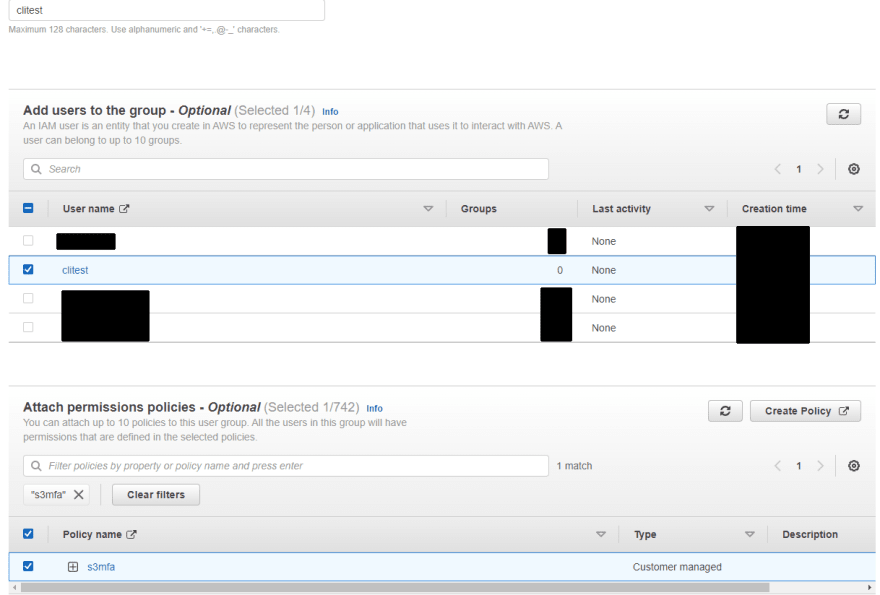
Finish the policy, and save it. I named mine s3mfa.
The final policy looks like this:
{ "Version": "2012-10-17", "Statement": [ { "Sid": "VisualEditor0", "Effect": "Allow", "Action": "s3:*", "Resource": "*", "Condition": { "BoolIfExists": { "aws:MultiFactorAuthPresent": "true" } } } ]}Now in User groups create a new group, and attach our clitest user and s3mfa policy.
Last step is to remove previously attached policy (which we attached to the user). This way the user will use only these policies which are attached to the group.
What we will see when we try to run our previous command in CLI?
aws s3 lsYes, we cannot list the buckets.
An error occurred (AccessDenied) when calling the ListBuckets operation: Access DeniedAccess from CLI with MFA
First, we need to get the information about ARN of our MFA device.
Go to IAM user, Security credentials and find the Assigned MFA device. Previously it was empty, now you should see the ARN.
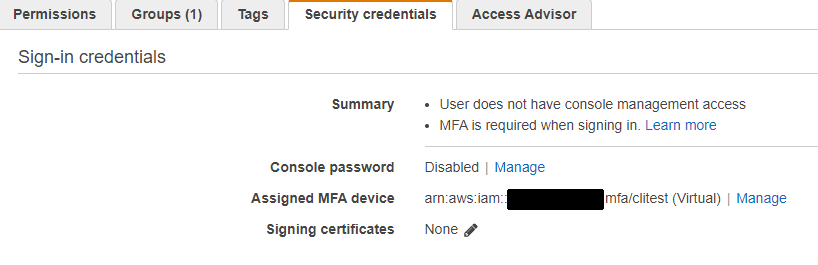
Copy this ARN.
In CLI type
aws sts get-session-token --serial-number arn:aws:iam::<ACCOUNT>:mfa/clitest --token-code <CODE>Where:
- ACCOUNT is the account id (don't worry, you have it in your ARN copied from your user)
- CODE is the code displayed in your MFA device (Duo, Authenticator, etc)
You should receive something like this:
{ "Credentials": { "AccessKeyId": "ACCESKEY", "SecretAccessKey": "<SECRETKEY>", "SessionToken": "aVeryLongStringHere", "Expiration": "2022-02-20T12:27:08+00:00" }}Ok, you even see when you access will expire!
Now try
aws s3 lsIf you configured everything correctly, it will show the buckets list.
The recommended way to work with MFA from CLI
While it works, and does the job, it is not the best practice. It works for small scale, but in properly configured environment we should use IAM Roles.
When you executed aws configure, something happened. .aws directory was created (if you did it for the first time) and the default profile was configured.
Now we will do a lot of modifications.
First, please remove some stuff we did earlier:
- The IAM User Group created
- The IAM Policy where we configured MFA
We don't need them anymore.
Now we will create an IAM Role, and we name it mfarole (creativity, remember!)

As you can see, I simply added S3FullAccess policy.
We need to modify Trust relationship and pass there our user.

Now we are ready do this:
- As user
clitest - Assume role
mfarole - With MFA enabled
- and do what we want to do.
It is time to modify our .aws/credentials
[default]aws_access_key_id = <ACCESS KEY>aws_secret_access_key = <SECRET KEY>[mfarole]role_arn = arn:aws:iam::<ACCOUNT>:role/mfarolesource_profile = defaultmfa_serial = arn:aws:iam::<ACCOUNT>:mfa/clitestin mfarole section we defined what role we want to assume (role_arn), as which user (source_profile) and also we added mfa_serial, which do great job. Let's see it on this example:
aws sts get-caller-identity{ "UserId": "<USERID>", "Account": "<ACCOUNT>", "Arn": "arn:aws:iam::<ACCOUNT>:user/clitest"}we get the info about our default user.
aws sts get-caller-identity --profile mfaroleEnter MFA code for arn:aws:iam::<ACCOUNT>:mfa/clitest:{ "UserId": "<USERID>:botocore-session-1645321182", "Account": "<ACCOUNT>", "Arn": "arn:aws:sts::<ACCOUNT>:assumed-role/mfarole/botocore-session-1645321182"}And here about the assumed role by the user. But! We had to provide the token! Exactly what we expected.
aws s3 lsaws s3 ls --profile mfaroleYour pure user is not able to list buckets, but your profile is. It means that the user has to assume the role in order to operate.
Is this better practice?
Yes, it is. For multiple reasons.
- It should be default, that your user assumes the role. This is another layer of security. Treat it as authentication & authorization, separated by function (user & role)
- Anyway, with Organizations or SSO, etc it works (almost) this way, so why to not use it?
- Once enabled, it is enabled for all actions taken through CLI. Not selected and configured in IAM Policices, where it is very easy to overlook.
- It brings some more complexity, but it is worth it.
- From security perspective - the user itself is "blocked". He cannot do anything. Any activites are possible after assuming the role. Therefore you need to know two elements of the puzzle.
Summary
On the end, we should have:
- AWS CLI installed and configured
- IAM User credenrtials created and stored in
.aws/credentials - IAM Role configured in
.aws/credentials - This IAM Role is configured with MFA enabled and with
Trust Relationshipfor our IAM User - The Role has attached standard policies (In our case full access to S3)
- The User doesn't have any policy attached (default deny everything)
With this setup, I repeat it, but this is imperative to understand, the IAM User is not able to perform any action. It is used as a "carier" for the IAM Role we created.
Why we created an IAM Policy then
I am sure you ask yourself about it. Why we created the Policy if we removed it very quickly. Well, I did it on purpose. It is learning by doing. When you created this policy by yourself, attached to user, you probably had the thought in your mind "but this will not work very well! I can easily workaround it and do not use MFA at all!". If you had this thought, than I achieved my goal, and you better understand the approach to programmatically access the AWS services with IAM Role.
Original Link: https://dev.to/aws-builders/aws-cli-do-it-right-1c3n
Dev To
More About this Source Visit Dev To