
An Interest In:
Web News this Week
- April 2, 2024
- April 1, 2024
- March 31, 2024
- March 30, 2024
- March 29, 2024
- March 28, 2024
- March 27, 2024
Some of Our Sources
- TutsPlus - Code
- TutsPlus - Design
- Creative Curio
- Fuel Your Creativity
- Inspiredology
- FanExtra - PSD
- Codrops
- Hashedout
- The Verge
- TechPowerUp
Help Webnuz
Referal links:
Intro to GraphQL with Node.js & TypeScript
Sup nerds, long time no see!
In this post, Ill help you get a solid understanding of working with GraphQL in Node.js and TypeScript using a library called TypeGraphQL. TypeGraphQL is an awesome way to create your GraphQL resolvers and it has seamless integration capabilities with ORMs like TypeORM (well be using it in this post!) and mikro-orm. It uses classes and decorators to beautifully generate our schemas using very less code.
Also stick around till the end to find some challenges to reinforce your skills!
What were gonna do
- First, well setup a basic TypeScript project
- Then, well configure TypeORM, to interact with our database
- Well create a
Taskdatabase entity and hook it up with TypeORM
- Well create a
- After that, well set up a basic Apollo/Express web server
- And finally, well create our own GraphQL resolver using TypeGraphQL with CRUD (create, read, update, delete) functionality
Alright, lets get started!
Setting up a TypeScript project
First lets create an empty directory called graphql-crud.
$ mkdir graphql-crudAnd you can open this directory with the editor of your choice (Ill be using Visual Studio Code).
Now lets initialize this as an NPM project using
npm init -yThis creates a basic package.json.
{ "name": "graphql-crud", "version": "1.0.0", "description": "", "main": "index.js", "scripts": { "test": "echo \"Error: no test specified\" && exit 1" }, "keywords": [], "author": "", "license": "ISC"}Alright cool!
So now since we have an NPM project set up, we can install TypeScript and the type definitions for Node:
yarn add typescriptand
yarn add -D @types/nodeNote: Ill be using Yarn throughout this post, feel free to use NPM.
Also we need to make a tsconfig.json file to configure the TypeScript compiler, so to do that well use a library called tsconfig.json
$ npx tsconfig.jsonSelect node from the options
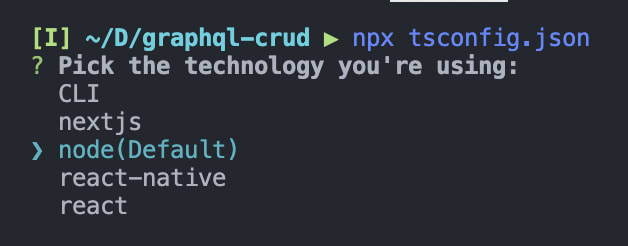
And now, it will create a TSConfig in your root directory.
{ "compilerOptions": { "target": "es2017", "module": "commonjs", "lib": ["dom", "es6", "es2017", "esnext.asynciterable"], "skipLibCheck": true, "sourceMap": true, "outDir": "./dist", "moduleResolution": "node", "removeComments": true, "noImplicitAny": true, "strictNullChecks": true, "strictFunctionTypes": true, "noImplicitThis": true, "noUnusedLocals": true, "noUnusedParameters": true, "noImplicitReturns": true, "noFallthroughCasesInSwitch": true, "allowSyntheticDefaultImports": true, "esModuleInterop": true, "emitDecoratorMetadata": true, "experimentalDecorators": true, "resolveJsonModule": true, "baseUrl": "." }, "exclude": ["node_modules"], "include": ["./src/**/*.ts"]}Now, lets create a simple TypeScript file.
src/index.ts
console.log("hellooooo");We cannot run this file directly using Node, so we need to compile this into JavaScript. To do this, lets create a watch script in our package.json to watch our TypeScript files for changes and compile them to JavaScript in the dist/ directory.
{ "name": "graphql-crud", "version": "1.0.0", "description": "", "main": "index.js", "scripts": { "watch": "tsc -w" }, "keywords": [], "author": "", "license": "ISC"}Now if we run npm watch in our terminal, it will create a dist folder with our compiled JavaScript code. Well create a dev command to run this compiled code with the following script:
"scripts": { "watch": "tsc -w", "dev": "nodemon dist/index.js"},By the way, make sure you install nodemon either globally or in this project for this command to work.
Now to run this code you will run both yarn watch and yarn dev together, to compile our TypeScript and run the compiled code automatically.
Alright, now our TypeScript project is ready to go!
Setting up TypeORM
TypeORM is an amazing ORM, which we can use to interact with various databases. It also has really good TypeScript support and the way we define database entities in TypeORM will be very useful when we setup TypeGraphQL later in this post.
In this tutorial, I will be using PostgreSQL as my database and really you can follow along with any relational database which you have set up.
Lets install TypeORM and the native Postgres driver for Node:
yarn add typeorm pgNow we can replace the code in src/index.ts to this:
import { Connection, createConnection } from "typeorm";const main = async () => { const conn: Connection = await createConnection({ type: "postgres", // replace with the DB of your choice database: "graphql-crud", // replace with the name of your DB username: "username", // replace with your database user's username password: "pass", // replace with your database user's password logging: true, // this shows the SQL that's being run synchronize: true, // this automatically runs all the database migrations, so you don't have to :) entities: [], // we'll add our database entities here later. });};main().catch((err) => console.error(err));This basically just specifies all the options for your database connection. We are using a main function because top-level awaits are not a thing unless youre using ES7 or something like that.
Creating our Entity
First things first, I think some people dont exactly know what an Entity is, so Ill just explain that part a bit now.
As you should already know, SQL databases (like Postgres, MySQL etc.) are made up of Tables and Columns. Like an Excel spreadsheet. Each table will contain fields related to it. For example:
- A table of Cars, may have columns like Manufacturer, Engine Type, Color etc.
An Entity basically defines the structure of a database table and its corresponding columns. In this post, well perform our CRUD operations with Tasks or Todos. So lets create an entity for a Task.
First off, create a new file in the src/entities directory.
To keep it simple, were going to have 2 columns for our Task table:
- The title of the task
- The description of the task
Well also have an id , a created , and an updated column.
We wont really use the created and updated column, but its kind of a best practice
src/entities/Task.ts
import { BaseEntity, Column, CreateDateColumn, Entity, PrimaryGeneratedColumn, UpdateDateColumn,} from "typeorm";@Entity()export class Task extends BaseEntity { @PrimaryGeneratedColumn() id!: number; @CreateDateColumn() created: Date; @UpdateDateColumn() updated: Date; @Column() title: string; @Column() description: string;}Woah, woah, what is that?!
This my friend, is the magic of decorators
This code is extremely clean and self-documenting:
- We are creating a class called
Taskwith theEntitydecorating specifying that this class is an Entity.- We are extending this class from
BaseEntityso that some useful methods likecreate,deleteetc. will be exposed to us with this class. Youll see what I mean later on.
- We are extending this class from
- Then were creating a primary column, for our ID. This is ID field is an integer and its automatically generated by TypeORM!
- Next is the created and updated column and this too is automatically generated by TypeORM.
- The
titleanddescriptionis a normal column, containing the title and the description of our task.
And dont forget to add the Task entity to your entities array in your TypeORM config:
src/index.ts
import { Connection, createConnection } from "typeorm";import { Task } from "./entities/Task";const main = async () => { const conn: Connection = await createConnection({ type: "postgres", // replace with the DB of your choice database: "graphql-crud", // replace with the name of your DB username: "postgres", // replace with your database user's username password: "postgres", // replace with your database user's password logging: true, // this shows the SQL that's being run synchronize: true, // this automatically runs all the database migrations, so you don't have to :) entities: [Task], // we'll add our database entities here later. });};main().catch((err) => console.error(err));Phew! Finally, lets get started with the GraphQL part!
Setting up Express with Apollo Server
Well be using Express as our server and well tell Express to use Apollo Server as middleware.
But, what is Apollo Server??
To understand what Apollo Server does, youll need to know how GraphQL works at its core. Basically, in an API there will be a REST endpoint for the GraphQL stuff (kinda ironic but yeah) from where you can run Queries and Mutations from your Resolvers. What Apollo Server does, is just create an endpoint for your GraphQL to be served with some extra dev tools, like GraphQL Playground which helps you test your GraphQL queries in a cool environment.
So lets start!
Well install these libraries:
expressapollo-server-express: Express middleware for Apollo Servergraphql: The JavaScript implementation of GraphQLtype-graphql
$ yarn add express apollo-server-express graphql type-graphql Lets also install the type definitions for express:
$ yarn add -D @types/expressCool!
Lets now create our Express app:
src/index.ts
import { Connection, createConnection } from "typeorm";import express, { Express } from "express";import { Task } from "./entities/Task";const main = async () => { const conn: Connection = await createConnection({ type: "postgres", // replace with the DB of your choice database: "graphql-crud", // replace with the name of your DB username: "postgres", // replace with your database user's username password: "postgres", // replace with your database user's password logging: true, // this shows the SQL that's being run synchronize: true, // this automatically runs all the database migrations, so you don't have to :) entities: [], // we'll add our database entities here later. }); const app: Express = express(); const PORT = process.env.PORT || 8000; app.listen(PORT, () => console.log(`server started on port ${PORT}`));};main().catch((err) => console.error(err));Lets also create a test route to see that everythings working properly:
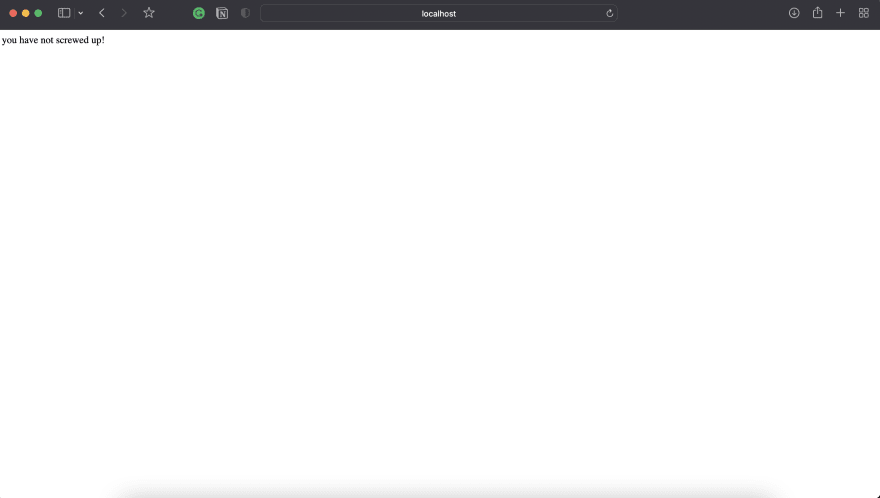
import { Connection, createConnection } from "typeorm";import express, { Express } from "express";import { Task } from "./entities/Task";const main = async () => { const conn: Connection = await createConnection({ type: "postgres", // replace with the DB of your choice database: "graphql-crud", // replace with the name of your DB username: "postgres", // replace with your database user's username password: "postgres", // replace with your database user's password logging: true, // this shows the SQL that's being run synchronize: true, // this automatically runs all the database migrations, so you don't have to :) entities: [Task], // we'll add our database entities here later. }); const app: Express = express(); app.get("/", (_req, res) => res.send("you have not screwed up!")); const PORT = process.env.PORT || 8000; app.listen(PORT, () => console.log(`server started on port ${PORT}`));};main().catch((err) => console.error(err));Note: I am using an _ in front of req because I wont be using that variable and if you dont use a variable you can prefix it with an underscore.
Now lets open up our browser and go to [localhost:8000/](http://localhost:8000/) and you should see something like this:
To add Apollo Server as a middleware for Express, we can add the following code:
import { Connection, createConnection } from "typeorm";import express, { Express } from "express";import { ApolloServer } from "apollo-server-express";import { buildSchema } from "type-graphql";const main = async () => { const conn: Connection = await createConnection({ type: "postgres", // replace with the DB of your choice database: "graphql-crud", // replace with the name of your DB username: "postgres", // replace with your database user's username password: "postgres", // replace with your database user's password logging: true, // this shows the SQL that's being run synchronize: true, // this automatically runs all the database migrations, so you don't have to :) entities: [], // we'll add our database entities here later. }); const apolloServer = new ApolloServer({ schema: await buildSchema({ resolvers: [], validate: false, }), }); await apolloServer.start(); const app: Express = express(); apolloServer.applyMiddleware({ app }); app.get("/", (_req, res) => res.send("you have not screwed up!")); const PORT = process.env.PORT || 8000; app.listen(PORT, () => console.log(`server started on port ${PORT}`));};main().catch((err) => console.error(err));Now youll get TypeScript yelling at you because the resolvers array is empty but bear with me for a sec.
Here what were basically doing is, creating an instance of ApolloServer and passing our GraphQL schema as the buildSchema function from type-graphql . So what TypeGraphQL does is it converts our GraphQL resolvers (TypeScript classes) which are present in the resolvers arrays into SDL or GraphQL Schema Definition Language, and passes this SDL as our final GraphQL schema to Apollo Server.
Lets also quickly create a simple GraphQL Resolver:
For those of you who dont know what a Resolver is:
Resolver isa collection of functions that generate response for a GraphQL query. In simple terms, a resolver acts as a GraphQL query handler.
tutorialspoint.com
src/resolvers/task.ts
import { Query, Resolver } from "type-graphql";@Resolver()export class TaskResolver { @Query() hello(): string { return "hello"; }}Thats all there is to it!
Of course, now we should add this resolver in our resolvers array:
src/index.ts
import { Connection, createConnection } from "typeorm";import express, { Express } from "express";import { ApolloServer } from "apollo-server-express";import { buildSchema } from "type-graphql";import { Task } from "./entities/Task";import { TaskResolver } from "./resolvers/task";const main = async () => { const conn: Connection = await createConnection({ type: "postgres", // replace with the DB of your choice database: "graphql-crud", // replace with the name of your DB username: "postgres", // replace with your database user's username password: "postgres", // replace with your database user's password logging: true, // this shows the SQL that's being run synchronize: true, // this automatically runs all the database migrations, so you don't have to :) entities: [Task], // we'll add our database entities here later. }); const apolloServer = new ApolloServer({ schema: await buildSchema({ resolvers: [TaskResolver], validate: false, }), }); await apolloServer.start(); const app: Express = express(); apolloServer.applyMiddleware({ app }); app.get("/", (_req, res) => res.send("you have not screwed up!")); const PORT = process.env.PORT || 8000; app.listen(PORT, () => console.log(`server started on port ${PORT}`));};main().catch((err) => console.error(err));Cool! Now lets look at our output in the terminal aaaandd...
UnmetGraphQLPeerDependencyError: Looks like you use an incorrect version of the 'graphql' package: "16.2.0". Please ensure that you have installed a version that meets TypeGraphQL's requirement: "^15.3.0". at Object.ensureInstalledCorrectGraphQLPackage (/Users/dhruvasrinivas/Documents/graphql-crud/node_modules/type-graphql/dist/utils/graphql-version.js:20:15) at Function.checkForErrors (/Users/dhruvasrinivas/Documents/graphql-crud/node_modules/type-graphql/dist/schema/schema-generator.js:47:27) at Function.generateFromMetadataSync (/Users/dhruvasrinivas/Documents/graphql-crud/node_modules/type-graphql/dist/schema/schema-generator.js:26:14) at Function.generateFromMetadata (/Users/dhruvasrinivas/Documents/graphql-crud/node_modules/type-graphql/dist/schema/schema-generator.js:16:29) at buildSchema (/Users/dhruvasrinivas/Documents/graphql-crud/node_modules/type-graphql/dist/utils/buildSchema.js:10:61) at main (/Users/dhruvasrinivas/Documents/graphql-crud/dist/index.js:23:54) at processTicksAndRejections (node:internal/process/task_queues:96:5)UH OH! We have an error! But its pretty obvious what we have to do to fix it. We just have to use the specified version of the graphql package in our package.json
{ "name": "graphql-crud", "version": "1.0.0", "description": "", "main": "index.js", "scripts": { "watch": "tsc -w", "dev": "nodemon dist/index.js" }, "keywords": [], "author": "", "license": "ISC", "dependencies": { "@types/node": "^17.0.10", "apollo-server-express": "^3.6.2", "express": "^4.17.2", "graphql": "^15.3.0", "pg": "^8.7.1", "type-graphql": "^1.1.1", "typeorm": "^0.2.41", "typescript": "^4.5.5" }, "devDependencies": { "@types/express": "^4.17.13" }}Now lets reinstall all of our dependencies:
$ yarnNow if we run our code, we shouldnt get any errors!
Apollo Server serves our GraphQL at the /graphql endpoint.
So lets open it up in our browser.
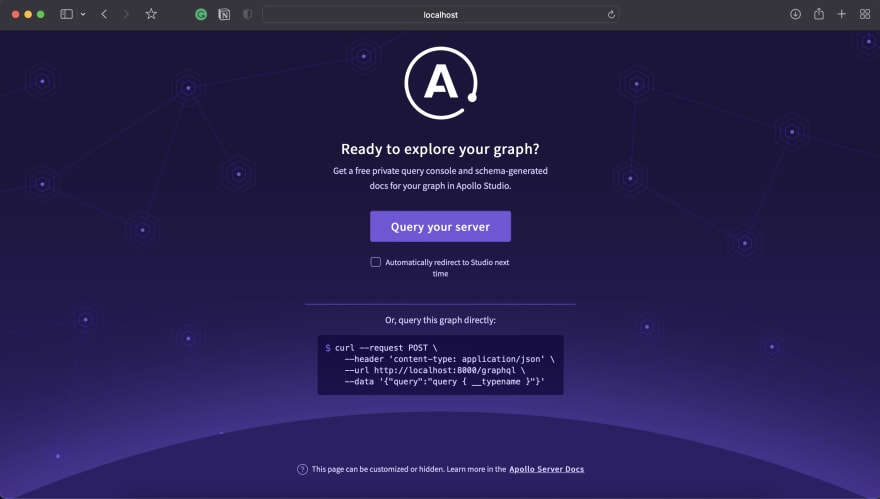
And oof were greeted by Apollo Servers propaganda page
Fun fact: This is actually a new Apollo Server update, earlier it used to directly open up GraphQL Playground, an interactive environment to test our GraphQL queries.
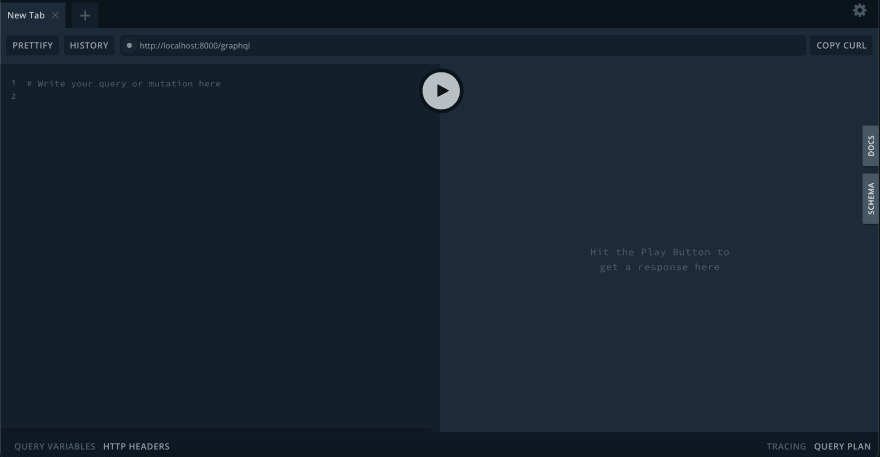
No worries though, we can spin up GraphQL playground using this Apollo Server Plugin:
src/index.ts
import { Connection, createConnection } from "typeorm";import express, { Express } from "express";import { ApolloServer } from "apollo-server-express";import { buildSchema } from "type-graphql";import { Task } from "./entities/Task";import { TaskResolver } from "./resolvers/task";import { ApolloServerPluginLandingPageGraphQLPlayground } from "apollo-server-core";const main = async () => { const conn: Connection = await createConnection({ type: "postgres", // replace with the DB of your choice database: "graphql-crud", // replace with the name of your DB username: "postgres", // replace with your database user's username password: "postgres", // replace with your database user's password logging: true, // this shows the SQL that's being run synchronize: true, // this automatically runs all the database migrations, so you don't have to :) entities: [Task], // we'll add our database entities here later. }); const apolloServer = new ApolloServer({ schema: await buildSchema({ resolvers: [TaskResolver], validate: false, }), plugins: [ApolloServerPluginLandingPageGraphQLPlayground()], }); await apolloServer.start(); const app: Express = express(); apolloServer.applyMiddleware({ app }); app.get("/", (_req, res) => res.send("you have not screwed up!")); const PORT = process.env.PORT || 8000; app.listen(PORT, () => console.log(`server started on port ${PORT}`));};main().catch((err) => console.error(err));Another fun fact: THAT IS THE LONGEST FUNCTION NAME IVE EVER SEEN WHAT THE-
Oh my god. After youve recovered from that atomic blow, if you refresh you can find something like this:
Now lets run our hello query:
{ hello}And youll see our output:
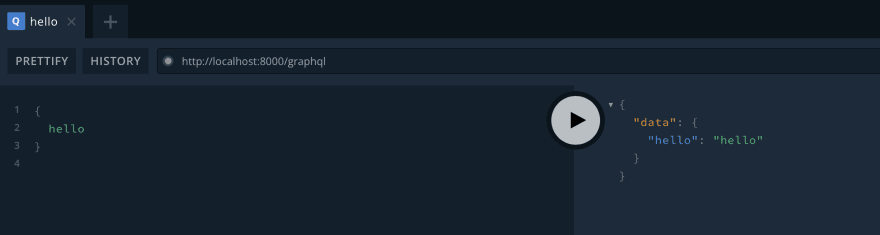
Awesome!!
Building CRUD functionality
Now, lets get to the main part, which is building out our CRUD functionality. Lets start with the easiest, which is to fetch all the posts:
BUT WAIT A MINUTE!
Remember that Task entity we made? Like a hundred years back? Yep, that one.
That is a database Entity, but when we get all tasks we have to return a Task and we cant return an Entity cause thats dumb. So what were gonna have to do is, to make Task a GraphQL type. Before you start complaining, remember that I told you that TypeGraphQL can integrate with TypeORM well? Lets see that in action!
src/entities/Task.ts
import { Field, Int, ObjectType } from "type-graphql";import { BaseEntity, Column, CreateDateColumn, Entity, PrimaryGeneratedColumn, UpdateDateColumn,} from "typeorm";@Entity()@ObjectType()export class Task extends BaseEntity { @PrimaryGeneratedColumn() @Field(() => Int) id!: number; @CreateDateColumn() @Field(() => String) created: Date; @UpdateDateColumn() @Field(() => String) updated: Date; @Column() @Field(() => String, { nullable: false }) title: string; @Column() @Field(() => String, { nullable: false }) description: string;}Get a load of that decorator magic
What were essentially doing here is:
- Specifying that this
Taskclass is also a GraphQL type! - We are then decorating each column with the
Fielddecorator, saying that each of these columns are also Fields of theTasktype. - We are also explicitly stating the GraphQL type of each
Field, which are all coming fromtype-graphql - We are also specifying that the title and description field has to have a value and can never be declared as null.
The cool thing about defining your entity and GraphQL type like this is that you may have a column in your database like a password which you dont want to expose in a response and you can just not decorate it with a Field to do this!
Getting all tasks
Now, lets fetch all of our Tasks:
src/resolvers/task.ts
import { Query, Resolver } from "type-graphql";import { Task } from "../entities/Task";@Resolver()export class TaskResolver { @Query(() => [Task]) async tasks(): Promise<Task[]> { return Task.find(); }}Here you can see that were specifying the GraphQL return type as an array of Tasks since we also made it a GraphQL type. One fault you may find with this approach is that were defining the return types twice: once for the GraphQL return type, and once for the functions return type. But thats just how we do things in the TypeGraphQL world
Ok cool, lets now run our query:
{ tasks { id created updated title description }}And we will get a response like this:
{ "data": { "tasks": [] }}The array is empty because we havent created any tasks yet.
Creating a task
Now Id like to ask you a question, if we use a Query to fetch data, will we be able to use the same Query to change (create, update, delete) data? No, we cant. We will use something called a **Mutation** to achieve our task.
One more thing you might be thinking is how exactly do we take inputs because when we create a task, well need to provide the title and description of the task, right? Guess what, TypeGraphQL has a decorator for it!
Lets see all of this in action. Well define a new function in our task resolver.
src/resolvers/task.ts
import { Arg, Mutation, Query, Resolver } from "type-graphql";import { Task } from "../entities/Task";@Resolver()export class TaskResolver { @Query(() => [Task]) async tasks(): Promise<Task[]> { return Task.find(); } @Mutation(() => Task) createTask( @Arg("title", () => String) title: string, @Arg("description", () => String) description: string ): Promise<Task> { return Task.create({ title, description }).save(); }}Ill walk you through this new function line by line since its a bit confusing at first.
- We are first declaring this
createTaskas a GraphQL mutation, which returns the GraphQLTasktype which we created. We are returning aTaskbecause after the task is saved to the database we want to show that it has successfully added it. - Then we have 2 variables,
titleandstringdecorated withArg. ThisArgspecifies that these two variables will be passed as arguments when we are running this mutation (which we will do in a sec). The GraphQL type is given asStringbut this is optional because in most cases TypeGraphQL can infer the GraphQL type after looking at the variables TypeScript type. - Then were creating a Task using
Task.createand passing the title and description variables to it and then were calling.save.
But why are we doing both .create and .save?
What .create essentially does is, that it creates an instance of the Task class!
Something like this:
const task = new Task(....) And .save actually saves this new instance to our Postgres database.
You might also be wondering why were specifying the name of the variable both as an argument for @Arg and for the TypeScript variable. What were specifying as the string is actually the name were going to use to provide GraphQL with the argument. For example:
@Arg("myrandomarg", () => String) arg: stringTo run this mutation we would do it like this:
mutation { myQuery(myrandomarg: "val") { ... }}Since we got all of that cleared, lets run our mutation!
mutation { createTask( title: "my first post!", description: "this is my first post" ) { id created updated title description }} And we get our response back!
{ "data": { "createTask": { "id": 1, "created": "1643090973749", "updated": "1643090973749", "title": "my first post!", "description": "this is my first post" } }}Awesome!
Another thing we can do now is since we have created a post, we can try fetching all of our posts again.
{ "data": { "tasks": [ { "id": 1, "created": "1643090973749", "updated": "1643090973749", "title": "my first post!", "description": "this is my first post" } ] }}And its all working yay
Getting a single post by ID
This should be pretty straight-forward since we already know how to include an argument.
src/resolvers/task.ts
@Query(() => Task, { nullable: true })async task(@Arg("id", () => Int) id: number): Promise<Task | undefined> { return Task.findOne({ id });}Here were saying that this Query returns a single Task and it can return a null if a post with this ID is not found.
Note: Int comes from type-graphql
Also the TypeScript return type is:
Promise<Task | undefined>This basically says that this function can either return a Promise of a Task if a post with such and such ID is found, but otherwise it will return an undefined.
And were using Task.findOne() to get a single task and providing the ID as the search query.
So, if we run this query using:
{ task (id: 1) { id title description }}Well get this response:
{ "data": { "task": { "id": 1, "title": "my first post!", "description": "this is my first post" } }}And if we provide an ID that doesnt exist, well get a null as the response:
{ task (id: 1717) { id title description }}{ "data": { "task": { "id": 1, "title": "my first post!", "description": "this is my first post" } }}Deleting a post
Deleting a post is quite similar to the function we created for getting a single post.
src/resolvers/task.ts
@Mutation(() => Boolean)async deleteTask(@Arg("id", () => Int) id: number): Promise<boolean> { if (await Task.findOne({ id })) { await Task.delete(id); return true; } else { return false; }}Here we are returning the Boolean GraphQL type. We first check if a post with the ID provided exists, then we delete it and return true, but if it doesnt, we return false.
Lets run this mutation:
mutation { deleteTask(id: 2) }Note: First, create another Task and then run this mutation.
And you will get this response!
{ "data": { "deleteTask": true }}Now, finally were gonna create one final function to update our Task.
Updating a Task
To update a task, well need to get:
- the ID of the task
- the new title
- the new description
And then well need to check if a post with the mentioned ID exists, if it doesnt we will return null
Then we will check if a title or a description if provided and if it is, we will update the Task using Task.update
src/resolvers/task.ts
@Mutation(() => Task, { nullable: true })async updateTask( @Arg("title", () => String, { nullable: true }) title: string, @Arg("description", () => String, { nullable: true }) description: string, @Arg("id", () => Int) id: number): Promise<Task | null> { const task = await Task.findOne(id); if (!task) { return null; } if (typeof title !== "undefined") { await Task.update({ id }, { title }); } if (typeof description !== "undefined") { await Task.update({ id }, { description }); } return task;}All this is familiar code, its just that the complexity of our operation is a bit higher. Lets now test this mutation:
mutation { updateTask(id: 1, title: "first post by me!") { id title description }}And well get our response:
{ "data": { "updateTask": { "id": 1, "title": "my first post!", "description": "this is my first post" } }}If we run the get task by ID query we can see our updated Task:
{ task (id: 1) { id title description }}Response:
{ "data": { "task": { "id": 1, "title": "first post by me!", "description": "this is my first post" } }}And thats it!! Were done with our CRUD!!
Challenge
As promised, you can try implementing the features listed below to improve your understanding of the concept
- Make an
isCompleteboolean field in theTaskentity - Make a
markCompletemutation to change the value ofisCompleteof a Task - You can also make a simple
filterquery to search for tasks based on thetitlearg given by the user.
If you need help implementing any of these, leave a comment and Ill answer your query!
You can find the source code down below:
 carrotfarmer / graphql-crud
Simple CRUD using TypeGraphQL and TypeORM
And thats it for this post, see ya in the next one!
Original Link: https://dev.to/carrotfarmer/intro-to-graphql-with-nodejs-typescript-2n48
Dev To
More About this Source Visit Dev To