
An Interest In:
Web News this Week
- April 1, 2024
- March 31, 2024
- March 30, 2024
- March 29, 2024
- March 28, 2024
- March 27, 2024
- March 26, 2024
Some of Our Sources
- Team Treehouse
- The Logo Smith
- Smashing Magazine
- TutsPlus - Design
- Vandelay Design
- Inspiredology
- Stylized Web
- Freelance Switch
- Android Headlines
- Willems Lab
Help Webnuz
Referal links:
How to build a full stack serverless application with Svelte, GraphQL, and Fauna
In this tutorial, you learn to will build a full-stack serverless application with Svelte.js, GraphQL, and Fauna. You will build a blogging platform similar to Dev.to, hashnode.com, or Medium. Users will be able to sign in to your application, create new posts, edit, and delete their own posts.
We will be using the following technology stack.
- Svelte.js (Sveltekit)
- GraphQL
- Fauna for the database
- Deployment (Vercel or Netlify)
You can find the final code in the following github link.
Create a new Svelte App
First, go ahead and create a new Svelte app. Run the following commands in our terminal.
npm init svelte@next blogAppThe Svelte CLI will give you some options to customize our application. Choose the following options.
Which Svelte app template? Skeleton project
Use TypeScript? No
Add ESLint for code linting? Yes
Add Prettier for code formatting? Yes
Run our newly created application with the following command.
cd blogAppnpm inpm run dev
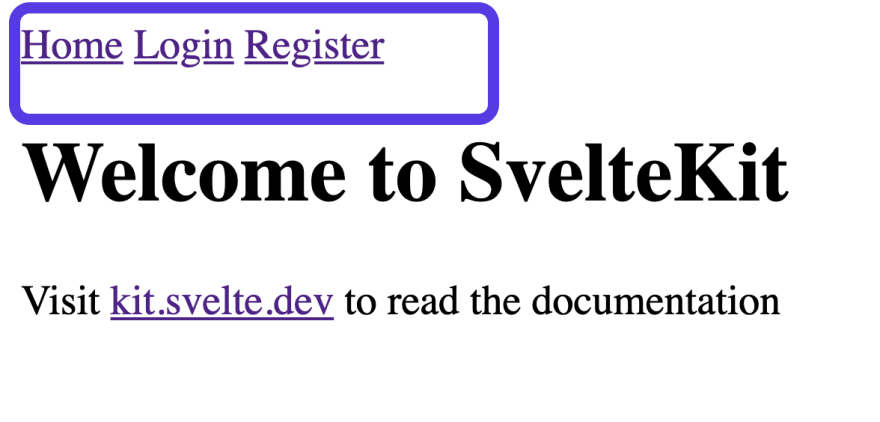
In this tutorial, we will primarily focus on the functionality of our application. We will not spend too much time styling. Lets go ahead and create a simple Navbar component. Create a new file src/lib/Nav.svelte and add the following code in there.
// src/lib/Nav.svelte<nav> <a href="/">Home</a> <a href="/login">Login</a> <a href="/register">Register</a></nav>Next, lets create a layout file. Create a new file src/routes/__layout.svelte and add the following code.
// src/routes/__layout.svelte<script> import Nav from '$lib/Nav.svelte'; </script><Nav /><slot></slot>Now when you run the application, a Navbar component will appear in each page.
Setting up Svelte GraphQL client
Your Svelte app will be consuming a GraphQL backend service. There are many popular libraries that you can use to consume GraphQL in Svelte. The @urql/svelte library is one of the most popular ones. Lets go ahead and set it up.
Run the following command to add the library in your project.
npm i @urql/svelte --saveNext create a new file src/client.js and add the following code snippet.
// src/client.jsimport { createClient } from '@urql/svelte';export default createClient({ url: 'https://graphql.us.fauna.com/graphql', // For DB in other zone use the following url // EU: https://graphql.eu.fauna.com/graphql // Classic: https://graphql.fauna.com/graphql fetchOptions: () => { const token = import.meta.env.VITE_PUBLIC_FAUNA_KEY; return { headers: { authorization: token ? `Bearer ${token}` : '' }, }; },}); We are now ready to query data from GraphQL backend. Lets go ahead and setup our database now.
Setting up the Database
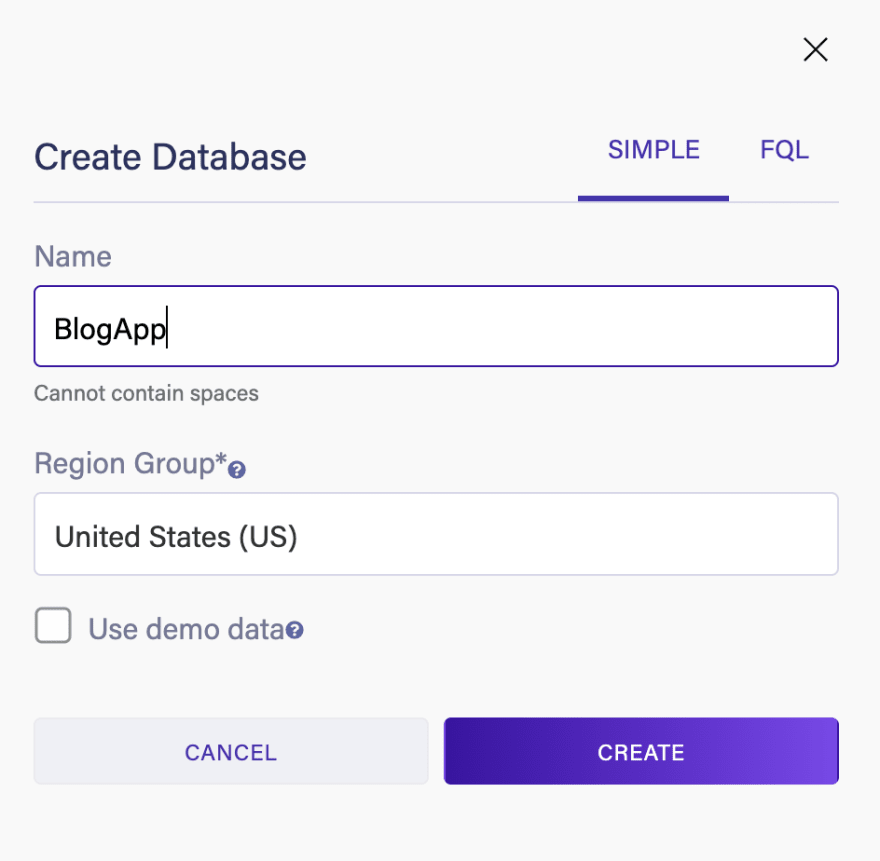
Go ahead and create a new account with Fauna if you havent done already. Fauna is a distributed serverless database that uses native GraphQL API.
Head over to the Fauna dashboard and create a new database.
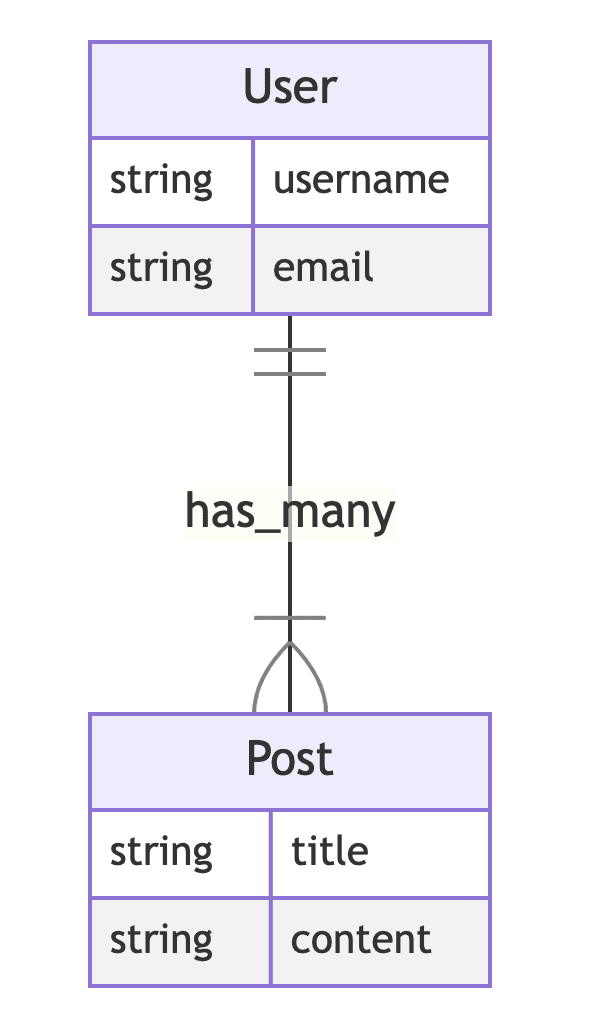
You are now ready to define our GraphQL schema. The following ULM diagram describes how to model the data in your application. In this app you have users and every user can have many posts. It is a has_many relationship between User and Post.
Head back over to the code and create a new file schema.graphql in your root directory. Add the following code.
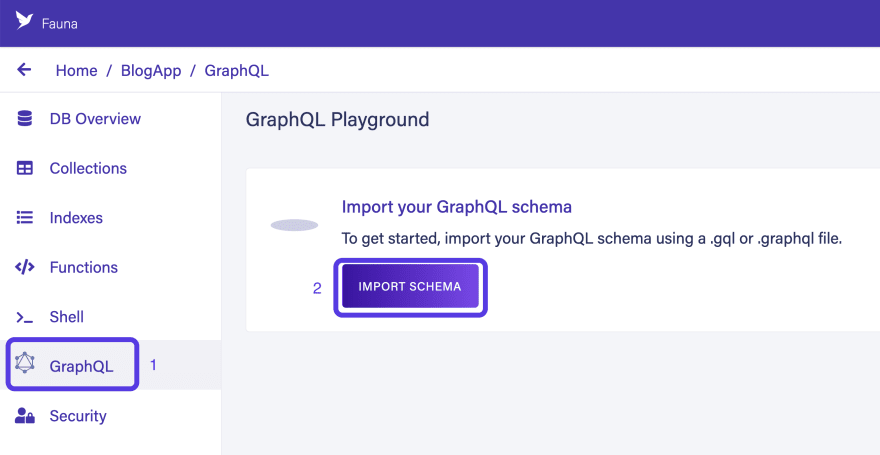
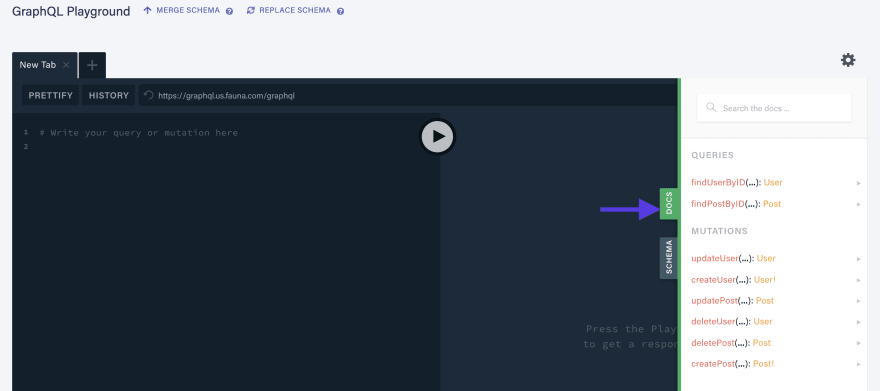
# schema.graphqltype User { username: String! email: String! posts: [Post!] @relation}type Post { title: String! content: String! author: User!}type Query { listPosts: [Post]}Next, upload the schema to your Fauna database. Head over to Fauna dashboard, select GraphQL and import schema. Import the schema.graphql file.
Notice that you are presented with a GraphQL playground once the scheme is uploaded. You can add, modify and debug your GraphQL api from this playground.
Lets go ahead and add some data to our database. Create a new user by running the following mutation inside the GraphQL playground.
mutation CreateNewUser { createUser(data: { username: "shadid" email: "[email protected]" }) { _id username email }}
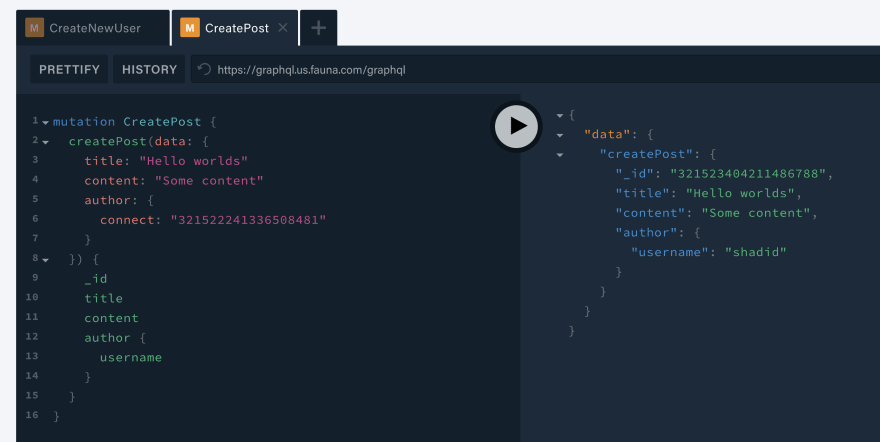
Similarly, create a new post. Run the following mutation in the GraphQL playground to create a new post.
mutation CreatePost { createPost(data: { title: "Hello worlds" content: "Some content" author: { **connect: "321522241336508481"** } }) { _id title content author { email } }}Notice that we used the author > connect field. You add the userId from the previous mutation here. This will associate the user with the post. Therefore this posts author will be the user you created in the first mutation.
Querying data from Svelte App
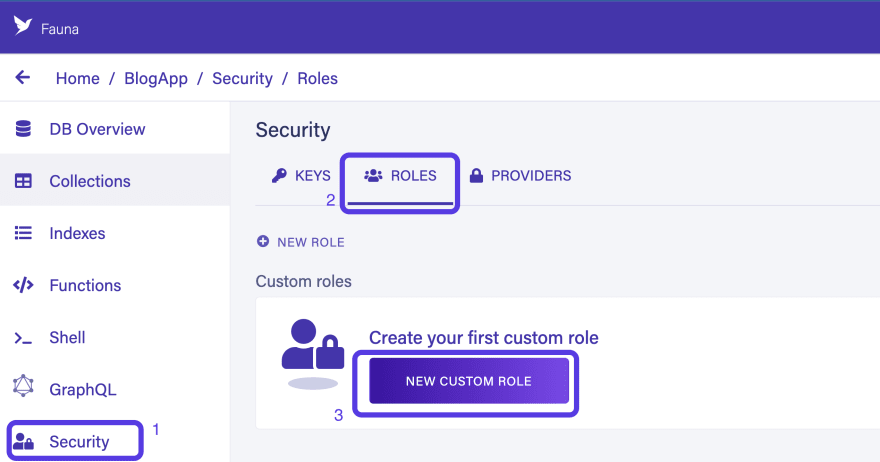
Lets go ahead and query the data from our Svelte application. We first need to specify a role and generate a key for our frontend to communicate with the database.
Head over to Fauna dashboard. Select Security > Roles > New Custom Role.
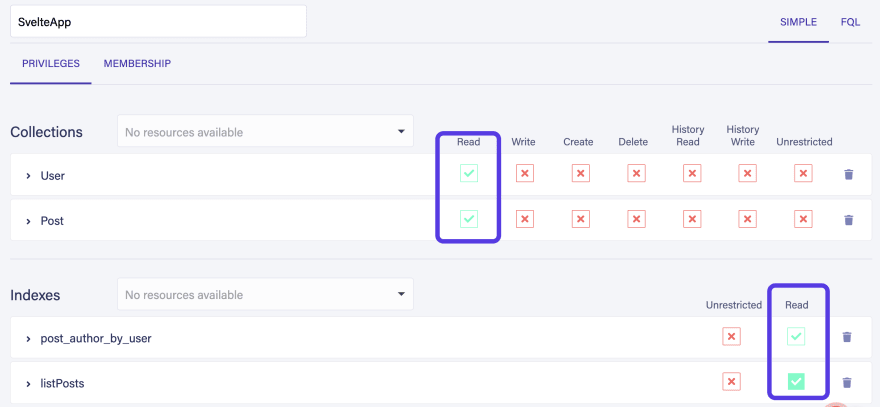
Give your role a name and provide read access to User and Post collections. Also provide read access to post_author_by_user index and listPosts index.
Now navigate to Security > Keys > New Key.

Create a new key for your SvelteApp role.
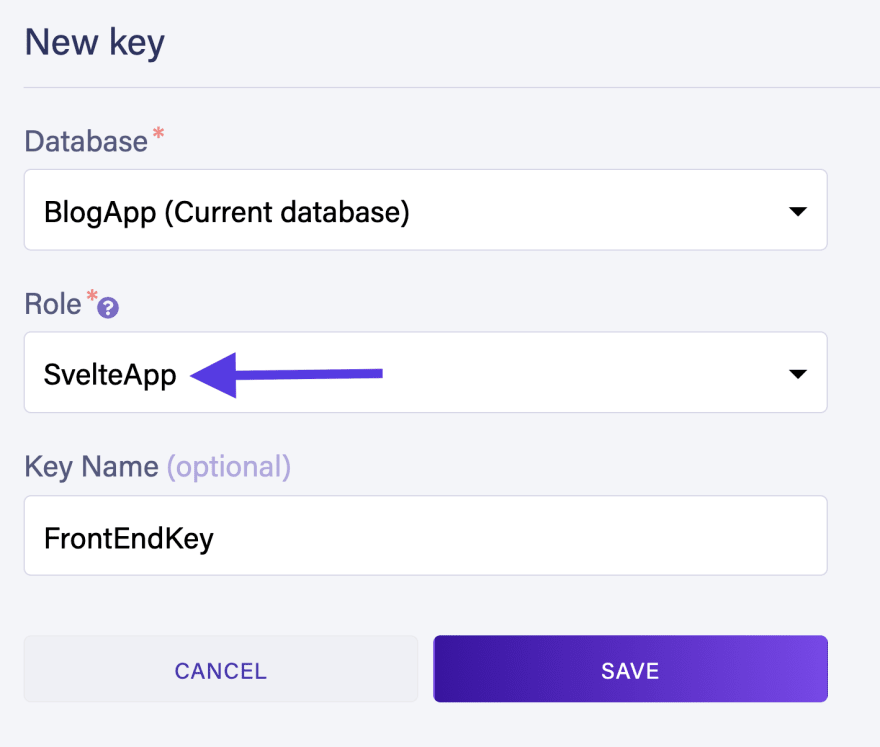

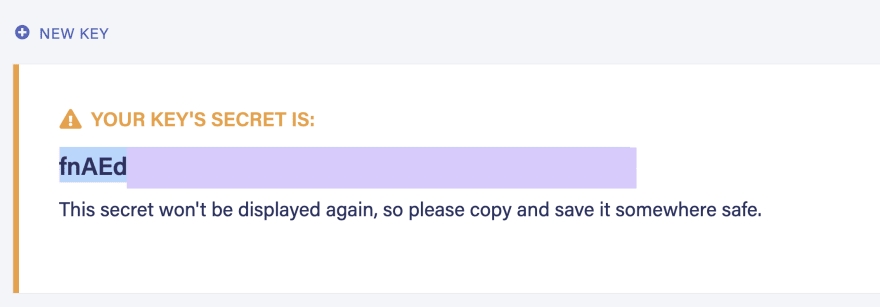
Next, copy the generated key. Create a new file .env in the root of your application and add the key as an environment variable.
# .envVITE_PUBLIC_FAUNA_KEY=<Your Key Here>Notice that this key is a public key and it will be exposed to the front end. This is why the role associated with this key only has read access.
Now on the home page lets pull in all the posts from your database. Add the following code to your src/routes/index.js file.
<script lang="js"> import { operationStore, query, setClient} from '@urql/svelte'; import client from '../client' setClient(client); const allPosts = operationStore(` query GetAllPosts($size: Int!, $cursor: String) { listPosts(_size: $size, _cursor: $cursor) { data { _id title author { email } } } } `, { size: 100 }, { requestPolicy: 'network-only' } ); query(allPosts);</script><h1>Posts</h1>{#if $allPosts.fetching}<p>Loading...</p>{:else if $allPosts.error}<p>Oh no... {$allPosts.error.message}</p>{:else}{#each $allPosts.data.listPosts.data as post}<div class="post-wrap"> <a href={`/posts/${post._id}`}> <div>{post.title}</div> </a> <span>by {post.author.email}</span></div>{/each}{/if}<style> .post-wrap { margin-bottom: 1rem; }</style>Restart your application. Notice that you are now getting all the posts in the root URL of your app.

Notice that when you select a post the app takes you to /post/:id route. You will be able to see individual posts in this route. Lets go ahead and create this route.
Create a new file routes/posts/[id].svelte and add the following code.
// routes/posts/[id].svelte<script lang="js"> import { operationStore, query, setClient} from '@urql/svelte'; import { page } from '$app/stores'; import client from '../../client' setClient(client); const currentPost = operationStore(` query GetPostById($id: ID!) { findPostByID(id: $id) { _id title content author { email } } } `, { id: $page.params.id } ) query(currentPost)</script>{#if $currentPost.fetching}<p>Loading...</p>{:else}<h2>{$currentPost.data.findPostByID.title}</h2><p>By <b>{currentPost.data.findPostByID.author.email}</b></p><p>{$currentPost.data.findPostByID.content}</p>{/if}Authentication and Authorization
Next, lets go ahead and add authentication to our application. We can easily add authentication using the fauna-gql-upload and fauna-graphql-tool library. First go lets go ahead and add these dependencies to our project.
npm i @fauna-labs/graphql-tool fauna-gql-upload --save-devThese libraries are automation scripts and you need an admin key from Fauna to run these tools.
Head over to the Fauna dashboard.
Select Security > Keys > New Key.

Create a new Admin key. Make sure the role is set as admin.
Do not share this admin key with anyone or deploy it with your application. Admin key should only be used with automation/migration tools.
Add the admin key to .env variable. Make sure that your .env file is in the gitignore list.
##.envVITE_PUBLIC_FAUNA_KEY=<Fauna Public Key>FGU_SECRET=<Your Admin Key>Next, you have to make the following changes to your GraphQL schema.
type User **@auth(primary: "email")** { username: String! email: String! posts: [Post!] @relation}type Post **@protected(membership: "User", rule: ["read", "write", "create"])** { title: String! content: String! author: User!}type Query { listPosts: [Post]}Notice in the previous code block we added a @auth directive to our User collection. This means that we will be using the User collection to authenticate. The primary key defines which fields will be used to register and login users. In this case, it is email. Therefore users can login using their email and password.
Notice that there is an @protected directive added to Post collection*.* This directive defines the access patterns. Logged in users are allowed to write, create new posts.
Once you add these changes to your schema open up the package.json file and add the following code snippet in the script section.
// package.json{ ... "script": { ... "fgu": "fgu", "fgt": "fgt" }}We are adding these scripts here so we can run fauna-graphql-tool (fgt) and fauna-gql-upload (fgu) from npm.
fgt takes your GraphQL schema and compiles the schema into various database resources (i.e. Collection, User Defined Functions, Authentication Rules) and fgu uploads the resources to Fauna.
Finally, run the following command in your terminal
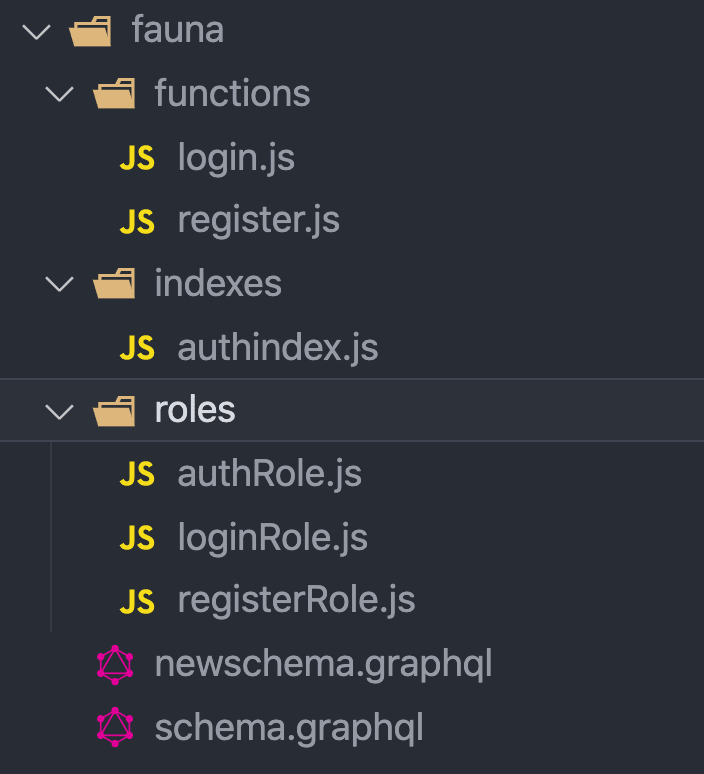
npm run fgt && npm run fguNotice that a new folder name/fauna is generated with all the resources.
Pro Tip:
Notice, that a new folder called
/faunais created when you run the scripts. You can open this folder up and observe the various functions and roles the automation scripts has created. If you wan to customize your authentication rules further feel free to change thelogic here.
If you are interested in how these resources work then go over the documentation on Fauna JavaScript drivers.
Now, when you go back to GraphQL playground in Fauna, you will notice that register and login mutation are available for you.

Finally, head over to Security > Roles > SvelteRole and give your role call privilege to these newly generated functions. Make sure to give read access to user_by_email index as well since this index is used by the login function.

User Registration Form
Next, lets go ahead and create the user registration form. Create a new file src/routes/register.svelte and add the following code.
// src/routes/register.svelte<script lang="js"> import { setClient, mutation } from '@urql/svelte'; import client from '../client' import { goto } from '$app/navigation'; setClient(client); const registerMutation = mutation({ query: ` mutation ($email: String!, $password: String!) { register(email: $email, password: $password) { email _id } } `, }); async function onSubmit(e) { const formData = new FormData(e.target); const data = {}; for (let field of formData) { const [key, value] = field; data[key] = value; } const { email, password } = data; const resp = await registerMutation({ email, password }) if (resp.data.register) { goto('/'); } if(resp.error) { alert(resp.error.message); console.log(resp.error); } }</script><div class="wrap"> <h3>Register New User</h3> <form on:submit|preventDefault={onSubmit}> <div> <label for="name">Email</label> <input type="text" id="email" name="email" value="" /> </div> <div> <label for="name">Password</label> <input type="password" id="password" name="password" value="" /> </div> <button class="button is-light" type="submit">Register</button> </form></div>In the previous code block you have a simple form component. On form submit the register mutation runs and a new user is registered.
User Login form
Next, lets go ahead and create a user login form. We can save the user session in the browser cookies. The js-cookie library let us do this easily. Add this library by running the following command in your terminal.
npm i js-cookie --saveCreate a new file src/routes/login.svelte and add the following code.
<script> import { setClient, mutation } from '@urql/svelte'; import client from '../client'; import Cookies from 'js-cookie'; import { goto } from '$app/navigation'; setClient(client); const loginMutation = mutation({ query: ` mutation ($email: String!, $password: String!) { login(email: $email, password: $password) { secret ttl data { _id email } } } `, }); async function onSubmit(e) { const formData = new FormData(e.target); const data = {}; for (let field of formData) { const [key, value] = field; data[key] = value; } const { email, password } = data; const resp = await loginMutation({ email, password }) if(resp.data.login.data) { Cookies.set( 'MY_BLOG_APP_TOKEN', JSON.stringify({ id: resp.data.login.data._id, secret: resp.data.login.secret }), { expires: resp.data.login.data.ttl } ); alert('Login Successful'); goto('/') } }</script><div> <h3>Login Form</h3> <form on:submit|preventDefault={onSubmit} > <div> <label for="name">Email</label> <input type="text" id="email" name="email" value="" /> </div> <div> <label for="name">Password</label> <input type="password" id="password" name="password" value="" /> </div> <button type="submit">Submit</button> </form></div>In the previous code block, you have a simple form component. On form submit the login mutation is triggered. On successful login, Fauna returns a new token. This token is authenticated user token. We use js-cookie to store this token in the browser cookies.
Creating a new Post
In our application, logged-in users are able to create new posts. Create a new function called clientWithAuthToken in your client.js file. You can pass in an auth token retrieved from session cookies and this function will set up the GraphQL client with that session token.
// src/client.jsexport const clientWithAuthToken = token => createClient({ url: 'https://graphql.us.fauna.com/graphql', fetchOptions: () => { console.log('token', token); return { headers: { authorization: token ? `Bearer ${token}` : '' }, }; },});Next, lets go ahead and create a page where users can post new posts.
Create a new file src/routes/posts/new.svelte and add the following code in there.
// src/routes/posts/new.svelte<script lang="js"> import Cookies from 'js-cookie'; import { setClient, mutation } from '@urql/svelte'; import { clientWithAuthToken } from '../../client'; import { goto } from '$app/navigation'; let userSession = Cookies.get('MY_BLOG_APP_TOKEN'); let authorId; if(userSession) { const { secret, id } = JSON.parse(userSession); authorId = id; setClient(clientWithAuthToken(secret)); } const newPost = mutation({ query: ` mutation CreatePost($title: String!, $content: String! $authorId: ID!) { createPost(data: { title: $title content: $content author: { connect: $authorId } }) { _id title content } } `, }); async function onSubmit(e) { const formData = new FormData(e.target); const data = {}; for (let field of formData) { const [key, value] = field; data[key] = value; } const { content, title } = data; try { console.log('authorId', authorId); if(!authorId) { alert('You must be logged in to create a post'); return; } const resp = await newPost({ title, content, authorId }); if(resp.data.createPost) { alert('Post created successfully') goto('/') } } catch (error) { console.log(error); } }</script><div> <h3>New Post</h3> {#if !userSession} <p class="login-promt">You must be logged in to create a post</p> {/if} <form on:submit|preventDefault={onSubmit} > <div class="input-blocks"> <label for="name">Title</label> <input type="text" name="title" value="" /> </div> <div class="input-blocks"> <label for="name">Content</label> <textarea type="text" name="content" value="" /> </div> <button type="submit">Submit</button> </form></div><style> .input-blocks { display: flex; flex-direction: column; max-width: 300px; margin-bottom: 1em; } .login-promt { color: coral; }</style>In the previous code block when a user submits the form the createPost mutation fires. Notice that we are using the clientWithAuthToken to set up your GraphQL client. You retrieve the session token from browser cookies and use it to set up the GraphQL client. If the user is not logged in or if the session token expired then this mutation will not work.
Deleting a Post
Lets add the functionality to delete a post. Create a new component src/lib/Delete.svelte
and add the following code.
// src/lib/Delete.svelte<script lang="js"> import Cookies from 'js-cookie'; import { clientWithAuthToken } from '../client'; import { setClient, mutation } from '@urql/svelte'; import { page } from '$app/stores'; import { goto } from '$app/navigation'; let userSession = Cookies.get('MY_BLOG_APP_TOKEN'); if (userSession) { setClient(clientWithAuthToken(userSession)) const {secret } = JSON.parse(userSession); setClient(clientWithAuthToken(secret)); } const deletePost = mutation({ query: ` mutation DeletePost($id: ID!) { deletePost(id: $id) { _id title } } ` }) async function handleDelete() { const { data, error } = await deletePost({ id: $page.params.id }); if(error) { console.log('error', error); alert('error', error.message); return; } if(data.deletePost) { alert('Post deleted'); goto('/') } }</script><button on:click|preventDefault={handleDelete} disabled={!userSession}>Delete</button>This component renders a button. When the button is selected it fires the deletePost mutation with the authenticated users token.
Add this component to your src/routes/posts/[id].svelte page.
<script lang="js"> ...</script>...<Delete />{/if}However, notice that when you select the button you will receive a permission denied message. This is because we havent set delete privilege.
Head over to Fauna dashboard again and select Security > Roles > UserRole.

In the Post collection check the delete and select save.

What if you only want the owner of the post to be able to delete it. It is very easy to add this rule. From the post dropdown select a delete rule.

Add the following code snippet in the predicate rule. This predicate rule defines that only the author of a post is allowed to delete a post.
Lambda("ref", Equals( Identity(), // logged in user Select(["data", "author"], Get(Var("ref")))))Editing a post
Next, lets add the edit post functionality. Go ahead and create a new component /src/lib/Edit.svelte and add the following code.
// /src/lib/Edit.svelte<script lang="js"> import { operationStore, query, setClient } from '@urql/svelte'; import { page } from '$app/stores'; import client from '../../client' import Delete from '$lib/Delete.svelte'; import Edit from '$lib/Edit.svelte'; setClient(client); const currentPost = operationStore(` query GetPostById($id: ID!) { findPostByID(id: $id) { _id title content author { email } } } `, { id: $page.params.id }, { requestPolicy: 'network-only' } ) query(currentPost) export let post = null; currentPost.subscribe(({data}) => { if(data) { post = data.findPostByID; } })</script>{#if $currentPost.fetching}<p>Loading...</p>{:else}<h2>{$currentPost.data.findPostByID.title}</h2><p>By <b>{currentPost.data.findPostByID.author.email}</b></p><p>{$currentPost.data.findPostByID.content}</p><Edit post={post}/><Delete />{/if}This component is a basic form component where the data is pre populated from the posts/[id].svelte component. On form submit this component fires the edit post mutation.
Add this component in your src/routes/posts/[id].svelte file.
<script lang="js"> import Edit from '$lib/Edit.svelte'; ... export let post = null; currentPost.subscribe(({data}) => { if(data) { post = data.findPostByID; } })</script>...<Edit post={post}/>{/if}With the changes applied the code in your src/routes/posts/[id].svelte file should be as follows.
// src/routes/posts/[id].svelte<script lang="js"> import { operationStore, query, setClient } from '@urql/svelte'; import { page } from '$app/stores'; import client from '../../client' import Delete from '$lib/Delete.svelte'; import Edit from '$lib/Edit.svelte'; setClient(client); const currentPost = operationStore(` query GetPostById($id: ID!) { findPostByID(id: $id) { _id title content author { email } } } `, { id: $page.params.id }, { requestPolicy: 'network-only' } ) query(currentPost) export let post = null; currentPost.subscribe(({data}) => { if(data) { post = data.findPostByID; } })</script>{#if $currentPost.fetching}<p>Loading...</p>{:else}<h2>{$currentPost.data.findPostByID.title}</h2><p>By <b>{currentPost.data.findPostByID.author.email}</b></p><p>{$currentPost.data.findPostByID.content}</p><Edit post={post}/><Delete />{/if}Update template to reflect user authentication state
Currently our app template doesnt change when user is in logged in state. Lets change that.
Create a new file src/store.js. Create a new writeable store in this file to hold user session data. Add the following code to this file.
import { writable } from 'svelte/store';export const userSession = writable(null); Next, whenever user logs in write the user information to this store. Make the following code changes to your src/routes/login.svelte file.
<script> ... import { userSession } from '../store'; ... async function onSubmit(e) { ... if(resp.data.login.data) { ... userSession.update(() => ({ email, id: resp.data.login.data._id, secret: resp.data.login.secret })); alert('Login Successful'); goto('/') } }</script>Finally update the src/lib/Nav.svelte file with he following code. In the following code block we are listening for any changes to the store. If the user is logged in the app renders Logout form else it renders login and register link.
<script lang="js"> import { userSession } from '../store.js'; import Cookies from 'js-cookie'; let user; userSession.subscribe(val => { user = val; }); function logout() { userSession.update(() => null); Cookies.remove('MY_BLOG_APP_TOKEN'); }</script><nav> <a href="/">Home</a> {#if user} <!-- svelte-ignore a11y-invalid-attribute --> <a href="#" on:click={logout}>Logout</a> {:else} <a href="/login">Login</a> <a href="/register">Register</a> {/if} <hr /></nav>Deployment
Vercel
We are now ready to make our application live. You can easily deploy a Svelte application with Vercel. Create a new account on Vercel if you havent done it already. Next run the following command and follow the instruction.
npx vercel --prodNetlify
Follow the article below for Netlify deployment.
https://dev.to/danawoodman/deploying-a-sveltekit-app-to-netlify-5dc3
And thats a wrap. I hope this article was informative and gave you an overall understanding of developing your own full-stack serverless apps with Svelte and GraphQL. If you have any feedback feel free to drop a line in the comment section. If you have any questions feel free to reach out to me on my Twitter @HaqueShadid
Original Link: https://dev.to/shadid12/how-to-build-a-full-stack-serverless-application-with-svelte-graphql-and-fauna-5427
Dev To
More About this Source Visit Dev To