
An Interest In:
Web News this Week
- April 19, 2024
- April 18, 2024
- April 17, 2024
- April 16, 2024
- April 15, 2024
- April 14, 2024
- April 13, 2024
Some of Our Sources
- Technology Review
- The Logo Smith
- Six Revisions
- Naldz Graphics
- My Ink Blog
- 24 Ways
- Android Dissected
- Codrops
- Willems Lab
- The Verge
Help Webnuz
Referal links:
Building An E-commerce Store with Nuxt.js and Strapi
In this tutorial, we are going to build an E-commerce store with Nuxt.js frontend, Strapi backend, Nodemailer for sending emails, and also integrate Stripe for payments. The E-commerce store were going to build can be found here.
What youll need for this tutorial:
- Basic knowledge of Vue.js
- Knowledge of JavaScript
Node.js (v14 recommended for Strapi)
Table of Contents:Installing Strapi
Building the Backend API
Installing Nuxt.js
Building Frontend
Integrating Stripe Payments
Using Nodemailer for Sending Emails
Heres what the completed version of your application will look like.


Lets get started.
Installing Strapi
From the Strapi documentation, it says that Strapi is a flexible, open-source Headless CMS that gives developers the freedom to choose their favorite tools and frameworks while also allowing editors to easily manage and distribute their content. By making the admin panel and API extensible through a plugin system, Strapi enables the world's largest companies to accelerate content delivery while building beautiful digital experiences.
Basically, Strapi helps us build an API in no time, I mean no hassle of creating a server from scratch. With Strapi, we can do literally everything, and its easily customizable, we can add our code and edit functionalities easily. Strapi is simply amazing and Im being modest about it. Im still stunned by what Strapi can do.
Strapi provides an admin panel to edit and create APIs and also provides code that can be edited. Its very easy to edit the code and it makes use of JavaScript.


To install Strapi, head over to the Strapi docs at Strapi, well be using the SQLite database for this project. To install Strapi, run the following commands:
yarn create strapi-app my-project # using yarn npx create-strapi-app my-project # using npxReplace my-project with the name you wish to call your application directory, your package manager will create a directory with the name and will install Strapi.
If you have followed the instructions correctly, you should have Strapi installed on your machine. Run the following commands to start the Strapi development server:
yarn develop # using yarn npm run develop # using npmThe development server starts our app on http://localhost:1337/admin.
Building the Backend API
We have Strapi up and running, the next step is to create our content-types of our application.
- Creating the Product content-type
- Click on content-types in the side menu
- Add new content-type named product.
- Create the following fields under product content-type
- Name as short text
- Description as short text
- Price as decimal number
- Image as collection.
Create as many products as you like.
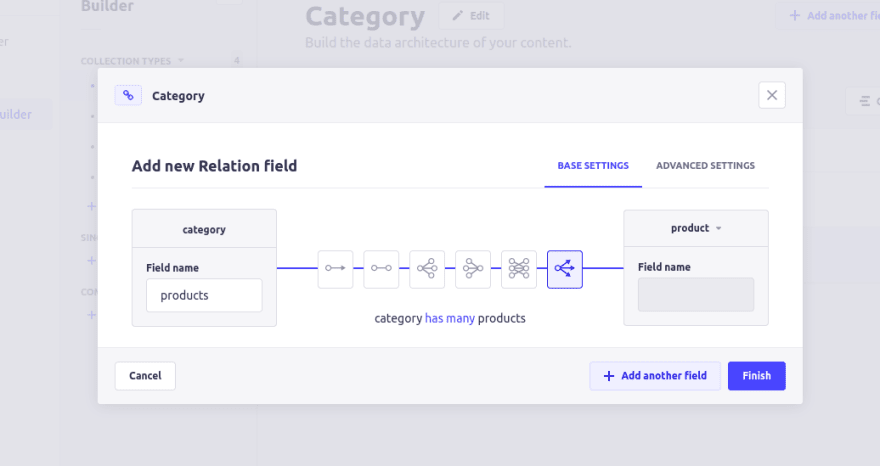
Creating the Category content-type
Create a category content type
Create the following fields under category content-type
- Nam e as short text
- Relations as category has many products.
- Creating the Order content-type
- Create an order content-type
Create the following fields under order content-type
- Item as JSON
Creating the Subscriber content-type
Create a subscriber content-type
Create the following fields under subscriber content-type
- Email as email.
Save the content-types and now we can view our API in JSON format by visiting http://localhost:1337/api/products.
Installing Nuxt.js
To install Nuxt.js, visit the Nuxt.js docs.
We want to use Nuxt in SSR mode, server hosting, and also Tailwind CSS as our preferred CSS framework, so go ahead and select those, then select the rest of the options according to your choice. Preferably leave out CI, commit-linting, style-linting, and the rest but do whatever you like, all well be needing in this tutorial is what Ive mentioned above.
To install Nuxt.js, run the following commands:
yarn create nuxt-app <project-name> # using yarn npx create-nuxt-app <project-name> # using npx npm init nuxt-app <project-name> # using npmThis will ask you some questions (name, Nuxt options, UI framework, TypeScript, linter, testing framework, etc.)
Once all questions are answered, all the dependencies will be installed. The next step is to navigate to the project folder and launch it by running the following commands:
yarn dev # using yarn npm run dev # using npmWe should have Nuxt running on http://localhost:3000.
Building The Frontend
Now, we can start building the frontend of our application. Lets start by building our components, but first lets edit our layouts at layouts/default.vue.
Head over to the layouts directory and open the default.vue file and fill it up with the following code:
<template> <div> <Nuxt /> </div> </template> <style> html { /* font-family: 'Nunito', 'Source Sans Pro', -apple-system, BlinkMacSystemFont, 'Segoe UI', Roboto, 'Helvetica Neue', Arial, sans-serif; */ font-family: 'Nunito'; font-size: 16px; word-spacing: 1px; -ms-text-size-adjust: 100%; -webkit-text-size-adjust: 100%; -moz-osx-font-smoothing: grayscale; -webkit-font-smoothing: antialiased; box-sizing: border-box; } *, *::before, *::after { box-sizing: border-box; margin: 0; } .button--hero { display: inline-block; color: #fff; text-decoration: none; padding: 10px 30px; } .button--green { display: inline-block; border: 1px solid #3b8070; color: #3b8070; text-decoration: none; padding: 10px 30px; } .button--green:hover { color: #fff; background-color: #3b8070; } .button--grey { display: inline-block; border: 1px solid #35495e; color: #35495e; text-decoration: none; padding: 10px 30px; margin-left: 15px; } .button--grey:hover { color: #fff; background-color: #35495e; } .button--delete { display: inline-block; border: 1px solid #35495e; padding: 5px; color: white; background-color: #35495e; } button:focus { outline: none; } .container { width: 80%; } </style>Building the Hero Section
Execute the following code to create a HeroSection.vue file.
cd components touch HeroSection.vueFill up the HeroSection.vue file with the code below.
<template> <div class="hero relative max-h-screen flex flex-col justify-center items-center text-center mx-auto bg-cover" > <div class="relative m-10 md:m-20"> <div class="relative"> <img class="absolute left-0 top-0" src="Repeat_Grid_2.png" alt="" /> </div> <div class="z-10 relative"> <h1 class="text-5xl text-white m-3 font-bold md:text-6xl"> Unique Essence Store </h1> <p class="text-white subtitle">...your one stop shop for all</p> </div> <div class="circle absolute z-0 right-0 top-0"></div> <div class="links mt-10"> <NuxtLink to="/" class="button--hero bg-button relative z-10"> View Collections </NuxtLink> </div> </div> </div> </template> <script> export default { name: 'HeroSection', } </script> <style scoped> /* Sample `apply` at-rules with Tailwind CSS .container { @apply min-h-screen flex justify-center items-center text-center mx-auto; } */ .hero { background-color: #9c7474dc; } .circle { width: 10em; height: 10em; border-radius: 5em; background: #b8738d; } .title { font-family: 'Nunito'; display: block; font-weight: 700; font-size: 50px; letter-spacing: 1px; line-height: 1em; } .subtitle { font-weight: 100; word-spacing: 2px; } </style>Building the Ads Section
Still in the components folder create an Ads.vue file by running the following command:
touch Ads.vueThen fill it up with the following code:
<template> <div class="bg-primary ads flex justify-center items-center"> <h3 class="text-white text-lg ml-6 sm:text-2xl font-bold"> 50% off on all Purchases Above $300, Hurry Now!!!! </h3> <img class="h-48 sm:pl-20" :src="`uriel-soberanes-MxVkWPiJALs-unsplash-removebg-preview.png`" alt="" /> </div> </template> <script> export default { name: 'Ads', } </script> <style scpoed> </style>Here, all were doing is linking to an image from our static folder and displaying some promo messages.
Building the Footer Section
Execute the following code to create a Footer.vue file.
touch Footer.vueFill it up with the following code:
<template> <div class="flex flex-col mt-10 sm:mt-0 sm:flex-row sm:items-center bg-primary text-white space-x-5 p-5 py-8 md:space-x-20 md:p-20 font-light text-sm" > <p class="ml-5 font-bold">Unique Essense Store</p> <div class="m-2 mb-3"> <NuxtLink to="/" class="m-2"><p>Home</p></NuxtLink> <NuxtLink to="/all" class="m-2"><p>All</p></NuxtLink> <NuxtLink to="men" class="m-2"><p>Men</p></NuxtLink> <NuxtLink to="women" class="m-2"><p>Women</p></NuxtLink> </div> <p> Sed ut perspiciatis unde omnis iste natus error sit voluptatem accusantium doloremque laudantium, totam rem aperiam, eaque ipsa quae ab illo inventore veritatis et quasi architecto beatae vitae dicta sunt explicabo. Nemo enim ipsam voluptatem quia voluptas sit aspernatur aut odit aut fugit, sed quia consequuntur magni dolores eos qui ratione voluptatem sequi nesciunt </p> </div> </template> <script> export default { name: 'Footer', } </script> <style scoped> </style>Building the Vuex Store
Vuex is a state manager that is popularly used with Vue.js. Well be setting up a simple store with Vuex in this section.
Execute the following code to open up the index.js file in the store folder.
cd store code index.jsThen fill up index.js with the following code:
export const state = () => ({ allProducts: [], featuredProducts: [], menProducts: [], womenProducts: [], cartItems: [], }) export const getters = { /* return items from store */ allProducts: (state) => state.allProducts, featuredProducts: (state) => state.featuredProducts, menProducts: (state) => state.menProducts, womenProducts: (state) => state.womenProducts, getCart: (state) => state.cartItems, getCartTotal: (state) => state.cartItems.length < 1 ? '0' : state.cartItems .map((el) => el.price * el.quantity) .reduce((a, b) => a + b), } export const actions = { async addItemToCart({ commit }, cartItem) { await commit('setCartItem', cartItem) }, async deleteCartItem({ commit }, id) { await commit('removeCartItem', id) }, } export const mutations = { setProducts: (state, products) => (state.allProducts = products), setFeaturedProducts: (state, products) => (state.featuredProducts = products), setMenProducts: (state, products) => (state.menProducts = products), setWomenProducts: (state, products) => (state.womenProducts = products), setCartItem: (state, item) => state.cartItems.push(item), removeCartItem: (state, id) => state.cartItems.splice( state.cartItems.findIndex((el) => el.id === id), 1 ), }Installing and Using @nuxtjs/swal
We need some kind of alert system to improve the user experience of our website, for example, to alert users when they carry out a specific task. Well be using @nuxtjs/swal module for that purpose.
Execute the following code to install the package.
yarn add @nuxtjs/swal # using yarn npm install @nuxtjs/swal # using npmThen add the following code to your nuxt.config.js file.
plugins: ['~/plugins/vue-swal'], build: { /* ** Run ESLint on save */ extend(config, ctx) { if (ctx.dev && ctx.isClient) { config.module.rules.push({ enforce: 'pre', test: /\.(js|vue)$/, loader: 'eslint-loader', exclude: /(node_modules)/, }) } }, /* ** Add vue-swal */ vendor: ['vue-swal'], },Installing and Using @nuxtjs/strapi
Well be using @nuxtjs/strapi module for to make API calls to our Strapi back-end.
Execute the following code to install the package.
yarn add @nuxtjs/strapi@^0.3.4 # using yarn npm install @nuxtjs/strapi@^0.3.4 # using npmThen add the following code to your nuxt.config.js file:
modules: [ ... '@nuxtjs/strapi', ], strapi: { url: process.env.STRAPI_URL || 'http://localhost:1337/api', entities: ['products', 'orders', 'subscribers'], }, env: { STRAPI_URL: `http://localhost:1337/api`, },
shell
Building the Newsletter Section
Execute the following code to create a NewsLetter.vue file.
cd components touch NewsLetter.vueFill it up with the code below:
<template> <div class="sm:flex mx-auto items-center m-10 justify-center space-x-6 sm:space-x-20 m-3 sm:m-6 mx-6" > <div> <h1 class="text-lg m-7">Sign Up For NewsLetter</h1> </div> <div> <form @submit="handleSuscribe"> <input id="" v-model="email" class="p-2 m-3 sm:m-0 border border-solid border-t-0 border-l-0 border-r-0 border-b-1 outline-none border-black" type="email" name="" placeholder="email" /> <button type="submit" class="button--grey">Subscribe</button> </form> </div> </div> </template> <script> export default { name: 'NewsLetter', data() { return { email: '', } }, methods: { async handleSuscribe(e) { e.preventDefault() this.$swal({ title: 'Successful!', text: 'Thanks for Subscribing', icon: 'success', button: 'Ok', }) await this.$strapi.$subscribers.create({ Email: this.email }) this.email = '' // clear email input }, }, } </script>This newsletter section gives users the privilege to sign up for our e-commerce stores newsletter. We use the @nuxtjs/strapi module to create a new subscriber every time our handleSuscribe method is invoked.
Building the Nav Section
Execute the following code to create a Nav.vue file.
cd components touch Nav.vueAdd the following code to the file:
<template> <div class="navbar flex text-white relative"> <div class="nav-item-center flex space-x-6 sm:space-x-20 p-5 mx-auto"> <NuxtLink to="/">Home</NuxtLink> <NuxtLink to="/all">All</NuxtLink> <NuxtLink to="/men">Men</NuxtLink> <NuxtLink to="/women">Women</NuxtLink> </div> <div class="cart fixed bottom-0 right-0 shadow-md m-3"> <p class="p-1 cartCount text-xs absolute top-0 right-0"> {{ getCart.length }} </p> <NuxtLink to="/cart"> <p class="pt-3 px-2">Cart</p> </NuxtLink> </div> <!-- <div class="ham-menu shadow-md fixed bottom-0 right-0 m-3 sm:hidden"> <p class="text-center pt-3">menu</p> </div> --> </div> </template> <script> import { mapGetters } from 'vuex' export default { name: 'Nav', computed: { ...mapGetters(['getCart']), }, } </script> <style scoped> .ham-menu { background-color: #000; width: 3em; height: 3em; border-radius: 1.5em; } .cart { background-color: rgb(163, 87, 129); width: 3em; height: 3em; border-radius: 1.5em; } .navbar { background-color: rgb(24, 20, 22); } .cartCount { background: #000; border-radius: 30%; } </style>In the Nav section component, we are making use of the Vuex store, we are using the getCart getter to get the number of items added to the cart from the Vuex store.
Building the Featured section
Still in the components folder, execute the following code to create a Featured.vue file.
touch Featured.vueAdd the following lines of code to the Featured.vue component:
<template> <div> <div class="sm:grid sm:grid-cols-3 md:grid-cols-3 gap-6 justify-center items-center" > <div v-for="(product, i) in data" :key="i" class="flex flex-col max-h-screen shadow-xl m-8 sm:m-2 md:m-4 justify-center items-center" > <!-- <div>{{ product }}</div> --> <div class="img-wrapper h-3/4 mx-auto max-h-screen"> <img class="flex-shrink h-1/2" :src="`http://localhost:1337${product.attributes.image.data.attributes.formats.small.url}`" alt="" /> </div> <div> <p class="text-center m-3"> {{ product.attributes.name }} </p> <NuxtLink :to="`/products/${product.id}`"> <button class="button--green mb-4">View Product</button> </NuxtLink> </div> </div> </div> </div> </template> <script> export default { name: 'Featured', props: ['data'], } </script> <style scoped> </style>What were doing here is displaying the data from our products API. This component is responsible for the cards that are displayed on the homepage, men and women products pages. We pass the data as props from the parent down to the featured component, then loop through it and display the data properly. If you recall correctly, our products content-type has a name and image property.
Building the Products Section
This component is responsible for displaying the details about individual product details and it also provides the option to add a product to our cart.
Execute the following code to create a Products.vue file.
touch Products.vueAdd the following lines of code:
<template> <div> <div class="sm:grid grid-cols-2 justify-center shadow-lg items-center gap-3 m-5 md:m-5" > <div> <img class="max-h-screen" :src="`http://localhost:1337${data.attributes.image.data.attributes.formats.small.url}`" /> </div> <div class="sm:m-3 md:m-5 p-3 sm:p-0"> <p class="my-2"> <span>Price: </span>{{ data.attributes.price | formatPrice }} </p> <span class="my-2">Quantity: </span ><input v-model="cartItem.quantity" class="p-3 border border-solid border-t-0 border-l-0 border-r-0 border-b-1" type="number" /> <p class="my-2 text-sm">{{ data.attributes.description }}</p> <button class="button--green my-2" @click=" addItemToCart(cartItem) displayMessage() " > Add to Cart </button> </div> </div> </div> </template> <script> import { mapActions } from 'vuex' export default { name: 'Products', props: ['data'], data() { return { cartItem: { id: this.data.id, name: this.data.attributes.name, url: `http://localhost:1337${this.data.attributes.image.data.attributes.formats.small.url}`, price: this.data.attributes.price, quantity: 1, }, } }, methods: { ...mapActions(['addItemToCart']), displayMessage() { this.$swal({ title: 'Cart Updated!', text: `${this.data.name} was added to your cart!`, icon: 'success', button: 'Ok', }) }, }, filters: { formatPrice(price) { return `$${price}` }, }, } </script> <style scoped> </style>Thats all for our components.
We can now start building our pages with Nuxt.js. Nuxt.js provides automatic page routing when we build pages. Amazing right!!.
Building our Homepage
Execute the following code to create an index.vue file in the pages directory.
cd pages touch index.vueThen we fill it up with the following code:
<template> <div> <HeroSection /> <Nav class="sticky top-0" /> <div class="sm:w-11/12 md:w-4/5 mx-auto"> <h1 class="m-5 font-bold text-lg">Featured Products</h1> <Featured class="mx-auto" :data="featuredProducts" /> </div> <Ads class="mx-auto sm:m-10" /> <NewsLetter class="mx-auto" /> <Footer /> </div> </template> <script> import { mapGetters } from 'vuex' export default { async asyncData({ $strapi, $http, store, error }) { try { const response = await this.$strapi.$products.find({ featured: true, populate: '*' }) store.commit('setFeaturedProducts', response.data) } catch (e) { error(e) } }, data() { return { featuredProds: [], } }, computed: { ...mapGetters(['featuredProducts']), }, } </script> <style scoped> /* Sample `apply` at-rules with Tailwind CSS .container { @apply min-h-screen flex justify-center items-center text-center mx-auto; } */ </style>What were doing here is basically creating our homepage using the components we created earlier on. Furthermore, were using @nuxtjs/strapi package to fetch data (featured products) from our Strapi backend API inside of our asyncData() lifecycle method and then we commit the data to the Vuex store. Then we get data from the store to display on our homepage through our featuredProducts getter.
Building All Products Page
Still in the pages directory, execute the following code to create an all.vue file.
touch all.vueFill the all.vue file up with the following code:
<template> <div> <Nav class="sticky top-0" /> <div class="sm:w-11/12 md:w-4/5 mx-auto"> <h1 class="m-5 font-bold text-lg">Our Collection</h1> <div class="flex justify-center text-center mx-auto"> <Featured :data="allProducts" /> </div> </div> <Ads class="mx-auto sm:m-10" /> <Footer /> </div> </template> <script> import { mapGetters } from 'vuex' export default { async asyncData({ $strapi, $http, store, error }) { try { const response = await this.$strapi.$products.find({ populate: '*' }) store.commit('setProducts', response.data) } catch (e) { error(e) } }, data() { return { products: [], } }, computed: { ...mapGetters(['allProducts']), }, } </script> <style scoped></style>Here, were doing the same thing as we did in the index.vue page, the only difference is that were fetching all of our products from the Backend API.
Building the Men Products Page
Execute the following code to create a men.vue file.
touch men.vueThen proceed to fill it up with the following code:
<template> <div> <Nav class="sticky top-0" /> <div class="md:w-4/5 sm:w-11/12 mx-auto"> <h1 class="m-5 font-bold text-lg">Men's Collection</h1> <div class="flex justify-center text-center mx-auto"> <Featured :data="menProducts" /> </div> </div> <Ads class="mx-auto sm:m-10" /> <Footer /> </div> </template> <script> import { mapGetters } from 'vuex' export default { async asyncData({ $strapi, $http, store, error }) { try { let response = await this.$strapi.$products.find({ populate: '*' }) response = response.data.filter( (el) => el.attributes.category.data.attributes.name === 'men' ) store.commit('setMenProducts', response) } catch (e) { error(e) } }, data() { return { menProds: [], } }, computed: { ...mapGetters(['menProducts']), }, } </script> <style scoped> </style>Building Women Products Page
Execute the following code to create a women.vue file.
touch women.vueThen proceed to fill it up with the following code.
<template> <div> <Nav class="sticky top-0" /> <div class="sm:w-11/12 md:w-4/5 mx-auto"> <h1 class="m-5 font-bold text-lg">Women's Collection</h1> <div class="flex justify-center text-center mx-auto"> <Featured :data="womenProducts" /> </div> </div> <Ads class="mx-auto sm:m-10" /> <Footer /> </div> </template> <script> import { mapGetters } from 'vuex' export default { async asyncData({ $strapi, $http, store, error }) { try { let response = await this.$strapi.$products.find({ populate: '*' }) response = response.data.filter( (el) => el.attributes.category.data.attributes.name === 'women' ) store.commit('setWomenProducts', response) } catch (e) { error(e) } }, data() { return { womenProds: [], } }, computed: { ...mapGetters(['womenProducts']), }, } </script> <style scoped> </style>Building Product Detail Page
Execute the following code to create a _products.vue file.
mkdir products touch _products.vueFill it up with the following code:
<template> <div> <Nav class="sticky top-0" /> <h1 class="font-bold m-5 md:mx-10"> {{ currentProduct.attributes.name }} </h1> <Products :data="currentProduct" /> <Ads class="mx-auto sm:m-10" /> <Footer /> </div> </template> <script> export default { async asyncData({ $strapi, $http, route }) { const id = route.params.products const response = await this.$strapi.$products.findOne(id, { populate: '*' }) const { data: currentProduct } = response return { currentProduct } }, data() { return { currentProduct: {}, } }, } </script> <style scoped> </style>Building Cart Page
Execute the following code to create a cart.vue file.
touch cart.vueThen fill the file up with the following code:
<template> <div> <Nav class="sticky top-0" /> <div class="w-4/5 sm:w-1/2 mx-auto"> <h1 class="m-5 font-bold text-lg">Your Cart</h1> </div> <div v-for="item in getCart" :key="item.id" class="w-4/5 sm:w-1/2 flex items-center space-x-3 mx-auto shadow-lg m-5 p-3" > <div> <img class="h-24" :src="`${item.url}`" alt="" /> </div> <div> <p> {{ item.name }} </p> <p> {{ item.quantity | formatQuantity }} </p> <button class="button--delete" @click="deleteCartItem(item.id)"> Delete </button> </div> </div> <div class="w-4/5 sm:w-1/2 mb-2 mx-auto"> <p> <span>Total: </span> {{ formatCartTotal(getCartTotal) | formatPrice }} </p> <button v-show="getCartTotal > 0" class="button--green mx-auto" @click="handleSubmit" > checkout </button> </div> <Ads class="mx-auto sm:m-10" /> <Footer /> </div> </template> <script> import { mapGetters, mapActions } from 'vuex' export default { data() {}, computed: { ...mapGetters(['getCart', 'getCartTotal']), }, methods: { async handleSubmit(e) { }, formatCartTotal(num) { if (num > 0) { return num.toFixed(2) } else { return num } }, ...mapActions(['deleteCartItem']), }, filters: { formatPrice(price) { return `$${price}` }, formatQuantity(num) { const qtyNum = num === 1 ? `${num} unit` : `${num} units` return qtyNum }, }, } </script> <style scoped> </style>We just built our cart page and if you look at the code above closely, youll notice some methods that weve not defined yet. In the next section, well define them when we integrate Stripe payments.
Integrating Stripe Payments
To get started with stripe, go to Stripe, and register to obtain your API keys before proceeding with this tutorial.
Once youve done that, Ill assume youve gotten your API keys and youre ready to proceed.
Installing Stripe Package
Execute the following code to install Stripe.
yarn add stripe # using yarn npm install stripe # using npmLook for the .env.example file in the root folder of your Strapi application and rename it to .env. Then add the following line of text to it:
STRIPE_KEY=<YOUR_STRIPE_KEY>Replace <YOUR_STRIPE_KEY> with your Stripe credentials.
Then proceed as follows to open up the order.js controller.
cd src/api cd order cd controllers code order.js # open in your editorEdit the contents of order.js to look like:
'use strict'; const stripe = require('stripe')(process.env.STRIPE_KEY) const MY_DOMAIN = 'http://localhost:3000/cart'; const { createCoreController } = require('@strapi/strapi').factories; module.exports = createCoreController('api::order.order', ({ strapi }) => ({ async create(ctx) { const { cartDetail, cartTotal } = ctx.request.body // build line items array const line_items = cartDetail.map((cartItem) => { const item = {} item.price_data = { currency: 'usd', product_data: { name: cartItem.name, images: [`${cartItem.url}`] }, unit_amount: (cartItem.price * 100).toFixed(0), }, item.quantity = cartItem.quantity return item; }) // create order await strapi.service('api::order.order').create({ data: { item: line_items}}); const session = await stripe.checkout.sessions.create({ payment_method_types: ['card'], line_items, mode: 'payment', success_url: `${MY_DOMAIN}?success=true`, cancel_url: `${MY_DOMAIN}?canceled=true`, }) return { id: session.id} } }));What weve done here is to redefine the create endpoint. Now when we hit the /order/create endpoint, we generate a line_items array which is stored in our database and also sent to Stripe as product details along with other essential details related to purchases. Finally, we return a JSON object containing an id with the Stripe session ID.
Thats all for Stripe on the backend. Next, open your Nuxt.js application to add Stripe support on the frontend.
Installing @stripe/stripe-js
To start using Stripe in our Nuxt.js application, we have to install a package to help us make the process easier. Execute the following code to install @stripe/stripe-js.
yarn add @stripe/stripe-js # usnig yarn npm install @stripe/stripe-js # using npmOpen up your cart.vue file, then add the following lines of code to the file:
export default { data() { return { dataItems: {}, session: {}, stripe: {}, stripePromise: {}, } }, computed: { ...mapGetters(['getCart', 'getCartTotal']), }, mounted() { this.displayMessage() }, methods: { async handleSubmit(e) { e.preventDefault() const response = await this.$http.$post( `http://localhost:1337/api/orders`, { cartDetail: this.getCart, cartTotal: this.getCartTotal.toFixed(2), } ) this.$swal({ title: 'Please wait', text: 'redirecting you to stripe, click ok', icon: 'success', button: 'Ok', }) // stripe logic const stripePromise = loadStripe(process.env.STRIPE_KEY) const session = response const stripe = await stripePromise const result = await stripe.redirectToCheckout({ sessionId: session.id, }) console.log(response) if (result.error) { this.$nuxt.context.error(result.error.message) } }, // using vue-swal to display messages displayMessage() { if (this.$route.query.success) { this.$swal({ title: 'Order placed!', text: 'Thanks for placing your orders', icon: 'success', button: 'Ok', }) } else if (this.$route.query.canceled) { this.$swal({ title: 'Order canceled!', text: "continue to shop around and checkout when you're ready.", icon: 'warning', button: 'Ok', }) } }, formatCartTotal(num) { if (num > 0) { return num.toFixed(2) } else { return num } }, ...mapActions(['deleteCartItem']), }, filters: { formatPrice(price) { return `$${price}` }, formatQuantity(num) { const qtyNum = num === 1 ? `${num} unit` : `${num} units` return qtyNum }, }, }Replace <YOUR_STRIPE_KEY> with your Stripe credentials*.* Now, we should have Stripe working across the whole application.
Using Nodemailer for Sending Emails
To install Nodemailer, run:
yarn add nodemailer # using yarn npm install nodemailer # using npmOpen up your Strapi application and execute the following code to access the subscriber.js controller.
cd src/api cd subscriber cd controllers code subscriber.jsAdd the following lines of code to your subscriber.js file:
'use strict'; const nodemailer = require('nodemailer') module.exports = { async create(ctx) { const { Email } = ctx.request.body const existingSub = await strapi.services.subscriber.find({ Email }) if (!existingSub) { await strapi.services.subscriber.create({ Email }) try { let transporter = nodemailer.createTransport({ service: "gmail", auth: { user: <your_email>, pass: <your_password>, } }) const mailOptions = { from: 'Unique essense stores', to: `${Email}`, subject: 'Welcome', text: `Hey @${Email}, Thanks for subscribing to our NewsLetter` }; await transporter.sendMail(mailOptions) } catch (error) { console.log(error) } } return Email } };In the code above, using Nodemailer, weve set up an email service that sends out notifications to subscribers.
In order for Nodemailer to work with Gmail, you need to turn on less secured app access. You can do so here.
Conclusion
Well devs, thats all for now. I hope this tutorial has given you an insight into how to build your own E-Commerce store with Strapi. You could even add more features to your store if you like.
Original Link: https://dev.to/strapi/building-an-e-commerce-store-with-nuxtjs-and-strapi-1n68
Dev To
More About this Source Visit Dev To