
An Interest In:
Web News this Week
- April 2, 2024
- April 1, 2024
- March 31, 2024
- March 30, 2024
- March 29, 2024
- March 28, 2024
- March 27, 2024
Some of Our Sources
- Engadget
- Techcrunch
- Simplebits
- Smashing Apps
- TutsPlus - Design
- Creative Curio
- My Ink Blog
- CSS Tricks
- Daily Now
- Dev To
Help Webnuz
Referal links:
Medusa: Node.js ecommerce platform for 11ty
In this tutorial, you will learn how to build a modern e-commerce storefront with Medusa and 11ty. You will create our stores backend using Medusa's headless commerce engine and admin panel, and the stores frontend with the 11ty framework and tailwind CSS.
Medusa is the open source Shopify alternative providing a headless commerce solution that is focused on maximizing developer flexibility. 11ty is a very flexible simple static site generators used for building modern websites.
In this tutorial, you will learn how to:
- Set up Medusa's backend server
- Install DigitalOcean spaces for easier file management
- Set up Medusa's admin panel for easier management of your online store
- Build a simple storefront with 11ty and TailwindCSS
Below is a video of what we will be building
Prerequisites
To follow through this tutorial, make sure to have:
- Nodejs and NPM installed on your local machine. You can follow the instructions in this link to fully install Nodejs and npm on your local computer.
- Git installed locally with a GitHub account. Follow the instructions here to install git, and create a GitHub account here.
- DigitalOcean account. Create a DigitalOcean account here.
Why Medusa?
- Open source - Medusa is an open source software that can be used as a commerce backend for your webshop and with a large support community behind it which you can access here.
- Headless architecture - Medusas headless architecture makes it easy to build with any type of frontend (e.g. 11ty) and integrate with your favorite CMS, payment, fulfillment solutions etc.
- Multi-market support - Medusa natively supports multiple currencies and allows you to set use local shipping and payment providers for a globale setup.
- Fully customizable - Our extendible architecture makes it easy to customize for any type of advanced use case and makes it easy to build in custom logic and integrations.
Medusa backend installation and setup
The first step in this tutorial will be to set up the Medusa server and admin panel. Medusa provides 3 core components for managing your commerce projects - a headless commerce engine that exposes REST APIs for your frontend consumption, a customizable frontend, and an admin panel for managing your store.
In this project, we will be making use of the headless commerce engine and admin panel only since we will be building the storefront with 11ty. To set up the backend server, first install the Medusa CLI.
npm install -g @medusajs/medusa-cliThen create a new project with the installed CLI.
medusa new <my-medusa-store> --seedChange to the preferred name of your project. Navigate to the generated folder, and create a new user.
cd <my-medusa-store>medusa user -e <[email protected]> -p <some_password>Change <[email protected]> to your preferred email, and to your preferred password.
Finally, start up the created server.
medusa developThe server can be accessed at http://localhost:9000.
Set up DigitalOcean Spaces for Image Uploads
After installation the Medusa server, the next step will be to set up a DigitalOcean space for storing our uploaded images. To do that:
- Open your DigitalOcean account. Navigate to Spaces. Create a new Space with the default settings.
Select the created space, and click Manage Keys.
Click Generate New Key.
Add the Key name and save it.


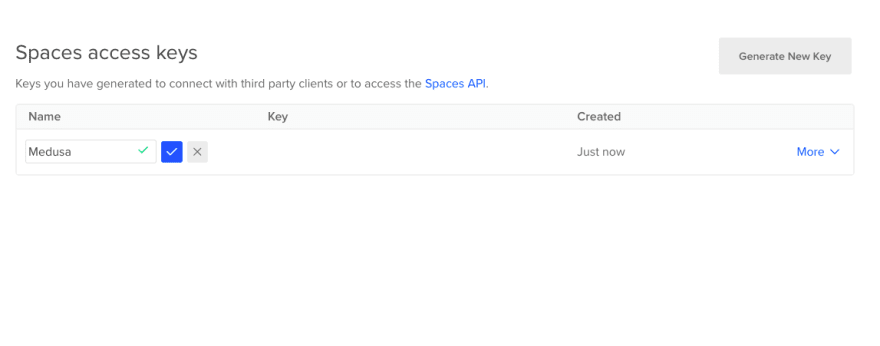
A key ID and secret key will be automatically generated, copy the keys to a safe place. Now, navigate back to the medusa project folder, and install the medusa-file-spaces package.
npm install medusa-file-spacesThen open your medusa-config.js file, and add the following code sample to the plugins section.
{ resolve: `medusa-file-spaces`, options: { spaces_url: "https://test.fra1.digitaloceanspaces.com", bucket: "test", endpoint: "fra1.digitaloceanspaces.com", access_key_id: "YOUR-ACCESS-KEY", secret_access_key: "YOUR-SECRET-KEY", },},Change spaes_url to the URL of your created DigitalOcean space, change bucket to the name of the space, change access_key_id to the generated key ID, and change the secret_access_key to the generated secret key.
Set up and Install the Medusa Admin Panel
Medusa provides an admin panel that makes it easy to configure and manage our store. To set up the admin panel you should first clone the admin repository from GitHub.
git clone https://github.com/medusajs/admin <medusa-admin>Change to your preferred folder name. Then navigate to the admin folder
cd <medusa-admin>Install all the required packages
npm installAnd finally, start the admin panel
npm startThe admin panel will load up at http://localhost:7000/.

Log in with your servers user mail and password to access the admin dashboard.

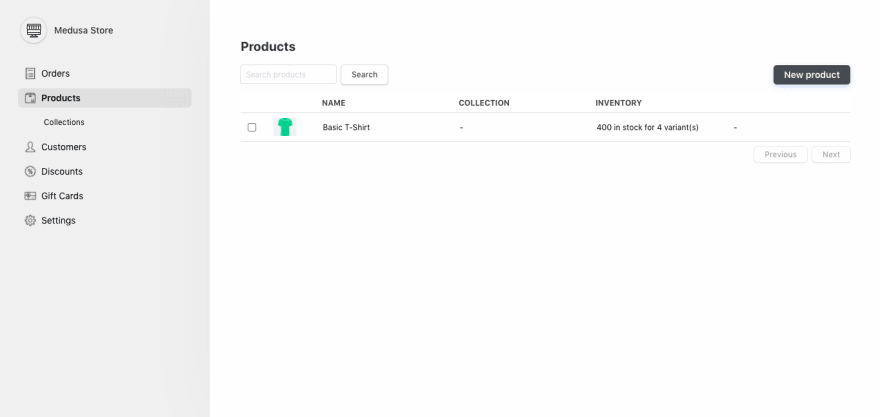
Add Products to the store
Now that we have fully set up the Medusa server and admin panel, the next step will be to add products to our store. We will be doing this through the admin panel, as the admin panel makes it much easier compared to sending API requests to the server directly.
To add a product to the store:
Select products on your side menu and click New product on the right-hand side of the window.
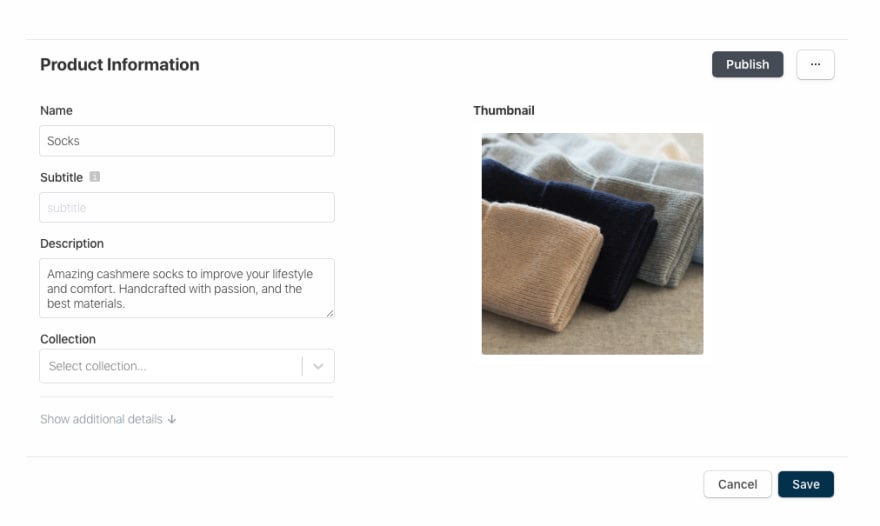
Add your product information and click Save to register the new product.
Click Publish on the next step to publish the new product.


Make sure to add at least 3 products to your store, this is required to complete the frontend setup for this particular tutorial. For each product, make sure to add:
- A thumbnail image
- 4 product images
- Product Name
- Product description
- Handle (the handle should be in slug format i.e., t-shirts, face-caps, etc.)
Create product collections
After adding the products to your store, the next step will be to group them into collections. For this tutorial, we will be using:
- Weekly sales collection
- Bestsellers collection
To create a collection:
Select collections under products in the sidebar menu. Click New collection on the top right-hand side to create the new collection.
Add the collection title and handle, then click Save.


To add a product to a collection,
Click the Product on the Product page to reveal the Product Information page.
Click the collection dropdown and select a collection to add the product to that collection.
Click Save to save your changes. Make sure to add each of your products to a collection.

11ty storefront installation and setup
Now that our Medusa setup is complete with products added, the next step in our tutorial will be to create a storefront for our store with the 11ty frontend framework. 11ty is a simple static site generator with zero configs by default, it is a flexible framework and allows for the usage of multiple templating languages like Nunjucks, Liquid, Javascript, markdown, etc. at once.
To install 11ty, create a new folder with the preferred name of your storefront. Navigate to the folder and initialize the folder with npm.
npm init -yA package.json file will be added to the folder. Then install 11ty into the folder with the following command.
npm install --save-dev @11ty/eleventyConfirm your installation with the following command.
npx @11ty/eleventyYou should get a response similar to this if your installation is successful.
Wrote 0 files in 0.03 seconds (v0.12.1)Now that we have completed our 11ty setup, the next step will be to install TailwindCSS into the frontend. TailwindCSS is a utility-first css framework used for building modern websites. Visit https://tailwindcss.com/ to learn more about the css framework.
To add TailwindCSS to 11ty; first, install TailwindCSS and its dependencies.
npm install tailwindcss postcss-cli autoprefixerThen generate your tailwind configuration file with the following command.
npx tailwind initCreate a new file named postcss.config.js and add the following to the file.
// postcss.config.jsmodule.exports = { plugins: { tailwindcss: {}, autoprefixer: {}, }}Create a css folder, and add a file named index.css to the folder. Then add the following code snippet to the c*ss/index.css* file.
@tailwind base;@tailwind components;@tailwind utilities;Finally, update your package.json file with the following code snippet.
"scripts": { "dev": "postcss css/index.css -o _site/css/index.css && eleventy --serve --quiet", "build": "postcss css/index.css -o _site/css/index.css" },To start the 11ty server, run npm run dev. The server will open up at http://localhost:8080/.
Create the storefront file structure
11ty is a very flexible framework, and ships with zero configs. It is up to us to set up our project however we want. Add an src folder to your root folder, this is the main folder where our files will be stored. Also, add a _includes and a _helper folder to the src folder. Components files will be stored in the src/_includes folder, while data files will be stored in the src/_helpers folder.
Add a .eleventy.js file to your root folder, and add the following code snippets to the .eleventy.js.
const HtmlMin = require('html-minifier');const ErrorOverlay = require('eleventy-plugin-error-overlay'); module.exports = eleventyConfig => { eleventyConfig.setTemplateFormats(['md']); eleventyConfig.addPlugin(ErrorOverlay); eleventyConfig.addTransform('htmlmin', (content, outputPath) => { if (outputPath.endsWith('.html')) { const minified = HtmlMin.minify(content, { useShortDoctype: true, removeComments: true, collapseWhitespace: true, }); return minified; } return content; }); return { dir: { input: "src", output: "_site", includes: "_includes", data: "_helpers", }, jsDataFileSuffix: '.data', };};The .eleventy.js file is our main 11ty configuration file. The code sample simply notifies 11ty of where our data files and includes files are stored, and where to store the output data. We also added a html-minifier plugin and eleventy-plugin-error-overlay to the project.
Finally, install the two plugins with the following command.
npm install html-minifier eleventy-plugin-error-overlayAfter completing the setup, your file structure should look like this:

Create the Storefronts layout
The next step is to create the storefronts layout. We will majorly be using Nunjucks as our templating engine of choice.
First add a header.njk and a footer.njk file to your _includes folder. Add the following code samples to the _includes/header.njk file,
<header class="bg-white text-gray-900 body-font shadow w-full"> <div class=" container mx-auto flex flex-wrap p-5 flex-col md:flex-row items-center " > <nav class="flex flex-wrap items-center text-base md:ml-auto"> <a href="https://dev.to/" class=" mr-5 hover:text-gray-900 cursor-pointer border-b border-transparent hover:border-blue-600 " >Products</a > <svg class="h-5 w-5" viewBox="0 0 24 24" fill="none" xmlns="http://www.w3.org/2000/svg" > <path d="M3 3H5L5.4 5M7 13H17L21 5H5.4M7 13L5.4 5M7 13L4.70711 15.2929C4.07714 15.9229 4.52331 17 5.41421 17H17M17 17C15.8954 17 15 17.8954 15 19C15 20.1046 15.8954 21 17 21C18.1046 21 19 20.1046 19 19C19 17.8954 18.1046 17 17 17ZM9 19C9 20.1046 8.10457 21 7 21C5.89543 21 5 20.1046 5 19C5 17.8954 5.89543 17 7 17C8.10457 17 9 17.8954 9 19Z" stroke="currentColor" stroke-width="2" stroke-linecap="round" stroke-linejoin="round" /> </svg> </nav> <a href="https://dev.to/" class=" flex order-first lg:order-first lg:w-2/5 title-font font-medium items-center lg:items-center mb-4 md:mb-0 " > <svg width="38" height="40" viewBox="0 0 38 40" fill="none" xmlns="http://www.w3.org/2000/svg" > <path d="M32.4865 6.48972L23.4254 1.28128C20.4607 -0.427092 16.8279 -0.427092 13.8631 1.28128L4.76024 6.48972C1.83728 8.19809 0 11.3648 0 14.7399V25.1984C0 28.6152 1.83728 31.7402 4.76024 33.4486L13.8214 38.6987C16.7861 40.4071 20.4189 40.4071 23.3836 38.6987L32.4448 33.4486C35.4095 31.7402 37.205 28.6152 37.205 25.1984V14.7399C37.2885 11.3648 35.4512 8.19809 32.4865 6.48972ZM18.6234 29.2819C13.4873 29.2819 9.31169 25.1151 9.31169 19.99C9.31169 14.8649 13.4873 10.6981 18.6234 10.6981C23.7594 10.6981 27.9768 14.8649 27.9768 19.99C27.9768 25.1151 23.8012 29.2819 18.6234 29.2819Z" fill="#56FBB1" /></svg> </a> </div></header>Then, add the following to the _includes/footer.njk file.
<footer class="bg-white h-30 flex items-end text-grey-900 pt-10 sm:mt-10 pt-10"> <div class=" w-full mx-auto text-gray-800 flex flex-wrap justify-between inset-x-0 bottom-0 p-5 " > <div> <a href="https://dev.to/" class=" mr-5 text-sm hover:text-gray-900 cursor-pointer border-b border-transparent hover:border-blue-600 " >Create Return</a > <a href="https://dev.to/" class=" mr-5 text-sm hover:text-gray-900 cursor-pointer border-b border-transparent hover:border-blue-600 " >FAQ</a > <a href="https://dev.to/" class=" mr-5 text-sm hover:text-gray-900 cursor-pointer border-b border-transparent hover:border-blue-600 " >Terms and Shipping</a > </div> <div> <a href="https://dev.to/" class=" mr-5 text-sm hover:text-gray-900 cursor-pointer border-b border-transparent hover:border-blue-600 " >Discord</a > <a href="https://dev.to/" class=" mr-5 hover:text-gray-900 cursor-pointer border-b border-transparent hover:border-blue-600 " >GitHub</a > <a href="https://dev.to/" class=" mr-5 text-sm hover:text-gray-900 cursor-pointer border-b border-transparent hover:border-blue-600 " >LinkedIn</a > </div> </div></footer>Finally, add a layout.njk file to your _incudes folder. Add the following code sample to the _includes/layout.njk file.
<html> <head> <title>medusa storefront</title> <link rel="stylesheet" href="css/index.css" /> </head> <div>{% include "header.njk" %}</div> <div> <body> <div> {{ content | safe }} </div> </body> </div> <div>{% include "footer.njk" %}</div> </html>In this code, we basically imports our css stylesheet, and also wrapped the page content with the created header.njk and footer.njk file. To use the layout on a page, simple add the layout.njk file to the pages frontmatter.
Import Medusa servers content to the storefront
Now that we have created our stores layout, the next step will be to import products from the Medusa server to the storefront. To do this, we will have to import the product data as an 11ty global data variable.
Add a file name products.js to your _helpers folder, and add the following code samples to the _helper/products.js file.
const { default: axios } = require('axios'); module.exports = async () => { try { const res = await axios.get('http://localhost:9000/store/products'); return res.data.products; } catch (error) { console.error(error); }};This code makes a get request to the Medusa server and returns the response to be stored as an 11ty global data. Visit this link to access a list of API endpoints provided by Medusa.
The returned data can be accessed anywhere in the storefront. Finally, install axios since we will be making our api calls with axios.
npm install axiosCreate the Storefronts Homepage
The storefront homepage will comprise 2 sections, a hero section and a products section for displaying our products.
Add a hero.njk file and a product.njk file to the _includes folder. Then, add the following code sample to the _includes/hero.njk file.
<div class="w-full mb-10"> <div class="flex bg-white" style="height: 600px"> <div class="hidden lg:block lg:w-1/2" style="clip-path: polygon(10% 0, 100% 0%, 100% 100%, 0 100%)" > <img class="" src="https://user-images.githubusercontent.com/59125401/144878845-da9d252a-abfb-4fa1-8fca-fa46c7b103b1.png" alt="hero photo" /> </div> <div class="flex items-center text-center lg:text-left px-8 md:px-12 lg:w-1/2" > <div> <h2 class="text-5xl font-semibold text-gray-800 md:text-4xl"> Get Free <span class="text-indigo-600">Merch</span> </h2> <p class="mt-2 text-2xl w-3/4 text-gray-500 md:text-base"> Contribute to Medusa and get free merch as a token of our appreciation. </p> <div class="flex justify-center lg:justify-start mt-6"> <a class=" px-4 py-3 bg-indigo-600 text-gray-200 text-xs font-semibold rounded hover:text-indigo-600 " href="#" >Get Started</a > </div> </div> </div> </div> </div>Add the following code sample to the _includes/product.njk file.
<div class=" grid grid-cols-1 gap-y-10 sm:grid-cols-2 gap-x-6 lg:grid-cols-3 max-w-6xl mx-auto " > {%- for product in products -%} <a key="{{ product.id }}" href="https://dev.to/{{ product.handle }}.html" class="group"> <img src="{{ product.thumbnail }}" alt="{{ product.id }}" class=" w-5/6 h-60 rounded-md border border-gray-500 object-center object-cover group-hover:opacity-75 " /> <h3 class="w-1/2 mx-auto text-indigo-600">{{ product.title }}</h3> <h3 class="w-1/2 mx-auto text-gray-500">${{ product.variants.0.prices.0.amount }}</h3> </a> {%- endfor -%} </div>In this code, we basically displayed part of our product details using the liquid templating engine. Add an index.md file to your src folder and add the following code snippet to the **src/index.md** file.
--- title: "Home" layout: layout.njk --- {% include hero.njk %} {% include product.njk %}In this code, we basically imported the hero.liquid file and product.liquid file using the include variable. We also implemented our created layout by adding it as a front matter to the file. When you visit http://localhost:8080/, you should see a page similar to this:

Create Single Product views
The last step will be to create our single product views, 11ty provides a pagination variable that allows us to create multiple files from a single template. Create a new file in the src folder named product.md. Add the following code samples to the src/product.md file.
--- layout: layout.njk pagination: data: products size: 1 alias: product permalink: "/{{ product.handle }}.html" title: { { product.title } } --- <div class=" mt-6 max-w-2xl mx-auto sm:px-6 lg:max-w-7xl lg:px-8 lg:grid lg:grid-cols-3 lg:gap-x-8 " > <div class="hidden aspect-w-3 aspect-h-4 rounded-lg overflow-hidden lg:block"> <img src="{{ product.thumbnail }}" alt="{{ product.id }}" class="w-full h-full object-center object-cover" /> </div> <div class="hidden lg:grid lg:grid-cols-1 lg:gap-y-8"> <div class="aspect-w-3 aspect-h-2 rounded-lg overflow-hidden"> <img src="{{ product.images.0.url }}" alt="{{ product.id }}" class="w-full h-96 object-center object-cover" /> </div> <div class="aspect-w-3 aspect-h-2 rounded-lg overflow-hidden"> <img src="{{ product.images.1.url }}" alt="{{ product.id }}" class="w-full h-full object-center object-cover" /> </div> </div> <div class="hidden lg:grid lg:grid-cols-1 lg:gap-y-8"> <div class=" aspect-w-4 aspect-h-2 sm:rounded-lg sm:overflow-hidden lg:aspect-w-3 lg:aspect-h-4 " > <img src="{{ product.images.2.url }}" alt="{{ product.id }}" class="w-full h-full object-center object-cover" /> </div> <div class=" aspect-w-4 aspect-h-2 sm:rounded-lg sm:overflow-hidden lg:aspect-w-3 lg:aspect-h-4 " > <img src="{{ product.images.3.url }}" class="w-full h-full object-center object-cover" /> </div> </div> </div> <div class=" max-w-2xl mx-auto pt-10 pb-16 px-4 sm:px-6 lg:max-w-4xl lg:pt-16 lg:pb-24 lg:px-8 " > <div class="mt-4 space-y-3 lg:mt-0" > <h1 class=" flex justify-center mb-5 text-2xl font-extrabold tracking-tight text-gray-900 sm:text-3xl " > {{ product.title }} </h1> <div class="space-y-6"> <p class="flex justify-center text-gray-900">{{ product.description }}</p> <div class="flex justify-center"> <p class="text-sm font-bold text-gray-900">Product collection -</p> <p class="text-sm font-bold text-indigo-700">{{ product.collection.title }}</p> </div> <div class="flex justify-center"> <p class="text-sm font-bold text-gray-900">Price -</p> <p class="text-sm font-bold text-indigo-700">${{ product.variants.0.prices.0.amount }}</p> </div> </div> <form> <div class="flex justify-center space-x-3 mb-5"> <h1 class=" flex justify-center text-lg font-bold tracking-tight text-gray-900">Quantity -</h1> <input type="number" name="quantity" value="1" min="0" max="10" class="flex border-2 rounded-md text-blue-900 px-1 py-1 border-indigo-700" /> </div> <h1 class=" flex justify-center mb-5 text-lg font-bold tracking-tight text-gray-900">Variants</h1> <div class="flex mt-2 max-w-xl mx-auto"> {%- for variant in product.variants -%} <label for="{{ variant.id }}"> {{ variant.title }} <span></span> </label> <input id="{{ variant.id }}" name="{{ variantId }}" type="radio" value="{{ variant.id }}" class="flex border -ml-24 mt-2 text-blue-900 border-indigo-700 w-full"> {%- endfor -%} </div> <button type="submit" class=" mt-10 w-full bg-blue-900 border border-transparent rounded-md py-3 px-8 flex items-center justify-center text-base font-medium text-white hover:bg-indigo-700 focus:outline-none focus:ring-2 focus:ring-offset-2 focus:ring-indigo-500 " > Add to cart </button> </form> </div> </div>In this code, we simply iterated over the product data and create a page with each product. The link to a product is also generated with the handle using the permalink variable. To visit a product page, simply click the product in your homepage, you should see a page similar to this:
Conclusion
In this tutorial, we created a storefront with Medusa and 11ty. You can access the code for this project in this GitHub repository - https://github.com/Quadrisheriff/medusa-storefront
For more info about Medusa, please visit their documentation or stay updated on their Discord where the community is ready to support you.
For info about 11ty, please visit their webpage or get help in their Discord.
Original Link: https://dev.to/medusajs/medusa-nodejs-ecommerce-platform-for-11ty-403p
Dev To
More About this Source Visit Dev To