
An Interest In:
Web News this Week
- April 19, 2024
- April 18, 2024
- April 17, 2024
- April 16, 2024
- April 15, 2024
- April 14, 2024
- April 13, 2024
Some of Our Sources
- Slashdot
- Technology Review
- Team Treehouse
- Smashing Magazine
- Smashing Apps
- Vandelay Design
- Crazy Leaf Design
- Design Modo
- Web Resource Source
- Hashedout
Help Webnuz
Referal links:
All About ArgoCD, A Beginner's Guide
ArgoCD, being one of their 1st in the market known for having a declarative GitOps based deployment over Kubernetes is one of the most adopted Continuous Delivery tool. It has been known for its excellent application deployment and management over Kubernetes and features such as auto healing clusters, user-access management, status check, etc. It is open-sourced on github under Apache 2.0 License.
ArgoCD Existence, Why ?

There are already hell lots of tools in the market, so why do we need another one? To justify the existence of ArgoCD, let's try to understand the workflow for application deployment before-and-after ArgoCD.
Workflow Before ArgoCD
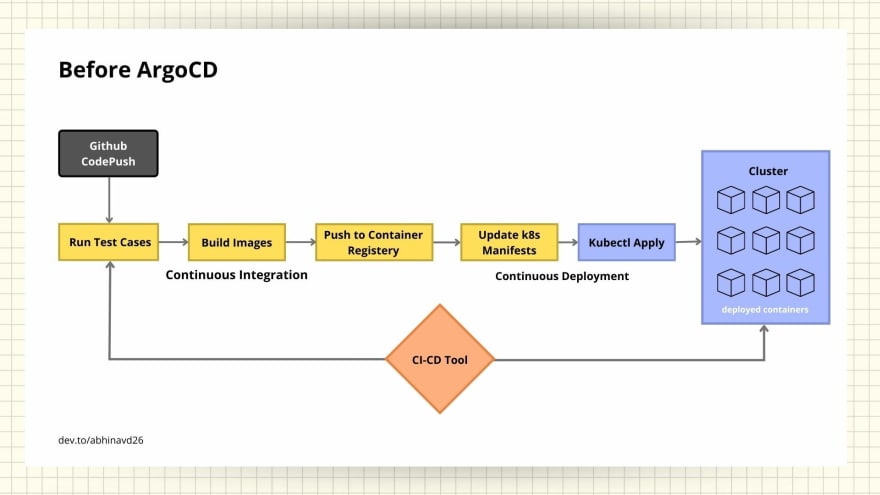
Before the existence of ArgoCD, the pipeline seems something like the image above. A common ci-cd tool is used for both the Continuous Integration and Continuous Deployment.
- once the code is being pushed to version-control let's say Github, the tool triggers the other jobs
- it runs the test-cases, build images, push the image to respective container registry
- then changes the deployment manifests as per the new image build, and then deploy the new manifest using
kubectlcommands
All these jobs/tasks are being performed by a ci-cd tool. This is how traditional ci-cd workflow works before the existence of ArgoCD. However there are some challenges in this workflow.
- We need to install and configure tools like kubectl, helm, etc in the ci-cd tools
- We will have to provide access to k8s cluster and cloud providers if using managed services like eks to the respective ci-cd tool
- It may lead to security loopholes as credentials are provided to external tools
- There's no visibility of deployment metrics, your ci-cd tools doesn't know the status of deployed application once they apply the manifests
Workflow After ArgoCD
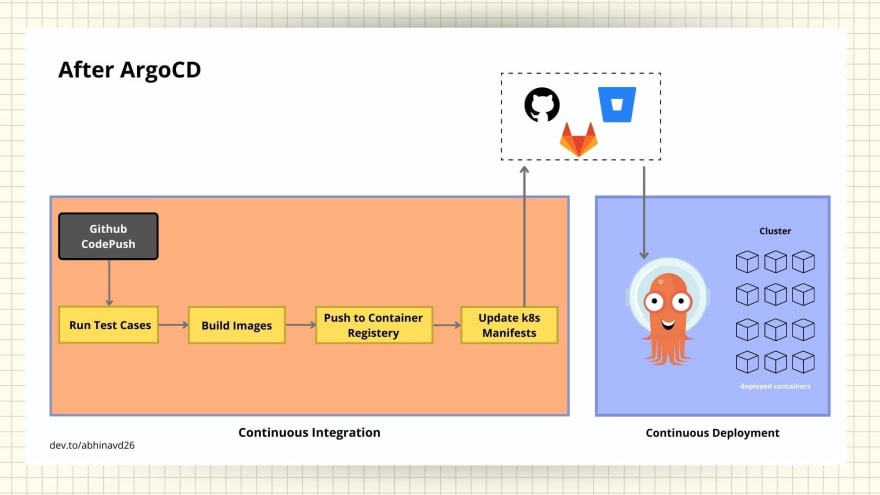
After the ArgoCD was launched in the market, the complete workflow has been changed. As you can see in the image, the Continuous Integration and Continuous Deployment has been separated now. ArgoCD uses declarative GitOps based deployment which states that the best practices is to have two different git repositories, one for application source code and another for deployment manifest files.
- once the code has been pushed to version, the CI pipeline trigger the job
- starts to run test cases, build images, push images to respective container registry and then update the manifest according and push manifests to its respective git repository
- once the updated manifests is pushed to its respective repository be it Github, Gitlab, etc as shown in the image, ArgoCD installed within the cluster automatically checks for the updates and apply within the cluster.
This is how, the respective ci-cd tool is limited to CI and ArgoCD handles the CD part and thus separating both the operations. There are many different advantages of using this workflow, some of them are -
- it uses git as a single source of truth, thus incorporating GitOps principles for the deployment
- since ArgoCD is installed within the cluster and is the only one that makes changes within the cluster, it doesn't require any extra credentials unlike the case of a ci-cd tool
- ArgoCD provides a dashboard to manage all the deployed applications hence enables you to get the status of application being deployed or not which we doesn't get in case of previous workflow
- easy rollback, as the cluster is synced with a separate git repository so we just need to revert the changes in git and the cluster will be automatically synced with the git repository
- disaster recovery, as in case of any disaster you just need to point the git repository to the newly created cluster and it will have all the configurations of the previous cluster
So, these are some of the major advantages of the Workflow after ArgoCD. Now let's dive into ArgoCD and do some practical stuffs.
ArgoCD Getting Started
As we have seen some background concepts of ArgoCD and its need, let dive into some hands-on part. There are two different ways to install and setup ArgoCD in you cluster,
- Install using script
- Install using helm chart
Let's look into each of these.
[Note: kubectl command must be installed and kubeconfig file should be at the default location(~/.kube/config) before installing argocd]
Installation by script
Just with few commands you can have your ArgoCD installed in your cluster and ready to deploy an application over it. Please execute the below commands for installation -
Create a namespace argocd where all ArgoCD resources will be installed
kubectl create namespace argocdInstall all resources in the created namespace
kubectl apply -n argocd -f https://raw.githubusercontent.com/argoproj/argo-cd/stable/manifests/install.yamlAfter installation, you need to access the dashboard. There are different methods given in their documentation for accessing the dashboard. We will be using port-forward as we are installing in our local machine. Please execute the command below
kubectl port-forward svc/argocd-server -n argocd 8080:443Now your ArgoCD dashboard can be accessed in 127.0.0.1:8080 as you can see in the image below.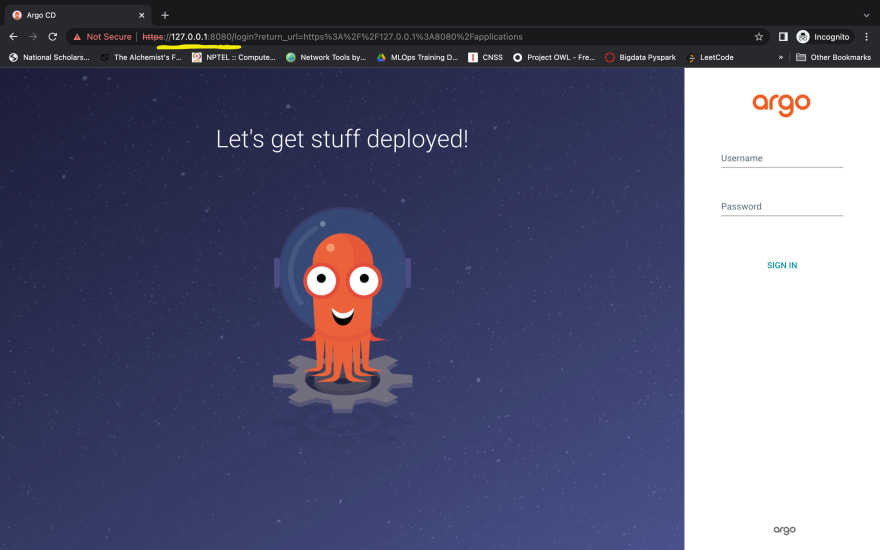
For the credentials to login, the username is admin and for password, execute the following command -
kubectl -n argocd get secret argocd-initial-admin-secret -o jsonpath="{.data.password}" | base64 -d; echoCongratulation You have successfully logged into the argocd dashboard.
Now, this was one of the method. It can also be installed using helm chart. Let's see how.
Installation by helm
Recently argo-project has launched their official helm-chart support for ArgoCD, which enables us to install it with helm as well. Please execute the following command to install ArgoCD with helm -
Add the helm repository in your system
helm repo add argo https://argoproj.github.io/argo-helmNow install the ArgoCD helm chart
helm install my-release argo/argo-cdThe advantage of installing with helm chart is that, you can easily provide the configuration as you want during the installation. For details of the parameters support by ArgoCD helm chart, please have a look at this detailed README
After installation, to access the dashboard and credentials, you can follow the same commands as we did earlier.
[Note: Make sure to remove namespace i.e, -n argocd if you have not provided any namespace during the installation from commands to access dashboard & credentials. To provide the namespace, append this with helm install command --create-namespace --namespace argocd]
This is how easily you can install ArgoCD with the two different methods. For detailed documentation of getting started with ArgoCD, please have a look at this. Now, lets deploy a simple application and configure it to manage by ArgoCD.
Application Deployment
For any application to be deployed and managed by ArgoCD, we need to create a config file say, application.yaml which will have all the configurations required by ArgoCD containing the repository URL to sync with, Path where all manifests are being stored which needs to be deployed, namespace, and other configs. Here's a demo project which we will deploy in our cluster having all yamls and application.yaml file with bare minimum configs.
Let's deploy our application. Please follow along with the following steps.
First, we need to store all the config files, including the
application.yamlin a separate gitHub (gitlab, bitbucket, etc) repository as you can see hereThen we just need to deploy the
application.yamlwhich consists config required by ArgoCD in the cluster by using the following command -
kubectl apply -f application.yaml
Now only just by applying the ArgoCD application config file, all other k8s yamls will automatically gets deployed and synced with the cluster. In the below image you can see that, the application, go-app-argo-config is responsible for creating all other resources.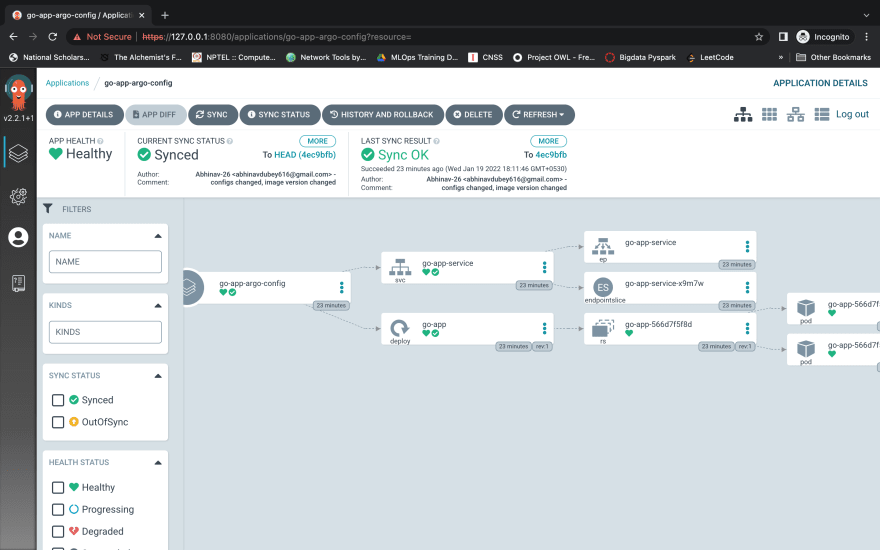
If we want to update the deployment, service or add any other k8s manifests (yamls), we simply need to makes the changes and push in the github repository synced with it and rest will be taken care ArgoCD.
So, this was all about ArgoCD which you need to kick-start and play around it. If you have any doubts or suggestions, please feel free to comment it down, I would be happy enough to answer all your queries.
For more details about ArgoCD please feel to check out their Github Repository
Original Link: https://dev.to/abhinavd26/all-about-argocd-a-beginners-guide-33c9
Dev To
More About this Source Visit Dev To