
An Interest In:
Web News this Week
- April 2, 2024
- April 1, 2024
- March 31, 2024
- March 30, 2024
- March 29, 2024
- March 28, 2024
- March 27, 2024
Some of Our Sources
- Techcrunch
- Technology Review
- Simplebits
- Team Treehouse
- TutsPlus - Design
- Creative Curio
- Web Designer Depot
- Noupe
- My Ink Blog
- Design Modo
Help Webnuz
Referal links:
Manage webhooks with MongoDB Functions and Triggers
In this post I explain how I built a webhook management system with MongoDB triggers and functions. This is part of mongodb atlas hackathon here in dev.to
Overview of My Submission
Webhooks are still a preferred choice of many organizations to communicate with 3rd party services. Since webhook calls are event-driven, if we use MongoDB Atlas as our database solution, we can use the features like triggers and functions to build a low code webhook management system. In this project, I showcase how to build such system with MongoDB Realm.
Submission Category:
Action Star
Link to Code
You can find the source code of the application at https://github.com/pubudusj/webhook-management-with-mongodb/
Setup instructions are available further in this post.
Additional Resources / Info
MongoDB features/tools used
- MongoDB Atlas
- Realm Triggers
- Realm Functions
- Realm External Dependancies
- Realm CLI
- Realm static hosting
- MongoDB NodeJS SDK
Demo
You can see a fully functional demo at
https://webhookmanagement-gfbga.mongodbstitch.com/
Architecture
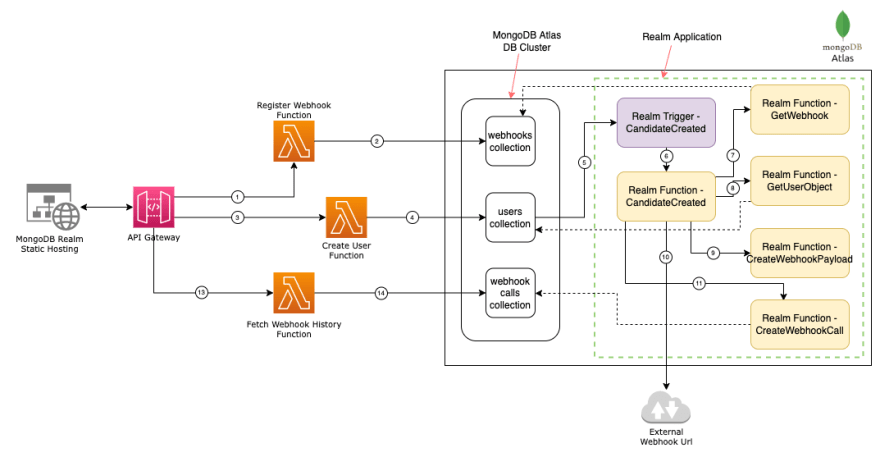
How it works
There are 3 parts to this implementation.
- Webhook registration.
- Webhook call for create candidate/user event.
- View webhook call history.
Webhook Registration
- There is an API exposed in the AWS API gateway which proxy to a Lambda function (RegisterWebhookFunction).
- In this function, MongoDB NodeJS SDK is included, where it generate a webhook signing token and save the companyId, webhookUrl, event type as candidate.created and the signing token to MongoDB collection - webhooks.
- Generated webhook signing token will be returned from the API end point.
- This token can be used to authenticate the incoming webhook.
Create user
- There is an API exposed in the AWS API gateway which proxy to a Lambda function (CreateUserFunction).
- Again, in this function, MongoDB NodeJS SDK is included, where it save user data including the companyId to a MongoDB collection - users.
- In MongoDB Realm, I have created a application - WebhookManagement.
- There, I have created a trigger (CandidateCreated), which will trigger when a new user is added to the users collection.
- Also, there is a function created as CandidateCreated attached to this trigger, so this function will be executed upon the trigger.
- Within this CandidateCreated function, there are few steps involved to call the webhook.
- First it calls another function, GetWebhook to check if there are webhooks registered for this companyId and event type candidate.created.
- If so, GetUserObject function will be called to fetch the respective user data from users collection.
- With those information, there is another function - CreateWebhookPayload - called to create the payload for the webhook.
- In this CreateWebhookPayload function, it generates a token to be added to the payload using signing token. To generate the token, I use SHA256 algorithm as:
hmacSHA256(userId + currentTime, signingToken) - This token will be used to verify the authenticity of the request coming into the webhook. To generate this token, I use JS library 'crypto-js' which can be added easily into the realm app as an external dependency.
- Once the payload is created, external url will be called including this payload using JS library 'axios'. Here also, I use external dependancy feature of realm app to load 'axios' library into the function.
- Once the external api is called, the result will be saved into the webhook_calls collection using the function - CreateWebhookCall. Here, the url, payload, timestamp, status and response from the webhook call are saved into the webhook_calls collection.
View webhook call history
- To fetch webhook call history, an API exposed in the AWS API gateway which proxy to a Lambda function (FetchWebhookHistoryFunction).
- Given the companyId, using MongoDB NodeJS SDK, it will query the webhook_call collection to fetch the data.
How to Set up
- First, create a new MongoDB Cluster with the name "Testing" at MongoDB Atlas.
- Create a new user with username+password authentication at the Database Access section with permission read and write to any database.
- In the Realm section, create a new application. Use name as "WebhookManagement" and choose the option: 'Use and existing MongoDB Atlas Data Source' and choose the cluster created in step 1 - Testing.
- Under the 'Authentication' section, enable API keys and create a API key. Generated public key and private keys is required for realm cli authentication later on.
- Install realm cli using
npm install -g mongodb-realm-cliin your local machine. - Clone this github repository to your local machine.
- This repo contains 3 main directories.
- Goto the the realm directory, open the Makefile and set the values for parameters: REALM_APP_ID, APP_NAME, REALM_PUBLIC_KEY, REALM_PRIVATE_KEY.
- Within the realm directory, run
make realm_login,make realm_pull_app,make setup_functions,make setup_triggers,make deploy_allin the same order. This will create all the functions, triggers and dependancies in the Realm app. backenddirectory contains a AWS SAM application to set up the required Lambda functions and API gateway apis which are consumed by the frontend app. Once the backend deployed, the API gateway url is required to set up frontend app. To deploy the backend, you need to have the connection string for the MongoDB database. You can get it from 'Connect' button on the dashboard of your DB cluster.- Instead of this AWS backend, you can use Realm endpoints as well. https://docs.mongodb.com/realm/endpoints/
frontenddirectory contains a VueJS app. Copy the .env.example file into .env and changed the VUE_APP_API_BASE_URL parameter with the one received in the backend deployment.- Then, use
npm run servefor local testing or for production build, usenpm run build --production. - Goto the hosting section of the Realm App and enable hosting. This will create a sample app with a url. ex: webhookmanagement-gfbga.mongodbstitch.com
- Upload the frontend build files generated in step 12.
- Confirm the changes and visit the url. You will see the frontend app.
Sample screenshot


Conclusion
Overall, Atlas and Realm provides great experience in terms of developer experience and performance. There are few thing I would like to see in future.
- Retry feature: Currently, if Realm function fails, we cannot automatically retry.
- Individual function calls in log: Currently if one function is being called within another function, it is not recorded in the logs. Only the calling function has a entry. Better to make all the function executions available in the logs.
Original Link: https://dev.to/pubudusj/manage-webhooks-with-mongodb-functions-and-triggers-4lob
Dev To
More About this Source Visit Dev To