
An Interest In:
Web News this Week
- April 2, 2024
- April 1, 2024
- March 31, 2024
- March 30, 2024
- March 29, 2024
- March 28, 2024
- March 27, 2024
Some of Our Sources
- Engadget
- TutsPlus - Code
- Pearsonified
- Spoon Graphics
- TutsPlus - Design
- Inspiredology
- FanExtra - PSD
- Reencoded
- Line 25
- Android Headlines
Help Webnuz
Referal links:
How I've set up my new Windows development environment in 2022
Follow me on Twitter at @tim_deschryver | Subscribe to the Newsletter | Originally published on timdeschryver.dev.
In the first week of 2022, I had the joy to receive a new machine from my new employer dotNET lab. In just a few hours I was up and running, let's take a look at my setup as a full-stack .NET and Angular developer.
Getting a new "toy" is always exciting but it's a double feeling because a new development environment involves manual work (remember what software to download, browse to the download page, step-through the install wizard), which is time-consuming. The last time that I configured my machine is a couple of years ago, and I remember that there were lots of sighs involved.
This time, a lot in the Windows eco-system has changed. In comparison to the previous time, it was a breeze, making this a fun experience!
Install Software with winget
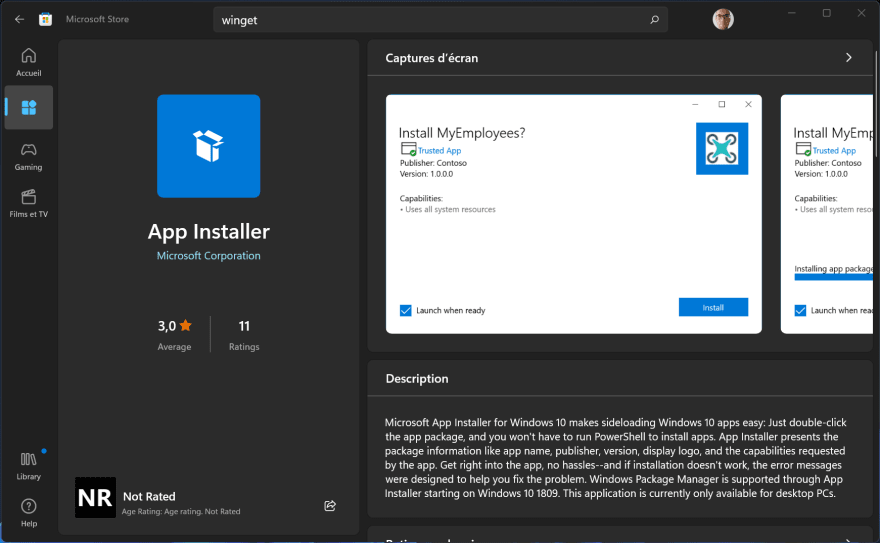
After the initial installation (and updates), the first step is to make sure that winget is installed, and that it's updated to the latest version. You can do this by going to the Microsoft Store and searching for winget (in the store it's listed as "App Installer").
winget has two important commands winget search to search for software, and winget install to install the software. When using the install command, note that you can pass it the interactive flag to intervene with the installation details by changing the defaults.
Once winget is installed, open a new command prompt and copy-paste the next script.
This script installs all of the software that I've used throughout the last month in a single command.
# Browserwinget install Microsoft.Edge.Betawinget install Google.Chrome.Betawinget install Mozilla.Firefox.DeveloperEdition# Chatwinget install Microsoft.Teamswinget install Discord.Discord.Canary# Windows and CLIwinget install Microsoft.PowerToys # https://github.com/microsoft/PowerToyswinget install Microsoft.WindowsTerminal.Previewwinget install Microsoft.PowerShell.Previewwinget install JanDeDobbeleer.OhMyPosh# Gitwinget install Git.Gitwinget install GitHub.cli# Development Enviromentwinget install Microsoft.dotnetwinget install OpenJS.NodeJSwinget install Yarn.Yarn# IDEwinget install Microsoft.VisualStudio.2022.Enterprise-Previewwinget install Microsoft.VisualStudioCode.Insiderswinget install Microsoft.SQLServer.2019.Developerwinget install Microsoft.SQLServerManagementStudiowinget install Microsoft.AzureDataStudio.Insiderswinget install JetBrains.ReSharperwinget install JetBrains.Riderwinget install JetBrains.WebStormwinget install JetBrains.DataGrip# Miscellaneouswinget install 7zip.7zipThe above script installs the majority, but there are a few programs that need to be installed manually because they aren't available on winget.
- NVM for Windows, easily switch between different Node.JS versions with a single command
- Gpg4win, to sign git commits
Multiple Node.JS versions with NVM
I use nvm because I need to work within multiple Node.JS versions.
Via its CLI, I can install (nvm install) the required versions and easily switch (nvm use) between these versions.
nvm install 14nvm use 14.18.2Make sure to start the command prompt with administrator privileges enabled when you're getting errors while executing the install or use command.
dotNET Tools
Tye has been indispensable in my toolkit for the past year.
I was immediately hooked from the first time when I heard about this tool.
Tye makes the development experience a lot smoother when it's required to run more than one application at once.
With a single command, all of the development instances (services, applications) are spawned locally (and can be debugged), making it effortless to run a development environment. For example, a .NET Web API and an Angular frontend.
To install Tye, use the dotnet tool install command and install Tye globally.
dotnet tool install --global Microsoft.Tye --version 0.10.0-alpha.21420.1To run Tye, a configuration file is required, so let's create one.
The following example configures two projects (project1 and project2) that have a .NET backend and an Angular frontend.
For the .NET instance, we can simply point to the csproj to run the API.
The Angular frontend is served by navigating to the Angular directory and running the serve command.
name: MyAwesomeProjectservices: - name: project1-backend project: C:/Users/timde/dev/Project1/src/Project1.Api/Project1.Api.csproj tags: - project1 bindings: - protocol: https port: 4061 - name: project1-frontend executable: cmd tags: - project1 args: '/c cd C:/Users/timde/dev/Project1-Frontend && npm run start' bindings: - protocol: https port: 4200 - name: project2-backend project: C:/Users/timde/dev/Project2/src/Project2.Api/Project2.Api.csproj tags: - project2 bindings: - protocol: https port: 4062 - name: project2-frontend executable: cmd tags: - project2 args: '/c cd C:/Users/timde/dev/Project2-Frontend && npm run start' bindings: - protocol: https port: 4300Now, I can use the tye run command to run one specific project or all projects.
By using the watch flag, the application also hot reloads when a change is made to a file.
# run alltye run --watch# run a specific projecttye run --tags project1 --watchTo run Tye from all directories, specify the tye config path.
This allows me to start my development environment from everywhere, without that I have to navigate to the directory where the tye config exists.
# run alltye run "C:\Usersimde\dev\workye.yaml" --watch# run a specific projecttye run "C:\Usersimde\dev\workye.yaml" --tags project1 --watchTye also comes with a dashboard to see all the instances that are up and running.

Enhancing the Terminal
To make the terminal awesome, I'm using the Windows Terminal together with Oh My Posh.
I compare the Windows Terminal as the default Command Prompt on steroids that has built-in tabs, and it can be tweaked to my preferences. This makes me feel happy, resulting in an increased productivity.
Via the settings of the Windows Terminal, I set the default font and the default profile, which uses PowershellCore.
I've also added a few shortcuts to open (ctrl+t) and close (ctrl+w) tabs.
I've set the font to a font family from Nerd Fonts to display the beautiful icons that are used with Oh My Posh. This font, or an alternative one, can be downloaded from the Nerd Fonts download page.
{ "$schema": "https://aka.ms/terminal-profiles-schema", "actions": [ { "command": { "action": "copy", "singleLine": false }, "keys": "ctrl+c" }, { "command": "paste", "keys": "ctrl+v" }, { "command": { "action": "newTab" }, "keys": "ctrl+t" }, { "command": "find", "keys": "ctrl+shift+f" }, { "command": { "action": "splitPane", "split": "auto", "splitMode": "duplicate" }, "keys": "alt+shift+d" }, { "command": { "action": "closeTab" }, "keys": "ctrl+w" } ], "copyFormatting": "none", "copyOnSelect": false, "defaultProfile": "{574e775e-4f2a-5b96-ac1e-a2962a402336}", "profiles": { "defaults": { "font": { "face": "CaskaydiaCove Nerd Font Mono" } }, "list": [ { "guid": "{574e775e-4f2a-5b96-ac1e-a2962a402336}", "hidden": false, "name": "PowerShell", "source": "Windows.Terminal.PowershellCore" }, { "commandline": "powershell.exe", "guid": "{61c54bbd-c2c6-5271-96e7-009a87ff44bf}", "hidden": true, "name": "Windows PowerShell" }, { "commandline": "cmd.exe", "guid": "{0caa0dad-35be-5f56-a8ff-afceeeaa6101}", "hidden": true, "name": "Command Prompt" }, { "guid": "{b453ae62-4e3d-5e58-b989-0a998ec441b8}", "hidden": true, "name": "Azure Cloud Shell", "source": "Windows.Terminal.Azure" }, { "guid": "{2ece5bfe-50ed-5f3a-ab87-5cd4baafed2b}", "hidden": false, "name": "Git Bash", "source": "Git" } ] }, "schemes": []}To make the terminal cozy and pretty, I'm using Oh My Posh.
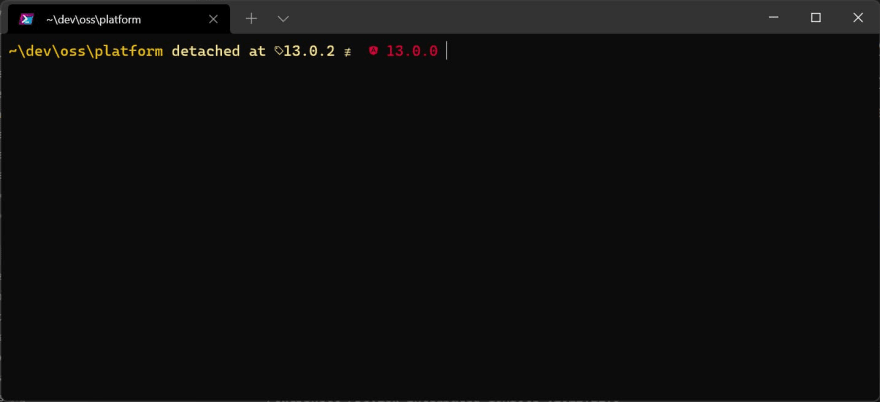
Oh My Posh also allows me to add key information to my prompt, making it more useful than the normal prompt. For example, my modified Oh My Posh theme (based on the Pure theme) shows the git status, the .NET, and Angular versions. Spoiler, Oh My Posh can do a lot more! For some inspiration, take a look at the default themes.
{ "$schema": "https://raw.githubusercontent.com/JanDeDobbeleer/oh-my-posh/main/themes/schema.json", "console_title": true, "console_title_style": "template", "console_title_template": "{{if .Root}}(Admin){{end}} {{.Path}}", "blocks": [ { "type": "prompt", "alignment": "left", "newline": false, "segments": [ { "type": "path", "style": "plain", "foreground": "#f8c400", "properties": { "prefix": "", "style": "full" } } ] }, { "type": "prompt", "alignment": "left", "segments": [ { "type": "git", "style": "plain", "foreground": "#ffe893", "properties": { "prefix": "", "fetch_stash_count": true, "fetch_status": true, "fetch_upstream_icon": true, "branch_icon": "", "github_icon": "", "branch_ahead_icon": "<#88C0D0>\u21e1 </>", "branch_behind_icon": "<#88C0D0>\u21e3 </>", "local_working_icon": "<#FFAFD7>\u002a</>", "template": "{{ .UpstreamIcon }}{{ .HEAD }}{{ .BranchStatus }}{{ if .Working.Changed }} \uF044 {{ .Working.String }}{{ end }}{{ if and (.Working.Changed) (.Staging.Changed) }} |{{ end }}{{ if .Staging.Changed }} \uF046 {{ .Staging.String }}{{ end }}{{ if gt .StashCount 0 }} \uF692 {{ .StashCount }}{{ end }}" } } ] }, { "type": "prompt", "alignment": "left", "segments": [ { "type": "dotnet", "style": "plain", "foreground": "#512bd4", "leading_diamond": "", "trailing_diamond": "", "properties": { "display_version": true, "prefix": " " } }, { "type": "angular", "style": "plain", "foreground": "#dd0031", "properties": { "display_version": true, "prefix": " \uE753 " } }, { "type": "exit", "style": "diamond", "foreground": "red", "properties": { "always_enabled": false } } ] } ]}To also render the icons Visual Studio Code, set the terminal's font of Visual Studio Code (via terminal.integrated.fontFamily) to the same font from the Windows Terminal config. By doing this, you'll get the same experience no matter where you are.
For example, the experience within an Angular repository looks as follows.
For more details and options about the terminal, I highly recommend My Ultimate PowerShell prompt with Oh My Posh and the Windows Terminal by Scott Hanselman, or the recorded version How to make the ultimate Terminal Prompt on Windows 11.
Powershell Profile
Here's where things get interesting, and this part often raises eyebrows while I'm pair programming.
Because the default terminal uses Powershell a lot of tasks can be scripted. To reduce my keystrokes, I like to create aliases and shortcuts to quickly get done what I want to do. The best part is that these tasks are at my disposal when I'm in the terminal.
The Powershell scripts are created in a Powershell profile, accessible via the $PROFILE variable.
To create the profile, either manually create the file at "C:\Users\USER\Documents\PowerShell\Microsoft.PowerShell_profile.ps1", or use a command to create and open the file, e.g. code-insiders $PROFILE (if you're using the normal Visual Studio Code, use code $PROFILE).
My profile, which can be found below, creates a couple of functions and aliases to:
- navigate to frequent folders
- add a wrapper and some templates to the most common git commands
- keep a history for used commands
- register shortcuts so I don't have to type the whole command
# For the first time install Terminal-Icons with# Install-Module -Name Terminal-Icons -Repository PSGalleryImport-Module Terminal-Iconsoh-my-posh --init --shell pwsh --config ~/ohmyposh-theme.omp.json | Invoke-Expression# HistorySet-PSReadLineOption -PredictionSource HistorySet-PSReadLineOption -PredictionViewStyle ListViewSet-PSReadLineOption -EditMode Windows# AliasSet-Alias -Name code -Value code-insiders# Directory Aliasfunction oss { cd "~/dev/oss/$args"}function work { cd "~/dev/work/$args"}# Gitfunction gb { git checkout -b $args}function gbt ([string] $taskid) { git checkout -b "task/$taskid"}function gs { git checkout $args git pull}function gmaster { gs 'master'}function gmain { gs 'main'}function gdev { gs 'develop'}function gco { git add . git commit -m $args}function gfeat { if($null -eq $args[1]) { gco "feat: $($args[0])" }else { gco "feat($($args[0])): $($args[1])" }}function gfix { if($null -eq $args[1]) { gco "fix: $($args[0])" }else { gco "fix($($args[0])): $($args[1])" }}function gdocs { if($null -eq $args[1]) { gco "docs: $($args[0])" }else { gco "docs($($args[0])): $($args[1])" }}function gstyle { if($null -eq $args[1]) { gco "style: $($args[0])" }else { gco "style($($args[0])): $($args[1])" }}function grefactor { if($null -eq $args[1]) { gco "refactor: $($args[0])" }else { gco "refactor($($args[0])): $($args[1])" }}function gperf { if($null -eq $args[1]) { gco "perf: $($args[0])" }else { gco "perf($($args[0])): $($args[1])" }}function gchore { if($null -eq $args[1]) { gco "chore: $($args[0])" }else { gco "chore($($args[0])): $($args[1])" }}function gpu { git pull}function goops { git add . git commit --amend --no-edit}function gfp { git push --force-with-lease}function gr { git reset --hard git clean -f -d}# Macros# Inspired by Scott's profile https://gist.github.com/shanselman/25f5550ad186189e0e68916c6d7f44c3Set-PSReadLineKeyHandler -Key Ctrl+Shift+b ` -BriefDescription BuildCurrentDirectory ` -LongDescription "Build the current directory" ` -ScriptBlock { [Microsoft.PowerShell.PSConsoleReadLine]::RevertLine() if(Test-Path -Path ".\package.json") { [Microsoft.PowerShell.PSConsoleReadLine]::Insert("npm run build") }else { [Microsoft.PowerShell.PSConsoleReadLine]::Insert("dotnet build") } [Microsoft.PowerShell.PSConsoleReadLine]::AcceptLine() }Set-PSReadLineKeyHandler -Key Ctrl+Shift+t ` -BriefDescription BuildCurrentDirectory ` -LongDescription "Build the current directory" ` -ScriptBlock { [Microsoft.PowerShell.PSConsoleReadLine]::RevertLine() if(Test-Path -Path ".\package.json") { [Microsoft.PowerShell.PSConsoleReadLine]::Insert("npm run test") }else { [Microsoft.PowerShell.PSConsoleReadLine]::Insert("dotnet test") } [Microsoft.PowerShell.PSConsoleReadLine]::AcceptLine() }Set-PSReadLineKeyHandler -Key Ctrl+Shift+s ` -BriefDescription StartCurrentDirectory ` -LongDescription "Start the current directory" ` -ScriptBlock { [Microsoft.PowerShell.PSConsoleReadLine]::RevertLine() if(Test-Path -Path ".\package.json") { [Microsoft.PowerShell.PSConsoleReadLine]::Insert("npm start") }else { [Microsoft.PowerShell.PSConsoleReadLine]::Insert("dotnet run") } [Microsoft.PowerShell.PSConsoleReadLine]::AcceptLine() }
Git Defaults
The following script sets a git identity and configures git to behave the way that I want.
git config --global user.name "first last"git config --global user.email "[email protected]"git config --global push.default currentgit config --global pull.rebase truegit config --global core.editor code-insidersgit config --global init.defaultBranch main# sign commitsgit config --global gpg.program "C:/Program Files (x86)/GnuPG/bin/gpg.exe"git config --global commit.gpgsign trueTo sign commits I've followed the blogpost A guide to securing git commits from tricking you on Windows by Ankur Sheel.
Visual Studio Code Plugins and Settings
If you know me, you already know that I like to customize my Visual Studio Code setup.
The following scripts don't include (color or icon) themes because I like to frequently rotate between them, depending on my mood.
However, the next script installs all of the mandatory extensions to be productive.
Because I'm using the Insiders version of Visual Studio Code, I'm using code-insiders instead of code.
# Formatting and Rulescode-insiders --install-extension dbaeumer.vscode-eslint --forcecode-insiders --install-extension esbenp.prettier-vscode --forcecode-insiders --install-extension formulahendry.auto-rename-tag --force# Gitcode-insiders --install-extension github.vscode-pull-request-github --forcecode-insiders --install-extension eamodio.gitlens-insiders --force# Angularcode-insiders --install-extension angular.ng-template --force# .NETcode-insiders --install-extension ms-dotnettools.csharp --forcecode-insiders --install-extension visualstudioexptteam.vscodeintellicode --force# Markdowncode-insiders --install-extension yzhang.markdown-all-in-one --forcecode-insiders --install-extension davidanson.vscode-markdownlint --force# Rest Clientcode-insiders --install-extension rangav.vscode-thunder-client --force# Miscellaneouscode-insiders --install-extension github.copilot --forceFor the completion, here's my entire settings.json file.
{ "editor.fontFamily": "Cascadia Code", "editor.fontSize": 18, "editor.lineHeight": 2, "editor.fontLigatures": true, "editor.dragAndDrop": false, "editor.cursorSmoothCaretAnimation": true, "editor.smoothScrolling": true, "editor.wordWrap": "on", "editor.formatOnSave": true, "editor.defaultFormatter": "esbenp.prettier-vscode", "files.defaultLanguage": "markdown", "terminal.integrated.fontFamily": "CaskaydiaCove NF", "workbench.list.smoothScrolling": true}Visual Studio Exceptions Settings
A setting that has saved me a lot of time is the "Common Language Runtime Exceptions" setting.
By default, the setting is partially enabled but I always enable it because it immediately points me to the source of the exception rather than I have to debug the entire stack to find the exception. When the setting is enabled, the debugger breaks on all exceptions and it navigates to the source. This makes it straightforward to find and fix bugs.
To enable the setting, use the ctrl+alt+e shortcut and tick the "Common Language Runtime Exceptions" checkbox.

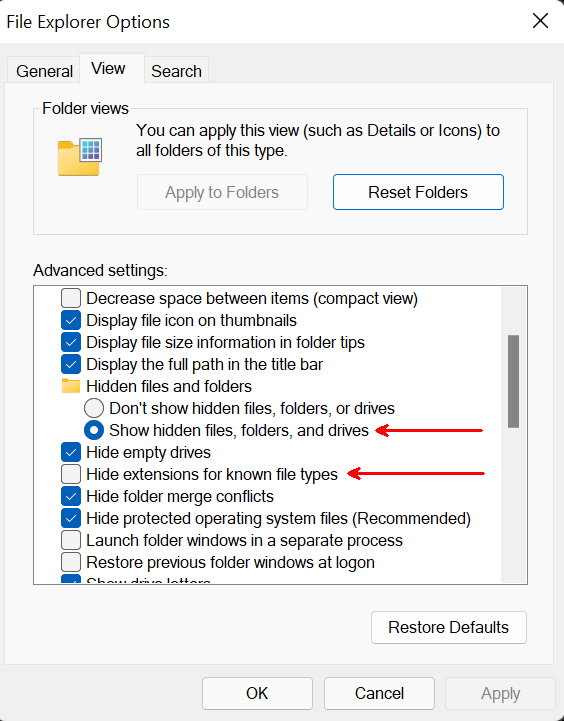
File Explorer Options
As a software developer, seeing hidden files and more importantly, the file extension is a must. Via the "File Explorer Options" window these two options can be enabled.
Allow Insecure Localhost
To run an Angular application on HTTPS locally you can create a self-signed certificate, but I find it easier to allow invalid certificates on localhost. This is a flag that can be enabled via the browser.

Conclusion
From my recent experience, it's painless and swift to set up a new Windows machine anno 2022.
To make our daily work more enjoyable, the Terminal and the IDE are configured to our needs and preferences.
I've created PowerShell profile to script frequent tasks, making them easy and fast to run, often with only a few keystrokes. While these seem small, it definitely is a productivity boost.
The last step is to clone your Git repository and start working.
Enjoy your new device!
Follow me on Twitter at @tim_deschryver | Subscribe to the Newsletter | Originally published on timdeschryver.dev.
Original Link: https://dev.to/this-is-learning/how-ive-set-up-my-new-windows-development-environment-in-2022-5h42
Dev To
More About this Source Visit Dev To